
1. Introduction
Thank you for purchasing the Ortega Guitars PTWO 12-Watt Bluetooth® Pocket Acoustic Amplifier. This compact and versatile amplifier is designed for acoustic musicians seeking portability, quality sound, and integrated effects. It features Bluetooth® connectivity for audio streaming, a headphone output for silent practice, and USB-C for direct recording. Please read this manual thoroughly to understand the amplifier's features and ensure safe and optimal operation.
2. Important Safety Instructions
Always follow these basic precautions when using electrical products:
- Read Instructions: Read all safety and operating instructions before using the product.
- Retain Instructions: Keep these instructions for future reference.
- Heed Warnings: Observe all warnings on the product and in the operating instructions.
- Follow Instructions: Follow all operating and use instructions.
- Water and Moisture: Do not use this product near water (e.g., bathtub, sink, swimming pool).
- Heat: Do not place near heat sources such as radiators, heat registers, stoves, or other heat-producing appliances.
- Power Sources: Connect only to the power supply described in the operating instructions or as marked on the product.
- Cleaning: Clean only with a dry cloth.
- Servicing: Do not attempt to service this product yourself. Refer all servicing to qualified service personnel.
3. Package Contents
Please check that all items are present in the package:
- Ortega Guitars PTWO Acoustic Amplifier
- USB-C Charging Cable
- User Manual (this document)
4. Product Overview
4.1 Front and Top Panel Controls

Figure 4.1: Front view of the Ortega Guitars PTWO amplifier, showing the speaker grille and faux leather casing.

Figure 4.2: Top panel of the Ortega Guitars PTWO amplifier, displaying the control knobs and power button.
- BASS Knob: Adjusts the low-frequency response of your sound. Range from -10 to +10.
- TREBLE Knob: Adjusts the high-frequency response of your sound. Range from -10 to +10.
- REVERB Knob (R/H): Selects and controls the intensity of the Reverb effect. 'R' for Room, 'H' for Hall.
- MODULATION/DELAY Knob (CH/DY): Selects and controls the intensity of the Modulation (Chorus) or Delay effect. 'CH' for Chorus, 'DY' for Delay.
- MASTER Knob: Controls the overall output volume of the amplifier.
- POWER Button: Press and hold to turn the amplifier on or off.
- FX Switch: Toggles the effects (Reverb, Chorus, Delay) on or off.
4.2 Rear Panel Connections
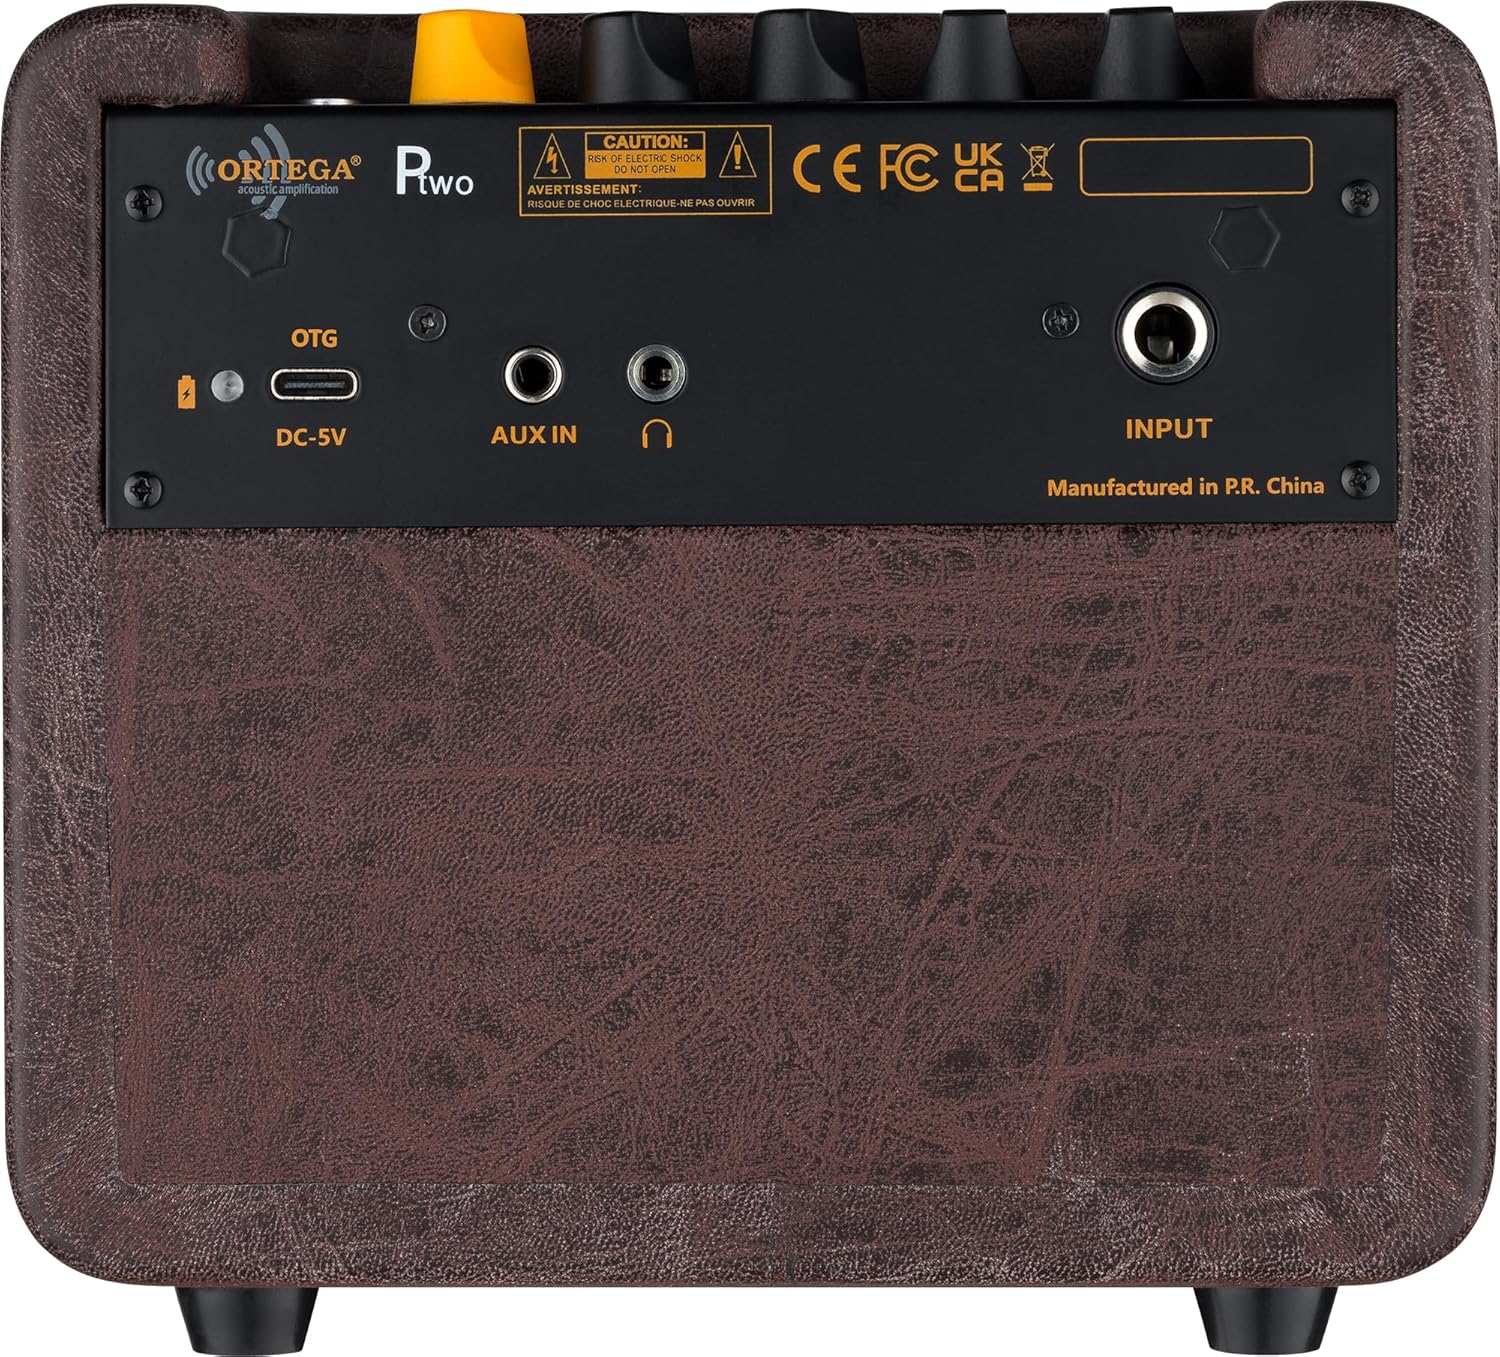
Figure 4.3: Rear panel of the Ortega Guitars PTWO amplifier, showing input and output ports.
- DC-5V Port: USB-C input for charging the internal battery.
- OTG Port: USB-C output for direct recording to compatible devices.
- AUX IN: 3.5mm (1/8") stereo input for connecting external audio sources (e.g., smartphone, MP3 player).
- Headphone Output: 3.5mm (1/8") stereo output for private listening.
- INPUT: 6.3mm (1/4") mono input for connecting your instrument (e.g., acoustic guitar).
5. Setup
5.1 Charging the Battery
Before first use, fully charge the amplifier's internal battery. Connect the supplied USB-C cable to the DC-5V port on the rear panel and the other end to a standard USB power adapter (not included) or a computer's USB port. The charging indicator light will show the charging status. A full charge typically takes approximately 3-4 hours and provides about 5 hours of playtime.
5.2 Initial Power On
Press and hold the POWER button on the top panel for a few seconds until the indicator light illuminates, indicating the amplifier is on.
6. Operating Instructions
6.1 Connecting an Instrument
Plug your acoustic instrument's 1/4" cable into the INPUT jack on the rear panel. Adjust the BASS, TREBLE, and MASTER knobs on the top panel to achieve your desired sound and volume.
6.2 Bluetooth® Connectivity
To connect a Bluetooth® device for audio playback:
- Ensure the amplifier is powered on.
- The amplifier will automatically enter Bluetooth® pairing mode (indicated by a flashing Bluetooth® LED, if present).
- On your device (smartphone, tablet, etc.), enable Bluetooth® and search for available devices.
- Select "Ortega PTWO" from the list.
- Once paired, the Bluetooth® LED will become solid, and you can play audio through the amplifier.
6.3 Using Built-In Effects
The PTWO amplifier includes Reverb, Chorus, and Delay effects.
- Activating Effects: Use the FX switch on the top panel to toggle the effects section on or off.
- Reverb: Turn the REVERB knob to select between 'R' (Room) or 'H' (Hall) reverb types and adjust the effect's intensity.
- Modulation/Delay: Turn the MODULATION/DELAY knob to select between 'CH' (Chorus) or 'DY' (Delay) and adjust the effect's intensity.
6.4 USB-C Recording (OTG)
The OTG (On-The-Go) USB-C port allows you to record your amplifier's output directly to a compatible recording device (e.g., smartphone, tablet, computer) using a USB-C to USB-C cable (not included) or appropriate adapter. Ensure your recording device supports USB audio input.
6.5 Using AUX-IN and Headphone Output
Connect an external audio source to the AUX IN jack using a 3.5mm stereo cable. The amplifier will play audio from this source. For silent practice, connect headphones to the Headphone Output jack. This will mute the main speaker output.
7. Maintenance
- Cleaning: Wipe the amplifier with a soft, dry cloth. Do not use abrasive cleaners, waxes, or solvents.
- Storage: Store the amplifier in a cool, dry place away from direct sunlight and extreme temperatures.
- Battery Care: For optimal battery life, avoid fully discharging the battery frequently. If storing for an extended period, charge the battery to about 50% every few months.
- Transport: When transporting, ensure the amplifier is securely packed to prevent physical damage.
8. Troubleshooting
| Problem | Possible Cause | Solution |
|---|---|---|
| No sound from amplifier. | Amplifier not powered on. Master volume too low. Instrument cable faulty or not connected. Headphones connected. | Press and hold POWER button. Increase MASTER volume. Check instrument cable connection. Disconnect headphones. |
| Bluetooth® not connecting. | Amplifier not in pairing mode. Device Bluetooth® off. Amplifier too far from device. | Ensure amplifier is on. Turn Bluetooth® on your device. Move device closer to amplifier (within 10m). |
| Short battery life. | Battery not fully charged. High volume usage. | Fully charge the battery. Reduce volume for longer playtime. |
| Effects not working. | FX switch is off. Effect knob set to minimum. | Toggle the FX switch to ON. Increase the REVERB or MODULATION/DELAY knob. |
9. Specifications
| Feature | Detail |
|---|---|
| Model | PTWO |
| Output Power | 12 Watts |
| Connectivity | Bluetooth®, AUX-IN, USB-C (OTG) |
| Inputs | 1/4" Instrument Input, 3.5mm AUX-IN |
| Outputs | 3.5mm Headphone Output, USB-C (OTG) |
| Effects | Reverb (Room/Hall), Modulation (Chorus), Delay |
| Controls | Bass, Treble, Reverb, Modulation/Delay, Master, Power, FX Switch |
| Battery Type | Lithium Ion (1 included) |
| Battery Life | Approximately 5 hours |
| Dimensions (L x W x H) | 8.27 x 7.56 x 5.71 inches (21 x 19.2 x 14.5 cm) |
| Weight | 2.97 pounds (1.35 kg) |
10. Warranty and Support
Ortega Guitars products are manufactured to high-quality standards. For information regarding warranty coverage, terms, and conditions, please refer to the warranty card included with your product or visit the official Ortega Guitars website. For technical support or service inquiries, please contact Ortega Guitars customer service through their official channels.
Ortega Guitars Official Website: https://ortegaguitars.com