1. Introduction & Safety Information
This manual provides essential instructions for the safe and effective use of your ANDELI Tempest Guardian PRO Digital Auto-Darkening Welding Helmet. Please read it thoroughly before operation and retain it for future reference.
1.1 General Safety Warnings
- Always wear appropriate personal protective equipment (PPE) when welding, cutting, or grinding.
- Protect your eyes from arc rays and sparks. The auto-darkening filter is designed for this purpose, but always inspect it for damage before use.
- Ensure proper ventilation to avoid inhaling fumes and gases, which can be hazardous to your health.
- Do not use the helmet if any part is damaged or if the auto-darkening function is not working correctly.
- Keep children and unauthorized personnel away from the welding area.
2. Product Overview & Key Features
The ANDELI Tempest Guardian PRO welding helmet offers advanced features for enhanced visibility, comfort, and protection during welding, cutting, and grinding operations.

Figure 1: ANDELI Tempest Guardian PRO Welding Helmet.
2.1 Panoramic View & Auto-Shade
This helmet features a total viewing area of 7.2" x 3.2", including a 4.6" x 3.2" main lens and two 1.3" x 2.5" auto-darkening side lenses, providing an exceptionally wide field of vision.

Figure 2: Panoramic view with main and side auto-darkening lenses.
2.2 Intuitive LCD Display & Digital Adjustment
Equipped with a fully digital auto-darkening filter and LCD display for precise control over shade, sensitivity, and delay settings. This offers pinpoint accuracy and customizable settings.

Figure 3: Digital LCD control panel for precise adjustments.
2.3 Memory & Auto-Adjustment Functions
Save up to 9 custom presets for quick recall. The lens can also self-adjust to optimal shade, delay, and sensitivity based on welding conditions. Shade and delay can be fine-tuned within ±9 levels.

Figure 4: Memory and auto-adjustment capabilities.
2.4 Gradation Mode
Allows the welding lens to smoothly fade from dark to light after arc extinction, providing dynamic eye protection and enhancing observation of weld solidification.
2.5 Type-C Fast Charging & Long Service Life
Powered by a 500mAh lithium-polymer battery with solar assist, offering up to 1200+ hours of continuous welding and 16,000 hours of standby time. Fully recharges in 2.5–3 hours via Type-C.

Figure 5: Next-Gen Li-Ion battery advantages.
2.6 5 Arc Sensors & Fast Auto-Darkening
Features 5 arc sensors for reliable arc detection and ultra-fast switching (1/30000 sec), ensuring immediate eye protection.

Figure 6: Fast photosensitivity with 5 arc sensors.
2.7 1/1/1/1 True Color View & Triple-Layer Lens System
Experience unparalleled clarity and true color views with top optical clarity. UV/IR protection up to Shade DIN16 is ensured by a triple-layer premium lens system (2 layers LCD, 1 integrated optical filter).
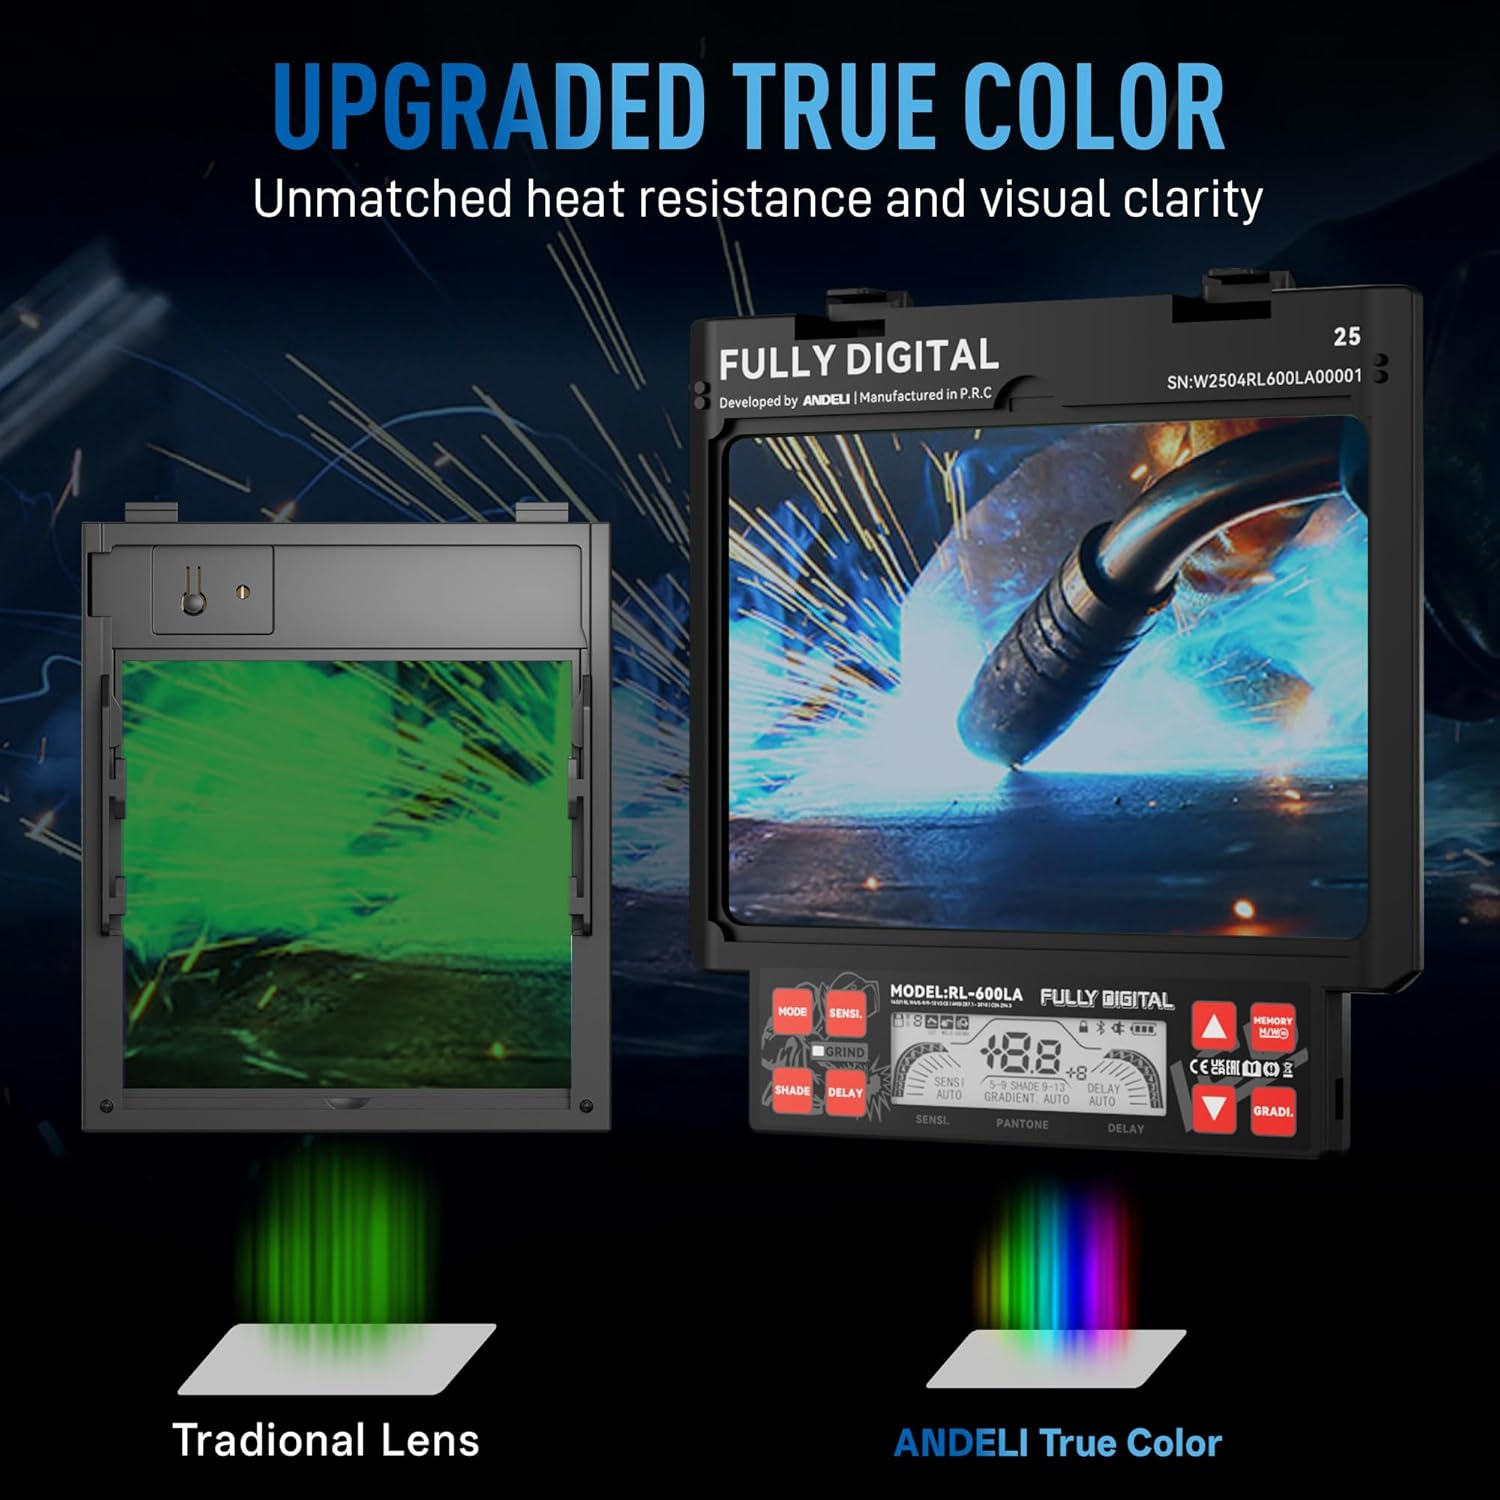
Figure 7: True Color View technology.
2.8 Comfortable & Stable Headgear
Designed with 6 contact points and cushioned headgear to evenly distribute weight, reducing fatigue during prolonged use.
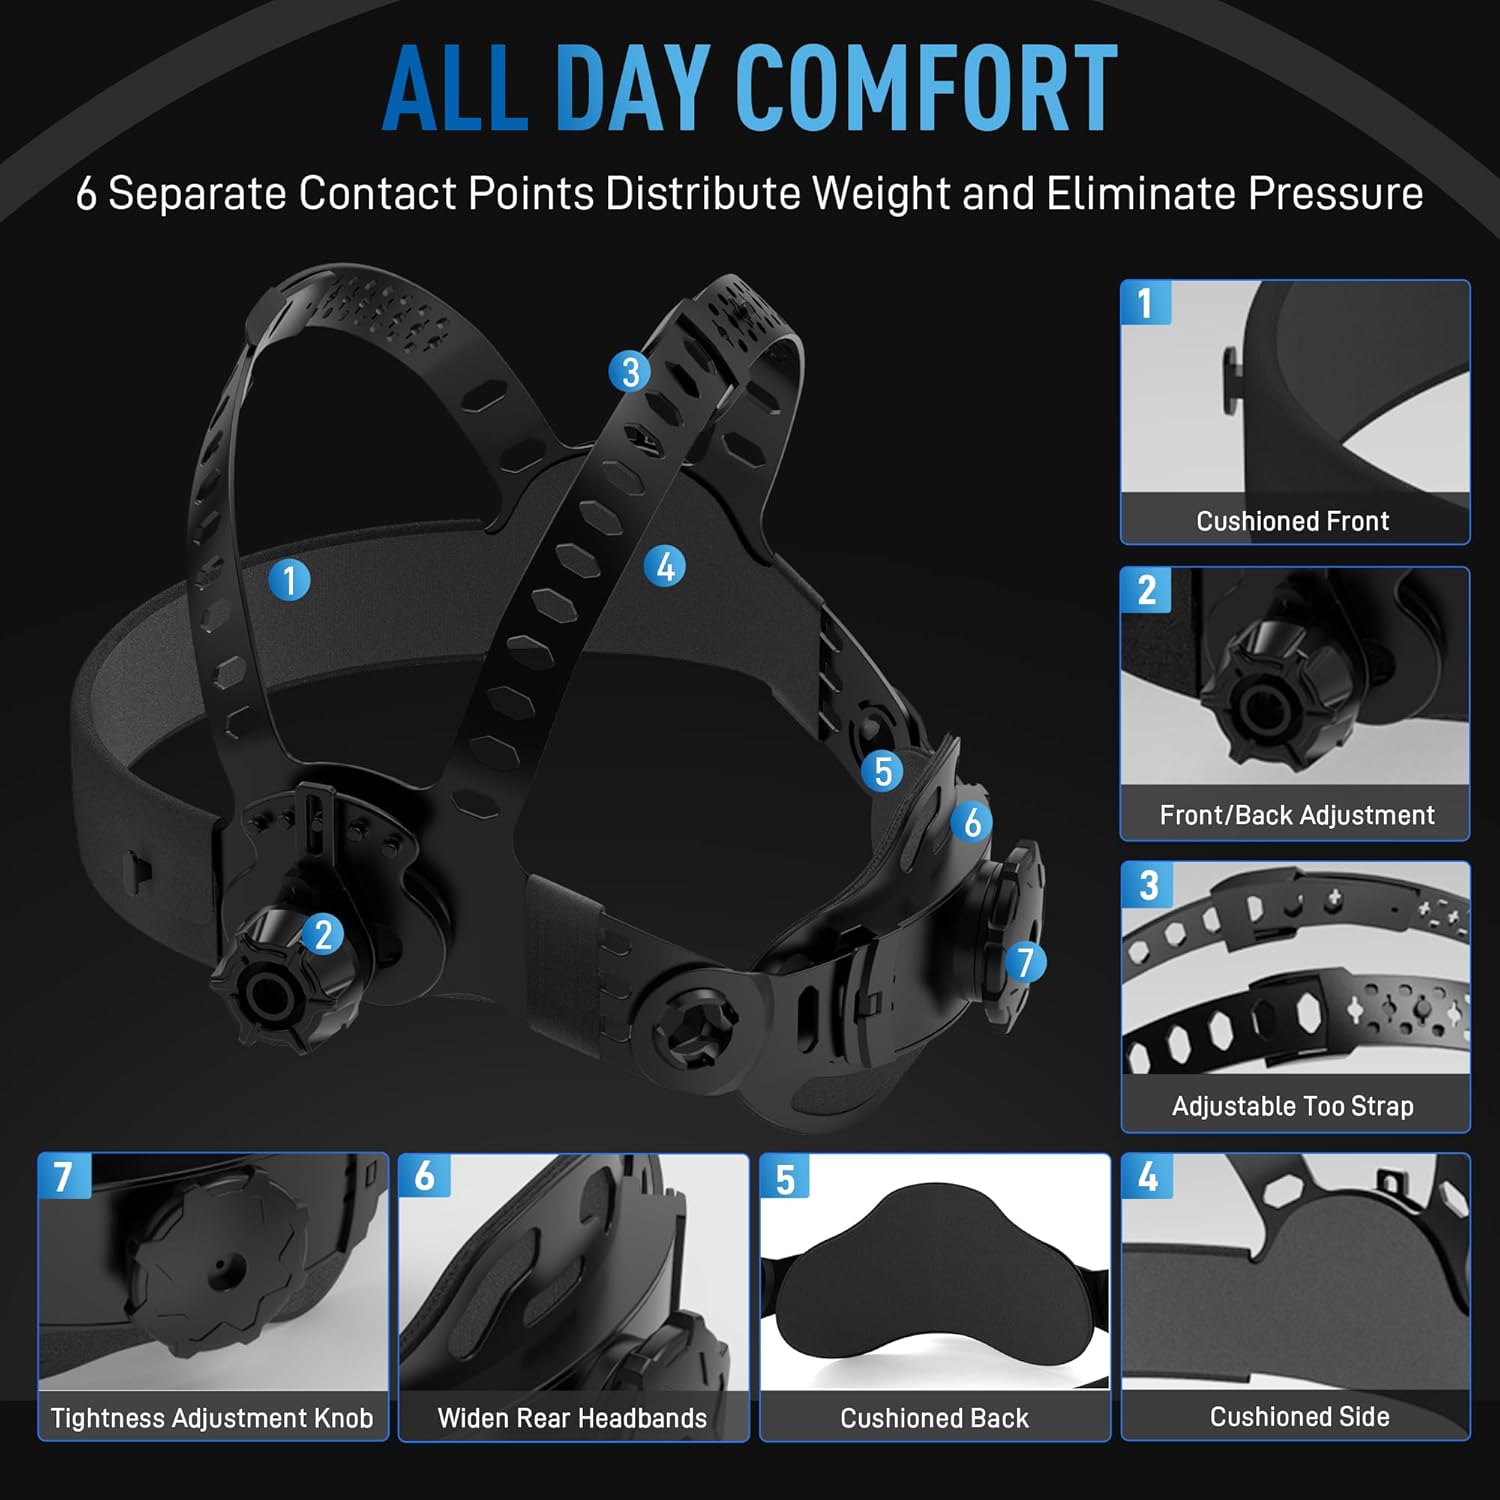
Figure 8: All-day comfort headgear design.
3. Setup & Initial Adjustment
3.1 Headgear Adjustment
The helmet features multiple adjustment points to ensure a secure and comfortable fit:
- Front/Back Position: Loosen the knobs on each side of the helmet to adjust the distance between your face and the lens. There are 3 adjustable levels.
- Tilt Angle: Adjust the tilt angle of the helmet using the side mechanisms. There are 5 adjustable levels.
- Head Circumference: Rotate the knob at the rear of the headgear to tighten or loosen the fit around your head.
- Top Strap: Adjust the top strap to ensure the helmet sits correctly on your head.
Ensure all adjustments are symmetrical and the helmet feels stable and comfortable before use.
3.2 Initial Charging
Before first use, fully charge the helmet's internal lithium-polymer battery using the provided Type-C USB cable. The charging indicator will light up during charging and turn off when complete. A full charge typically takes 2.5-3 hours.
Video 1: Detailed installation and adjustment guide for the ANDELI Auto Darkening Welding Helmet.
4. Operation
The helmet features both internal LCD controls and an external control button for easy access to functions.
4.1 Power On/Off & Grinding Mode
- Power On/Off: Press and hold the lower external button (labeled 'GRIND ON/OFF') for approximately 3 seconds. The internal LCD display will light up.
- Quick Switch to Grinding Mode: Briefly press the lower external button. The helmet will switch to Grind Mode (Shade DIN 4).
4.2 Mode Switching & Adjustment (Internal LCD)
The internal LCD control panel allows for precise adjustments:
- Mode Selection: Briefly press the 'MODE' button to cycle through available modes: Weld, Grind, Cut, and Lock.
- Shade Adjustment: In Weld or Cut mode, press the 'SHADE' button to adjust the shade level. Use the '+' and '-' buttons to increase or decrease the shade (Weld: 9-13, Cut: 5-9, Grind: 4, Lock: 5-13).
- Sensitivity Adjustment: Press the 'SENSI' button to adjust the sensitivity of the auto-darkening filter. Use '+' and '-' for 9 adjustable levels.
- Delay Adjustment: Press the 'DELAY' button to set the time it takes for the lens to return to its light state after welding. Use '+' and '-' for 9 adjustable levels.
- Automatic Adjustment (Auto-Mode): Press and hold the 'SHADE', 'SENSI', or 'DELAY' button until 'AUTO' appears on the display. The helmet will then automatically adjust that parameter based on conditions. You can fine-tune auto-adjusted shade/delay by ±9 levels.
- Memory Function: The helmet can store up to 9 custom welding parameter presets. Briefly press the 'MEMORY M/W' button to recall a stored setting. Press and hold to save the current settings to the selected channel.
- Gradient Mode: Press the 'GRADI' button to activate the Gradation Mode for a smooth light-to-dark transition.
4.3 External Control Button
The upper external button (labeled 'MODE HOLD A/M') allows for quick cycling between Shade, Sensitivity, and Delay adjustments. Use the rotary knob to adjust the parameter when its indicator is blinking.
5. Maintenance
5.1 Protective Lens Replacement
The helmet uses both outer and inner protective lenses that may need replacement due to scratches or damage.
- Outer Lens: Align one side of the new outer lens with the mounting holes and secure it. Gently press the center of the lens, then align the other side with the holes and press down until it snaps into place.
- Inner Lens: Align one side of the new inner lens with the slot and secure it. Gently bend the lens with your fingers, then insert the other side into the slot until it clicks into position.
5.2 Cleaning
- Clean the helmet and lenses regularly with a soft, damp cloth.
- Do not use abrasive cleaners, solvents, or alcohol, as these can damage the helmet or filter.
6. Troubleshooting
| Problem | Possible Cause | Solution |
|---|---|---|
| Helmet does not power on. | Low battery or faulty charging. | Ensure the helmet is fully charged using the Type-C cable. If the issue persists, contact support. |
| Lens does not darken when welding. | Low battery, sensors obstructed, incorrect sensitivity, or damaged filter. | Charge the helmet. Clean sensors. Adjust sensitivity. If problem persists, discontinue use and contact support. |
| Poor visibility through the lens. | Scratched or dirty protective lenses, or main filter. | Clean or replace outer and inner protective lenses. Ensure the main filter is clean. |
| Helmet feels uncomfortable or loose. | Improper headgear adjustment. | Re-adjust the headgear's front/back position, tilt angle, and head circumference for a snug fit. |
7. Specifications

Figure 9: Product Specifications and Included Components.
| Feature | Detail |
|---|---|
| Model Name | OPTIM-600LA-TGB |
| Viewing Size | 4.53"x3.23" Main Lens + 2 Side Lenses (Auto Dimming) |
| True Color | 1/1/1/1 Optical Clarity |
| Light States | DIN 3.0 (Side Lenses DIN 3) |
| Dark States | DIN 5-9 / 9-13 (Side Lenses DIN 11) |
| Auto Darkening Time | 0.07ms Light-dark |
| Delay Time | 0.1-2.0s Dark-Light |
| UV/IR Protection | Up to Shade DIN16 At All Time |
| Power Source | Lithium Polymer Battery, Type-C Charging, Solar Assist |
| Operating Temperature | -5°C ~ +55°C / 23°F ~ 131°F |
| Weight | 0.6 Kilograms (1.32 pounds) |
| Material | Plastic |
| Included Components | Welding Helmet With Auto-darkening Side View*1; Replacement Lens*3, Storage Bag *1, Type-C USB cable *1 |
8. Warranty & Support
This ANDELI welding helmet comes with a 1-year warranty from the date of purchase, covering manufacturing defects. Please retain your proof of purchase for warranty claims.
For technical support, troubleshooting assistance, or warranty inquiries, please contact ANDELI customer service through the official channels provided with your product or on the ANDELI website.


