1. Introduction
Thank you for choosing the Aeitto Nugget Ice Maker. This manual provides essential information for the safe and efficient operation, maintenance, and troubleshooting of your new ice maker. Please read it thoroughly before first use and keep it for future reference.
Video: Overview of the Aeitto Nugget Ice Maker's features and operation. This video demonstrates the ice making process and various uses for nugget ice.
2. Important Safeguards
To reduce the risk of fire, electric shock, or injury when using your ice maker, follow these basic precautions:
- Read all instructions before use.
- Do not touch the evaporator or ice basket when the unit is operating.
- Do not immerse the appliance, power cord, or plug in water or other liquids.
- Supervise children when the appliance is in use.
- Unplug the ice maker from the outlet when not in use, before cleaning, or during servicing.
- Do not operate any appliance with a damaged cord or plug, or after the appliance malfunctions or has been damaged in any manner.
- Use only potable water in the ice maker.
- Ensure proper ventilation around the unit. Maintain at least 5 inches of space on all sides.
3. Product Components
Familiarize yourself with the parts of your Aeitto Nugget Ice Maker:
- Ice Maker Unit
- Ice Basket
- Ice Scoop
- Drip Tray
- Drain Hose

Image: The Aeitto Nugget Ice Maker showing its compact dimensions (7.3"W x 13.0"D x 12.8"H) and included accessories: an ice scoop, ice basket, and drip tray. The ice basket can store up to 1.8 lbs of nugget ice.
4. Before First Use
Before operating your ice maker for the first time, perform the following steps:
- Unpack: Remove all packaging materials and check that all accessories are present.
- Clean: Wash the ice basket and ice scoop with warm water and mild detergent. Rinse thoroughly and dry.
- Position: Place the ice maker on a stable, level surface away from direct sunlight and heat sources. Ensure adequate ventilation around the unit.
- Initial Cleaning Cycle: It is recommended to run a self-cleaning cycle before making ice for consumption. Refer to the "Self-Cleaning Function" section for detailed instructions.
5. Operating Instructions
5.1 Making Ice
Follow these simple steps to produce nugget ice:
- Add Water: Open the lid and pour potable water into the water reservoir up to the MAX fill line.
- Insert Ice Basket: Place the ice basket securely inside the unit.
- Start Ice Production: Press the "ICE" button on the control panel. The ice maker will begin the ice-making cycle.
- Collect Ice: The first batch of ice may take approximately 5 minutes. The unit will continue to produce ice until the ice basket is full or the water reservoir is empty.
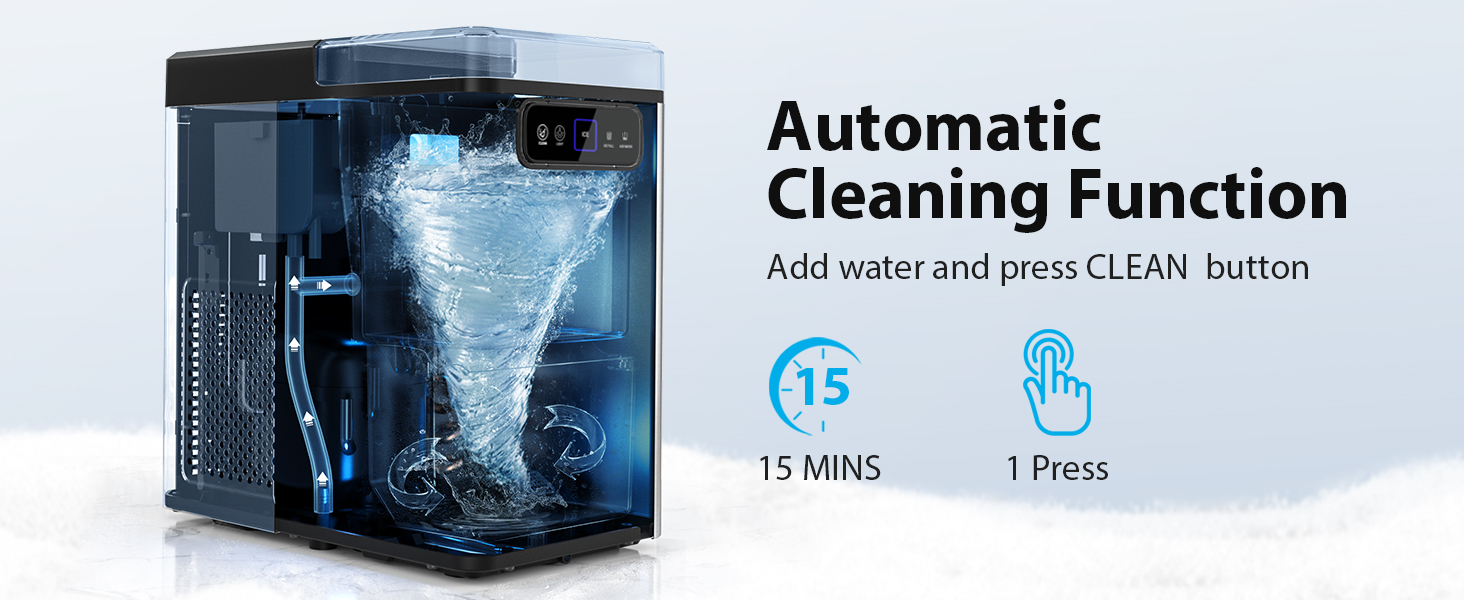
Image: A visual guide demonstrating the three steps to make nugget ice: 1. Add water to the reservoir. 2. Press the "ICE" button on the control panel. 3. Enjoy the freshly made nugget ice.
5.2 Ice Full Reminder
The ice maker is equipped with an "Ice Full" sensor. When the ice basket is full, the unit will automatically stop ice production to prevent overflow and save energy. Production will resume once ice is removed from the basket.

Image: The ice maker's control panel showing the "ICE FULL" indicator light, which illuminates when the ice basket is full, signaling the unit to pause ice production.
6. Cleaning and Maintenance
6.1 Self-Cleaning Function
The ice maker features an automatic self-cleaning function for convenience and hygiene:
- Empty Water: Ensure the water reservoir is empty.
- Add Water for Cleaning: Fill the reservoir with clean, potable water. You may add a small amount of white vinegar or a descaling solution (follow product instructions) for enhanced cleaning.
- Start Cleaning: Press and hold the "CLEAN" button for 3 seconds. The unit will initiate a 15-minute cleaning cycle.
- Drain Water: After the cycle, drain the water from the unit using the drain hose.
- Rinse: Repeat the process with fresh water only to rinse out any cleaning solution residue.

Image: The internal mechanism of the ice maker during a self-cleaning cycle, showing water circulating to clean the components. The process takes 15 minutes and is activated with a single press of the clean button.
6.2 Draining the Unit
To drain water from the ice maker:
- Locate the drain pipe at the back of the unit.
- Remove the stopper from the drain pipe.
- Direct the drain pipe into a sink or container to collect the water.
- Once drained, replace the stopper firmly.

Image: A close-up of the ice maker's unique water outlet design, showing how the drain pipe is connected and used to easily discharge water into a sink, preventing leaks.
6.3 Descaling
Mineral buildup from hard water can affect ice production and the lifespan of your machine. Descale your ice maker regularly:
- Monthly: In moderately hard water areas.
- Every two or three weeks: In hard to very hard water areas.
Use a descaling solution specifically designed for ice makers or a mixture of water and white vinegar (1:1 ratio). Follow the self-cleaning instructions, substituting the cleaning solution for water in the first step.

Image: A map illustrating hard water concentrations across the United States, with recommendations for descaling frequency based on water hardness: monthly for moderately hard water (1-60mg/L) and every 2-3 weeks for hard to very hard water (61-250mg/L).
7. Troubleshooting
If your ice maker is not functioning correctly, consult the table below for common issues and solutions:
| Problem | Possible Cause | Solution |
|---|---|---|
| Ice maker not producing ice. | No water in reservoir. | Add water to the reservoir. |
| Ice basket is full. | Remove ice from the basket. | |
| Unit is unplugged or power outage. | Ensure unit is plugged in and power is on. | |
| Ice production is slow. | Poor ventilation. | Ensure adequate space around the unit for airflow. |
| High ambient temperature. | Operate in a cooler environment. | |
| Ice has an unusual taste or odor. | Stale water or mineral buildup. | Perform a self-cleaning cycle and use fresh, potable water. Descale if necessary. |
| Unit is noisy. | Normal operation sounds (compressor, water pump). | This is normal. If noise is excessive or unusual, contact customer support. |
8. Technical Specifications
| Specification | Detail |
|---|---|
| Model Name | BLK23-24M |
| Product Dimensions | 12.99"D x 7.29"W x 12.79"H |
| Capacity (Ice Production) | Up to 40 lbs per day |
| Wattage | 110 watts |
| Refrigerant | R600a |
| Material | Stainless Steel |
| Item Weight | 19.36 pounds |
9. Warranty and Customer Support
For warranty information or customer support, please refer to the warranty card included with your product or visit the official Aeitto website. If you encounter any issues not covered in this manual, please contact Aeitto customer service for assistance.
Contact Information: Please refer to your product packaging or the official Aeitto website for the most up-to-date contact details.