1. Introduction
This manual provides detailed instructions for the installation, operation, and maintenance of your Thermalright Peerless Assassin 140 Digital Black CPU Cooler. This high-performance air cooler features a magnetic digital display board, six heatpipes with AGHP technology, and dual fans for efficient heat dissipation. Please read this manual thoroughly before installation and use to ensure optimal performance and safety.

Image 1.1: The Thermalright Peerless Assassin 140 Digital Black CPU Cooler, showcasing its dual-tower design and integrated digital display.
2. Safety Information
- Always disconnect power from your computer before installing or performing maintenance on the CPU cooler.
- Handle components with care to avoid damage.
- Keep out of reach of children.
- Ensure proper grounding to prevent electrostatic discharge.
- Refer to your motherboard and CPU manuals for additional compatibility and installation guidelines.
3. Package Contents
Verify that all components are present before beginning installation:
- Thermalright Peerless Assassin 140 Digital Black Heatsink
- 120mm PWM Fan
- 140mm PWM Fan
- Magnetic Digital Display Board
- Mounting Hardware for AMD (AM4/AM5) and Intel (LGA1851/1700/1150/1151/1155/1156/1200/2011/2066) platforms
- Y-adapter for connecting two fans
- Thermal Paste
- 9PIN USB Cable for Digital Display
4. Setup & Installation
4.1. Compatibility Check
Ensure your motherboard and PC case provide adequate clearance for the cooler. The cooler is compatible with the following CPU sockets:
- AMD: AM4, AM5
- Intel: LGA1851, LGA1700, LGA1150, LGA1151, LGA1155, LGA1156, LGA1200, LGA2011, LGA2066
Memory modules should have a height of 44mm or less to avoid interference with the cooler's design.

Image 4.1: Visual representation of CPU socket compatibility for the cooler.
4.2. Heatsink Mounting
Follow the specific instructions provided with the mounting hardware for your CPU socket type. The cooler includes dual-platform mounting grommets for secure installation. For AMD platforms, utilize the motherboard's original backplate as this product does not include one.

Image 4.2: The CPU cooler installed within a computer case, demonstrating memory and graphics card clearance.
4.3. Fan and Digital Display Installation
- Attach the 120mm and 140mm fans to the heatsink using the provided clips. The magnetic design of the top digital panel facilitates easy fan installation.
- Connect both fans to your motherboard's CPU fan headers, utilizing the included Y-adapter if only one header is available.
- Place the magnetic digital display board onto the top of the heatsink.
- Connect the digital display board to your motherboard's 9PIN USB interface using the provided cable. Ensure the wiring is secure for proper data communication and power supply.
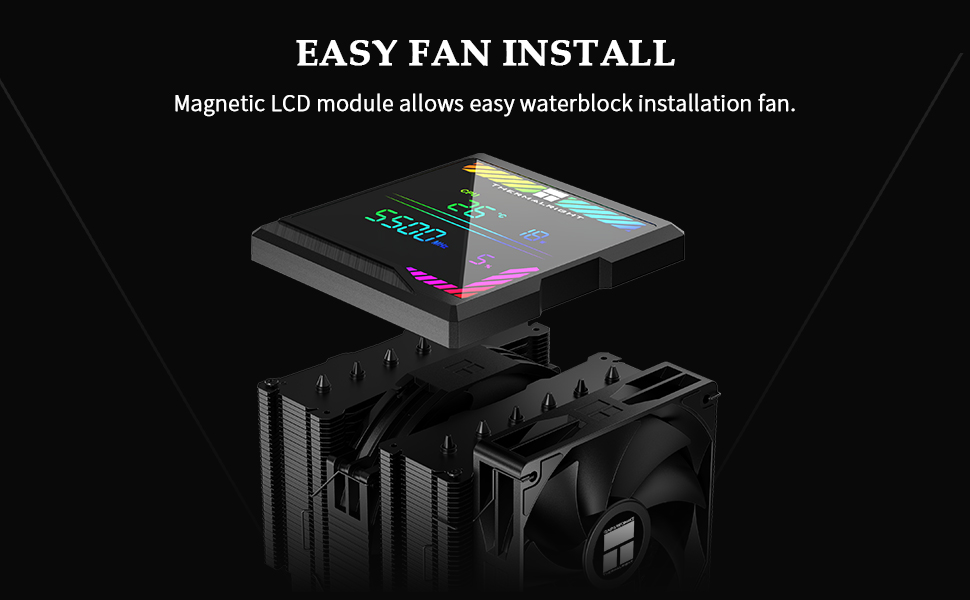
Image 4.3: The magnetic LCD module detaching from the heatsink, illustrating the ease of fan installation.
5. Operating Instructions
5.1. Digital Display Board
The magnetic top cover ARGB digital display board provides real-time monitoring of CPU and graphics card temperature and utilization. The display can be customized for color switching based on temperature figures when used with the TRCC control software.

Image 5.1: A close-up view of the digital display board, showing CPU temperature, wattage, frequency, and utilization metrics.
5.2. TRCC Software
The TRCC Control Centre software allows you to monitor CPU and GPU temperature and occupancy, and adjust the color of the displayed text. Ensure the 9PIN USB interface is correctly connected before installing the software.
Download and install the TRCC software from the official Thermalright website: thermalright.com/support/download/
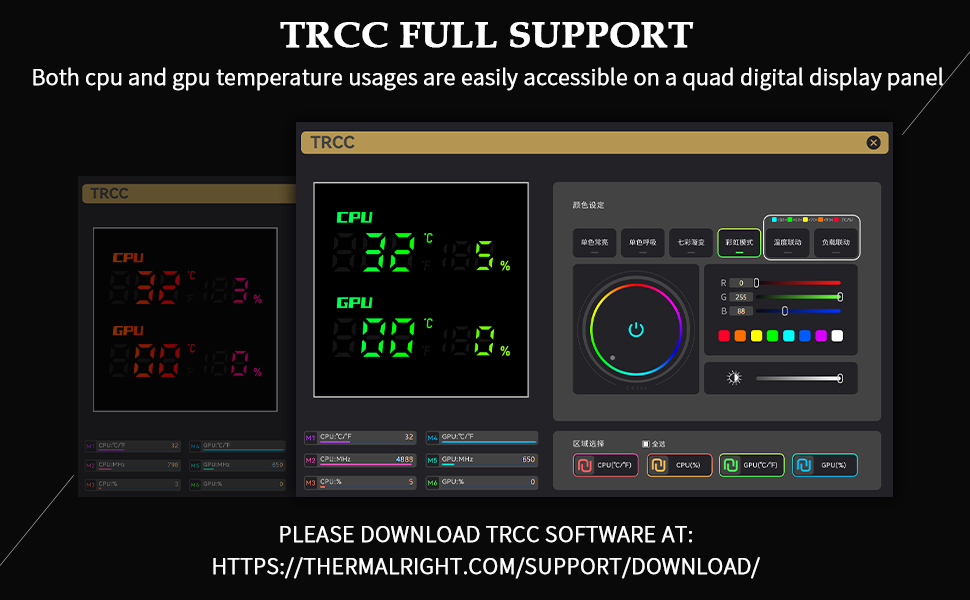
Image 5.2: The TRCC software interface, demonstrating CPU and GPU monitoring and color customization options.
5.3. PWM Fan Control
The included fans feature PWM (Pulse Width Modulation) intelligent temperature control. This automatically adjusts fan speed based on CPU temperature, optimizing cooling performance and reducing noise without manual intervention.
6. Maintenance
Regular maintenance ensures the longevity and optimal performance of your CPU cooler.
- Dust Removal: Periodically clean dust from the heatsink fins and fan blades using compressed air or a soft brush. Ensure fans are not spinning during cleaning.
- Fan Cleaning/Replacement: The fans can be easily removed from the heatsink for thorough cleaning or replacement, thanks to the SS2 fasteners and magnetic top cover.
- Thermal Paste: If reinstalling the cooler or replacing the CPU, clean off old thermal paste and apply a fresh layer.
7. Troubleshooting
If you encounter issues with your CPU cooler, consider the following:
- No Display/Incorrect Readings: Verify that the 9PIN USB cable is securely connected to both the digital display board and the motherboard. Ensure TRCC software is installed and running correctly.
- High CPU Temperatures: Check that the heatsink is properly mounted and making good contact with the CPU. Ensure thermal paste is correctly applied. Confirm fans are spinning and not obstructed. Verify fan cables are securely connected to the motherboard.
- Excessive Fan Noise: Ensure fans are securely mounted and free from obstructions. Check for dust buildup on fan blades or heatsink fins. The fans feature S-FDB bearings designed for quiet operation; if noise persists, inspect for damage.
- Installation Issues: Double-check compatibility with your CPU socket and memory clearance. Refer to the installation steps and your motherboard manual.
8. Specifications
8.1. General Specifications
- Model: Peerless Assassin 140 Digital Black
- Overall Size: 140mm (L) x 160mm (W) x 165mm (H)
- Heatsink Material: Pure Copper Heatpipes, Aluminum Fins
- Heat Pipe Technology: 6x6mm AGHP (Anti-Gravity Heat Pipe) Version 5.0
- Weight: 1.89 Kilograms (approx. 4.17 Pounds)
8.2. Fan Specifications
| Feature | TL-C12C-X28 V2 (120mm Fan) | TL-D14CB (140mm Fan) |
|---|---|---|
| Dimensions | 120mm x 120mm x 28mm | 140mm x 140mm x 27mm |
| Rated Speed | 1850 RPM ±10% (MAX) | 1500 RPM ±10% (MAX) |
| Airflow | 82 CFM | 77.8 CFM |
| Static Pressure | 2.1 mm H2O (MAX) | 2.09 mm H2O (MAX) |
| Operating Noise | ≤29.6 dB(A) | ≤25.6 dB(A) |
| Connector | 4PIN PWM | 4PIN PWM |
| Bearing Type | S-FDB Bearing | S-FDB Bearing |
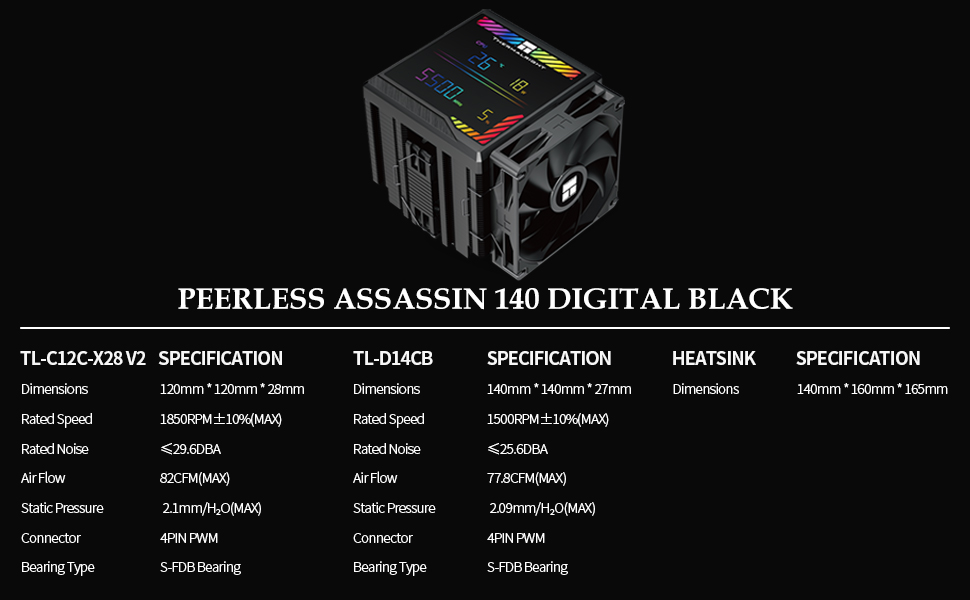
Image 8.1: A comprehensive table detailing the specifications of the fans and heatsink.
8.3. AGHP Heat Pipe Technology
The 6x6mm heat pipes incorporate Version 5.0 of AGHP (Anti-Gravity Heat Pipe) technology. This advanced design ensures optimal thermal performance regardless of the cooler's orientation (standing or lying), effectively counteracting the effects of gravity on heat transfer. The pure copper heat pipes combined with a precision reflow soldered micro-engraved copper base further optimize heat dissipation for modern high-performance CPUs.

Image 8.2: A detailed view of the six 6mm AGHP heatpipes, highlighting the advanced heat transfer technology.
9. Warranty & Support
For warranty information, technical support, or any inquiries regarding your Thermalright Peerless Assassin 140 Digital Black CPU Cooler, please visit the official Thermalright website or contact their customer service department. Keep your proof of purchase for warranty claims.


