1. Introduction
This manual provides essential instructions for the safe and efficient use of your Generic 54.6V XLR 3-Prong Charger. This charger is specifically designed for 48V Lithium-ion batteries found in compatible electric bikes, including the Smartravel ST201F Pro and Ebkarocy TDT102Z/CDC102Z models. Please read this manual thoroughly before first use to ensure proper operation and to prevent damage to the charger or your electric bike battery.
2. Safety Information
WARNING: Failure to follow these safety instructions may result in electric shock, fire, or serious injury.
- This charger is exclusively for 48V Lithium-ion batteries with a 3-pin XLR connector. Do not attempt to charge Lead-Acid (SLA) batteries or any other battery types.
- Ensure the charger is connected to a power outlet within the specified input voltage range of AC 100V–240V.
- Do not use the charger if the cable or connector is damaged.
- Keep the charger away from water, moisture, and extreme temperatures.
- Do not disassemble or modify the charger. It contains built-in Over Voltage Protection (OVP), Over Current Protection (OCP), and Short Circuit Protection (SCP) for safety.
- Always unplug the charger from the power outlet and the battery when not in use.
- Charge in a well-ventilated area.
3. Product Overview
The Generic 54.6V XLR 3-Prong Charger is a reliable power supply designed for specific electric bike models. It features a robust design and an LED indicator to show charging status.

Figure 1: The main unit of the 54.6V charger, featuring the 3-prong XLR output connector.
Key Features:
- Input Voltage: AC 100V–240V
- Output Voltage: DC 54.6V
- Output Current: 2.5 Amps
- Connector Type: 3-Pin XLR
- Special Feature: Charging Indicator LED
- Safety: Built-in OVP, OCP, SCP Protections
4. Specifications
| Feature | Specification |
|---|---|
| Input Voltage Range | AC 100V–240V |
| Output Voltage | DC 54.6V |
| Output Current | 2.5 Amps |
| Wattage | 110 Watts |
| Connector Type | 3-Pin XLR |
| Product Dimensions | 4.5 x 2 x 1.25 inches |
| Item Weight | 8 ounces |
| Special Feature | Charging Indicator LED |
| Safety Certification | UL Compliant |
| Compatible Battery Type | 48V Lithium-ion |
5. Compatibility
This 54.6V XLR 3-Prong Charger is compatible with the following electric bike models and their respective 48V Lithium-ion batteries:
Smartravel Electric Bikes:
- Model: ST201F, ST201F Pro
- Motor: 1200W
- Battery: 48V 20Ah Lithium-ion
- Part Number: LBC030480201
- Features a 3-Pin XLR Charger Port.

Figure 2: An image of the Smartravel ST201F Pro electric bike, which is compatible with this 54.6V charger.
Ebkarocy Electric Bikes:
- Model: TDT102Z, CDC102Z
- Size: 14 Inches
- Motor: 400W / 750W
- Battery: 48V 15Ah Lithium-ion
- Compatible with Battery Pack: T/TCDZ0001-2019 TTCDZ00012019 Li-ion Battery Pack

Figure 3: An image of the Ebkarocy TDT102Z/CDC102Z electric bike, compatible with this 54.6V charger.
6. Setup Instructions
Follow these steps to properly set up your charger:
- Inspect the Charger: Before each use, visually inspect the charger, cable, and XLR connector for any signs of damage. Do not use if damaged.
- Connect to Battery: Locate the 3-pin XLR charging port on your electric bike's battery. Carefully align the charger's XLR connector with the port and push it in firmly until it is securely connected.
- Connect to Power Outlet: Plug the AC power cord of the charger into a standard AC 100V–240V wall outlet.
- Verify Connection: The charger's LED indicator should illuminate, typically indicating the charging status (e.g., red for charging, green for fully charged). Refer to the 'Operating Instructions' section for LED indicator details.
7. Operating Instructions
Once set up, the charger will automatically begin charging your electric bike battery.
Charging Process:
- After connecting the charger to both the battery and the power outlet, the charging process will start.
- The charger's LED indicator will display the current charging status.
- Charging time varies depending on the battery's capacity and its current charge level.
- The charger is designed to stop charging automatically once the battery reaches full capacity to prevent overcharging.
LED Indicator Status:
- Red LED: Indicates the battery is currently charging.
- Green LED: Indicates the battery is fully charged or the charger is in standby mode (not connected to a battery or battery is full).
Disconnecting the Charger:
- Once the LED indicator turns green, indicating a full charge, first unplug the charger from the wall outlet.
- Then, carefully disconnect the XLR connector from the electric bike's battery charging port.
8. Maintenance
Proper maintenance ensures the longevity and safe operation of your charger.
- Cleaning: Use a soft, dry cloth to clean the charger. Do not use liquid cleaners or solvents.
- Storage: Store the charger in a cool, dry place away from direct sunlight and moisture when not in use.
- Cable Care: Avoid bending or crimping the power cable and connector excessively. Do not wrap the cable tightly around the charger.
- Inspection: Periodically check the charger, cable, and connectors for any signs of wear or damage. Replace if necessary.
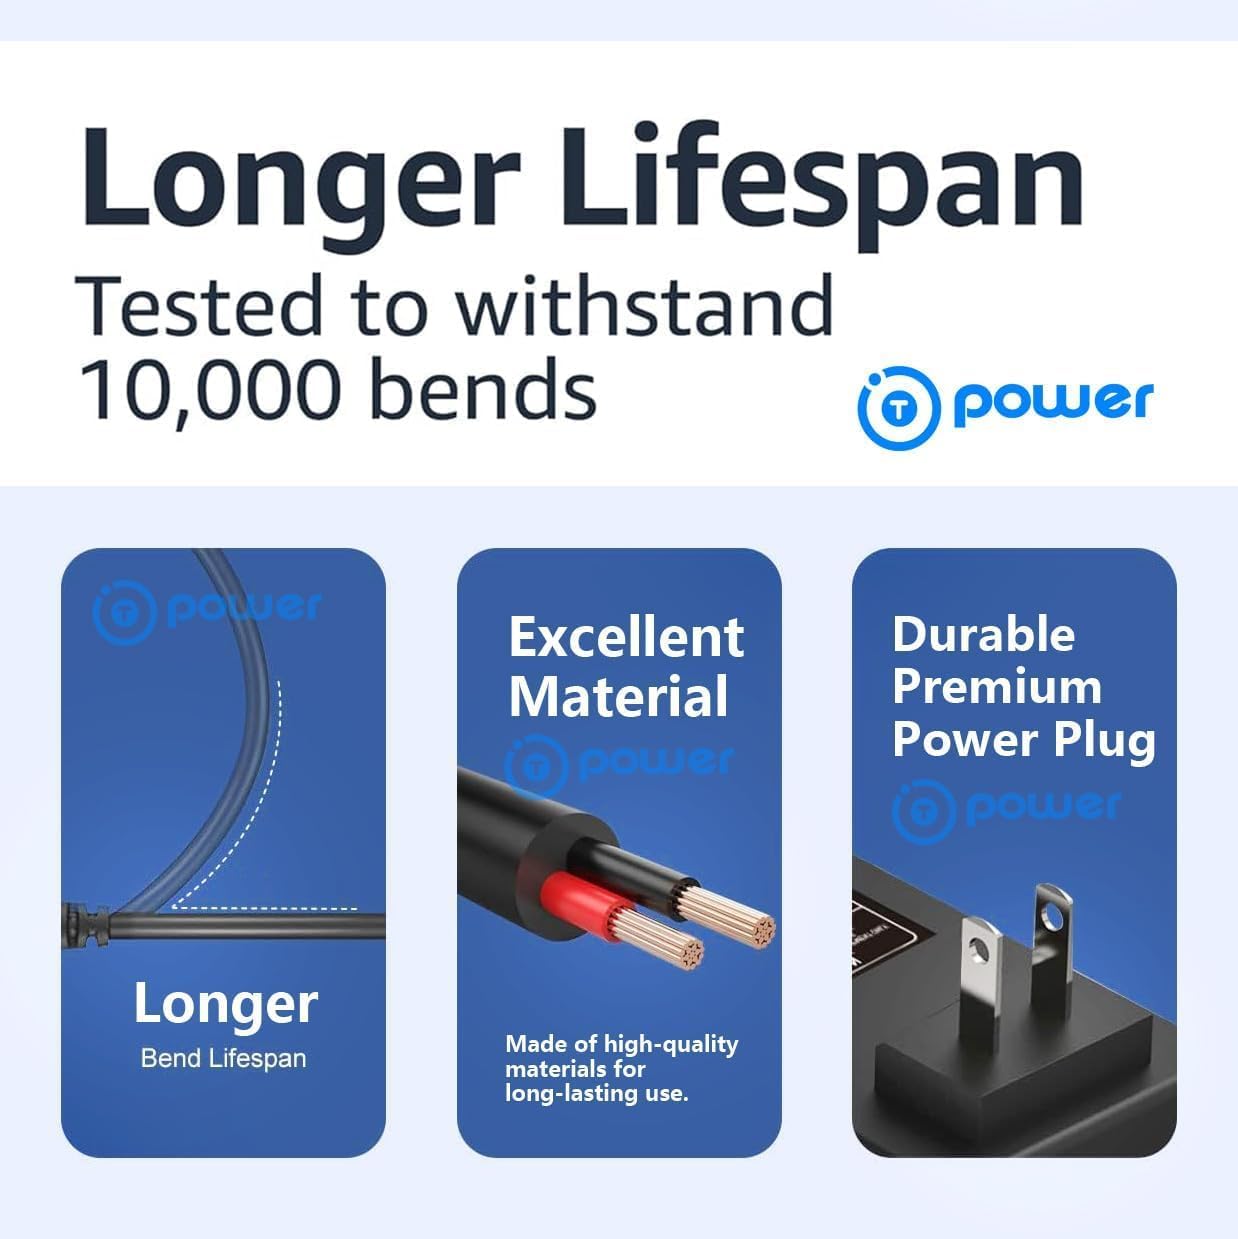
Figure 4: This diagram highlights the robust construction of the charger, emphasizing its long bend lifespan, use of high-quality materials, and durable power plug design for extended product life.
9. Troubleshooting
If you encounter issues with your charger, refer to the following common problems and solutions:
- Charger LED does not light up:
- Ensure the charger is securely plugged into a working wall outlet.
- Verify the XLR connector is firmly attached to the bike's charging port.
- Check if the wall outlet is functional by plugging in another device.
- Battery is not charging (LED remains green when connected to battery):
- The battery might already be fully charged.
- Ensure the battery is properly connected and the XLR connector is fully inserted.
- Confirm that your electric bike's battery is a 48V Lithium-ion type and compatible with this charger.
- Slow charging:
- Ensure the charger is used in a well-ventilated area to prevent overheating, which can slow down charging.
- Verify the charger's specifications match your battery's requirements.
- Charger feels hot during use:
- It is normal for the charger to feel warm during operation. However, if it becomes excessively hot, disconnect it immediately and allow it to cool. Ensure adequate ventilation.
If these steps do not resolve the issue, please contact customer support.
10. Warranty and Support
For warranty information or technical support, please refer to the documentation provided at the point of purchase or contact the seller directly. Keep your purchase receipt as proof of purchase.


