Safety Information
General Safety Precautions
- Proper assembly and handling of heavy components is required.
- Keep away from children and pets.
- Do not exceed weight limits specified for the shed.
- Always wear appropriate personal protective equipment, including gloves and eye protection, during assembly.
- Ensure the assembly area is clear of obstructions and on a level, stable surface.
- Assembly requires a minimum of two people for safe handling of large and heavy panels.
- Anchor the shed securely to the ground to prevent wind damage, especially in areas with heavy winds.
Package Contents
Before beginning assembly, verify that all parts are present and undamaged. Refer to the parts list provided in your physical manual for exact quantities. Typical components include:
- Roof Panels
- Wall Panels
- Door Panels
- Frame Components (beams, supports)
- Base Frame Components
- Hardware (screws, nuts, bolts, washers)
- Door Latch and Hinges
- Ventilation Grilles
- Protective Film (on panels)

This image illustrates the overall dimensions of the Aoxun 10 x 12FT Outdoor Storage Shed, including roof, internal, and door measurements. It also highlights the base structure and indicates that two pairs of gloves are included for assembly.
Setup and Assembly Instructions
Careful adherence to these instructions is crucial for the structural integrity and longevity of your shed. Assembly typically requires 2-3 individuals and can take several hours.
1. Site Preparation
Select a level, firm surface for the shed installation. A concrete slab, paved area, or compacted gravel base is recommended. Ensure adequate drainage around the site.

This image demonstrates the importance of a high-quality and solid base for the shed. It shows how the elevating storage shed design prevents direct ground contact, adapts to various terrains, and enhances stability.
2. Base Frame Assembly
Assemble the base frame components according to the diagrams in your manual. Ensure all connections are secure and the frame is square before proceeding.
3. Wall Panel Installation
Attach the wall panels to the base frame and to each other. Panels are constructed from robust, thick-gauge galvanized steel with a scratch-protective film that should be removed during installation. Pay attention to the panel bearing design for proper alignment.

This image highlights the refined material of the shed panels, showcasing the panel bearing design and the scratch-protective film that covers the galvanized steel for protection during transport and assembly.
4. Roof Assembly
Install the roof frame components and then attach the roof panels. The shed features a high-angle sloping roof design to prevent water pooling and maximize interior height. Ensure all roof sections are securely fastened to provide wind and water resistance.

This image illustrates the high-angle sloping roof design of the shed, which is engineered to avoid feeling repressive and increase storage capacity. It also emphasizes the stable structural design for wind resistance, showing rain on the roof.
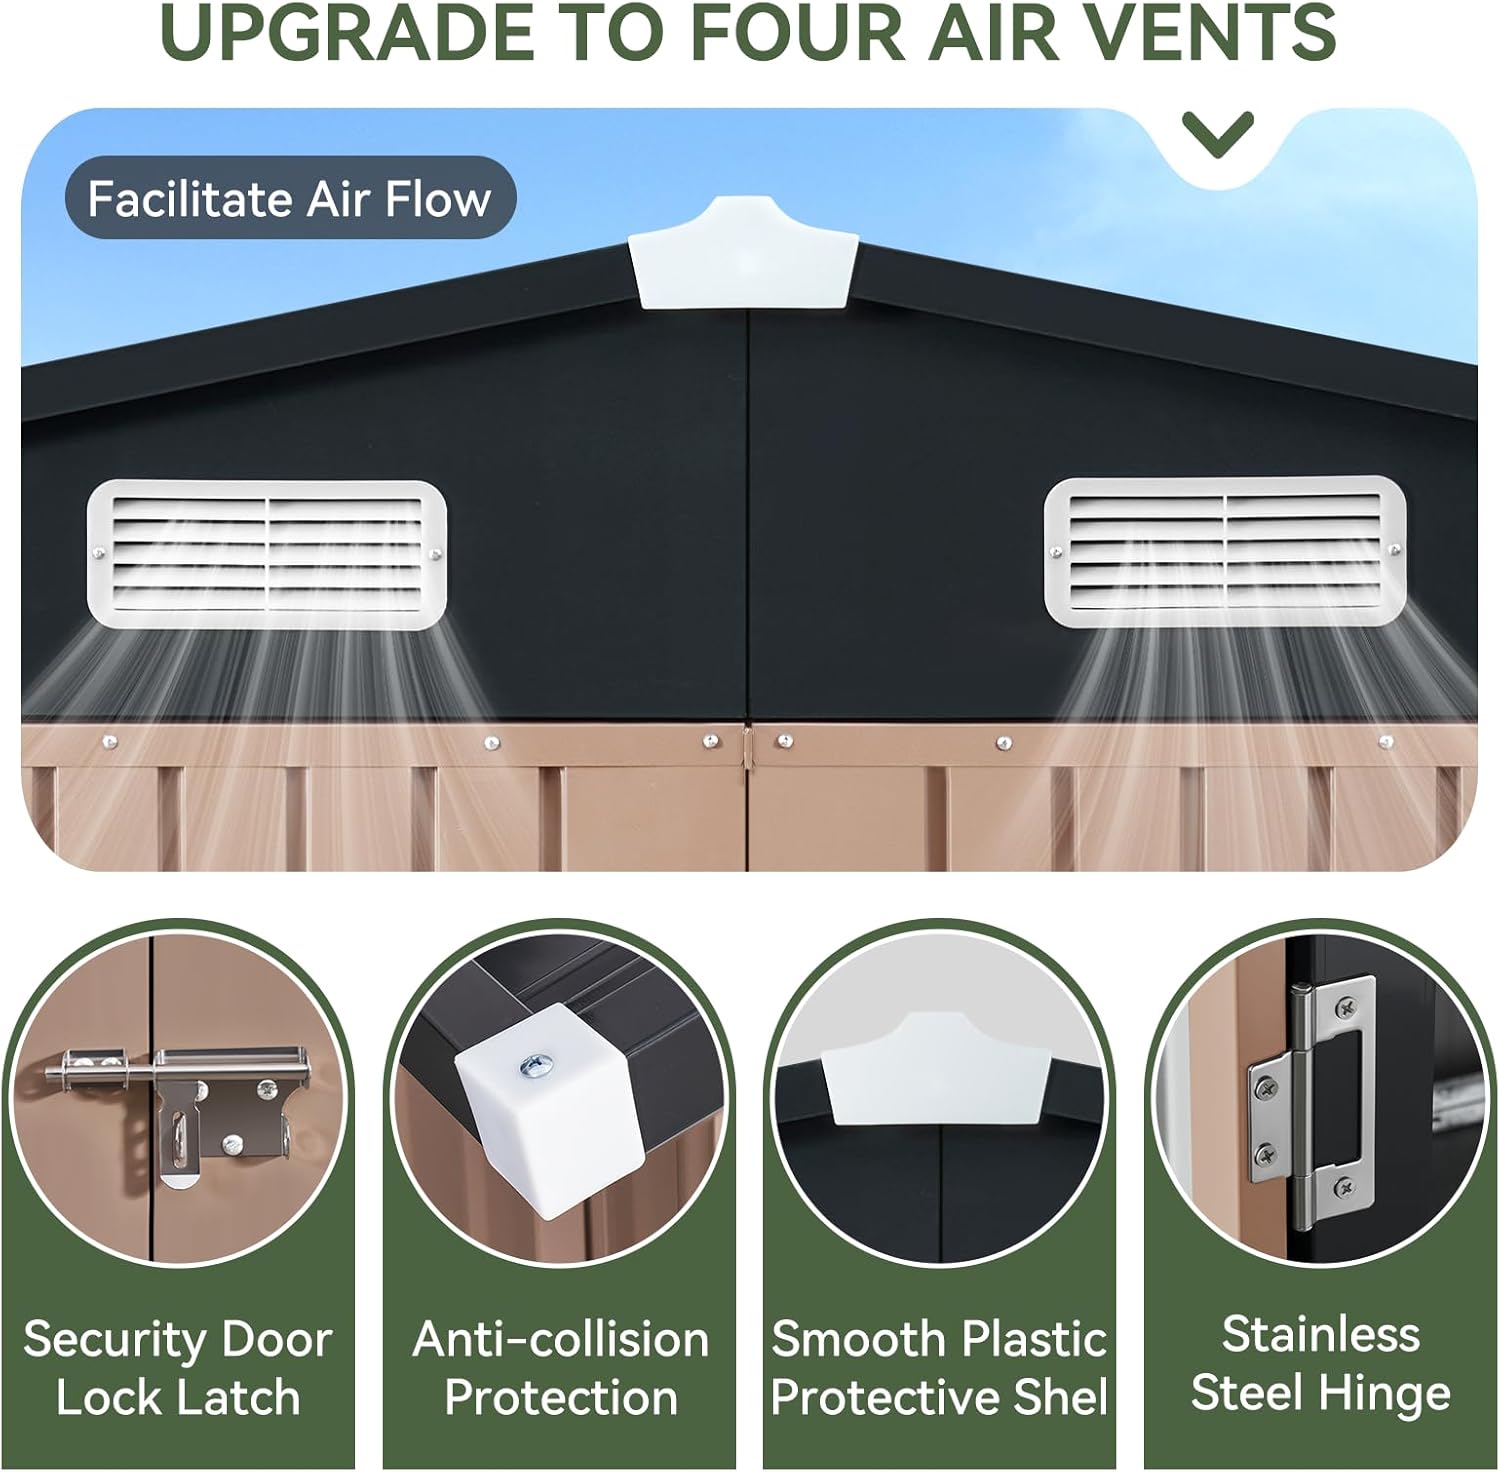
This image details the upgraded ventilation system, featuring four air vents to facilitate airflow. It also shows the security door lock latch, anti-collision protection, smooth plastic protective shell, and stainless steel hinges.
5. Door Installation
Mount the door panels using the provided stainless steel hinges. Ensure the doors swing freely and align correctly with the frame. Install the security door lock latch for secure closure.
6. Finishing Touches
Install any remaining trim pieces or protective elements. Double-check all screws and bolts for tightness. Ensure the shed is properly anchored to the ground for stability.

This image displays the fully assembled Aoxun 10 x 12FT Outdoor Storage Shed in a backyard setting, with its double doors open, revealing ample interior space for tools and equipment. It showcases the shed's brown color and sloped roof design.

This image provides an internal view of the shed's roof structure, highlighting the high-strength beams and the 3D load-bearing system. It notes that the beams are salt spray tested and rust-resistance certified, designed to prevent top panel sagging, especially under snow cover.
Operating Instructions
Accessing the Shed
The shed features a lockable double door for easy access. To open, disengage the security door lock latch and pull the doors outwards. To close, push the doors firmly shut and engage the latch. A padlock (not included) can be used for additional security.
Ventilation
The shed is equipped with integrated air vents to ensure crucial airflow. These vents help reduce moisture buildup and protect stored items. Ensure vents are not obstructed for optimal performance.
Storage Capacity
The generous interior space is designed to store a variety of outdoor essentials. For optimal organization, consider installing optional internal storage racks (not included) to maximize vertical space and keep belongings neatly arranged.
Maintenance
- Cleaning: Periodically clean the exterior of the shed with mild soap and water. Avoid abrasive cleaners or harsh chemicals that could damage the coating.
- Inspection: Regularly inspect the shed for any signs of damage, loose fasteners, or rust. Address any issues promptly to prevent further deterioration.
- Lubrication: Lubricate door hinges and the lock mechanism annually with a silicone-based spray to ensure smooth operation.
- Roof Care: Keep the roof clear of heavy snow accumulation or debris to prevent structural stress and maintain proper drainage.
- Anchoring: Periodically check the ground anchors to ensure the shed remains securely fastened, especially after strong winds.
Troubleshooting
- Issue: Water Leakage
- Possible Cause: Improperly sealed seams, misaligned panels, or obstructed roof drainage.
- Solution: Check all panel connections and roof seams for proper alignment and tightness. Ensure the sloped roof is clear of debris. Apply a silicone sealant to any gaps if necessary.
- Issue: Doors Sticking or Not Closing Properly
- Possible Cause: Uneven ground, misaligned hinges, or panel warping.
- Solution: Verify the shed is on a level surface. Adjust hinges if possible. If doors feel flimsy, consider reinforcing them with thin plywood on the interior, as suggested by some users, to improve rigidity.
- Issue: Rust Spots Appearing
- Possible Cause: Surface scratches exposing bare metal, or prolonged exposure to moisture.
- Solution: The galvanized steel is designed for rust resistance. For minor spots, clean the area and apply a rust-inhibiting primer followed by an exterior metal paint matching the shed's color. Ensure the protective film was fully removed during assembly.
Specifications
| Feature | Detail |
|---|---|
| Brand | Aoxun |
| Model Number | G37038BR07A-YF |
| Color | Brown |
| Material | Metal (Galvanized Steel) |
| Product Dimensions (D x W x H) | 140.94"D x 112.6"W x 76.38"H |
| Item Weight | Approximately 259 Pounds |
| Style | Garden Storage Shed |
| Base Material | Alloy Steel |
| Top Material Type | Metal |
| Water Resistance Level | Waterproof |
| Frame Material | Metal |
| Door Style | Single Hinged, Lockable |
| Assembly Required | Yes |
Warranty and Support
For specific warranty details, please refer to the documentation included with your purchase or contact Aoxun customer support directly. The product typically includes a 30-day easy return policy.
If you encounter any issues or require assistance with your Aoxun storage shed, please reach out to the seller, Aoxun Direct, or visit the official Aoxun store on Amazon for customer support.
Aoxun Store Link: Visit the Aoxun Store


