1. Introduction
This manual provides essential information for the safe and effective operation of your HABOTEST HT93 Smart Digital Multimeter. Please read it thoroughly before use and retain it for future reference.
1.1 What's in the Box
- 1 x HABOTEST HT93 Smart Digital Multimeter
- 1 x User Manual
- 2 x AAA 1.5V Batteries
1.2 Key Features
- AC/DC Voltage Measurement
- Non-Contact Voltage (NCV) Detection
- Live Wire Detection
- Phase Sequence Detection Test
- Resistance Measurement
- Continuity Test
- Automatic Range Selection (AUTO mode)
- Data Hold Function
- Low Battery Indication
- Automatic Power Off
- Backlight Display
- Integrated LED Flashlight
2. Product Overview
Familiarize yourself with the components of your HT93 multimeter.

Figure 2.1: Front and top view of the HT93 multimeter with key components labeled.
2.1 Components
- NCV Probe: Used for non-contact voltage detection.
- Display Screen: High-resolution LCD for displaying measurement data and function symbols.
- Function Switch Button (F/*): Cycles through measurement functions and activates backlight.
- Data Hold / Flashlight Switch Button (H/☀): Holds current reading or turns on/off the flashlight.
- Power On/Off Button (⑂): Turns the instrument on or off.
- Input Socket (COM, INPUT): Connects test leads for measurements.
- Probe Storage Slot: Located on the back for convenient storage of test probes.
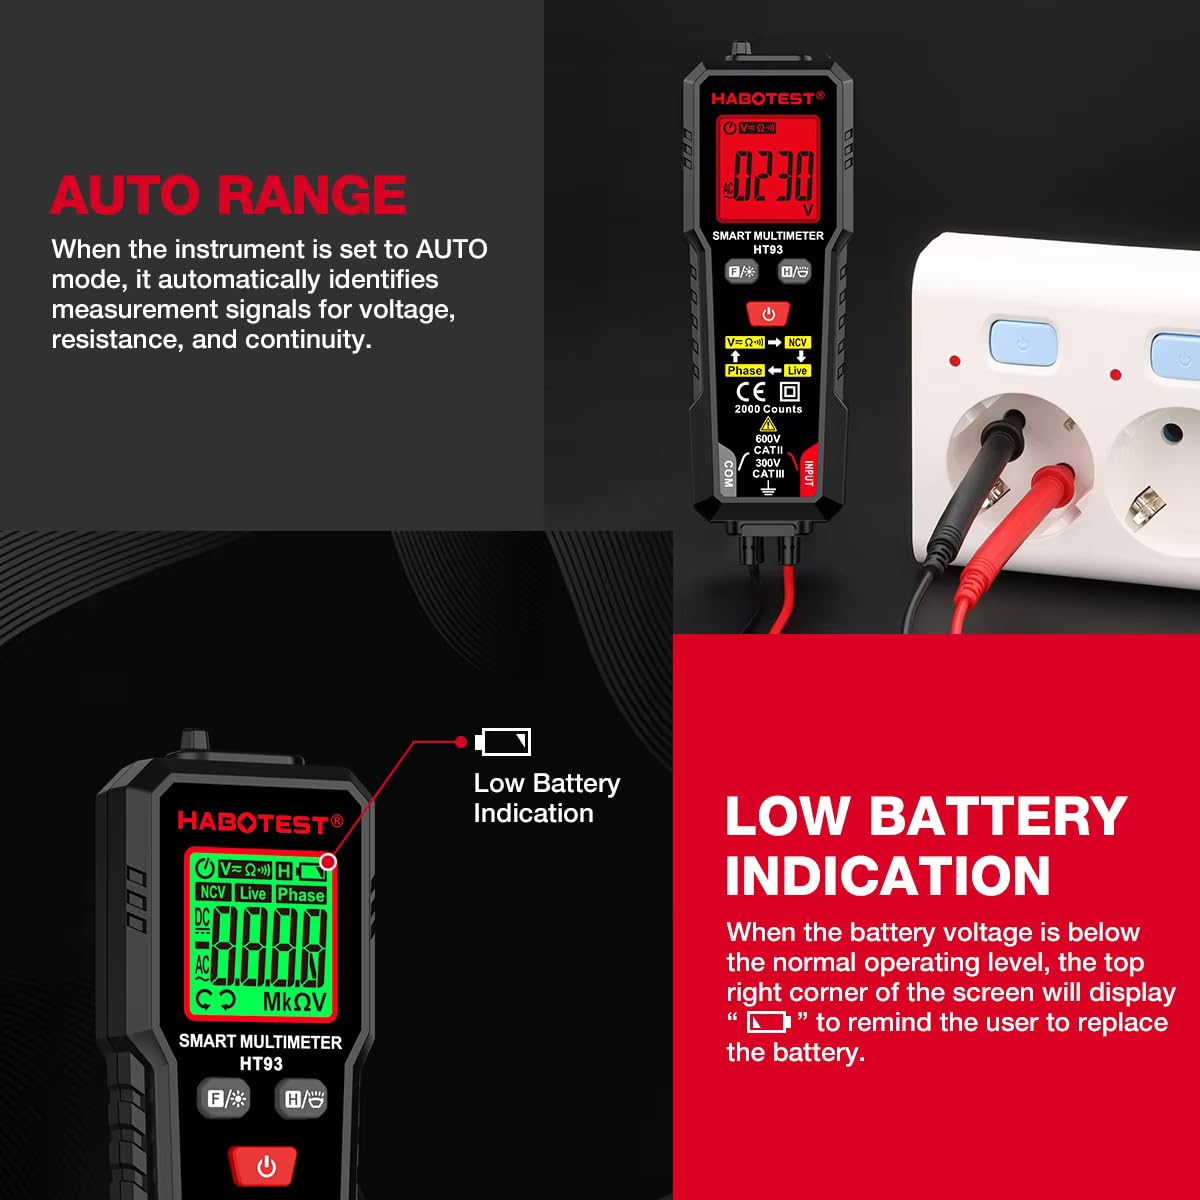
Figure 2.2: The instrument's back features a probe storage slot design for convenience.
3. Setup
3.1 Battery Installation
- Ensure the multimeter is powered off.
- Locate the battery compartment cover on the back of the device.
- Use a screwdriver to open the battery compartment.
- Insert two 1.5V AAA batteries, observing the correct polarity (+/-).
- Replace the battery compartment cover and secure it with the screw.
Note: When the battery voltage is below the normal operating level, the top right corner of the screen will display a battery symbol (⚧) to remind the user to replace the battery.

Figure 3.1: The display indicates low battery with a dedicated symbol.
4. Operating Instructions
4.1 Power On/Off
Press the ⑂ button to power the multimeter on. Press and hold the ⑂ button to power it off.
4.2 Automatic Mode (AUTO)
When the instrument is set to AUTO mode, it automatically identifies measurement signals for voltage, resistance, and continuity, simplifying operation.
Figure 4.1: The multimeter automatically identifies measurement signals in AUTO mode.
4.3 Non-Contact Voltage (NCV) Detection
In NCV mode, move the instrument's NCV sensing probe gradually closer to the area being tested. When a weak electric field signal is detected, the green backlight lights up, and the screen displays "---L". When a strong electric field signal is detected, the red backlight lights up, and it emits a quick beeping sound, while the screen displays "--H".

Figure 4.2: NCV detection in progress, indicating voltage presence without direct contact.
4.4 AC/DC Voltage Measurement
Connect the test leads to the appropriate input sockets (COM and INPUT). Select the voltage measurement mode (V∼ for AC, V— for DC) or use AUTO mode. Apply the test probes to the circuit points to measure voltage.
4.5 Resistance Measurement
Connect the test leads to the COM and INPUT sockets. Select the resistance measurement mode (Ω) or use AUTO mode. Apply the test probes across the component to measure its impedance. The multimeter can measure the impedance of various resistive components and cables.

Figure 4.3: Measuring resistance of a component using the multimeter.
4.6 Continuity Testing
For resistance measurements less than 50Ω, the instrument will produce an audible beep, and the backlight will turn green, indicating continuity. This function is often integrated with resistance measurement or AUTO mode.
Figure 4.4: Performing a continuity test on a fuse, indicated by an audible beep and green backlight.
4.7 Live Wire Detection
This function helps identify live electrical wires. Refer to the display for 'Live' indication.
4.8 Phase Sequence Detection
The multimeter can detect the phase sequence in three-phase systems. Follow on-screen prompts for correct lead placement.
4.9 Data Hold Function
Press the 'H' button to hold the current reading on the display. Press it again to release the hold.
4.10 Backlight Control
Press the 'F/*' button to toggle the display backlight on or off for improved visibility in various lighting conditions.
4.11 LED Flashlight Illumination
Press the '☀' button to activate the integrated LED flashlight. This allows for close inspection of contact points, making it convenient for probe measurements in dimly lit areas.

Figure 4.5: The LED flashlight provides illumination for inspecting contact points.
5. Maintenance
5.1 Battery Replacement
When the low battery indicator appears on the display, replace the batteries as described in Section 3.1. Always use two new 1.5V AAA batteries of the same type.
5.2 Cleaning
To clean the multimeter, wipe the casing with a damp cloth and a mild detergent. Do not use abrasive cleaners or solvents. Ensure the device is powered off and disconnected from any circuits before cleaning.
6. Troubleshooting
- No Display: Check if the batteries are correctly installed and have sufficient charge. Replace batteries if necessary. Ensure the power button is pressed.
- Inaccurate Readings: Verify that the correct measurement function is selected. Check test lead connections for proper contact. Ensure batteries are not low.
- No NCV Detection: Ensure the NCV probe is positioned correctly near the voltage source. Check for proper function selection.
- Auto Shutdown: The instrument automatically powers off within 15 minutes of no operation to conserve battery power. This is normal behavior. Press the power button to restart.
7. Technical Specifications
The following table outlines the technical parameters and specifications of the HABOTEST HT93 Smart Digital Multimeter.

Figure 7.1: Detailed technical parameters of the HT93 multimeter.
| Function | Range | Accuracy |
|---|---|---|
| DC Voltage | 2.000V/20.00V/200.0V/600V | ±(0.5%+3) |
| AC Voltage | 2.000V/20.00V/200.0V/600V | ±(1.0%+3) |
| Resistance | 2000Ω/20.00kΩ/200.0kΩ/2.000MΩ/20.00MΩ | ±(1.5%+3) |
| Counts | 2000 | |
| Display | HTN | |
| Auto/Manual Range | Auto | |
| Live Test | Yes | |
| NCV | Yes | |
| Phase Test | Yes | |
| Continuity | Yes | |
| Data Hold | Yes | |
| True RMS | Yes | |
| Bandwidth | 40~1KHz | |
| Low Battery Indication | Yes | |
| Auto Power Off | Yes (15 minutes) | |
| Backlight | Yes | |
| Work Light | Yes (LED Flashlight) | |
| Power Supply | 2x1.5V AAA Batteries | |
| Product Weight | Approx. 66.9g (70g with packaging) | |
| Product Size | 136.2 x 44.5 x 32mm | |
| Safety Rating | IEC 61010-1, EN61010-2-030, EN61010-2-033 CAT III 600V | |
8. Safety Information
To ensure safe operation, always adhere to the following safety precautions:
- Do not exceed the maximum input values specified for each function.
- Never use the multimeter if it appears damaged or if the test leads are compromised.
- Exercise extreme caution when working with voltages above 30V AC RMS, 42V peak, or 60V DC. These voltages pose a shock hazard.
- Always disconnect the test leads from the circuit before changing functions.
- Ensure the battery compartment is securely closed before operation.
- Do not operate the multimeter in explosive gas, vapor, or dusty environments.
- Adhere to the safety standards IEC 61010-1 and CAT III 600V.
9. Warranty and Support
Your HABOTEST HT93 Smart Digital Multimeter is covered by a standard manufacturer's warranty against defects in materials and workmanship. For specific warranty terms, duration, and to obtain technical support or service, please refer to the warranty card included with your product or contact your local HABOTEST distributor or customer service.
Manufacturer: Dongguan Habotest Instrument Company Limited
Importer/Packer (India): MDS Automech Solutions, Q-106, Phase 3, Shivalik Nagar, BHEL, Haridwar, Uttarakhand-249403
Contact: +91-9870694636, mohit@mdsautomech.in


