1. Introduction
Thank you for choosing the AODSK 88-Key Weighted Hammer Action Digital Piano and Storage Bench. This manual provides essential information for the safe and efficient use of your new instrument. Please read it thoroughly before assembly and operation, and retain it for future reference.

Image 1.1: The AODSK 88-Key Digital Piano and accompanying white storage bench.
2. Safety Instructions
- Power Supply: Use only the specified power adapter. Ensure the voltage matches the requirements of your region.
- Water and Moisture: Do not expose the instrument to rain, moisture, or excessive humidity. Avoid placing objects filled with liquids on or near the piano.
- Ventilation: Ensure proper ventilation. Do not block ventilation openings.
- Heat Sources: Keep the instrument away from heat sources such as radiators, heat registers, stoves, or other heat-producing appliances.
- Cleaning: Clean only with a dry cloth. Do not use liquid cleaners or aerosols.
- Children: Supervise children when they are near the instrument. Small parts could be a choking hazard.
- Moving the Instrument: When moving the piano, ensure it is unplugged and handled carefully to prevent damage or injury.
3. Package Contents
Please verify that all items listed below are included in your package:
- AODSK 88-Key Digital Piano Unit
- White Storage Bench
- Triple Pedal Unit
- Furniture Stand Components
- Sliding Key Cover
- Power Adapter
- Headphones
- Dust Cover
- Assembly Hardware and Tools
- User Manual (this document)
- Online Lesson Access Information
4. Setup
4.1. Digital Piano Assembly
Follow these steps to assemble the digital piano and its stand:
- Unpack all components and lay them out on a soft, clean surface to prevent scratches.
- Attach the side panels of the furniture stand to the main piano body using the provided screws and tools. Ensure all connections are secure.
- Install the triple pedal unit into its designated slot on the stand. Connect the pedal cable to the corresponding port on the piano.
- Carefully place the assembled piano unit in its desired location.
- Slide the key cover into its tracks above the keyboard.
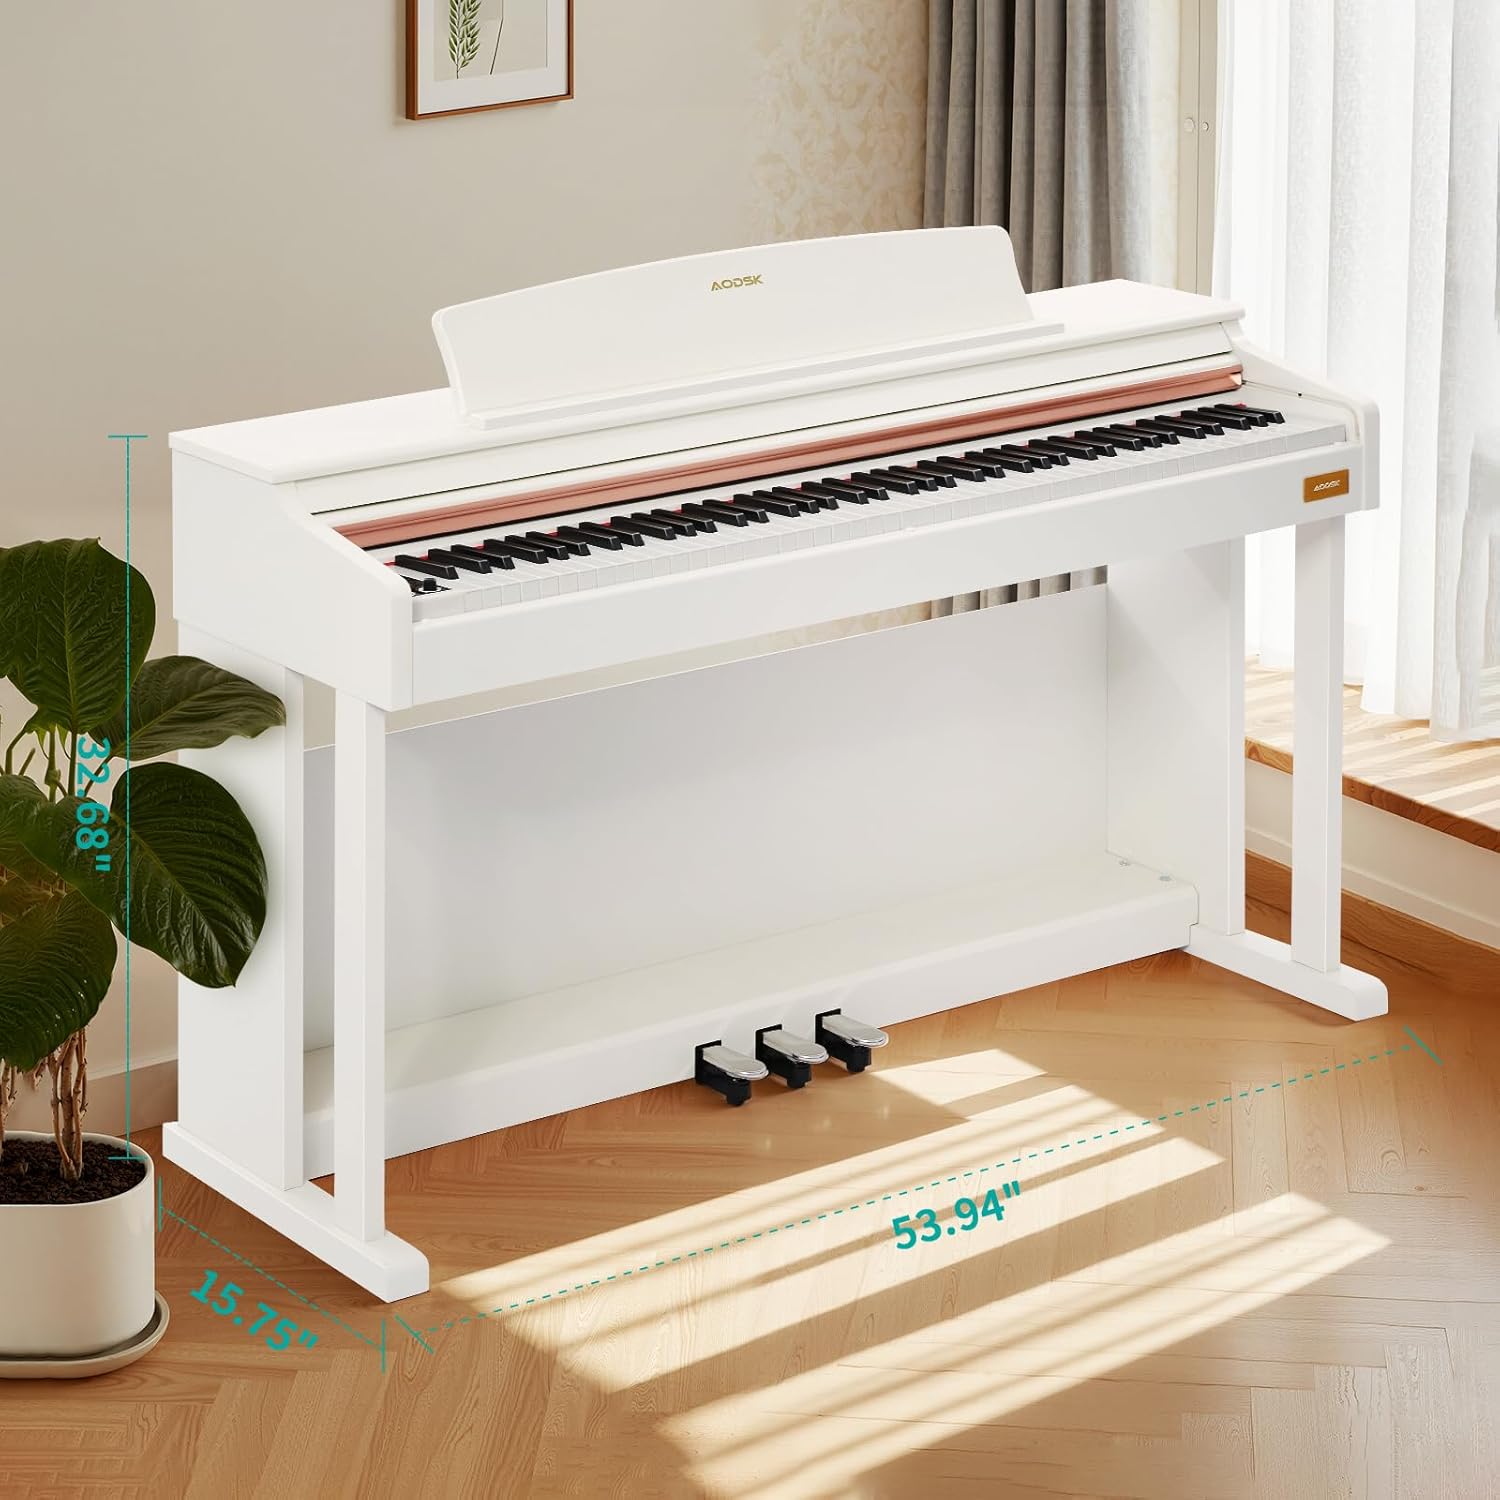
Image 4.1: Digital piano dimensions for placement planning. (Approx. 53.94" W x 15.75" D x 32.68" H)
4.2. Storage Bench Assembly
The storage bench is designed for quick, tool-free assembly:
- Remove the bench legs and hardware from the storage compartment under the seat.
- Screw each leg firmly into the designated corner mounts on the underside of the bench seat. No tools are typically required for this step.
- Ensure all legs are stable and the bench is level before use.

Image 4.2: The storage bench with its lid open, revealing the internal compartment.
5. Components Overview
5.1. Control Panel
The control panel provides access to various functions and settings of the digital piano.

Image 5.1: Close-up view of the digital piano's control panel, showing buttons for tone, rhythm, demo, volume, and other features.
- Power Button: Turns the piano on or off.
- Volume Knobs: Adjust the master volume.
- Tone Button: Selects from 680 available tones.
- Rhythm Button: Selects from 600 available rhythms.
- Demo Button: Plays demonstration songs (80 available).
- Split Button: Activates dual keyboard split tone function.
- MP3 Play/Pause: Controls MP3 playback via USB.
- Record/Play: Initiates and plays back two-track recordings.
- Numerical Select: Used to input specific tone, rhythm, or demo numbers.
- USB Socket: For MP3 playback and potentially other data transfer.
5.2. Triple Pedal System
The piano features a standard triple pedal system for expressive playing.
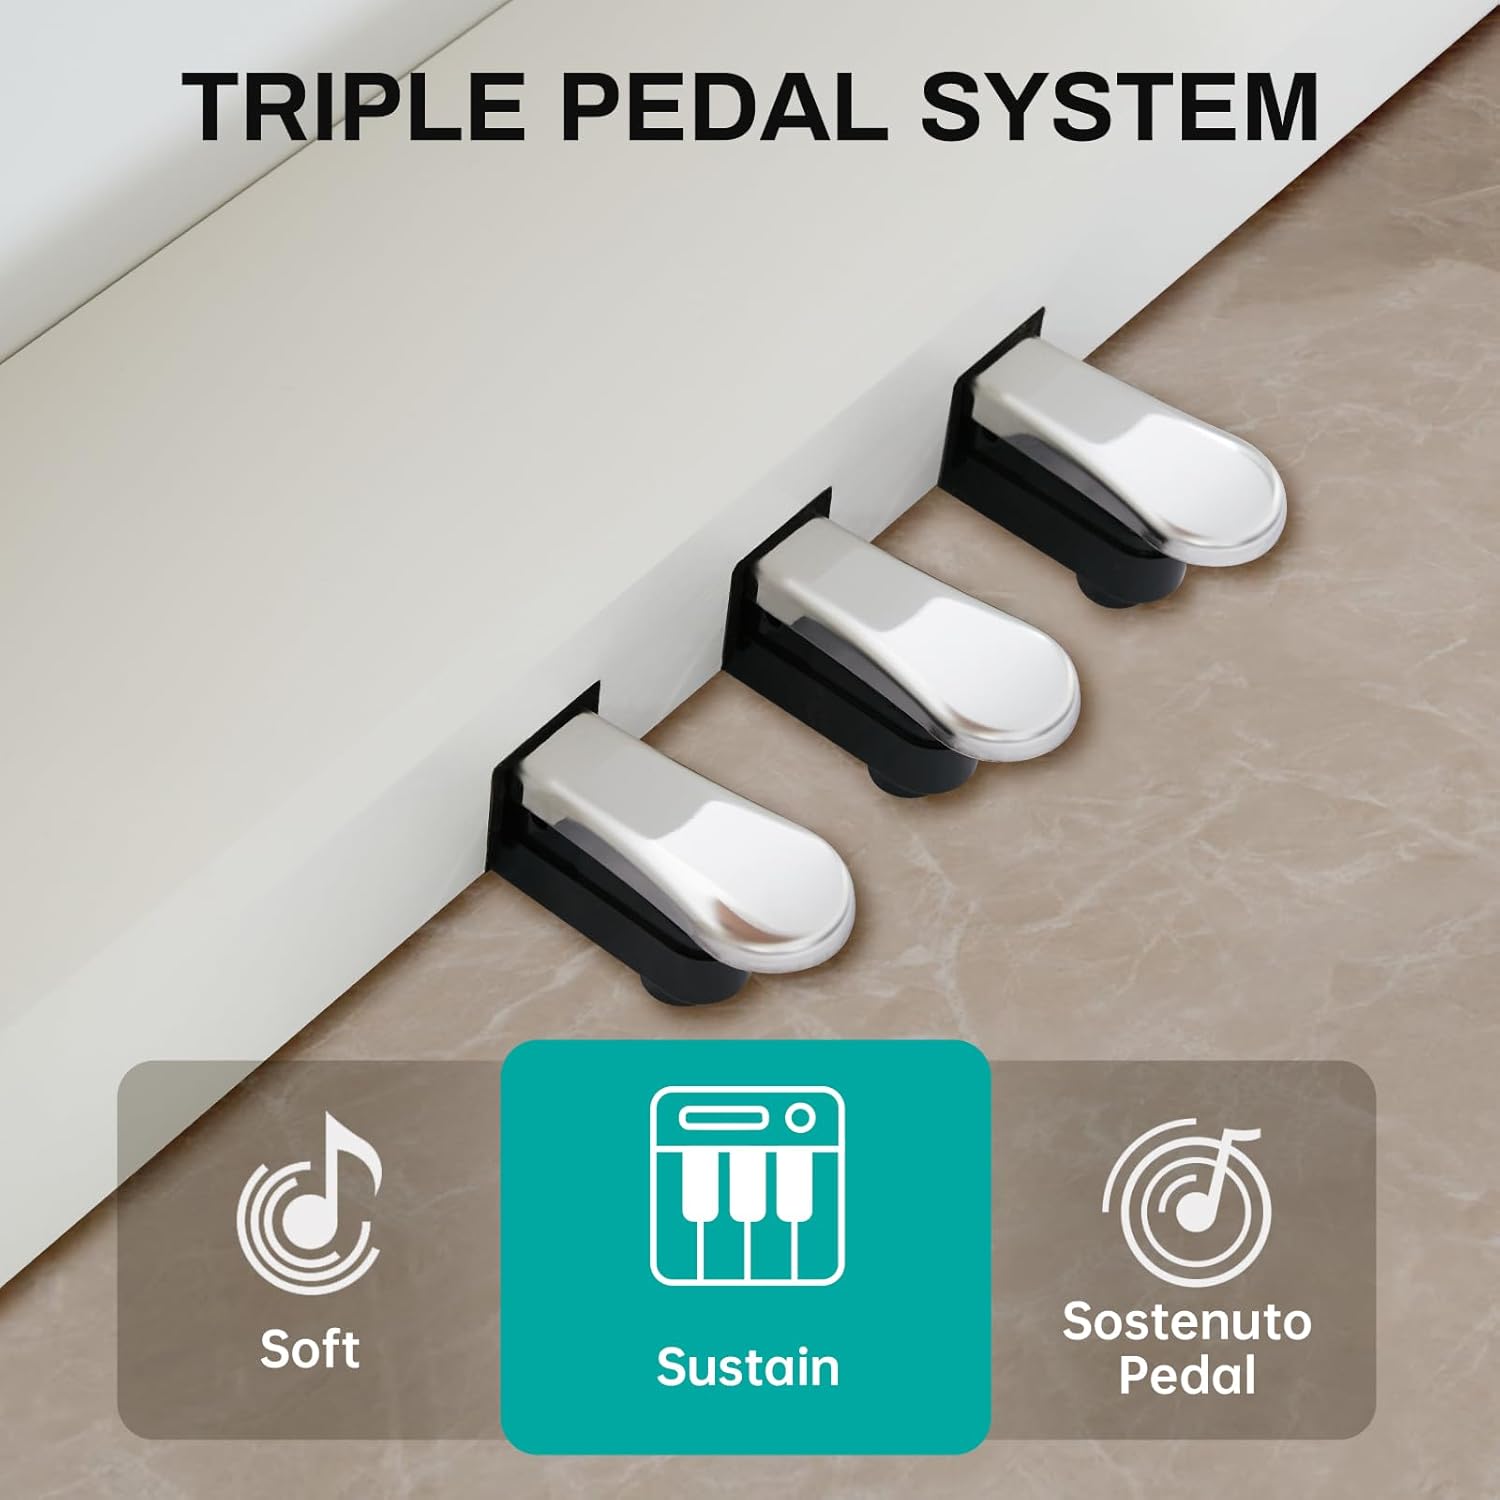
Image 5.2: Close-up of the three pedals: Soft, Sustain, and Sostenuto.
- Soft Pedal (Left): Reduces the volume and changes the timbre of the notes.
- Sustain Pedal (Middle): Sustains the notes, allowing them to ring out after the keys are released.
- Sostenuto Pedal (Right): Sustains only the notes that are held down at the moment the pedal is pressed, while subsequent notes remain unaffected.
5.3. 88-Key Weighted Hammer Action Keyboard
The 88-key keyboard is designed to replicate the feel of an acoustic grand piano, providing a realistic playing experience.
- Weighted Hammer Action: Provides a heavier touch in the lower register and a lighter touch in the higher register, similar to an acoustic piano.
- Touch Sensitivity: The piano responds to the force with which keys are played, allowing for dynamic expression.
6. Operating Instructions
6.1. Power On/Off
Press the Power Button on the control panel to turn the piano on. Press it again to turn the piano off.
6.2. Volume Control
Use the Volume Knobs on the control panel to adjust the overall output volume of the piano.
6.3. Tone Selection
Press the Tone Button, then use the numerical keys or navigation buttons to select from the 680 available instrument tones.
6.4. Rhythm Selection
Press the Rhythm Button, then use the numerical keys or navigation buttons to select from the 600 available rhythm patterns.
6.5. Demonstration Songs
Press the Demo Button to cycle through or select one of the 80 built-in demonstration songs.
6.6. Dual Keyboard Split Tone
Activate the Split Button to divide the keyboard into two sections, allowing two different tones to be played simultaneously or for two players to use the keyboard independently.
6.7. MP3 Playback
Insert a USB drive with MP3 files into the USB Socket. Use the MP3 Play/Pause and navigation buttons to control playback.
6.8. Two-Track Recording
Press the Record Button to start recording your performance. Press it again to stop. Use the Play Button to listen to your recorded tracks.
6.9. Pedal Functions
Utilize the Soft, Sustain, and Sostenuto Pedals as described in Section 5.2 to add expression to your playing.
7. Maintenance
Proper maintenance ensures the longevity and performance of your digital piano.
- Cleaning: Wipe the piano and bench surfaces with a soft, dry cloth. For stubborn dirt, slightly dampen the cloth with water and mild soap, then wipe dry immediately. Avoid abrasive cleaners or solvents.
- Dust Cover: Use the provided dust cover when the piano is not in use to protect it from dust and debris.
- Key Care: Keep the keys clean. If they become dirty, wipe them gently with a soft, slightly damp cloth.
- Environmental Conditions: Store the piano in a stable environment, away from direct sunlight, extreme temperatures, and high humidity, which can affect electronic components and wood finishes.
8. Troubleshooting
If you encounter any issues, please refer to the table below for common problems and solutions.
| Problem | Possible Cause | Solution |
|---|---|---|
| No sound | Power off; Volume too low; Headphones connected; Pedal issue. | Ensure power is on. Increase volume. Disconnect headphones. Check pedal connections. |
| Keys not responding | Instrument off; Specific setting activated (e.g., local control off). | Turn piano on. Check manual for advanced settings like local control. |
| Pedals not working | Pedal cable loose; Pedal unit faulty. | Ensure pedal cable is securely connected to the piano. |
| MP3 playback issues | USB drive not formatted correctly; Incompatible file type; USB drive loose. | Ensure USB drive is FAT32 formatted. Use MP3 files. Reinsert USB drive. |
| Distorted sound | Volume too high; Speaker interference. | Reduce volume. Ensure no objects are blocking speakers. |
If the problem persists after attempting these solutions, please contact customer support.
9. Specifications
- Keyboard: 88-Key Weighted Hammer Action
- Polyphony: 128-note
- Tones: 680 built-in tones
- Rhythms: 600 built-in rhythms
- Demonstration Songs: 80
- Pedals: Triple Pedal System (Soft, Sustain, Sostenuto)
- Functions: Dual Keyboard Split, MP3 Playback, Two-Track Recording
- Bench Dimensions: 29-inch width, 2.68-inch deep storage bin
- Bench Weight Capacity: 300 pounds
- Connectivity: USB Socket
10. Warranty and Support
This AODSK product is covered by a standard manufacturer's warranty against defects in materials and workmanship. Please refer to the warranty card included in your package for specific terms and conditions, including the warranty period and how to make a claim.
For technical support, troubleshooting assistance, or warranty inquiries, please contact AODSK customer service through the retailer where you purchased the product or visit the official AODSK website for contact information.


