1. Introduction
Thank you for choosing the Rockwood MIG 160 Multi-Process Welder. This machine is designed for versatility, offering Flux-Cored, MIG (with shielding gas), and Stick welding capabilities. It features dual voltage input (120V/240V) and user-friendly digital controls, making it suitable for various welding tasks. This manual provides essential information for safe and effective operation, setup, maintenance, and troubleshooting.
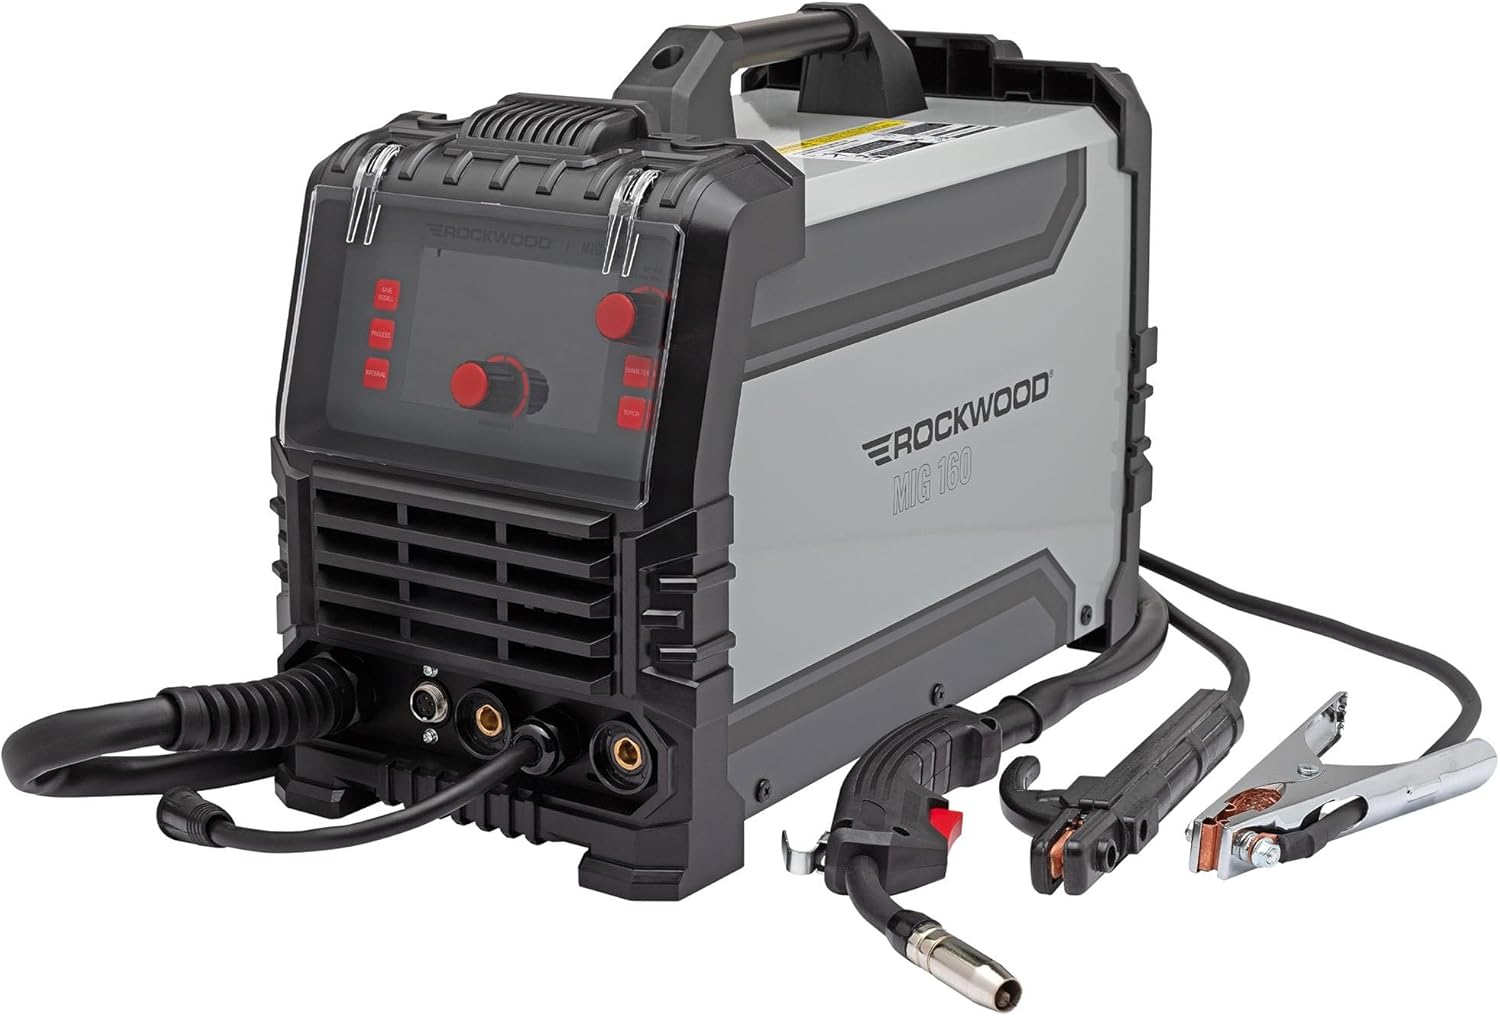
Figure 1.1: The Rockwood MIG 160 Multi-Process Welder shown with its included MIG gun, ground clamp, and electrode holder.
2. Safety Information
WARNING: Welding can be dangerous. Always follow safety precautions to prevent serious injury or death.
- Electric Shock: Can kill. Do not touch live electrical parts. Wear dry welding gloves and protective clothing. Ensure the work area is dry.
- Fumes and Gases: Can be hazardous to your health. Keep your head out of the fumes. Use adequate ventilation or exhaust at the arc.
- Arc Rays: Can burn eyes and skin. Wear a welding helmet with a proper shade filter. Wear protective clothing to cover exposed skin.
- Fire and Explosion: Welding sparks can cause fire or explosion. Keep flammable materials away from the welding area. Have a fire extinguisher readily available.
- Hot Parts: Can cause severe burns. Allow equipment to cool before touching.
- Noise: Excessive noise can damage hearing. Wear ear protection.
- Read the Manual: Always read and understand the entire instruction manual before operating the welder.
3. Product Overview
3.1 Key Features
- Multi-Process Versatility: Capable of flux-cored welding, solid wire MIG welding with gas, and stick welding.
- Lift-Start TIG Ready: Compatible with an optionally available valved TIG welding torch.
- Dual Voltage Capability: Operates efficiently on both 120V household outlets and 240V dedicated welder outlets.
- User-Friendly Digital Controls: Simplifies setting adjustments for quick learning and efficient operation.
- Compact & Lightweight Inverter Design: Inverter technology ensures portability.
3.2 Included Components
- (1) Rockwood MIG 160 Welder
- (1) MIG Gun with 5' (1.5m) Cable Assembly and 0.030" Tip Installed
- (1) Ground Clamp with 4' (1.2m) Cable
- (1) Electrode Holder with 6' (1.8m) Cable
- (1) Adapter Cord, 8" (0.2m) (for 120V connection)
- (1) Shielding Gas Hose, 4.6' (1.4m)

Figure 3.1: Another view of the Rockwood MIG 160 Welder, highlighting its compact design.
4. Setup
4.1 Power Connection
The Rockwood MIG 160 is a dual voltage machine. It can operate on either 120V or 240V AC power. Use the provided adapter cord for 120V household outlets. For full power, connect directly to a dedicated 240V welder outlet.
4.2 Connecting Welding Accessories
- MIG Gun: Connect the MIG gun cable assembly to the appropriate receptacle on the front panel. Ensure it is securely fastened.
- Ground Clamp: Attach the ground clamp cable to the negative (-) terminal on the front panel. Secure the clamp to the workpiece or welding table to ensure a good electrical connection.
- Electrode Holder (for Stick Welding): Attach the electrode holder cable to the positive (+) terminal on the front panel.
4.3 Wire Spool Installation (MIG/Flux-Cored)
Open the side panel of the welder to access the wire feed mechanism. Place the wire spool onto the spindle, ensuring it rotates freely. Thread the welding wire through the guide and into the drive rollers. Adjust the tension on the drive rollers to prevent slipping or crushing the wire. Ensure the correct wire diameter (0.023" - 0.035") is used.
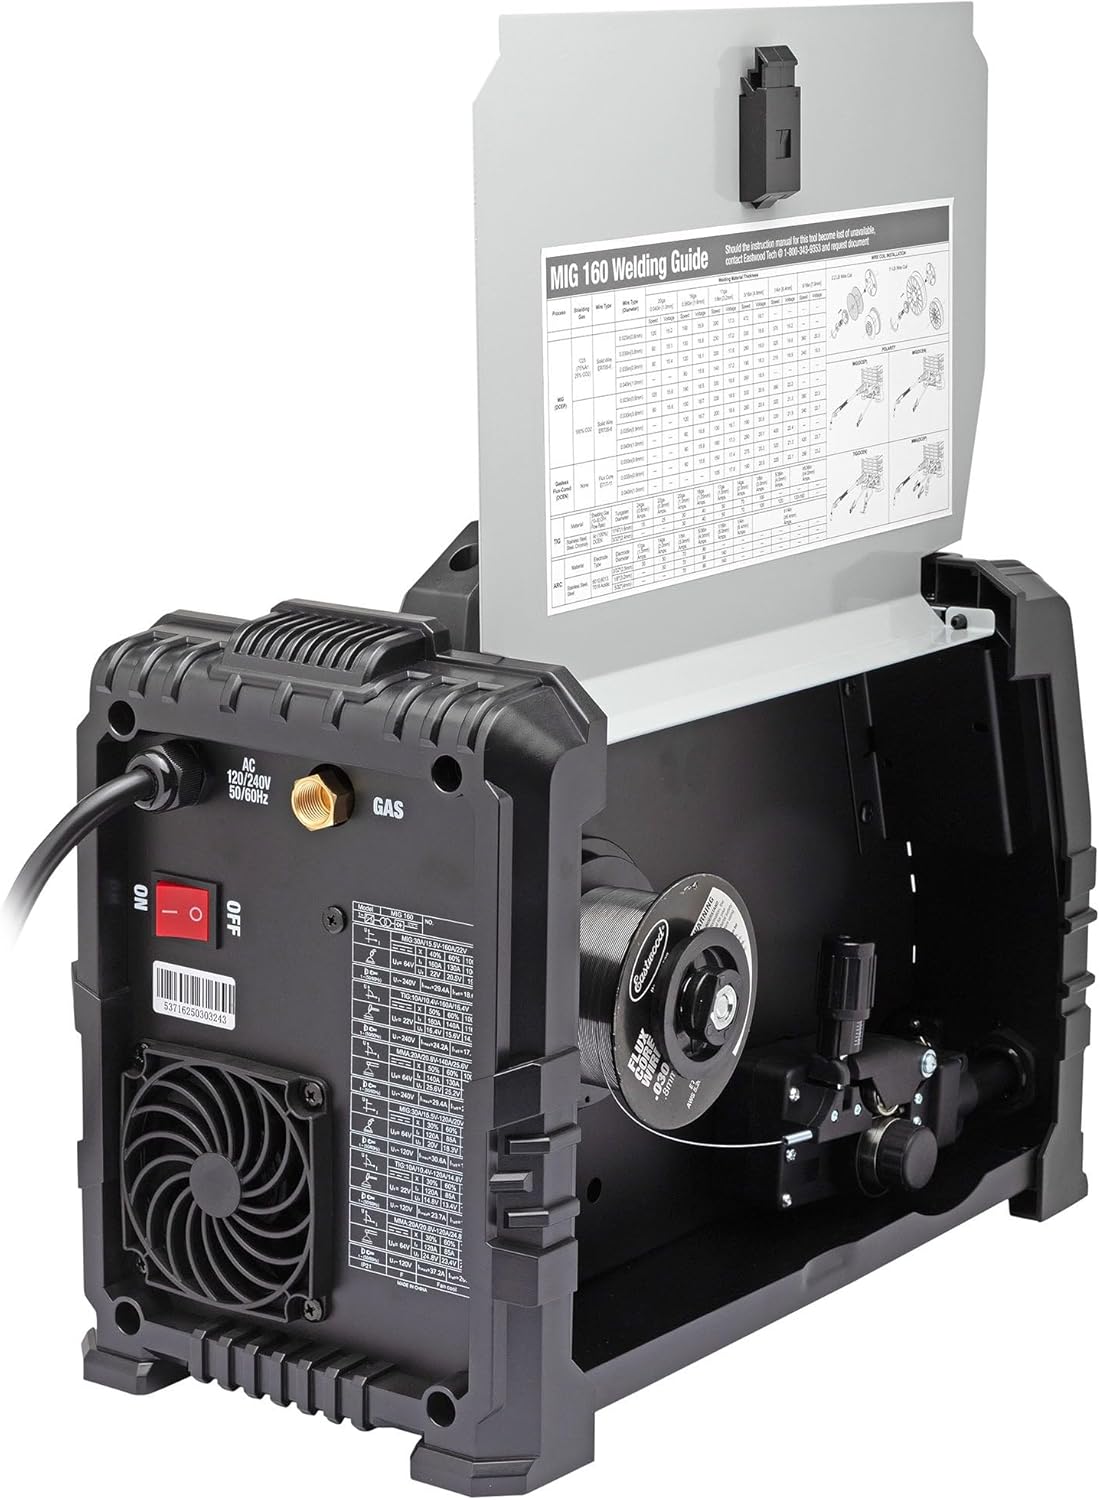
Figure 4.1: Internal view of the welder, showing the wire spool compartment and the integrated welding guide.
4.4 Shielding Gas Connection (for MIG Welding)
If performing MIG welding with solid wire, connect the provided shielding gas hose to the gas inlet on the rear of the welder and to your gas cylinder regulator. Ensure all connections are tight to prevent gas leaks.

Figure 4.2: Rear view of the welder, indicating the power switch and gas inlet connection point.
5. Operating
5.1 Digital Controls Overview
The Rockwood MIG 160 features a digital control panel for easy adjustment of welding parameters. The display shows current settings, and dedicated buttons allow selection of process, material, and wire diameter.
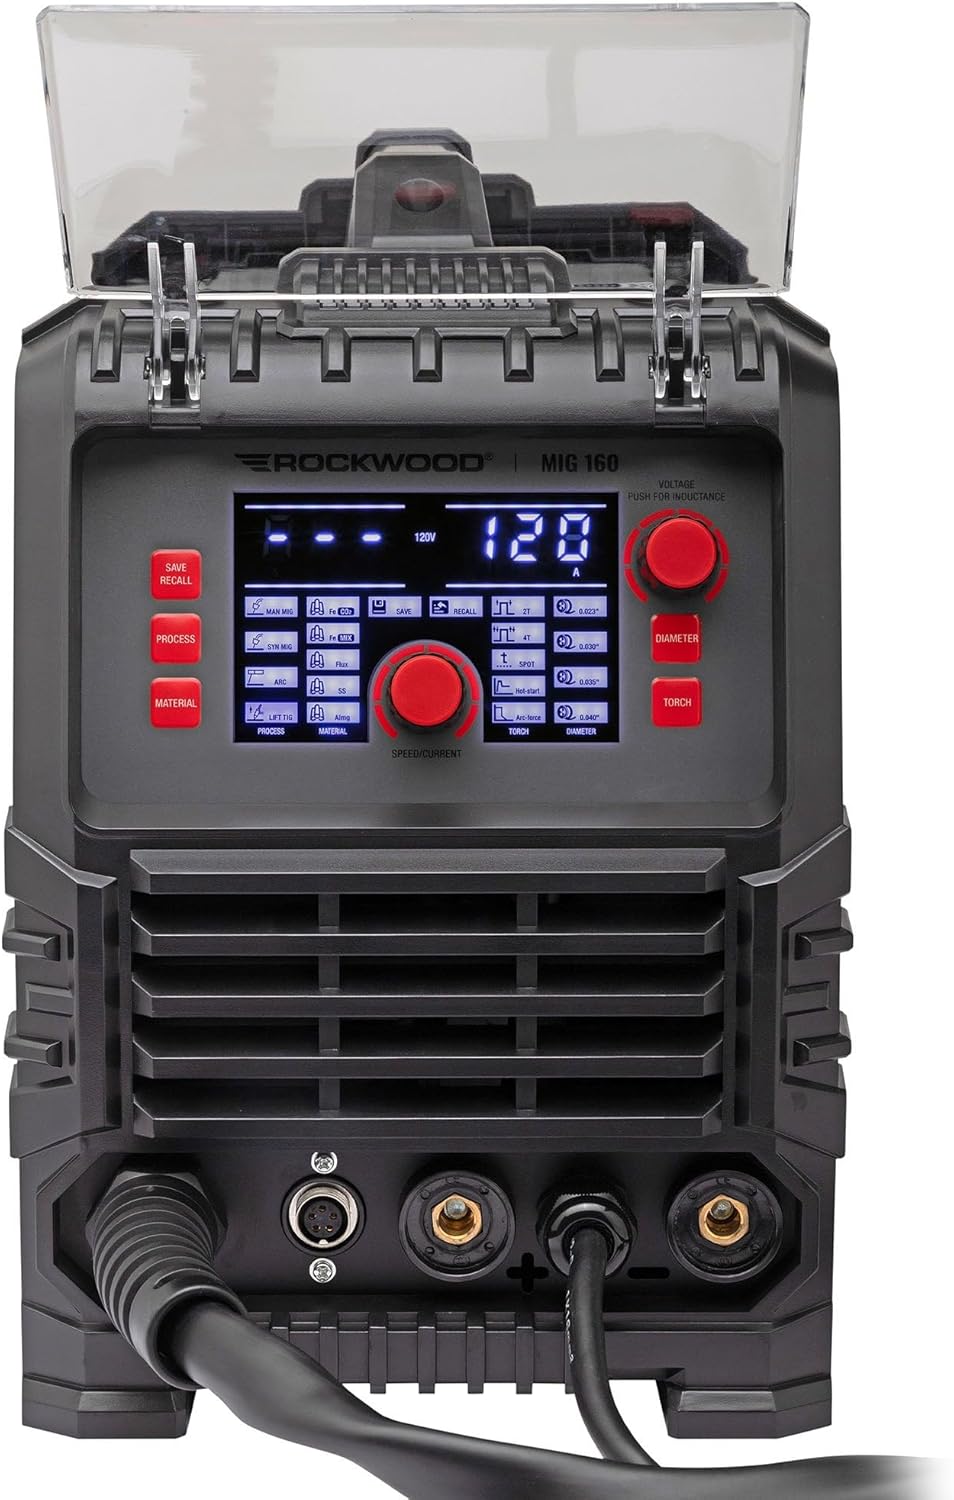
Figure 5.1: Detailed view of the digital control panel, showing various settings and adjustment knobs.
5.2 Selecting Welding Process
Use the 'PROCESS' button on the control panel to cycle through the available welding modes: MIG (Gas), Flux-Cored (No Gas), and Stick. If an optional TIG torch is connected, TIG (Lift Start) will also be available.
5.3 Adjusting Parameters
- Voltage/Current: Use the main adjustment knob to set the desired voltage (for MIG/Flux-Cored) or amperage (for Stick/TIG).
- Wire Feed Speed: For MIG/Flux-Cored, the wire feed speed is typically synchronized with the voltage setting. Fine-tune as needed for optimal arc stability.
- Material/Diameter: Select the appropriate material type and wire/electrode diameter using the dedicated buttons to optimize machine settings.
5.4 Basic Welding Procedure
- Ensure all safety gear is worn (helmet, gloves, protective clothing).
- Prepare the workpiece: Clean off any rust, paint, or contaminants.
- Connect the ground clamp securely to the workpiece.
- Select the desired welding process and adjust parameters.
- Position the torch/electrode.
- Initiate the arc and begin welding, maintaining a consistent travel speed and arc length.
- Allow the weld and workpiece to cool before handling.

Figure 5.2: The Rockwood MIG 160 Welder in use, demonstrating a typical welding setup.
6. Maintenance
Regular maintenance ensures the longevity and optimal performance of your Rockwood MIG 160 welder.
- Cleaning: Periodically clean the internal components with compressed air to remove dust and metal particles. Ensure the power is disconnected before cleaning.
- MIG Gun Maintenance: Regularly inspect and clean the contact tip, nozzle, and diffuser. Replace worn contact tips to ensure good electrical conductivity and consistent wire feeding.
- Wire Feed Rollers: Check the wire feed rollers for wear and ensure they are clean. Replace if grooves are worn or damaged.
- Cables and Connections: Inspect all cables (power, ground, torch) for damage, cuts, or frayed insulation. Ensure all connections are tight and free of corrosion.
7. Troubleshooting
This section provides solutions to common issues you might encounter.
| Problem | Possible Cause | Solution |
|---|---|---|
| No power to the welder | Power switch off, circuit breaker tripped, loose power cord | Turn on power switch, reset breaker, check power cord connection |
| No arc when welding | Poor ground connection, wrong process selected, contact tip clogged/worn, wire feed issue | Ensure good ground, select correct process, clean/replace contact tip, check wire feed |
| Wire not feeding | Wire tangled, drive rollers loose/dirty, wrong size rollers, clogged liner | Untangle wire, adjust/clean rollers, ensure correct roller size, clean/replace liner |
| Poor weld quality | Incorrect settings (voltage/WFS), improper technique, contaminated material, insufficient gas (MIG) | Adjust settings, improve technique, clean workpiece, check gas flow/cylinder |
8. Specifications
Detailed technical specifications for the Rockwood MIG 160 Welder.
| Parameter | Value |
|---|---|
| Input Voltage | 120 VAC / 240 VAC, 50/60Hz, 1 Ph |
| No Load Voltage MIG/Stick | 64V |
| No Load Voltage TIG | 22V |
| Output Current Adjustment MIG (240V) | 30A (15.5V) - 160A (22V) |
| Output Current Adjustment MIG (120V) | 30A (15.5V) - 120A (20V) |
| Rated Duty Cycle MIG (240V) | 40% @ 160A, 60% @ 130A, 100% @ 100A |
| Rated Duty Cycle MIG (120V) | 30% @ 120A, 60% @ 85A, 100% @ 66A |
| Wire Feed Speed MIG | 80 - 472 in/min |
| Welding Wire Diameter | 0.023 - 0.035 inches |
| Overall Dimensions | 17.44" x 8.66" x 12.83" (443 x 220 x 326mm) |
| Weight | 21.61 lbs. (9.8kg) |

Figure 8.1: Size comparison of the Rockwood MIG 160 Welder relative to an average person, indicating its compact footprint.
9. Warranty and Support
For warranty information, technical support, or service inquiries regarding your Rockwood MIG 160 Welder, please refer to the warranty card included with your product or visit the official Rockwood website. You may also contact the seller directly for assistance.
No official product videos from the seller were available for embedding based on the provided data.


