
1. Product Overview
The ORICO MiniTower M435 is a versatile 2-bay RAID enclosure designed for expanding storage and connectivity, particularly compatible with Mac mini M4 Max. It supports a hybrid storage solution, combining high-speed NVMe SSDs with high-capacity SATA HDDs/SSDs, and offers an integrated expansion hub.

Image: The ORICO MiniTower M435 seamlessly integrated with a Mac mini setup, showcasing its compact design and connectivity.
Key Features:
- Hybrid Storage: Supports two SATA HDDs/SSDs (up to 24TB each) and one M.2 NVMe SSD (up to 8TB), totaling up to 56TB.
- High-Speed Transmission: USB 3.2 Gen 2 protocol enables 10Gbps data transfer for both M.2 NVMe and NGFF protocols.
- Expansion Hub: Includes 1x USB-A (10Gbps), 3x USB 2.0, and TF/SD 3.0 card slots.
- RAID Modes: Configurable in RAID 0, RAID 1, single-disk, or JBOD modes for data management and security.
- Efficient Cooling: Features an anti-fingerprint aluminum shell and a low-noise fan with dual cooling vents.
2. Package Contents
Please verify that all items are present in the package:
- ORICO MiniTower Enclosure
- Packaging box
- Screwdriver
- SSD Heatsink, Thermal Silicone Pad
- Screw x 2
- User Manual
- 15cm 10Gbps USBC to USBC Cable
- 1m 10Gbps USBC to USBC/A Cable
- 12V 5A Power Adapter
3. Setup and Installation
3.1. Hard Drive (HDD/SSD) Installation
- Gently pull up the blue clasps on both sides of the drive bracket.
- Insert your 3.5-inch or 2.5-inch SATA HDD/SSD into the bracket. Ensure the drive is seated correctly.
- Snap the blue clasps back into place to secure the drive. For 2.5-inch drives, use the provided screws to secure it to the bracket.
- Slide the loaded bracket into an available bay in the MiniTower enclosure until it clicks securely.

Image: A 3.5-inch hard disk drive being inserted into one of the bays of the ORICO MiniTower M435.
3.2. NVMe SSD Installation
- Locate the M.2 NVMe SSD slot on the rear of the MiniTower.
- Insert your M.2 NVMe SSD (2230/2242/2260/2280 compatible) into the slot until it clicks.
- Secure the NVMe SSD with the provided rubber plug or screw, ensuring it is firmly in place.
- Apply the SSD heatsink and thermal silicone pad for optimal heat dissipation.

Image: An M.2 NVMe SSD being installed into the dedicated slot on the ORICO MiniTower M435, showing compatibility with various lengths.
3.3. Initial Connection
- Connect the 12V 5A Power Adapter to the DC IN port on the rear of the MiniTower.
- Connect the MiniTower to your computer (e.g., Mac mini) using the provided USB-C to USB-C or USB-C to USB-A cable. Use the PC IN port on the MiniTower.
- Press the Power Button on the front of the MiniTower to turn it on.
Video: A short demonstration of unboxing and installing a hard drive into the ORICO MiniTower M435.
4. Operating Instructions
4.1. RAID Mode Configuration
The MiniTower supports RAID 0, RAID 1, Single-disk, and JBOD modes. The RAID mode controls are located on the rear of the unit. Note: The RAID mode controls on this unit operate in reverse order from bottom to top. Always verify settings before finalizing to ensure proper configuration and safeguard data integrity.
- RAID 0 (Striping): Combines two drives into a single logical unit for increased performance. No data redundancy.
- RAID 1 (Mirroring): Duplicates data across two drives for data redundancy. Provides protection against single drive failure.
- Single-disk (PM): Each drive operates independently.
- JBOD (Just a Bunch Of Disks): Combines multiple drives into a single large logical unit without striping or mirroring.
To change RAID modes, ensure the device is powered off. Adjust the RAID switches as per the desired configuration, then power on the device. Refer to the diagram below for switch positions.

Image: Visual representation of the RAID mode switches and their corresponding settings (PM, RAID 1, RAID 0, SPAN/JBOD) on the ORICO MiniTower M435.
4.2. Using Expansion Ports
The MiniTower features several expansion ports on its front and rear panels to enhance connectivity:
- Front Ports: TF/SD 3.0 card slots (104MB/s), USB 3.2 (10Gbps) x 1, USB 2.0 (480Mbps) x 1, Power Button (ON/OFF).
- Rear Ports: RAID Key (for mode selection), USB 2.0 (480Mbps) x 2, DC (12V5A) power input, PC IN (USB-C for host connection).
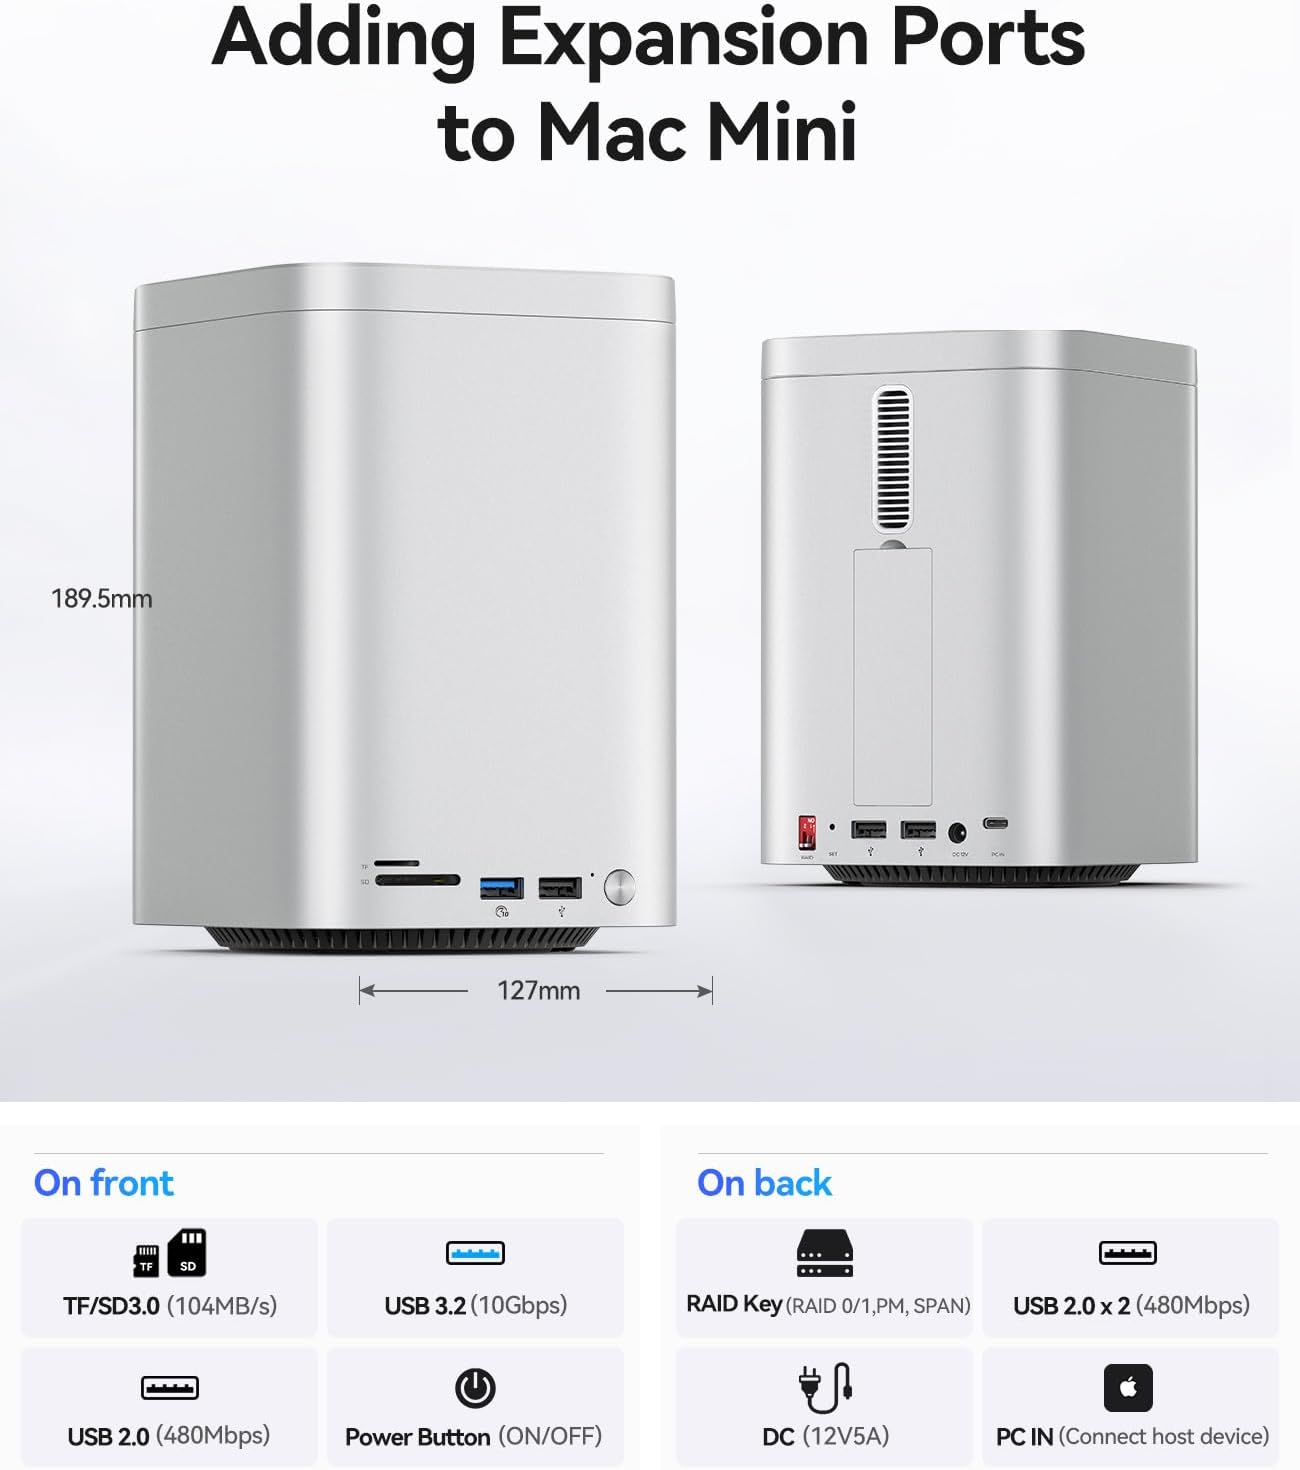
Image: Detailed view of the front and rear expansion ports of the ORICO MiniTower M435, including USB, card reader, and power connections.
5. Maintenance
5.1. Heat Dissipation
The ORICO MiniTower M435 is designed with an anti-fingerprint aluminum shell and a low-noise fan integrated into the middle of the enclosure. It provides two cooling vents at the top and bottom for optimal airflow, ensuring stable operation even when multiple devices are connected simultaneously. Regular cleaning of dust from the vents is recommended to maintain efficient cooling.

Image: An internal view of the ORICO MiniTower M435 highlighting its cooling fan and airflow design for excellent heat dissipation.
6. Troubleshooting
- Drives Not Appearing: If drives are not recognized after insertion, ensure the power adapter is securely connected and the device is powered on. For new drives, they may need to be initialized and formatted by your operating system.
- RAID Mode Issues: Always power off the device before changing RAID mode switches. After setting the desired RAID mode, power on the device and verify the configuration. Remember the RAID mode controls operate in reverse order from bottom to top.
- Drive Unmounting/Eject Warnings: If inserting a new drive causes other drives to temporarily unmount and remount, it is recommended to power off the entire system, insert all desired drives, and then power it back on. This ensures all drives are properly recognized and mounted.
- Slow Data Transfer: Ensure you are using the correct USB 3.2 Gen 2 (10Gbps) ports and cables for optimal speed. Older USB 2.0 ports will result in slower transfer rates.
- Compatibility: The MiniTower is widely compatible with macOS, Windows, Linux, and HarmonyOS. Ensure your operating system is up-to-date for best performance.
Video: An introductory overview of the ORICO MiniTower M435, highlighting its features and design.
7. Specifications
| Feature | Specification |
|---|---|
| Model Number | M435-V1 |
| Brand | ORICO |
| Material | Alloy Steel |
| Memory Storage Capacity | Up to 56 TB (2x 24TB SATA HDD/SSD + 1x 8TB NVMe SSD) |
| Compatible Devices | Desktop, Laptop, Mac Mini M4 Max, NVMe SSD |
| Hard Disk Form Factor | 3.5 Inches (SATA), 2.5 Inches (SATA), M.2 (NVMe) |
| Max Number of Supported Devices | 2 (SATA) + 1 (NVMe) |
| Data Transfer Rate | 10 Gigabits Per Second (USB 3.2 Gen 2) |
| Hardware Interface | USB 3.2 Gen 2 |
| Product Dimensions | 8 x 10 x 4 inches |
| Item Weight | 4.22 pounds |
| Color | Silver |
8. Warranty and Support
Specific warranty details are not provided in the product information. Please refer to the product packaging or the official ORICO website for the most up-to-date warranty information.
For technical support or customer service inquiries, please visit the official ORICO website or contact their customer support channels.


