1. Safety Information
Please read and understand this entire manual before attempting to assemble, install, or operate this product. Failure to follow these instructions may result in electric shock, fire, or serious personal injury.
- Always disconnect power at the main circuit breaker before installation or maintenance.
- All electrical connections must be in accordance with local codes, ordinances, and the National Electric Code.
- Consult a qualified electrician if you are unfamiliar with electrical wiring.
- Ensure the installation site can support the fan's weight (approximately 12 lbs).
- Do not operate the fan with damaged blades or housing.
2. Package Contents
Verify that all components listed below are included in your package. If any parts are missing or damaged, please contact customer service.
- Fan Motor Assembly
- 5 Double-Sided Fan Blades
- Caged Light Kit (with E12 sockets)
- 6-inch Downrod
- Remote Control
- Mounting Hardware Kit
- Installation Instructions

Image 2.1: Overview of the Fanbulous 42 Inch Rustic Caged Ceiling Fan with Lights, including the remote control and double-sided blades.
3. Specifications
| Brand | Fanbulous |
| Model Name | Fanbulous Rustic |
| Color | Black |
| Size | 42 INCH |
| Product Dimensions | 42"D x 11"W x 5"H |
| Item Weight | 11.97 pounds |
| Power Source | AC |
| Wattage | 75 watts |
| Noise Level | 35 Decibels |
| Number of Power Levels | 6 |
| Control Method | Remote |
| Mounting Type | Downrod Mount |
| Recommended Room Size | Below 10 ft x 10 ft |

Image 3.1: Detailed specifications and dimensions of the Fanbulous 42 Inch Ceiling Fan.
4. Setup and Installation
This section provides a general overview of the installation process. Refer to the detailed instructions included in your package for specific steps and diagrams.
4.1 Pre-Installation
- Power Disconnection: Before starting, ensure the power supply to the installation area is turned off at the circuit breaker.
- Site Preparation: Confirm the ceiling junction box is securely mounted and capable of supporting the fan's weight.
- Tools Required: Gather necessary tools such as a screwdriver, wire strippers, and a ladder.
4.2 Mounting the Fan
- Attach the mounting bracket to the ceiling junction box using the provided screws.
- Assemble the downrod to the fan motor assembly.
- Carefully lift the fan assembly and hang it from the mounting bracket.
4.3 Wiring Connections
Connect the electrical wires according to the wiring diagram provided in your package. Ensure all connections are secure and insulated with wire nuts.
- Connect the fan's live (black) wire to the house live wire.
- Connect the fan's neutral (white) wire to the house neutral wire.
- Connect the fan's ground wire to the house ground wire.
- Install the receiver for the remote control as per instructions.
4.4 Attaching Blades and Light Kit
- Attach the five fan blades to the motor housing using the provided screws. Ensure they are securely fastened.
- Install the light kit to the bottom of the fan motor assembly.
- Insert two E12 base bulbs (not included) into the light sockets.
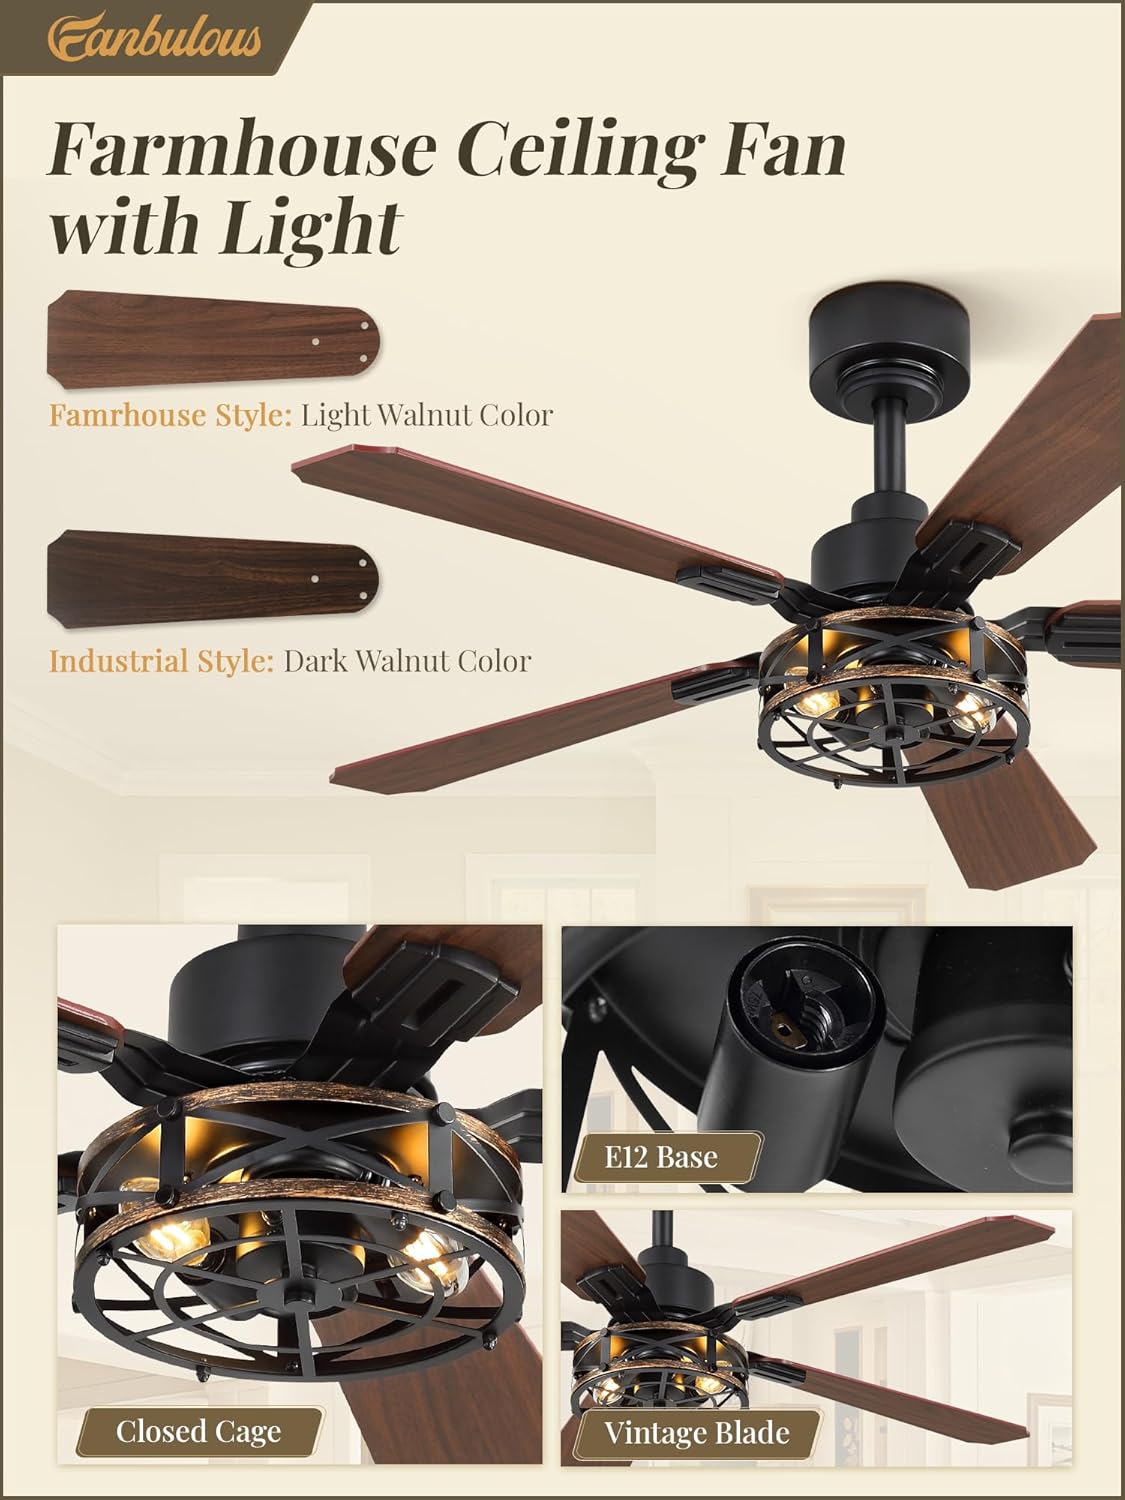
Image 4.1: Details of the fan blades, E12 bulb base, and caged light kit.
Video 4.1: An official product video demonstrating the features and potentially aspects of installation for the 42 Inch Rustic Caged Ceiling Fan with Lights.
5. Operating Instructions
Your Fanbulous ceiling fan is operated using the included remote control.
5.1 Remote Control Functions

Image 5.1: Remote control layout and functions for the Fanbulous ceiling fan.
- Power Button: Turns the fan and light on/off.
- Light Button: Toggles the light on/off.
- Fan Speed Buttons (1-6): Adjusts the fan speed from 1 (lowest) to 6 (highest).
- Timer Buttons (1H/4H/8H): Sets the fan to turn off automatically after 1, 4, or 8 hours.
- Natural Wind Mode: Simulates natural breeze by varying fan speed.
- Reversible Mode: Changes the direction of blade rotation.
- Mute Button: Turns off the remote control's beep sound.
5.2 Reversible DC Motor (Summer/Winter Mode)
The fan features a reversible DC motor to optimize air circulation for different seasons.
- Summer (Forward Rotation): Blades rotate counter-clockwise, pushing air downwards to create a cooling breeze.
- Winter (Reverse Rotation): Blades rotate clockwise, drawing air upwards to circulate warm air near the ceiling throughout the room.

Image 5.2: Visual representation of the reversible DC motor function for seasonal use.
6. Maintenance
Regular maintenance ensures optimal performance and longevity of your ceiling fan.
- Cleaning: Dust the fan blades and light kit regularly with a soft, damp cloth. Avoid using abrasive cleaners that may damage the finish.
- Bulb Replacement: When replacing bulbs, ensure the power is off. Use E12 base bulbs.
- Tightening Screws: Periodically check and tighten all screws on the fan blades and mounting hardware to prevent wobbling or noise.
7. Troubleshooting
If you encounter any issues, refer to the following common problems and solutions. If the problem persists, contact customer service.
| Problem | Possible Cause | Solution |
|---|---|---|
| Fan does not start | No power to the fan; loose wiring; remote control battery low. | Check circuit breaker; ensure all wiring is secure; replace remote battery. |
| Light does not work | Bulbs not installed correctly; faulty bulbs; loose wiring. | Ensure bulbs are screwed in tightly; replace bulbs; check light kit wiring. |
| Fan wobbles | Loose blade screws; unbalanced blades; loose mounting bracket. | Tighten all blade screws; ensure blades are balanced; check mounting bracket security. |
| Excessive noise | Loose screws; motor issue; blades hitting an obstruction. | Check and tighten all screws; ensure no obstructions; contact customer service if motor noise persists. |
8. Warranty and Support
For warranty information, please refer to the documentation included with your purchase or contact Fanbulous customer service directly. Fanbulous offers 24/7 customer support to assist with installation or after-sales inquiries.
For assistance, please visit the Fanbulous Store on Amazon or refer to the contact information provided in your product packaging.
