
1. Introduction
This manual provides essential information for the installation, operation, and maintenance of your Jingelsye 8 Core Car Radio. Please read this manual thoroughly before using the product to ensure proper function and safety. This car radio is specifically designed for Honda CRV models manufactured between 2002 and 2006, offering an enhanced in-car entertainment and navigation experience.
2. Safety Information
- Professional Installation Recommended: Due to the complexity of car electrical systems, professional installation is highly recommended to prevent damage to the unit or your vehicle.
- Avoid Distractions: Do not operate the unit or watch videos while driving. Always prioritize road safety.
- Power Supply: Ensure the unit is connected to a 12V DC power supply with a negative ground.
- Wiring: Incorrect wiring can cause damage. Follow the wiring diagram carefully.
- Temperature: Avoid exposing the unit to extreme temperatures or direct sunlight for prolonged periods.
3. Package Contents
Verify that all components are present in the package:
- Jingelsye 8 Core Car Radio Unit
- Backup Camera
- Steering Wheel Control (SWC) Interface
- Power Cable
- 2x USB Cable
- MIC
- GPS Module
- Reversing Cable
- Original Vehicle's USB Cable
- RCA Cable
- Crowbar (for installation)

Figure 3.1: Included components with the Jingelsye 8 Core Car Radio.
4. Installation Guide
The Jingelsye 8 Core Car Radio is designed for a direct fit in Honda CRV 2002-2006 models. While the unit is designed for compatibility, professional installation is strongly recommended to ensure correct wiring and functionality.
4.1 Pre-Installation Checks
- Disconnect the vehicle's battery before starting any electrical work.
- Confirm the compatibility of the unit with your specific Honda CRV model (2002-2006).
- Review the wiring diagram provided with the unit and compare it to your vehicle's wiring.
4.2 Installation Steps (General Overview)
- Carefully remove the original car radio and dashboard trim using appropriate tools (e.g., the included crowbar).
- Connect the power harness, speaker wires, and other necessary cables from the vehicle to the new car radio.
- Install the GPS antenna in a location with a clear view of the sky.
- Connect the backup camera cable and route it to the rear of the vehicle.
- Mount the new car radio securely into the dashboard opening.
- Reconnect the vehicle's battery and test all functions before reassembling the dashboard trim.

Figure 4.1: Before and After installation of the Jingelsye Car Radio in a Honda CRV 2002-2006.

Figure 4.2: The car radio is designed for a precise fit in Honda CRV 2002-2006 models.
5. Basic Operation
5.1 Power On/Off
The unit typically powers on automatically when the vehicle's ignition is turned on. To manually power off or restart, press and hold the power button on the unit's front panel or use the software controls.
5.2 Touchscreen Interface
The car radio features a responsive 1280*800 HD touchscreen. Navigate through menus, select applications, and control functions by tapping, swiping, and pinching gestures similar to a smartphone or tablet.

Figure 5.1: High-definition 1280*800 IPS touchscreen for clear visuals.
6. Key Features and Functions
6.1 Android 13 System & Performance
The car radio operates on the Android 13 system, powered by an 8-core processor and 32GB of internal storage. This configuration ensures smooth performance for applications, navigation, and multimedia playback.

Figure 6.1: 8-Core processor and 32GB ROM for efficient operation.
6.2 Wireless CarPlay & Android Auto
Connect your smartphone wirelessly via CarPlay (for iPhone) or Android Auto (for Android phones) to access navigation, music, calls, and messages directly on the car radio's screen. This feature allows for voice control via Siri or Google Assistant.
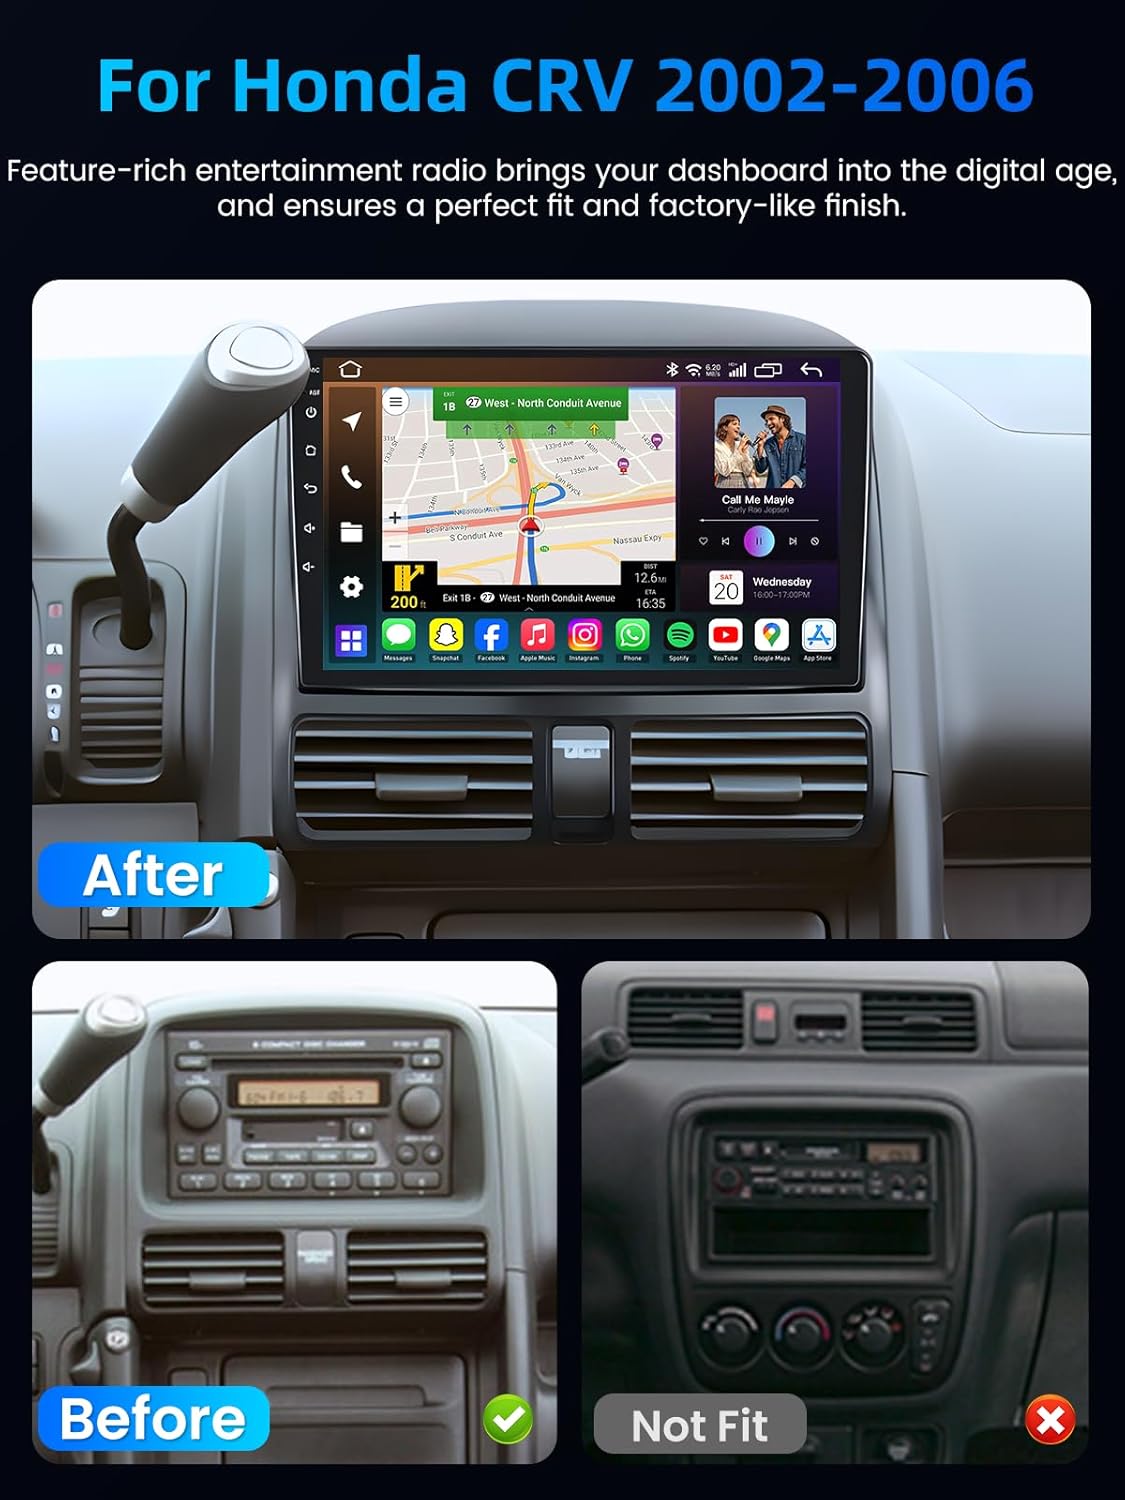
Figure 6.2: Wireless CarPlay and Android Auto integration.
Video 6.1: Demonstration of Wireless CarPlay and Android Auto functionality on the car radio.
6.3 5G WiFi & GPS Navigation
The unit supports 5G WiFi for fast internet access, enabling online streaming and application updates. The built-in GPS navigation provides real-time directions and supports various mapping applications.

Figure 6.3: 5G WiFi connectivity and integrated GPS navigation.
6.4 Bluetooth & FM/RDS Radio
Bluetooth 5.0 allows for hands-free calling and wireless music streaming from your smartphone. The FM/RDS radio provides clear broadcast reception and displays real-time station information.
Figure 6.4: Bluetooth 5.0 for connectivity and FM/RDS radio interface.
6.5 Steering Wheel Control (SWC) & Backup Camera
The unit supports existing steering wheel controls for convenient operation. A 1080p backup camera is included, providing a wide-angle view and night vision for enhanced safety during reversing maneuvers.

Figure 6.5: Steering Wheel Control integration and backup camera display.
6.6 Built-in EQ Setting
Customize your audio experience with the built-in Equalizer (EQ) settings. Adjust various frequency bands, sound fields, and bass enhancements to achieve optimal sound quality within your vehicle.

Figure 6.6: Detailed built-in EQ settings for audio customization.
6.7 Split Screen Function
The split-screen feature allows you to run two applications simultaneously on the display, such as navigation and music playback, enhancing multitasking capabilities while driving.

Figure 6.7: Split screen functionality for enhanced multitasking.
7. Troubleshooting
If you encounter issues with your car radio, refer to the following common troubleshooting steps:
| Problem | Possible Cause | Solution |
|---|---|---|
| No Power | Loose power connection, blown fuse, vehicle battery issue. | Check all power connections. Inspect vehicle fuses and replace if necessary. Verify vehicle battery health. |
| No Sound | Speaker wires disconnected, volume too low, incorrect audio output settings. | Check speaker wire connections. Increase volume. Verify audio output settings in the system menu. |
| GPS Signal Lost/Inaccurate | GPS antenna obstructed, antenna faulty, software issue. | Ensure GPS antenna has a clear view of the sky. Check antenna connection. Restart the unit. Update GPS software if available. |
| Bluetooth Disconnection | Interference, device out of range, software glitch. | Ensure devices are within range. Re-pair the Bluetooth device. Restart both the car radio and the connected device. |
| Touchscreen Unresponsive | System freeze, dirty screen, hardware issue. | Restart the unit. Clean the screen. If the issue persists, contact support. |
If these steps do not resolve the issue, please contact Jingelsye customer support for further assistance.
8. Specifications
| Feature | Specification |
|---|---|
| Brand | Jingelsye |
| Model Name | 8 Core Car Radio |
| Compatible Vehicle Type | Honda CRV 2002-2006 (SUV) |
| Operating System | Android 13 |
| Processor | 8 Core |
| Memory Storage Capacity | 32 GB |
| Display Type | Touchscreen (Capacitive) |
| Screen Resolution | 1280*800 HD |
| Connectivity Technology | Bluetooth 5.0, 5G WiFi, Wired (implied) |
| Special Features | Wireless CarPlay & Android Auto, DSP, GPS Navigation, Backup Camera, FM/RDS Radio, Steering Wheel Control (SWC), Mirror Link |
| Supported Satellite Navigation System | GPS |
| Included Components | Backup Camera, Steering Wheel Control (SWC) Interface |
| Item Weight | 1.8 Kilograms |
9. Maintenance
- Screen Cleaning: Use a soft, lint-free cloth to clean the touchscreen. Avoid abrasive cleaners or solvents.
- Software Updates: Periodically check for and install available software updates to ensure optimal performance and access to new features.
- Environmental Conditions: Protect the unit from extreme heat, cold, and moisture.
10. Warranty and Support
Your Jingelsye 8 Core Car Radio is covered by a manufacturer's warranty. For specific warranty terms and conditions, please refer to the warranty card included in your package or visit the official Jingelsye website. For technical support, troubleshooting assistance, or warranty claims, please contact Jingelsye customer service through the contact information provided with your product or on the seller's platform.