1. Introduction
This manual provides detailed instructions for the installation, operation, and maintenance of your Hodozzy Carplay Autoradio for Citroen C5 (2008-2017). This 10-inch in-cell Android car stereo features Bluetooth 5.0, Wireless CarPlay, Android Auto, WiFi, GPS, RDS, FM radio, USB connectivity, and DSP for enhanced audio. Please read this manual thoroughly before use to ensure proper functionality and safety.
2. Safety Information
- Professional Installation Recommended: Due to the complexity of car electrical systems, professional installation is highly recommended to prevent damage to the unit or your vehicle.
- Driving Safety: Do not operate the unit in a way that distracts you from driving. Always prioritize road safety.
- Power Supply: Ensure the unit is connected to a 12V DC power supply with negative grounding.
- Avoid Moisture: Do not expose the unit to water or excessive moisture.
- Temperature: Operate the unit within normal vehicle operating temperatures.
3. Package Contents
Verify that all items listed below are included in your package:
- 1 x Hodozzy Carplay Autoradio Unit
- 1 x Power Cable
- 1 x Installation Tool Set
- 1 x Canbus Decoder
- 1 x Antenna Adapter
- 1 x Radio Antenna
- 1 x GPS Antenna
- 1 x Rear Camera Input Cable
- 1 x RCA Cable
- 1 x USB Cable
- 1 x User Manual
- 1 x Backup Camera (if included in your specific package)
- Additional Accessories
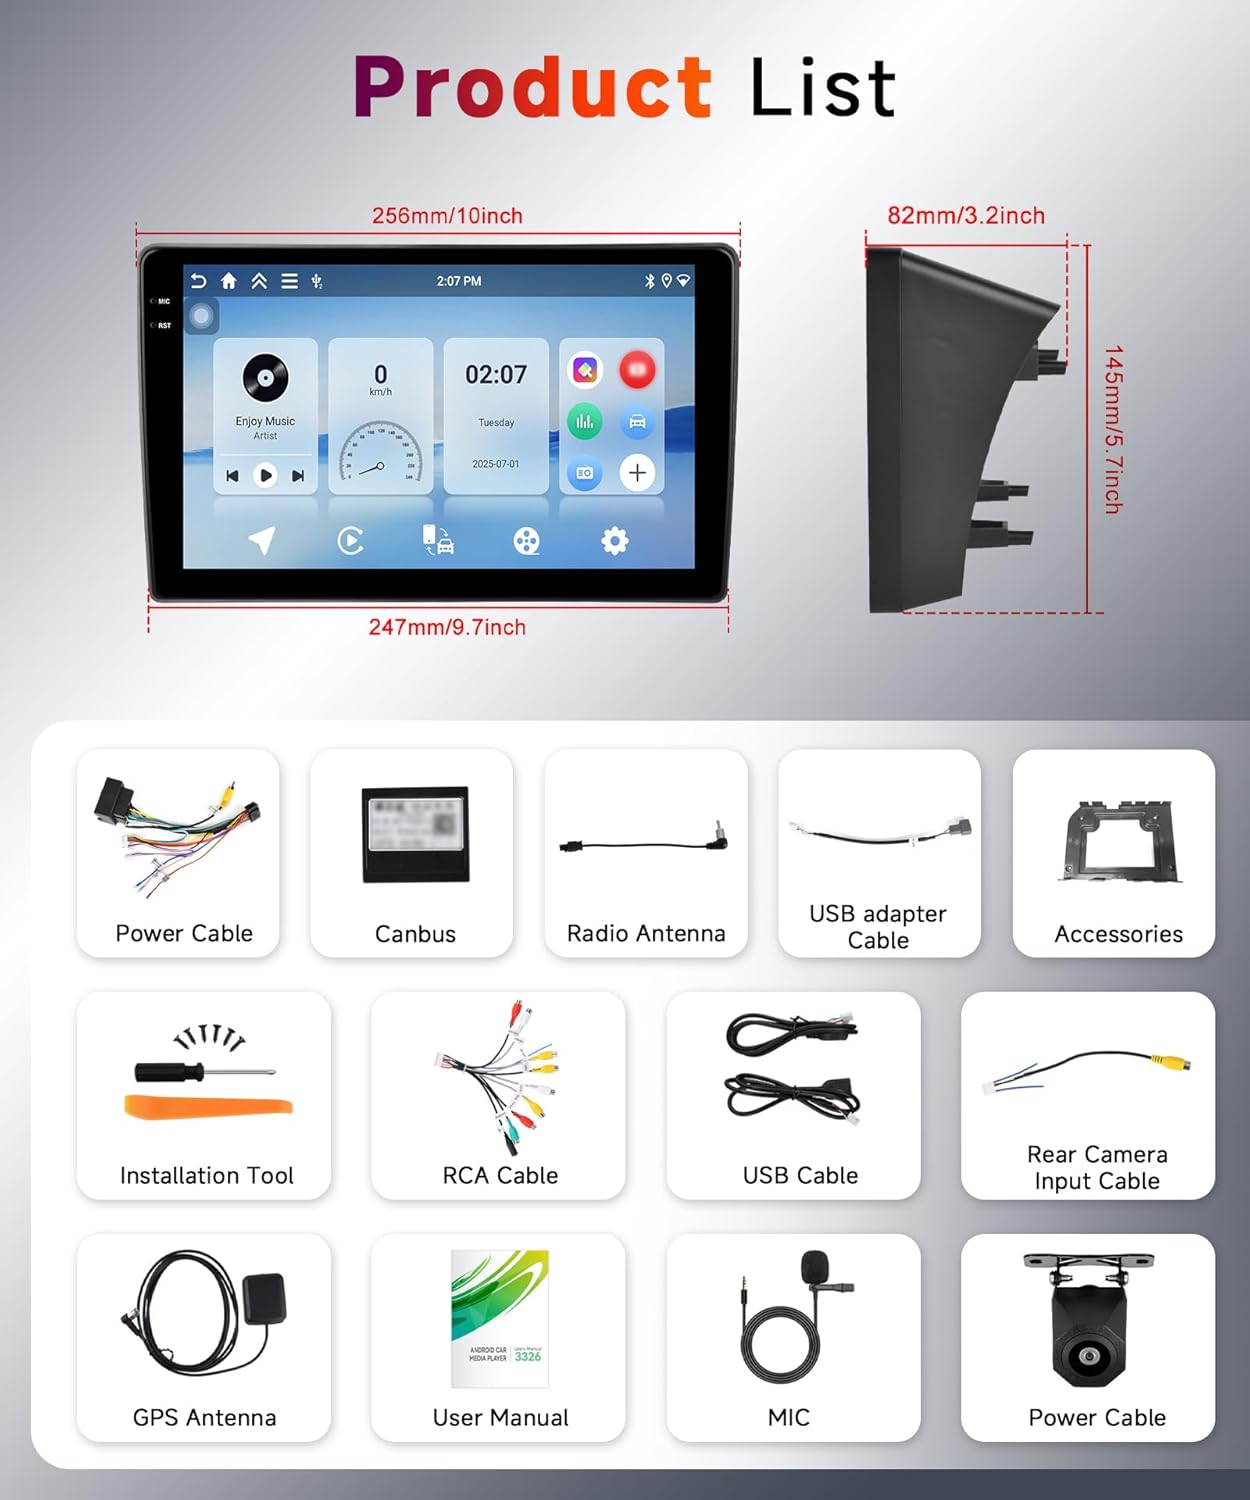
Image: Detailed view of all components included in the product package, such as the main unit, various cables, antennas, and installation tools.
4. Product Overview
The Hodozzy Carplay Autoradio is designed to seamlessly integrate into your Citroen C5 (2008-2017) dashboard, replacing the original radio with an advanced 10-inch in-cell touchscreen display. It offers a modern interface and a wide range of connectivity options.

Image: Comparison of the Citroen C5 dashboard before and after the installation of the Hodozzy Carplay Autoradio, highlighting the integrated 10-inch screen.

Image: Visual representation of the 10-inch HD In-Cell screen technology, emphasizing its thinner profile, better display quality, and more sensitive touch response compared to traditional screens.

Image: Diagram showing the physical dimensions of the autoradio unit, including width (256mm/10inch), height (145mm/5.7inch), and depth (82mm/3.2inch).
5. Installation Guide (Setup)
This unit is specifically designed for Citroen C5 models manufactured between 2008 and 2017. Ensure your vehicle is compatible before proceeding with installation.
5.1 General Installation Steps
- Disconnect Battery: Before starting, disconnect the negative terminal of your vehicle's battery to prevent electrical shorts.
- Remove Original Radio: Carefully remove the existing car radio and any trim panels as required by your vehicle's specific model.
- Connect Wiring Harness: Connect the provided power cable and Canbus decoder to the vehicle's wiring harness. Ensure all connections are secure.
- Connect Antennas: Connect the GPS antenna and radio antenna to their respective ports on the new autoradio unit. Position the GPS antenna in a location with a clear view of the sky.
- Connect Rear Camera (Optional): If installing a backup camera, connect its input cable to the designated port on the autoradio. Refer to the wiring diagram below.
- Test Connections: Before fully securing the unit, reconnect the car battery and briefly power on the autoradio to ensure basic functions (power, sound, display) are working.
- Secure Unit: Mount the Hodozzy autoradio securely into the dashboard opening.
- Reassemble: Reinstall any removed trim panels.
5.2 Rear Camera Wiring

Image: Technical diagram showing the wiring steps for installing a car reversing camera system, including connections to the car radio, power supply, and reversing light.
Follow the diagram for connecting the reversing camera:
- Cable 1 and Cable 4: Connect to the positive pole of the power supply of the car's reversing light.
- Cable 2: Connect to the negative pole of the power supply of the car's reversing light.
- Cable 3 and Cable 5: Connect together.
6. Operating Instructions
6.1 Basic Operation
- Power On/Off: Press and hold the power button (usually located on the front panel or a soft button on the screen) to turn the unit on or off. A short press typically mutes/unmutes audio.
- Volume Control: Adjust the volume using the physical knob (if present) or the on-screen controls.
- Touchscreen: The 10-inch in-cell capacitive touchscreen responds to touch gestures similar to a smartphone. Tap to select, swipe to navigate.
6.2 Wireless CarPlay and Android Auto
This autoradio supports both Wireless CarPlay for Apple iPhones and Wireless Android Auto for Android smartphones, allowing seamless integration of your phone's features.

Image: Multiple screen views showcasing the user interfaces for Wireless CarPlay and Android Auto, displaying navigation, music, and communication apps.
- Enable Bluetooth: On your smartphone, ensure Bluetooth is enabled.
- Pair Device: On the autoradio, go to the Bluetooth settings and search for available devices. Select your phone and pair them.
- Initiate CarPlay/Android Auto: Once paired, the system should prompt you to start CarPlay or Android Auto. Follow the on-screen instructions.
- Access Apps: You can now access compatible apps like navigation, music, calls, and messages directly from the autoradio screen.
Note: The Mirror Link function may not be compatible with all Samsung and Huawei phone models.
6.3 Bluetooth 5.0
The integrated Bluetooth 5.0 module allows for hands-free calling and wireless audio streaming.

Image: Displays the Bluetooth 5.0 interface for hands-free calls and music playback, alongside the FM/RDS radio interface showing station selection and frequency.
- Hands-Free Calling: Pair your phone via Bluetooth to make and receive calls directly from the autoradio. The unit supports contact synchronization.
- Music Streaming: Play audio from your phone through the car's speakers wirelessly.
6.4 GPS Navigation and WiFi
The unit features a built-in GPS receiver and WiFi connectivity for navigation and online services.

Image: Four panels illustrating key features: GPS navigation with a map, WiFi connectivity with signal strength, Bluetooth 5.0 for phone calls, and DSP for sound equalization.
- GPS Navigation: The unit comes with a pre-installed navigation application (e.g., "Here We Go"). You can download offline maps for navigation without an internet connection. Online map applications are also supported.
- WiFi Connectivity: Connect to a WiFi network or a mobile hotspot to access online features, download apps, and browse the internet.
6.5 FM/RDS Radio
Enjoy your favorite radio stations with the built-in FM/RDS tuner.
- Station Search: Use the auto-scan function to find available stations (87.5 MHz-107.5 MHz) or manually tune to a specific frequency.
- Presets: Save your preferred stations for quick access.
- RDS: Radio Data System displays information such as station name and song title (if broadcasted).
6.6 DSP and Equalizer
Customize your audio experience with the built-in Digital Sound Processor (DSP) and 32-band equalizer.

Image: Displays the graphical user interface for the built-in DSP and 48-band equalizer, showing various sound effect settings and frequency adjustments.
- Equalizer Settings: Adjust individual frequency bands to tailor the sound to your preference.
- Sound Modes: Select from various preset sound modes (e.g., Pop, Rock, Jazz) or create custom profiles.
6.7 Split Screen Function
The split-screen feature allows you to run two applications simultaneously on the display.

Image: A split-screen view on the autoradio display, showing two different applications running side-by-side, such as navigation and music playback.
- Activate Split Screen: Refer to the on-screen instructions or user interface for activating split-screen mode. Typically, this involves long-pressing an app icon or using a dedicated button.
- Select Applications: Choose two compatible applications to display side-by-side.
6.8 Steering Wheel Control
The unit supports integration with your vehicle's existing steering wheel controls for convenient and safe operation.

Image: A split view showing a car's backup camera display with parking lines, and a separate panel illustrating the interface for programming steering wheel controls, including options to assign functions like volume adjustment and song switching.
- Configuration: Access the "Steering Wheel Control" settings in the autoradio's menu.
- Program Buttons: Follow the on-screen prompts to assign functions (e.g., volume up/down, track skip, answer call) to your steering wheel buttons.
6.9 Backup Camera
If a compatible AHD backup camera is installed, the display will automatically switch to the camera view when the vehicle is put into reverse gear.

Image: Highlights the features of the backup camera (HD image, night vision, waterproof, wide angle) and how the autoradio retains original vehicle functions like steering wheel controls and door open hints.
- Automatic Display: The camera image will appear on the screen when reversing.
- Parking Guidelines: Dynamic parking guidelines may be displayed to assist with parking.
7. Maintenance
- Screen Cleaning: Use a soft, lint-free cloth to gently wipe the touchscreen. For stubborn smudges, slightly dampen the cloth with water or a screen-safe cleaner. Avoid harsh chemicals.
- Software Updates: Periodically check the manufacturer's website or the unit's settings for available software updates to ensure optimal performance and access to new features.
- General Care: Keep the unit free from dust and debris. Avoid extreme temperatures.
8. Troubleshooting
If you encounter issues with your Hodozzy Carplay Autoradio, refer to the following common problems and solutions:
| Problem | Possible Cause | Solution |
|---|---|---|
| Unit does not power on. | Loose power connection, blown fuse, vehicle battery issue. | Check all power cable connections. Inspect vehicle fuses. Ensure car battery is charged. |
| No sound. | Volume muted, incorrect audio source, loose speaker wires. | Check volume level and mute status. Verify correct audio input. Inspect speaker wiring. |
| Bluetooth connection issues. | Phone not in pairing mode, interference, incorrect pairing process. | Ensure phone's Bluetooth is on and discoverable. Delete previous pairings and re-pair. Move closer to the unit. |
| GPS signal loss or inaccuracy. | GPS antenna obstructed, poor satellite reception. | Ensure GPS antenna has a clear view of the sky. Check antenna connection. |
| CarPlay/Android Auto not connecting. | Incorrect phone settings, app issues, incompatible phone model. | Ensure CarPlay/Android Auto is enabled on your phone. Update phone OS and apps. Check for phone compatibility. |
| Touchscreen unresponsive. | Software glitch, screen damage. | Restart the unit. If issue persists, contact support. |
9. Specifications
Technical specifications for the Hodozzy Carplay Autoradio C5:
| Feature | Detail |
|---|---|
| Brand | Hodozzy |
| Model Name | Carplay Autoradio C5 |
| Compatible Vehicle Type | Citroen C5 (2008-2017) |
| Screen Size | 10 Inches (In-Cell Capacitive Touch Screen) |
| RAM | 4 GB |
| Internal Storage (ROM) | 128 GB |
| Connectivity Technology | Bluetooth 5.0, USB, Wi-Fi |
| Special Features | RDS, Touchscreen, Wireless CarPlay, Android Auto, GPS, DSP, Split Screen, Mirror Link, Steering Wheel Control Support, AHD Backup Camera Support |
| Map Type | Satellite (via GPS) |
| Mounting Type | Dashboard Mount |
| Rechargeable Battery | No |
10. Warranty and Support
10.1 Warranty Information
This product comes with a manufacturer's warranty of 2 years. Please retain your proof of purchase for warranty claims.
10.2 Customer Support
For technical assistance, troubleshooting, or warranty inquiries, please contact Hodozzy customer support through the platform where you purchased the product. If purchased on Amazon, follow these steps:
- Click on the 'Hodozzy' seller name on the product page.
- On the seller's page, locate and click the 'Ask a question' button.

Image: A visual guide demonstrating how to contact Hodozzy customer support on Amazon by clicking the seller name and then the 'Ask a question' button.


