
Important Safety Information
Read and understand all instructions before beginning installation. Failure to follow these instructions may result in electric shock, fire, or personal injury.
- Consult a qualified electrician if you are unsure about wiring procedures.
- Ensure the installation site can support the fan's weight (approximately 18 lbs).
- Turn off power at the circuit breaker or fuse box before installation or servicing.
- Do not bend blade holders during installation or cleaning.
- Keep children away from the fan during installation.
- This fan is designed for indoor use only.
Package Contents
Verify that all components are present before discarding packaging materials. If any parts are missing or damaged, contact customer service.
- Motor Housing Assembly
- Fan Blades (5)
- Blade Brackets (5)
- Light Kit Assembly with Integrated LED
- Canopy and Mounting Bracket
- Downrod Assembly
- Hardware Pack (screws, washers, wire nuts)
- Remote Control with Wall Mount and Battery
- Instruction Manual
Tools Required
The following tools are typically required for installation:
- Phillips Screwdriver
- Flathead Screwdriver
- Adjustable Wrench
- Wire Strippers
- Electrical Tape
- Step Ladder
Setup and Installation
Follow these steps carefully to install your ceiling fan. Ensure power is OFF at the circuit breaker before starting.
1. Mounting the Fan
Secure the mounting bracket to the ceiling outlet box. The fan supports flush mounting. Ensure the outlet box is securely fastened to the building structure and can support the fan's weight.

Image: Main product view of the Hampton Bay Scenic 52-inch Integrated LED Indoor Ceiling Fan. This image shows the fan's overall design, including the brushed nickel finish and the integrated LED light kit.
2. Wiring Connections
Connect the fan's electrical wires to the household wiring according to local electrical codes. Typically, this involves connecting the black wire (hot) to the black fan wire, the white wire (neutral) to the white fan wire, and the ground wire to the green or bare copper fan wire. Use the provided wire nuts and secure connections with electrical tape.
3. Attaching Fan Blades
Attach the fan blades to the blade brackets using the provided screws. Then, secure the blade assemblies to the motor housing. Ensure all screws are tightened securely.
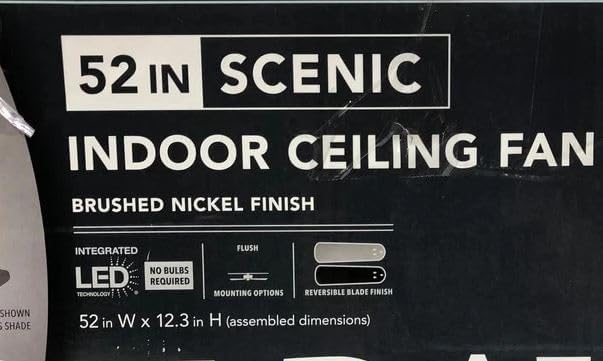
Image: Product label for the Hampton Bay Scenic 52-inch Indoor Ceiling Fan. This label highlights key features such as "52 IN SCENIC", "INDOOR CEILING FAN", "BRUSHED NICKEL FINISH", "INTEGRATED LED TECHNOLOGY", "NO BULBS REQUIRED", "FLUSH MOUNTING OPTIONS", and "REVERSIBLE BLADE FINISH". It also indicates assembled dimensions of 52 in W x 12.3 in H.
4. Installing the Light Kit
Connect the light kit's wires to the corresponding wires from the fan motor. Secure the light kit assembly to the bottom of the fan motor housing. This model features an integrated LED light, so no separate bulbs are required.
Operating Instructions
Your Hampton Bay Scenic ceiling fan is operated by a remote control.
- Fan Speed Control: Use the speed buttons on the remote to adjust the fan's rotation speed (Low, Medium, High).
- Light Control: Press the light button to turn the integrated LED light ON or OFF. Hold the button to dim or brighten the light.
- Reversible Motor Function: A switch on the fan's motor housing allows you to change the direction of blade rotation. In warm weather, set the switch for downward airflow to create a cooling effect. In cool weather, set the switch for upward airflow to circulate warm air near the ceiling. Ensure the fan is OFF before changing the direction switch.
Maintenance
Regular maintenance ensures optimal performance and extends the life of your fan.
- Cleaning: Use a soft, damp cloth to clean the fan blades and motor housing. Do not use abrasive cleaners or solvents.
- Blade Care: Periodically check blade screws for tightness. Loose blades can cause wobbling.
- Light Kit: The integrated LED light is designed for long life and does not require bulb replacement.
Troubleshooting
Before attempting any repairs, ensure power is OFF at the circuit breaker.
| Problem | Possible Cause | Solution |
|---|---|---|
| Fan does not start | No power to fan; Loose wire connections; Remote control battery dead. | Check circuit breaker; Verify all wire connections are secure; Replace remote battery. |
| Fan wobbles | Loose blade screws; Unbalanced blades; Loose mounting bracket. | Tighten all blade screws; Use a balancing kit (not included) if necessary; Ensure mounting bracket is secure. |
| Light does not work | Loose wire connection to light kit; Faulty light kit. | Check light kit wiring; Contact customer service if light kit is faulty. |
Specifications
- Model Name: Hampton Bay Scenic
- Model Number: 92302
- Fan Size: 52 inches
- Finish: Brushed Nickel
- Light Source: Integrated LED (No bulbs required)
- Mounting Type: Ceiling Mount (Flush mount capable)
- Usage: Indoor
- Assembled Dimensions: 52 in W x 12.3 in H
- UPC: 082392923020
Warranty and Customer Support
This Hampton Bay product comes with a manufacturer's warranty. Please refer to the warranty card included in your package for specific terms and conditions. For technical assistance, missing parts, or warranty claims, please contact Hampton Bay customer service.
Contact information can typically be found on the product packaging or the manufacturer's official website.


