Introduction
This manual provides essential information for setting up, operating, maintaining, and troubleshooting your SAMSUNG 40" Odyssey G7 (G75F) WUHD Curved Gaming Monitor. Please read this manual thoroughly to ensure proper use and to maximize the performance of your monitor.

Figure 1: Front view of the SAMSUNG 40" Odyssey G7 Curved Gaming Monitor.
Video 1: A brief overview of the SAMSUNG 40" Odyssey G7 monitor's key features.
1. Setup
1.1 Unboxing and Stand Assembly
Carefully remove all components from the packaging. It is recommended to assemble the stand first before attaching it to the monitor panel.

Figure 2: Illustration of the ergonomic stand's height, tilt, and swivel adjustments.
The ergonomic stand allows for height, tilt, and swivel adjustments to optimize your viewing comfort. Refer to the included Quick Setup Guide for detailed assembly instructions.
1.2 Connecting Cables
Connect the necessary cables to the monitor and your computer or other devices. Ensure all connections are secure.
- Power Cable: Connect the power adapter to the monitor's DC 24V port and then to a power outlet.
- Video Cables: Use either the provided HDMI or DisplayPort cable to connect your computer to the monitor. The monitor supports 2x HDMI and 2x DisplayPort inputs.
- USB Cables: Connect the USB Type-B Upstream cable from your computer to the monitor to enable the monitor's USB 3.0 ports.
- Audio: A 3.5mm headphone output is available for external audio devices.
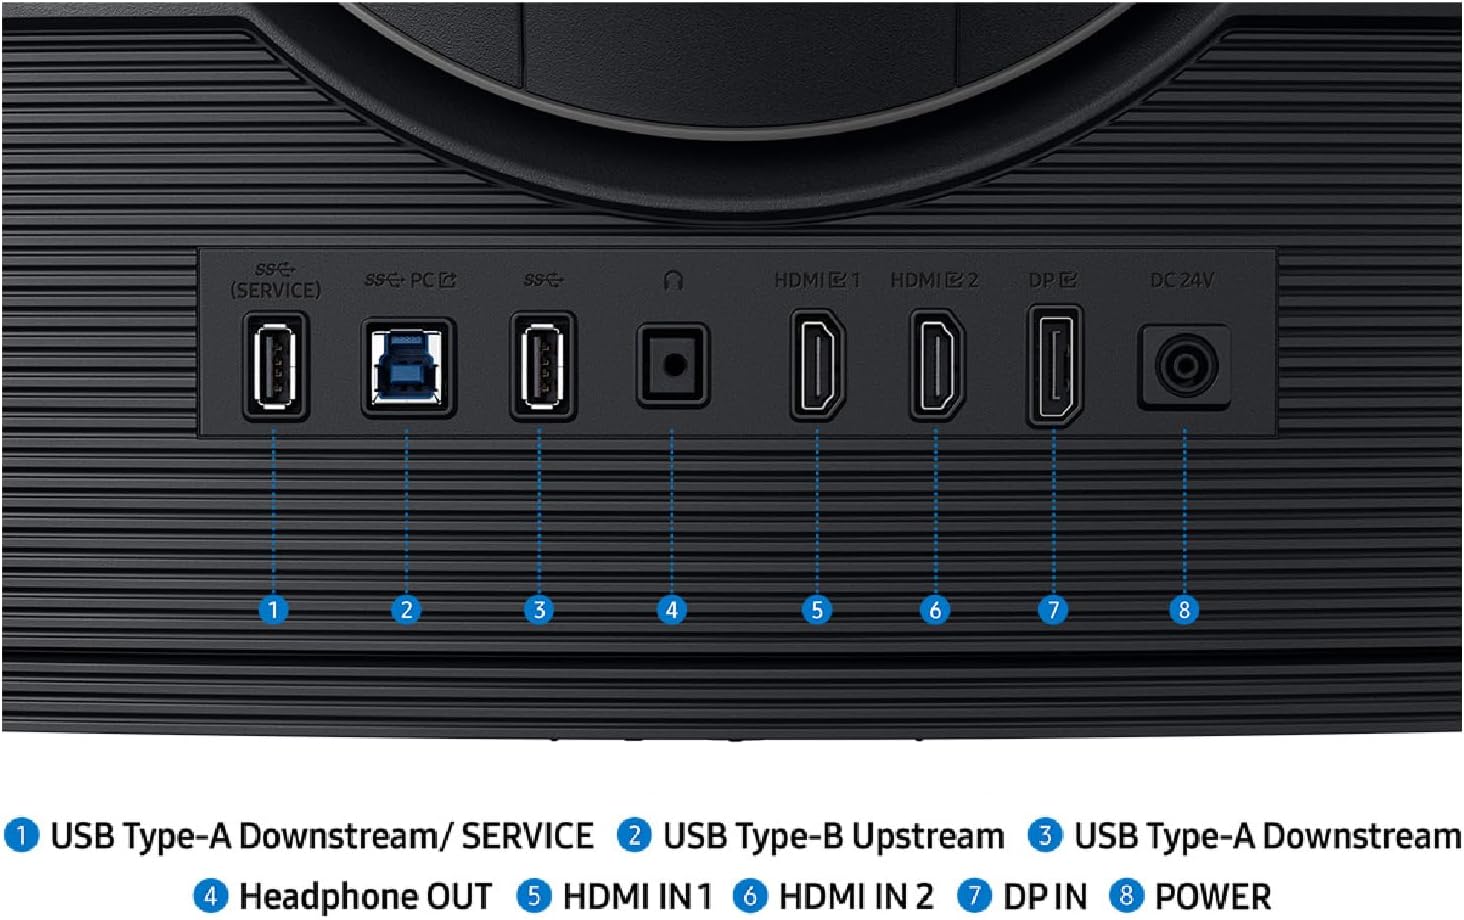
Figure 3: Rear view of the monitor showing the input/output port layout including USB, HDMI, DisplayPort, and power.
2. Operating Instructions
2.1 Power On/Off
To power on the monitor, press the multi-directional button located on the bottom center of the monitor. Press and hold the button to power off.
2.2 On-Screen Display (OSD) Navigation
The OSD menu allows you to adjust various monitor settings. Use the multi-directional button to navigate the menu:
- Press the button to open the OSD menu.
- Move the button up/down/left/right to navigate through options.
- Press the button again to select an option or confirm a setting.

Figure 4: Diagram illustrating the multi-directional button for OSD control.
2.3 Core Lighting+
The Core Lighting+ feature projects vibrant on-screen colors into the real world for an immersive experience. You can customize the lighting effects and colors through the OSD menu under 'Game' settings.

Figure 5: Rear view of the monitor highlighting the Core Lighting+ feature.
2.4 Multitasking Features (Picture-by-Picture and Picture-in-Picture)
The monitor supports advanced multitasking options:
- Picture-by-Picture (PBP): Display content from two different sources side-by-side on the screen simultaneously. This is ideal for team gaming or comparing content.
- Picture-in-Picture (PIP): View content from a secondary source in a smaller window overlaid on the main display. This allows for managing multiple tasks like watching a video while working.

Figure 6: Illustration of Picture-by-Picture mode displaying two PC inputs simultaneously.

Figure 7: Illustration of Picture-in-Picture mode with a sub-screen for multitasking.
2.5 Auto Source Switch+
The monitor features Auto Source Switch+, which automatically detects when connected devices are turned on and instantly switches to the new source signal, streamlining your workflow.
3. Maintenance
- Cleaning the Screen: Gently wipe the screen with a soft, lint-free cloth. For stubborn marks, lightly dampen the cloth with water or a screen-cleaning solution specifically designed for monitors. Avoid using harsh chemicals or abrasive materials.
- Cleaning the Body: Use a soft, dry cloth to clean the monitor's casing. Do not use liquid cleaners directly on the monitor.
- Ventilation: Ensure the monitor's ventilation openings are not blocked to prevent overheating.
- Power Management: Unplug the monitor from the power outlet during lightning storms or when it will be left unattended for long periods.
4. Troubleshooting
| Problem | Possible Solution |
|---|---|
| No image on screen |
|
| Image is blurry or distorted |
|
| No sound |
|
5. Specifications
| Feature | Detail |
|---|---|
| Brand | Samsung |
| Model Number | LS40FG75DENXZA |
| Screen Size | 40 Inches |
| Screen Resolution | 5120 x 2160 Pixels (WUHD) |
| Aspect Ratio | 21:9 |
| Screen Surface Description | Curved (1000R) |
| Refresh Rate | 180Hz |
| Response Time (GtG) | 1ms |
| HDR Support | VESA DisplayHDR™ 600 |
| Adaptive Sync Technology | AMD FreeSync™ Premium Pro |
| Connectivity | 2x HDMI, 2x DisplayPort, 3x USB 3.0 Ports, 1x Headphone Out |
| Dimensions (LxWxH) | 11.96 x 36.56 x 23.58 inches |
| Item Weight | 24.9 pounds |
| Color | Black |
6. Warranty Information
Samsung provides a limited warranty to the original purchaser of this product. The warranty period and coverage details are as follows:
- Labor: One (1) Year (Carry-in/Ship-in)
- Parts: One (1) Year
Repair options for defective products within the warranty period are available upon approval by Samsung Technical Support Department. To request warranty service, the purchaser must contact Samsung at 1-800-SAMSUNG for problem determination, problem analysis, and service procedures.
This warranty does not cover damage due to accident, fire, flood, and/or other Acts of God, misuse, burned-in images, incorrect line voltage, improper or unauthorized repairs, commercial use, or damages incurred in shipping. Exterior and interior finish, lamps, glass, plastic parts, and temperature probes are not covered under this warranty. Customer adjustments and failure to follow operating instructions, maintenance, and environmental instructions that are covered and reproducible in the product, is considered customer responsibility.
7. Support
For further assistance, technical support, or to access additional resources, please visit the official Samsung website or contact their customer service:
- Samsung Support Website: www.samsung.com/us/support/
- Customer Service: 1-800-SAMSUNG


