Introduction
This manual provides detailed instructions for the Hosyond 7-inch IPS LCD Touchscreen Display, Model H085. Please read this manual thoroughly before using the product to ensure proper operation and to maximize its lifespan. Keep this manual for future reference.
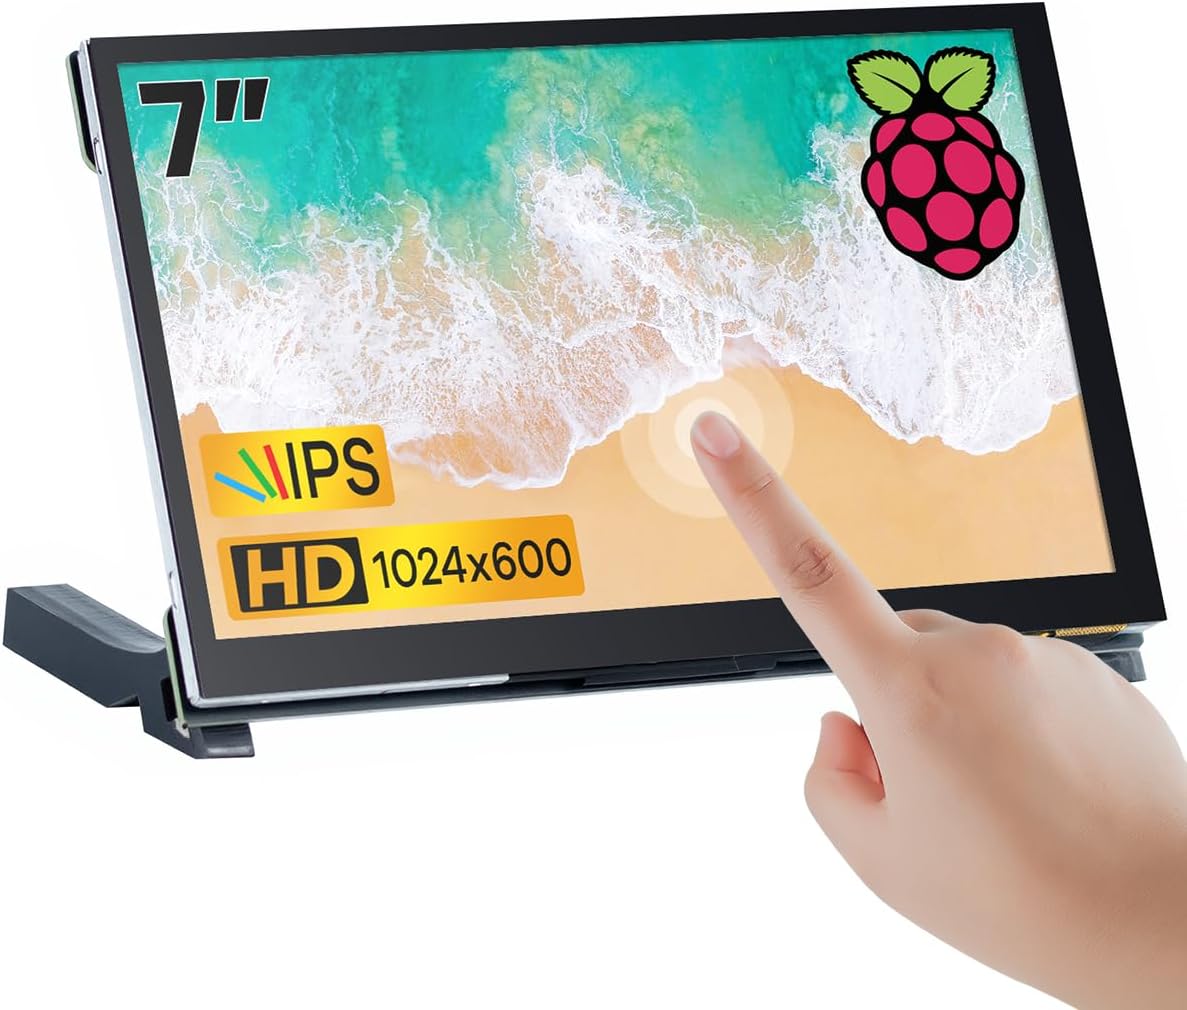
Image: The Hosyond 7-inch IPS LCD Touchscreen Display, highlighting its touch functionality and key features like IPS panel and 1024x600 resolution.
Package Contents
Verify that all items listed below are included in your package. If any items are missing or damaged, please contact customer support.
- 1 x Hosyond 7-inch Touchscreen Display
- 1 x User Manual (this document)
- 1 x HDMI Cable
- 1 x Type-C Cable (for power)
- 1 x HDMI Adapter
- 2 x Display Stands
- 1 x Screws Kit

Image: A visual representation of all items included in the Hosyond 7-inch Touchscreen Display package, including the display, cables, stands, and screw kit.
Specifications
| Feature | Detail |
|---|---|
| Panel Type | IPS |
| Panel Size | 7 inch |
| Resolution | 1024x600 |
| Luminance (TYP) | 320 cd/m² |
| Backlight Type | White LED |
| Touch Screen Type | Capacitive Touch Screen (5-point) |
| Power Input | Type-C USB (5V) |
| Total Power Consumption | 2.55W (100%) |
| Video Input Interface | HDMI |
| Active Area | 154.21 × 85.92 mm |
| Outline Size | 164.90 × 102.00 × 15.15 mm |
| Item Weight | 9.4 ounces (approx. 266g) |
| Refresh Rate | 60Hz |
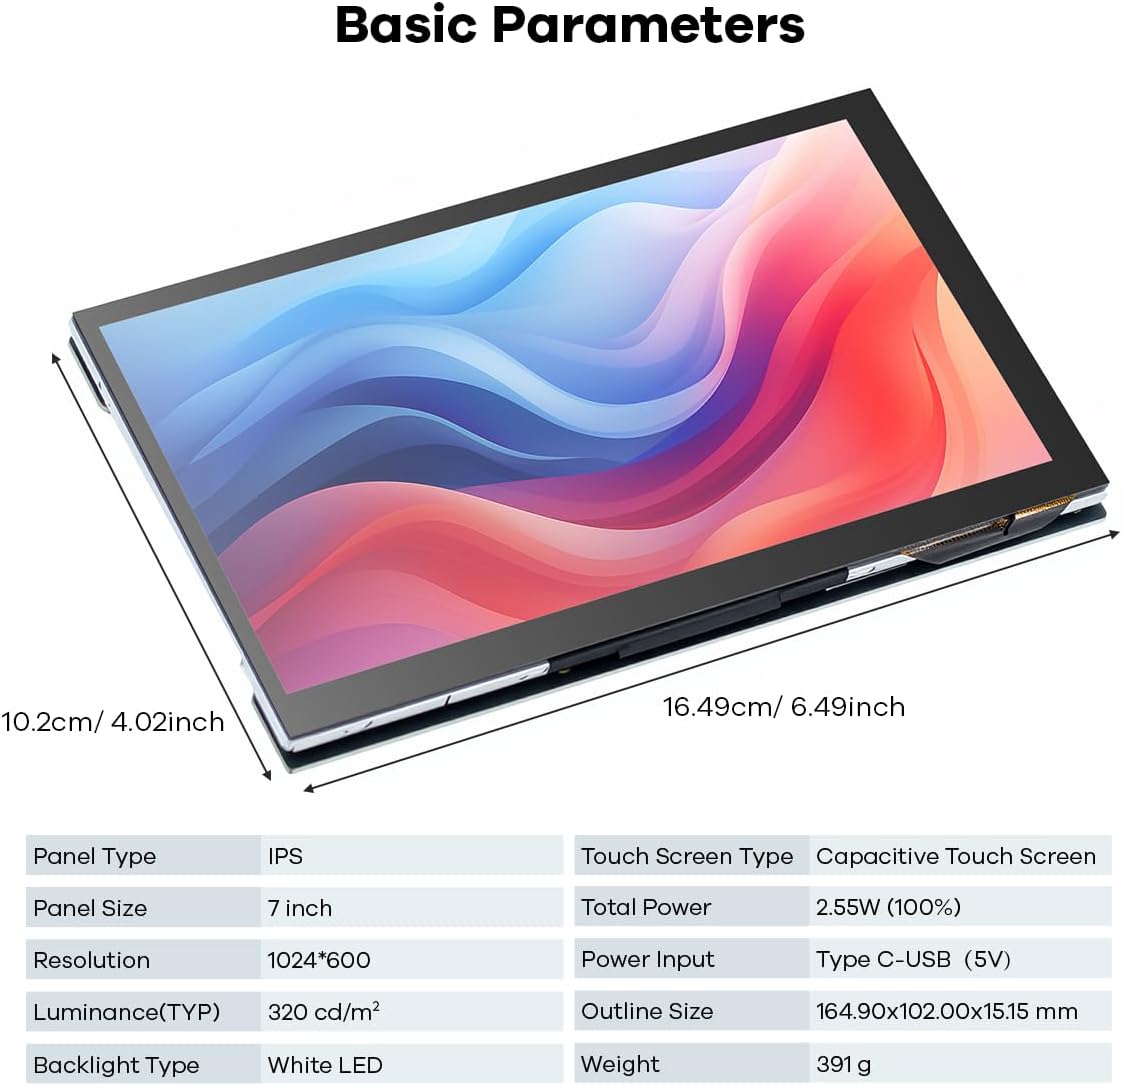
Image: Detailed specifications and physical dimensions of the Hosyond 7-inch IPS LCD Touchscreen Display.

Image: Key display features such as IPS panel, resolution, touch points, and refresh rate.
Setup Instructions
Follow these steps to set up your Hosyond 7-inch IPS LCD Touchscreen Display.
1. Identifying Ports and Controls
Familiarize yourself with the display's interfaces and buttons.

Image: A detailed diagram illustrating the various ports, buttons, and connectors on the display's circuit board, including HDMI input, Type-C power/touch, OSD menu buttons, and expansion ports.
- OSD Menu: On-Screen Display menu button.
- Left/Up: Navigation button for menu.
- Right/Down: Navigation button for menu.
- Return: Back button for menu.
- Power: Power on/off button.
- M2.5*4mm Hole: Mounting holes.
- 20P-FPC-0.5mm Display: Internal display connector.
- HD-MI Input: HDMI video input port.
- Touch & Power Type-C: USB Type-C port for power and touch data.
- Earphone socket 3.5mm Earphone: Audio output port.
- 4P-1.25mm Touch Expansion & Power: Expansion port for touch and power.
- PWM Expansion: Pulse Width Modulation expansion.
- Raspberry Pi mounting hole *4: Mounting holes for Raspberry Pi.
2. Connecting to a Raspberry Pi
The display is designed for plug-and-play operation with Raspberry Pi models (Pi 5, Pi 4/4B, Pi 3/3B+).
- Connect the HDMI Cable from your Raspberry Pi's HDMI output to the display's HD-MI Input port (8). Use the provided HDMI adapter if necessary.
- Connect the Type-C Cable from a 5V power source (e.g., Raspberry Pi's USB port or a dedicated USB power adapter) to the display's Touch & Power Type-C port (9). This provides power to the display and enables touch functionality.
- No additional drivers are typically required for basic display and touch functionality on Raspbian, Kali Linux, Ubuntu, Kodi, or Win10 IoT.

Image: Connection guide for the Hosyond 7-inch display with Raspberry Pi models, showing HDMI and Type-C cable connections.
3. Connecting to Other Devices (Windows PC, Game Consoles, TV Boxes)
The display can also function as a secondary monitor for various devices.
- Connect the HDMI Cable from your device's HDMI output to the display's HD-MI Input port (8).
- Connect the Type-C Cable from a 5V power source to the display's Touch & Power Type-C port (9) for power.
- For touch functionality on Windows 7/8/10/11, connect the Type-C cable to a USB port on your computer. The display should be recognized as a touch input device automatically.
- For game consoles (PS4, Xbox 360, Switch) and TV boxes, the display will function in display-only mode.

Image: The display connected to a computer, game console, TV box, and camera, demonstrating its compatibility with multiple devices.
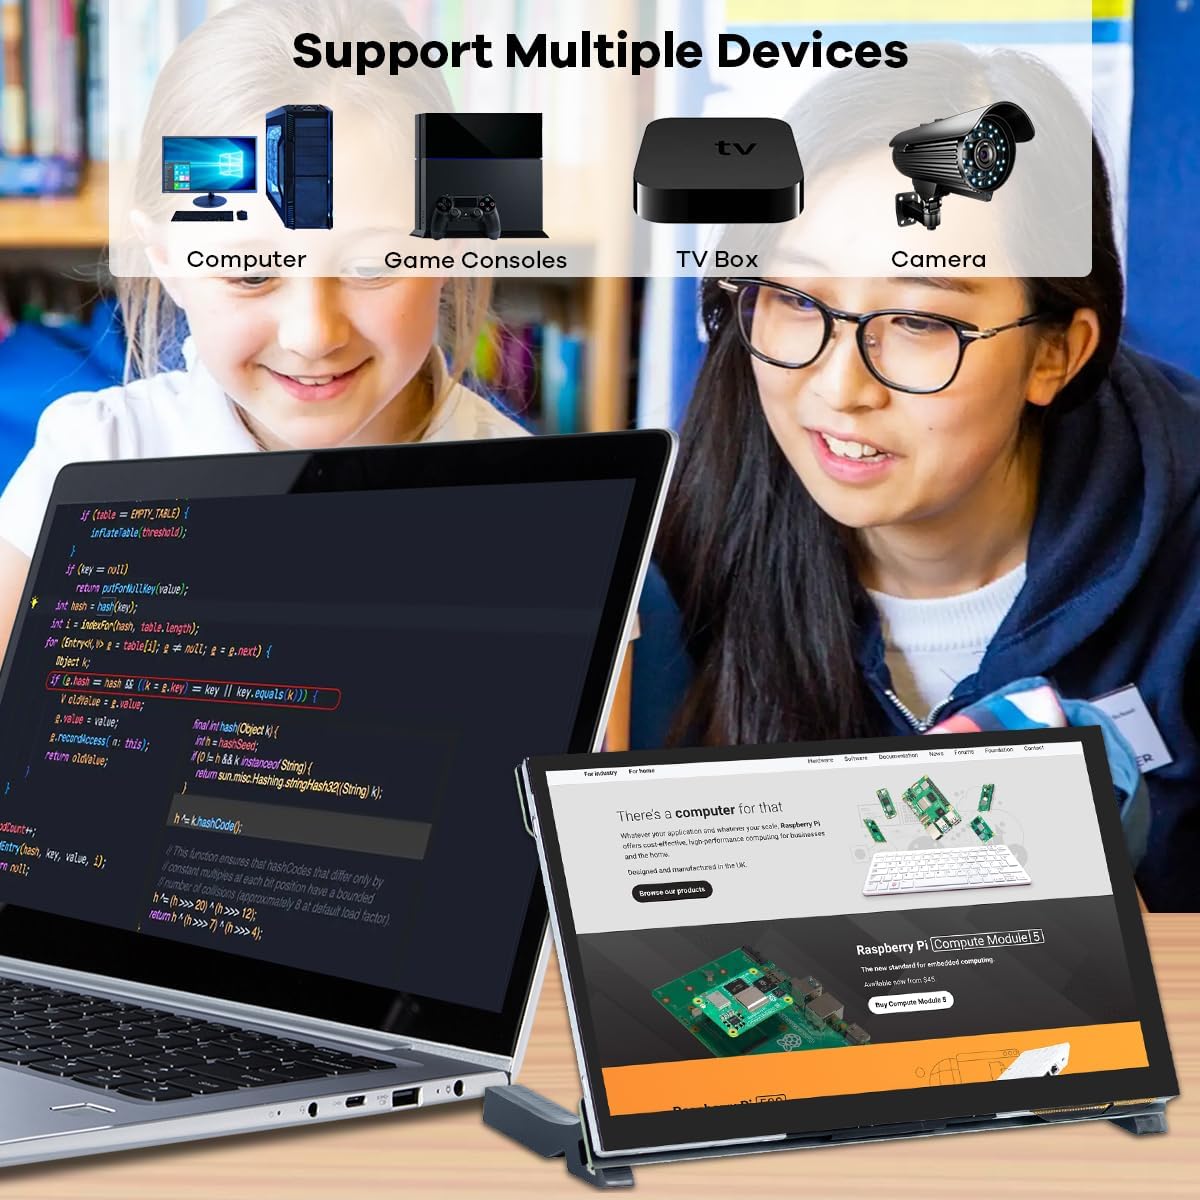
Image: Examples of how the display can be used as a duplicate, extended, or secondary screen with a laptop.
Operating Instructions
Power On/Off
- To power on the display, ensure it is connected to a 5V power source via the Type-C port (9), then press the Power button (5).
- To power off, press and hold the Power button (5) until the display turns off.
Using the OSD Menu
The On-Screen Display (OSD) menu allows you to adjust various display settings.
- Press the OSD Menu button (1) to open the menu.
- Use the Left/Up (2) and Right/Down (3) buttons to navigate through menu options.
- Press the OSD Menu button (1) again to select an option or confirm a setting.
- Use the Return button (4) to go back to the previous menu or exit the OSD.
Common adjustable settings include brightness, contrast, color temperature, aspect ratio, and input source selection.
Touch Functionality
The display features a 5-point capacitive touch screen.
- Ensure the Type-C cable is connected from the display's Touch & Power Type-C port (9) to a USB port on your host device (e.g., Raspberry Pi, Windows PC).
- For compatible operating systems (Linux-based systems like Raspbian, Ubuntu, and Windows 7/8/10/11), touch functionality is typically driver-free and plug-and-play.
- If touch input is not recognized, verify the Type-C connection and ensure your operating system supports external touchscreens.
Maintenance and Care
- Cleaning: Use a soft, lint-free cloth slightly dampened with water or a screen cleaner to wipe the display surface. Avoid harsh chemicals, abrasive materials, or excessive moisture.
- Handling: Handle the display by its edges. Avoid applying pressure to the screen surface, especially when transporting.
- Storage: Store the display in a cool, dry place away from direct sunlight and extreme temperatures. If storing for extended periods, use the original packaging or a protective case.
- Power: Always use the recommended 5V power supply. Disconnect power during electrical storms or when not in use for long periods.
- Ventilation: Ensure adequate ventilation around the display to prevent overheating. Do not block any ventilation openings.
Troubleshooting
No Display / Black Screen
- Check Power: Ensure the Type-C cable is securely connected to a 5V power source and the display's Type-C port. Verify the power source is active.
- Check HDMI Connection: Ensure the HDMI cable is firmly connected to both the display's HDMI input and your host device's HDMI output. Try a different HDMI cable if available.
- Input Source: If your host device has multiple video outputs, ensure the correct output is selected. On the display, use the OSD menu to verify the input source is set to HDMI.
- Host Device Output: Confirm your host device (e.g., Raspberry Pi, PC) is powered on and configured to output video to the connected display.
Touch Functionality Not Working
- Check Type-C Connection: The Type-C cable carries both power and touch data. Ensure it is securely connected to both the display and a USB data port on your host device.
- Operating System Support: Verify that your operating system (e.g., specific Linux distribution, Windows version) supports external capacitive touchscreens and has the necessary drivers. Most modern OS are plug-and-play.
- Calibration: Some operating systems may require touch screen calibration. Refer to your OS documentation for calibration procedures.
- Restart: Try restarting both the display and your host device.
Image Quality Issues (Flickering, Distorted Colors)
- Cable Integrity: Inspect the HDMI cable for any damage. Try a different HDMI cable.
- Resolution Settings: Ensure your host device's output resolution is compatible with the display's native resolution (1024x600). Adjust settings on your host device if necessary.
- Power Supply: An unstable or insufficient power supply can cause image issues. Ensure you are using a stable 5V power source.
- OSD Adjustments: Use the OSD menu to adjust brightness, contrast, and color settings.
Warranty and Support
For warranty information and technical support, please refer to the official Hosyond website or contact their customer service directly. Details are typically provided on the product packaging or the manufacturer's official online resources.
Manufacturer: Hosyond
Model Number: H085
For further assistance, please visit the Hosyond Store on Amazon.