1. Product Overview
The PowerSmart DB1002 Electric Pressure Washer is designed for efficient and powerful cleaning of various outdoor surfaces. It features a durable induction brushless motor and delivers high pressure for effective dirt removal.

Figure 1: PowerSmart DB1002 Electric Pressure Washer with included accessories.
Key Features:
- High-Efficiency Induction Brushless Motor: Offers quieter performance, greater durability, and better energy efficiency compared to traditional brushed motors.
- 2600 PSI & 1.2 GPM Powerful Cleaning: Delivers strong water pressure and flow for deep cleaning of siding, driveways, decks, and vehicles.
- 5 Quick-Connect Nozzles: Includes 0°, 15°, 25°, 40°, and soap nozzles for versatile cleaning tasks, from spot cleaning to wide-area rinsing and detergent application.
- Built-In Detergent Tank & 8” Wheels: Integrated soap tank for efficient detergent use and large wheels for easy maneuverability across various terrains.
- Compact Design with Full Accessories: Comes with spray gun, hose, wand, siphoning tube, 5 nozzles, and quick assembly tools, designed for easy storage and home use.
2. Assembly Instructions
Follow these steps to assemble your PowerSmart DB1002 pressure washer. Assembly is designed to be quick and straightforward.
2.1 Unboxing and Component Identification
Carefully remove all components from the packaging. Verify that all parts listed in the manual are present before proceeding.
Video 1: Unboxing and identifying components of the PowerSmart pressure washer. This video provides a visual guide to ensure all parts are present.
2.2 Attaching the Support Beam and Wheels
Secure the support beam to the base of the unit. Then, attach the shaft, collars, and wheels as shown. Ensure all locking nuts are tightened securely.

Figure 2: The pressure washer with its wheels and support beam securely attached, ready for further assembly.
2.3 Installing the Soap Reservoir and Top Handle
Place the soap reservoir onto its designated position. Attach the top handle and lock both sides in place using the provided red fasteners. These fasteners offer a secure and tool-free connection.
Video 2: Demonstrates the easy assembly of the soap reservoir and top handle, highlighting the quick-lock mechanisms.
2.4 Connecting Hoses and Spray Gun
Connect the spray handle to the shaft. Attach the hose holder to the side of the unit for tidy storage. Connect the water inlet hose to the pump and the other end of the high-pressure hose to the trigger gun. Ensure all connections are tight to prevent leaks.
Figure 3: The fully assembled PowerSmart pressure washer, ready for operation.
3. Operating Instructions
3.1 Pre-Operation Checklist
- Ensure all hoses are securely connected and free from kinks.
- Verify the water supply is turned on and flowing freely.
- Select the appropriate quick-connect nozzle for your cleaning task.
- If using detergent, fill the built-in detergent tank.
3.2 Using Quick-Connect Nozzles
The pressure washer includes 5 quick-connect nozzles, each designed for specific applications:
- 0° (Red): For tough, concentrated cleaning on small areas.
- 15° (Yellow): For intense cleaning of hard surfaces with stubborn grime.
- 25° (Green): For general cleaning of various surfaces.
- 40° (White): For gentle rinsing and cleaning of delicate surfaces.
- Soap (Black): For applying detergent.
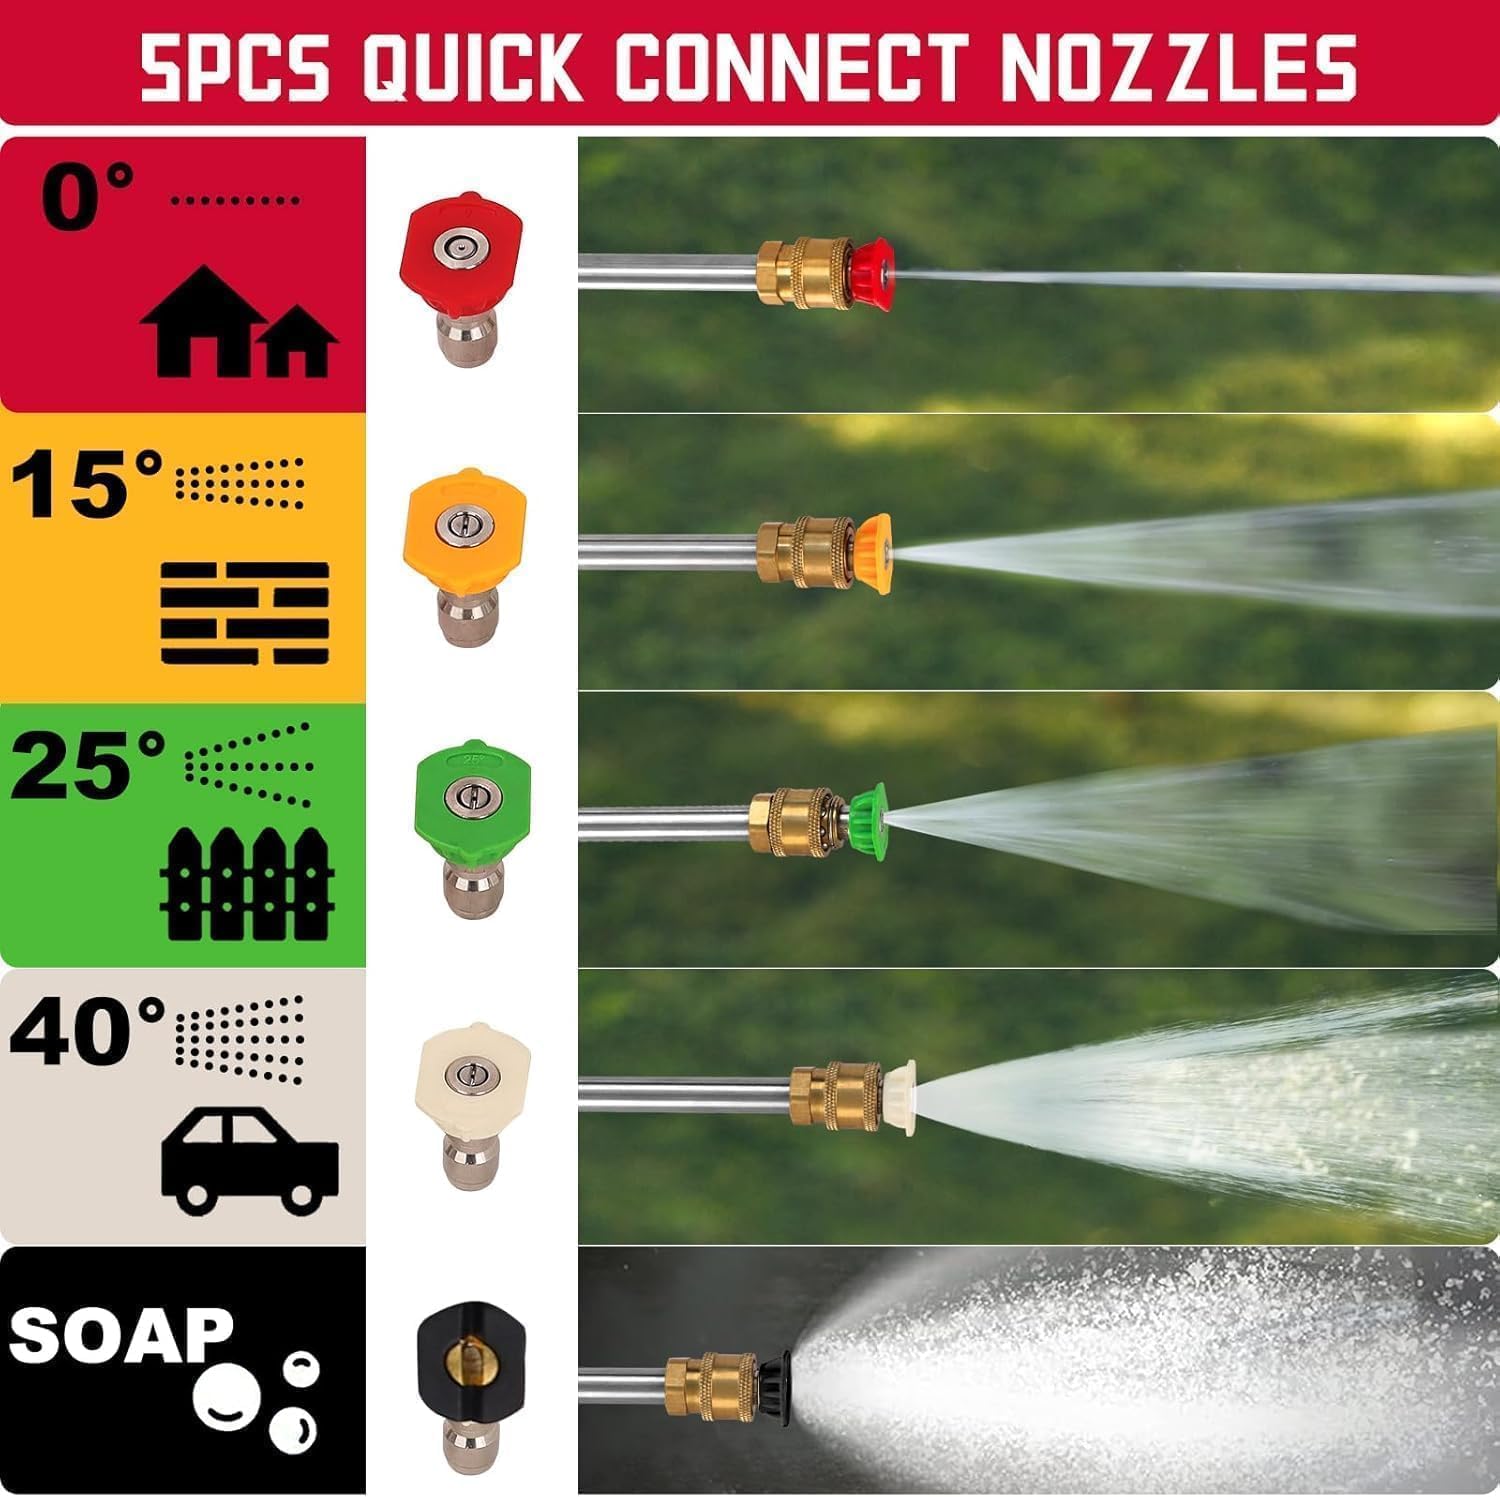
Figure 4: Visual guide to the 5 quick-connect nozzles and their recommended uses.
3.3 Detergent Application
Fill the built-in detergent tank with appropriate pressure washer detergent. Attach the black soap nozzle to the spray gun. The pressure washer will automatically mix the detergent with water for application.
3.4 Water Intake Methods
The pressure washer supports two water intake methods: direct connection to a garden hose (Method A) or drawing water from a static source like a bucket (Method B) using the siphoning tube.

Figure 5: Illustration of the two water intake methods for the pressure washer.
4. Maintenance
4.1 General Maintenance
- Regularly inspect hoses and connections for wear or damage.
- Clean nozzles after each use to prevent clogging.
- Ensure the water inlet filter is clean to maintain optimal performance.
4.2 Storage
- Drain all water from the pump and hoses before storing to prevent freezing damage.
- Store the pressure washer in a dry, protected area away from extreme temperatures.
- Utilize the integrated hose holder and accessory storage for compact organization.
5. Troubleshooting
| Problem | Possible Cause | Solution |
|---|---|---|
| Unit does not start | Power cord not plugged in; GFCI tripped; On/Off switch off. | Plug in power cord; Reset GFCI; Turn On/Off switch to ON. |
| Low pressure | Insufficient water supply; Clogged nozzle; Air in pump. | Ensure full water flow; Clean nozzle; Purge air from pump by running without nozzle until steady stream. |
| Water leaks | Loose connections; Damaged O-rings. | Tighten all connections; Replace damaged O-rings. |
6. Specifications
- Brand: PowerSmart
- Model Number: DB1002
- Power Source: AC Electric
- Maximum Pressure: 2600 PSI
- Maximum Flow Rate: 1.2 GPM (Gallons Per Minute)
- Item Weight: 35 Pounds
- Product Dimensions: 14.19"L x 13.4"W x 20.9"H
- Hose Length: 27 Inches (High-Pressure Hose)
- Wheels: 8-inch
- Motor: 14-Amp Induction Brushless Motor
7. Warranty & Support
PowerSmart products are backed by a manufacturer's warranty. For specific warranty details, please refer to the warranty card included in your product packaging or visit the official PowerSmart website. For technical support, replacement parts, or any questions, please contact PowerSmart customer service.
PowerSmart has 500+ certified repair centers in the U.S. and provides full replacement parts through its IL headquarters.
Visit the PowerSmart Store on Amazon for more information.


