
Introduction
Thank you for purchasing the Douk Audio P7 Vacuum Tube Phono Preamplifier. This device is designed to enhance your audio experience by providing a high-quality pre-amplification stage for turntables and other audio sources, featuring vacuum tube warmth, balanced XLR output, and precise tone controls. Please read this manual thoroughly before operation to ensure proper setup and optimal performance.
What's in the Box?
- 1x Douk Audio P7 Preamp Unit
- 2x PSVANE ECC83 Tubes
- 1x DC 12V Power Adapter
- 1x User Manual

Image: The Douk Audio P7 package contents, showing the main unit, two PSVANE ECC83 tubes, a DC 12V power adapter, and the user manual.
Safety Instructions
- Do not expose this device to rain or moisture.
- Do not disassemble the unit. Refer all servicing to qualified personnel.
- Ensure proper ventilation around the unit to prevent overheating.
- Use only the provided power adapter. Using an incorrect adapter may damage the unit and void the warranty.
- Keep out of reach of children.
- Avoid placing the unit near heat sources or in direct sunlight.
Product Overview
Front and Rear Panel Layout
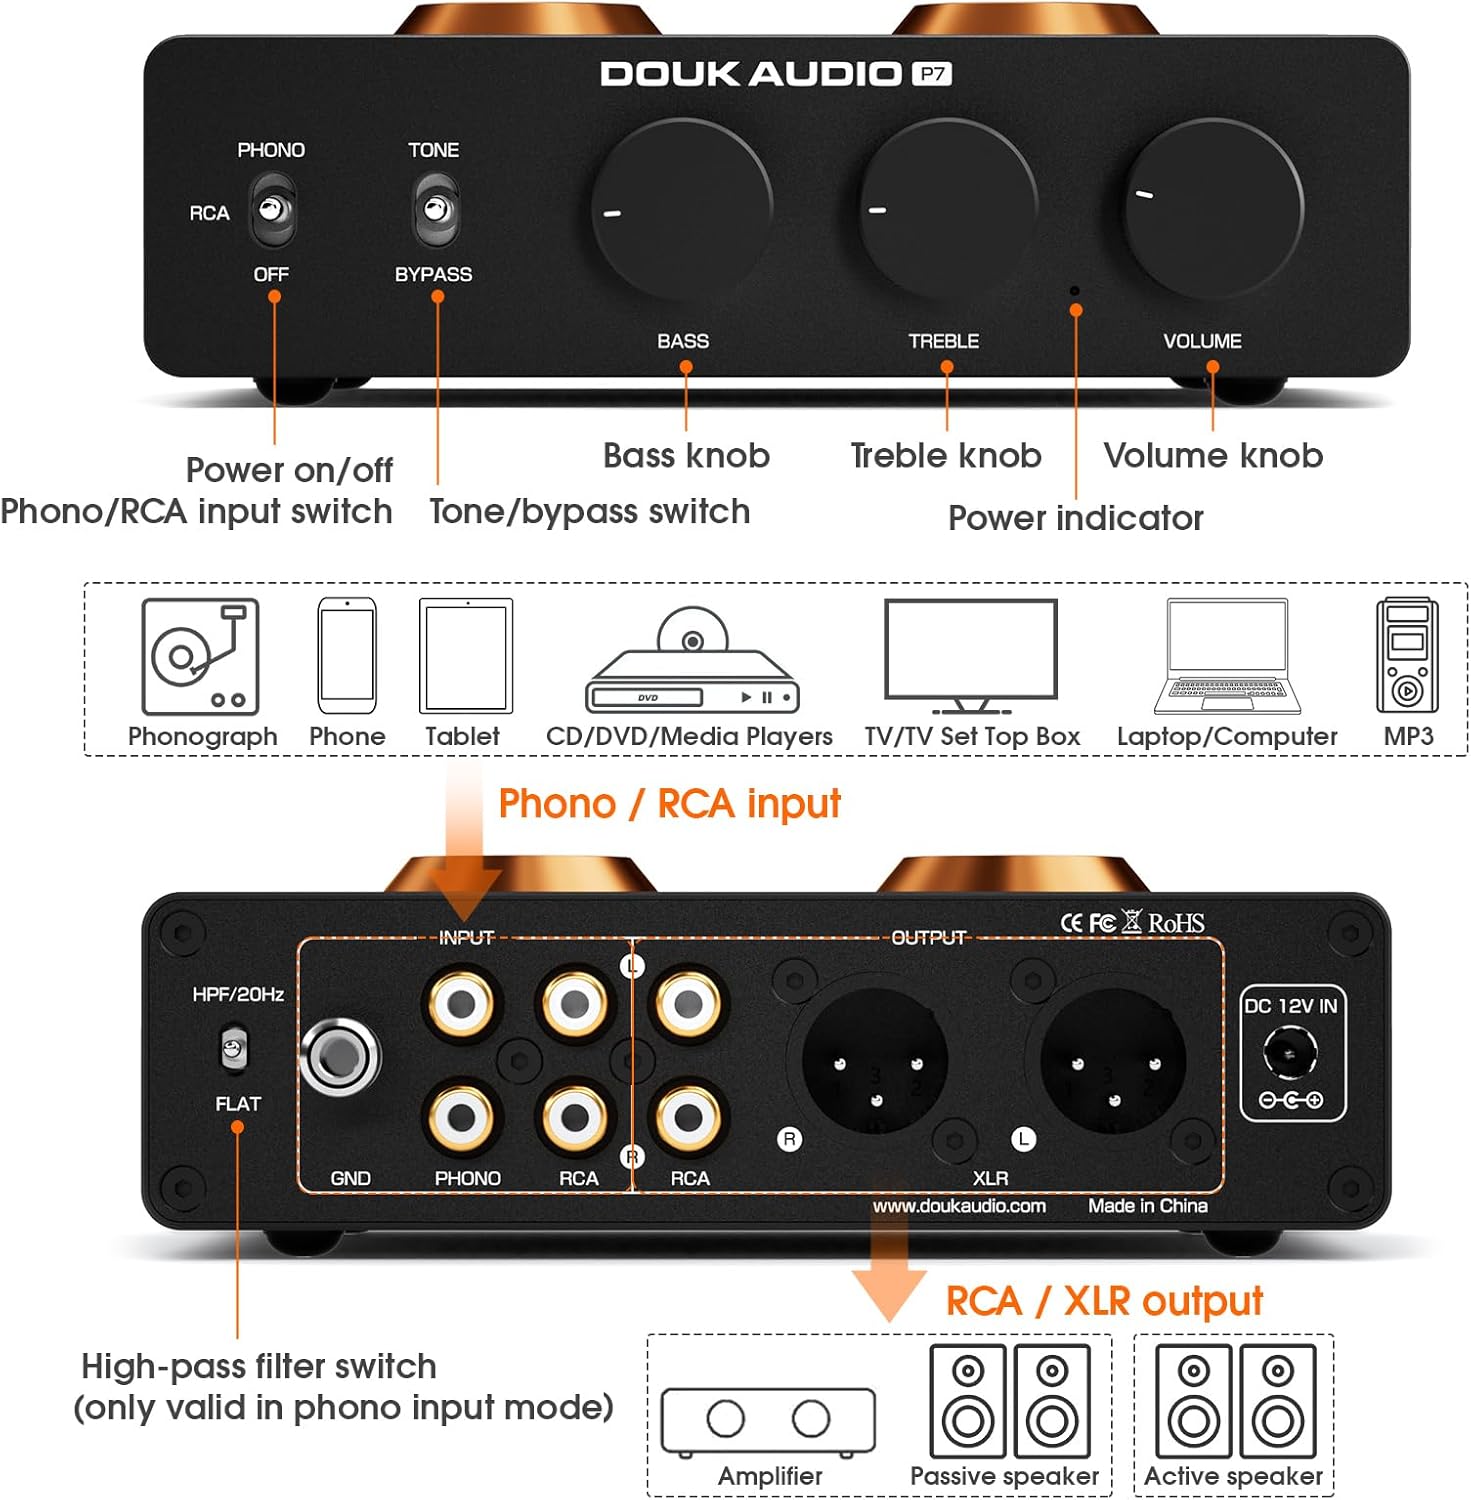
Image: A comprehensive diagram illustrating the front and rear panels of the Douk Audio P7, highlighting the location and function of each control, input, and output.
Front Panel Controls:
- Power On/Off Switch: Toggles the unit's power.
- Phono/RCA Input Switch: Selects between Phono (turntable) and RCA (line-level) inputs.
- Tone/Bypass Switch: Engages or bypasses the Bass and Treble tone controls.
- Bass Knob: Adjusts low-frequency response.
- Treble Knob: Adjusts high-frequency response.
- Volume Knob: Controls the overall output volume.
- Power Indicator: Illuminates when the unit is powered on.
Rear Panel Connections:
- High-Pass Filter (HPF) Switch: Activates a 20Hz high-pass filter (only for Phono input).
- GND Terminal: Ground connection for turntables.
- PHONO Input (RCA L/R): Connects to a turntable with MM cartridge.
- RCA Input (L/R): Connects to line-level audio sources (CD player, TV, phone, etc.).
- RCA Output (L/R): Standard unbalanced audio output.
- XLR Output (L/R): Balanced audio output for reduced noise and improved dynamic range.
- DC 12V IN: Power input for the included DC 12V adapter.
Setup
1. Tube Installation
Carefully insert the two PSVANE ECC83 tubes into their respective sockets on the top of the unit. Ensure the pins align correctly with the socket holes and gently push down until the tubes are seated firmly. Do not force them.

Image: A detailed view of two PSVANE ECC83 vacuum tubes, ready for installation into the preamplifier.
2. Connecting Audio Sources
- For Turntables (MM Cartridge): Connect your turntable's RCA output cables to the PHONO input (L/R) on the rear panel. Connect the turntable's ground wire to the GND terminal on the P7.
- For Line-Level Sources (CD Player, Phone, TV, etc.): Connect your audio source's RCA output cables to the RCA input (L/R) on the rear panel.
3. Connecting to an Amplifier/Speakers
- Using RCA Output: Connect the P7's RCA Output (L/R) to the RCA input of your amplifier or active speakers.
- Using Balanced XLR Output: For optimal noise reduction and dynamic range, connect the P7's XLR Output (L/R) to the balanced XLR input of your amplifier or active speakers.

Image: A detailed view of the Douk Audio P7's rear panel, focusing on the balanced XLR output connections.
4. Power Connection
Connect the provided DC 12V power adapter to the DC 12V IN port on the rear panel of the P7, then plug the adapter into a wall outlet.
Operating Instructions
1. Powering On/Off
Press the Power On/Off switch on the front panel to turn the unit on. The power indicator light will illuminate. Press it again to turn off the unit.
2. Input Selection
Use the Phono/RCA Input Switch on the front panel to select the appropriate input source:
- Set to PHONO for turntables.
- Set to RCA for line-level devices.
3. Volume Control
Adjust the Volume Knob on the front panel to achieve your desired listening level. Start with a low volume and gradually increase it.
4. Tone Control and Bypass
The P7 features Bass and Treble controls for sound customization. Use the Tone/Bypass Switch to engage or disengage these controls:
- Set to TONE to enable the Bass and Treble knobs. Adjust them to your preference.
- Set to BYPASS for a pure, unaltered audio signal, bypassing the tone control circuit.

Image: The front panel controls of the Douk Audio P7, illustrating the Bass, Treble, and Volume knobs, and the Tone/Bypass switch.
5. High-Pass Filter (HPF)
The High-Pass Filter (HPF) switch on the rear panel is only active when the Phono input is selected. It cuts off subsonic noise below 20Hz, which can improve sound clarity and reduce distortion from turntable rumble.
- Set to HPF/20Hz to activate the filter.
- Set to FLAT to disable the filter.

Image: The rear panel of the Douk Audio P7, showing the High-Pass Filter switch with its two settings: HPF/20Hz and FLAT.
Tube Replacement
The PSVANE ECC83 tubes are designed to be easily swappable, allowing for tube rolling to tailor the sound to your preference. To replace tubes:
- Ensure the unit is powered off and unplugged from the wall outlet.
- Allow the tubes to cool down completely if the unit has been in use.
- Gently pull the existing tubes straight up from their sockets. Avoid twisting or bending.
- Carefully insert the new ECC83 tubes, aligning the pins with the socket holes. Push down gently until they are seated firmly.
- Reconnect power and test the unit.
Maintenance
- Cleaning: Use a soft, dry cloth to clean the exterior of the unit. Do not use liquid cleaners or solvents.
- Ventilation: Ensure the ventilation holes on the unit are not obstructed to maintain proper airflow.
- Storage: When not in use for extended periods, store the unit in a cool, dry place, away from direct sunlight and extreme temperatures.
Troubleshooting
| Problem | Possible Cause | Solution |
|---|---|---|
| No power | Power adapter not connected; Power outlet faulty; Unit switched off. | Check power connections; Try a different outlet; Ensure power switch is ON. |
| No sound output | Incorrect input selected; Cables not connected properly; Volume too low; Amplifier/speakers off. | Select correct input (Phono/RCA); Check all audio cable connections; Increase volume; Ensure amplifier/speakers are on. |
| Humming/Buzzing noise (Phono) | Turntable ground not connected; Ground loop; HPF not engaged. | Connect turntable ground wire to GND terminal; Try engaging HPF; Ensure all components are properly grounded. |
| Distorted sound | Volume too high; Faulty cables; Damaged tubes. | Reduce volume; Replace audio cables; Inspect tubes for damage or try new tubes. |
| Tone controls not working | Tone/Bypass switch set to BYPASS. | Set Tone/Bypass switch to TONE. |
Specifications
| Feature | Detail |
|---|---|
| Model Number | SUC-P7 |
| Product Dimensions | 4.88 x 6.1 x 1.65 inches |
| Item Weight | 1.56 pounds |
| Input Types | MM Phono, RCA Line-level |
| Output Types | RCA, Balanced XLR |
| Tubes | 2x PSVANE ECC83 |
| High-Pass Filter | 20Hz (Phono input only) |
| Tone Control | Bass & Treble (with Bypass function) |
| Manufacturer | Douk Audio |
Warranty and Support
Douk Audio products are designed for reliability and performance. For warranty information and technical support, please refer to the official Douk Audio website or contact your retailer. Keep your purchase receipt as proof of purchase for warranty claims.
For further assistance, you may visit the Douk Audio store on Amazon: Douk Audio Store


