1. Introduction
This manual provides detailed instructions for the installation, operation, and maintenance of your Technical Pro Home Audio System Kit KTHM12X65. This comprehensive audio system is designed to deliver high-quality sound for both residential and commercial environments. Please read this manual thoroughly before using the product to ensure proper setup and optimal performance.
2. Safety Instructions
- Electrical Safety: Always connect the amplifier to a grounded power outlet. Do not expose the unit to rain or moisture. Disconnect power before cleaning or servicing.
- Ventilation: Ensure adequate ventilation around the amplifier. Do not block ventilation openings. Overheating can cause damage.
- Placement: Place the amplifier on a stable, level surface. Avoid placing it near heat sources, direct sunlight, or areas with excessive dust or vibration.
- Cleaning: Use a soft, dry cloth for cleaning. Do not use liquid cleaners or aerosols.
- Servicing: Do not attempt to service this unit yourself. Refer all servicing to qualified service personnel.
- Speaker Wire: Ensure correct polarity when connecting speaker wires to prevent damage to speakers and amplifier.
3. Package Contents
Carefully unpack your system and ensure all items listed below are present and in good condition:
- 1 x Technical Pro H12X500UBT Hybrid Amplifier
- 12 x 6.5-inch In-Wall/In-Ceiling Speakers
- 2 x Wired Dynamic Microphones with 10 ft XLR to 1/4" cables
- 1 x 500 ft Spool of 16 Gauge Speaker Wire
- 1 x Wireless Remote Control
- 1 x Power Cable

Image 3.1: All components included in the Technical Pro Home Audio System Kit.
4. Product Overview
4.1. Hybrid Amplifier (Model: H12X500UBT)
The H12X500UBT is a powerful 6-zone, 12-speaker hybrid amplifier system delivering 6000 watts of power. It features Bluetooth v2.0 connectivity, USB and SD card inputs, iPod compatibility, and a wireless remote for convenient control.

Image 4.1.1: Key features of the Technical Pro H12X500UBT Hybrid Amplifier.

Image 4.1.2: Front and rear panel layout of the H12X500UBT Amplifier.
4.2. In-Wall/In-Ceiling Speakers
The system includes 12 versatile 6.5-inch speakers designed for in-wall and in-ceiling applications. These speakers feature high-temperature voice coils and high-efficiency response rates, providing exceptional sound quality. They come with convenient speaker terminals and a cut-out template for easy installation.
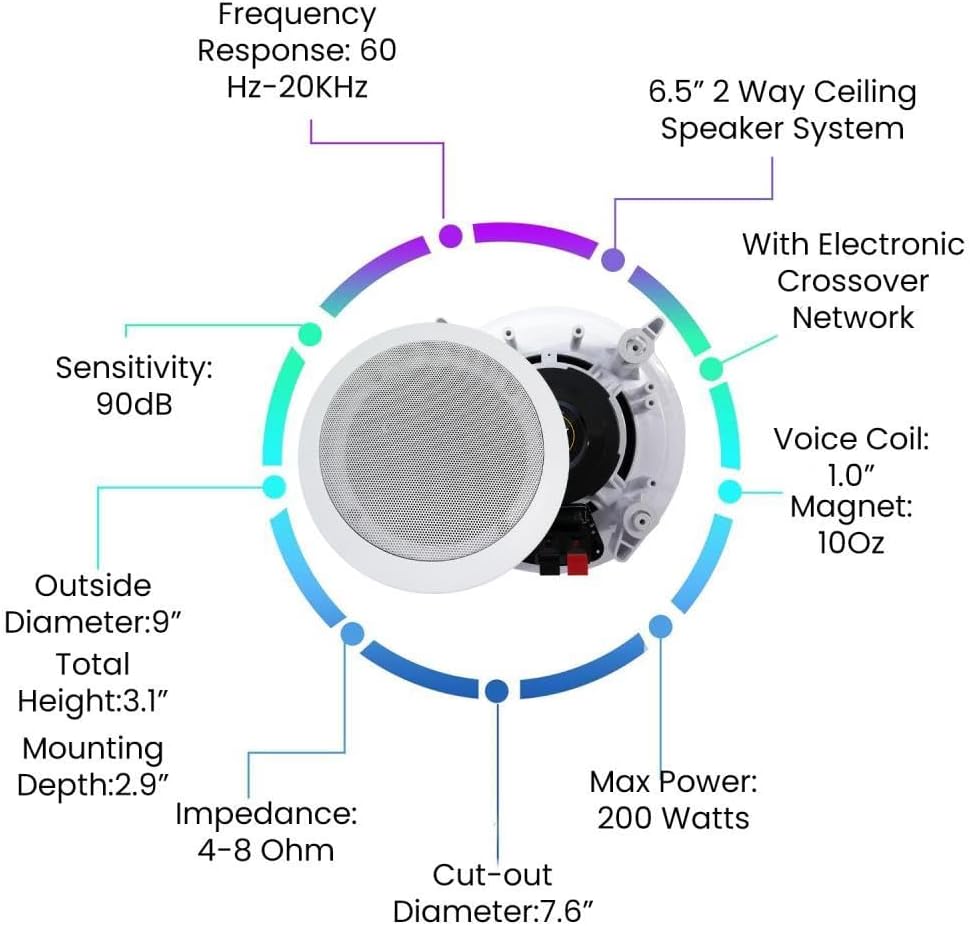
Image 4.2.1: Key features and dimensions of the 6.5-inch In-Wall/In-Ceiling Speakers.
4.3. Speaker Wire
A 500 ft spool of 16 gauge high-quality speaker zip wire is included. The plastic jacket ensures high-quality, undistorted signals, and a black line indicates polarity for easy setup.

Image 4.3.1: Features of the included 16 Gauge Speaker Wire.
4.4. Wired Microphones
Two professional dynamic microphones are included, each with durable steel construction and a 10 ft XLR to 1/4" cable. They feature a frequency range of 50Hz-15kHz, cardioid directional pattern, 600 ohm impedance, and -72dB sensitivity.

Image 4.4.1: Key features of the included Wired Dynamic Microphones.
5. Setup
5.1. Amplifier Placement
Place the amplifier on a flat, stable surface with sufficient space around it for proper ventilation. Avoid enclosed cabinets or areas that may restrict airflow.
5.2. Speaker Installation
The 6.5-inch speakers are designed for in-wall or in-ceiling mounting. Follow these general steps:
- Choose Location: Select appropriate locations in your wall or ceiling, ensuring no electrical wires, pipes, or structural elements are present.
- Cut-out: Use the provided cut-out template to mark the opening. Carefully cut the hole in the drywall or ceiling material. The cut-out diameter is approximately 7.6 inches.
- Wiring: Run speaker wire from the amplifier to each speaker location. Leave enough slack for connection.
- Connect Speaker: Connect the speaker wire to the speaker terminals. Ensure correct polarity: match the positive (+) terminal on the speaker to the positive (+) terminal on the amplifier, and negative (-) to negative (-). The black line on the speaker wire indicates polarity.
- Mount Speaker: Insert the speaker into the cut-out. The locking tabs will secure the speaker in place. Tighten the screws on the front baffle to engage the locking tabs.
- Attach Grille: Secure the removable speaker grille over the speaker.

Image 5.2.1: Speaker parts and connection points for installation.
5.3. Speaker Wire Connection to Amplifier
Connect the other end of the speaker wires to the corresponding speaker output terminals on the rear of the H12X500UBT amplifier. The amplifier supports 6 zones, each with left and right speaker outputs. Maintain correct polarity (positive to positive, negative to negative) for all connections.
5.4. Microphone Connection
Connect the 10 ft XLR to 1/4" cable from each microphone to the MIC1 or MIC2 input jacks on the front panel of the amplifier.
5.5. Power Connection
Once all audio connections are made, connect the power cable to the amplifier's power input and then to a standard AC power outlet.
6. Operating Instructions
6.1. Power On/Off
Press the POWER button on the front panel of the amplifier or on the remote control to turn the unit on or off.
6.2. Source Selection
Use the input selector buttons on the front panel (e.g., USB, SD, AUX, Bluetooth, CD, DVD, Source) or the remote control to choose your desired audio source.

Image 6.2.1: Available input sources for the amplifier.
6.3. Bluetooth Pairing
- Select Bluetooth as the input source on the amplifier. The display will show "BLUE" or a similar indicator.
- On your mobile device, enable Bluetooth and search for available devices.
- Select "Technical Pro" or a similar name from the list to pair.
- Once paired, you can stream audio from your device to the amplifier.
6.4. USB/SD Playback
Insert a USB drive or SD card containing MP3, WAV, or WMA audio files into the respective slots on the front panel. The amplifier will automatically switch to the USB or SD source and begin playback.
6.5. Volume and Tone Controls
- MASTER VOLUME: Adjusts the overall output volume of the system.
- BASS/TREBLE: Adjusts the low and high frequency response of the audio.
- BALANCE: Adjusts the left/right channel balance.
6.6. Microphone Usage
- MIC VOL: Adjusts the volume of the connected microphones.
- MIC BASS/TREBLE: Adjusts the tone of the microphone input.
- MIC ECHO: Adds an echo effect to the microphone input.
6.7. Remote Control
The included wireless remote control allows for convenient operation of power, input selection, volume, and other functions from a distance.
7. Maintenance
- Cleaning: Regularly wipe the amplifier and speakers with a soft, dry cloth. Avoid using harsh chemicals or abrasive materials.
- Ventilation: Ensure that the amplifier's ventilation openings remain clear of dust and obstructions to prevent overheating.
- Cable Management: Periodically check all cable connections to ensure they are secure and free from damage.
8. Troubleshooting
| Problem | Possible Cause | Solution |
|---|---|---|
| No power | Power cable not connected; Power outlet faulty; Amplifier fuse blown | Check power cable connection; Try a different outlet; Contact service for fuse replacement. |
| No sound from speakers | Incorrect input source selected; Speaker wires disconnected or incorrect polarity; Speaker volume too low; Amplifier in protection mode | Select correct input source; Check all speaker wire connections and polarity; Increase master volume; Turn off amplifier, wait a few minutes, then restart. |
| Bluetooth connection issues | Device not in pairing mode; Amplifier not in Bluetooth mode; Interference | Ensure amplifier is in Bluetooth mode; Put device in pairing mode; Move device closer to amplifier; Restart both devices. |
| Microphone not working | Microphone cable not connected; MIC VOL too low; Faulty microphone or cable | Check microphone cable connection; Increase MIC VOL; Test with another microphone or cable if available. |
9. Specifications
9.1. Hybrid Amplifier (H12X500UBT)
- Power Output: 6000 Watts (Peak)
- Channels: 6-zone, 12-speaker support
- Bluetooth: Version 2.0
- Inputs: USB, SD Card, AUX, RCA (CD, DVD, Source), 2 x 1/4" Microphone
- Tuner: AM/FM Digital
- Controls: Master Volume, Bass, Treble, Balance, Mic Volume, Mic Bass, Mic Treble, Mic Echo
- Dimensions: Approximately 19 inches (W) x 12.6 inches (D) x 4.3 inches (H)
- Weight: Approximately 53 pounds (Total Kit Weight)
9.2. In-Wall/In-Ceiling Speakers
- Speaker Type: 2-Way In-Ceiling/In-Wall
- Woofer Size: 6.5 inches
- Max Power: 200 Watts (Each)
- Impedance: 4-8 Ohm
- Frequency Response: 60Hz-20KHz
- Sensitivity: 90dB
- Voice Coil: 1.0 inch (High-temperature)
- Magnet: 10oz
- Outside Diameter: 9 inches
- Total Height: 3.1 inches
- Mounting Depth: 2.9 inches
- Cut-out Diameter: 7.6 inches
9.3. Speaker Wire
- Gauge: 16 Gauge
- Length: 500 feet (152.4 meters)
- Conductors: 2 (Copper Clad Aluminum - CCA)
- Jacket: Translucent PVC
- Features: High Performance Multi Twist stranded wires, Polarity indicator (black line)
9.4. Wired Microphones
- Type: Dynamic
- Construction: Durable Steel
- Cable: 10 ft XLR to 1/4" (6.35mm)
- Frequency Range: 50Hz-15kHz
- Directional Pattern: Cardioid
- Impedance: 600 Ohm
- Sensitivity: -72dB ± 3dB
10. Warranty and Support
For warranty information and technical support, please refer to the documentation provided with your purchase or visit the official Technical Pro website. Keep your proof of purchase for any warranty claims.


