1. Introduction
The BlackVue DR970X-1CH Plus II is a high-performance 4K UHD dash camera designed to record your driving in exceptional detail. Featuring a STARVIS 2 sensor, HDR technology, and advanced parking mode, it provides reliable surveillance for your vehicle. This manual provides essential information for installing, operating, and maintaining your dash cam.
2. What's in the Box
Before you begin, please verify that all components are present:

Image: The image displays the contents of the BlackVue DR970X-1CH Plus II dash cam box. Included items are: the BlackVue DR970X-1CH Plus II dash cam, a MicroSD card and reader, a Quick Start Guide, cable clips (5EA), double-slide tape for the mounting bracket, a pry tool, a hardwiring power cable, and a cigarette lighter power cable.
- BlackVue DR970X-1CH Plus II Dash Cam
- MicroSD Card & Reader
- Quick Start Guide
- Cable Clips (5EA)
- Double-slide Tape for Mounting Bracket
- Pry Tool
- Hardwiring Power Cable
- Cigarette Lighter Power Cable
3. Setup
3.1 Mounting the Dash Cam
- Choose Location: Select a location on your windshield, typically behind the rearview mirror, that does not obstruct your view. Ensure the camera lens has a clear view of the road ahead.
- Clean Surface: Clean the chosen area on the windshield thoroughly with an alcohol wipe and let it dry completely.
- Attach Mount: Peel off the protective film from the double-sided tape on the mounting bracket. Firmly press the mount onto the cleaned windshield surface for at least 30 seconds.
- Insert Dash Cam: Slide the dash cam onto the mounted bracket until it clicks into place. Adjust the camera angle to ensure optimal recording coverage.
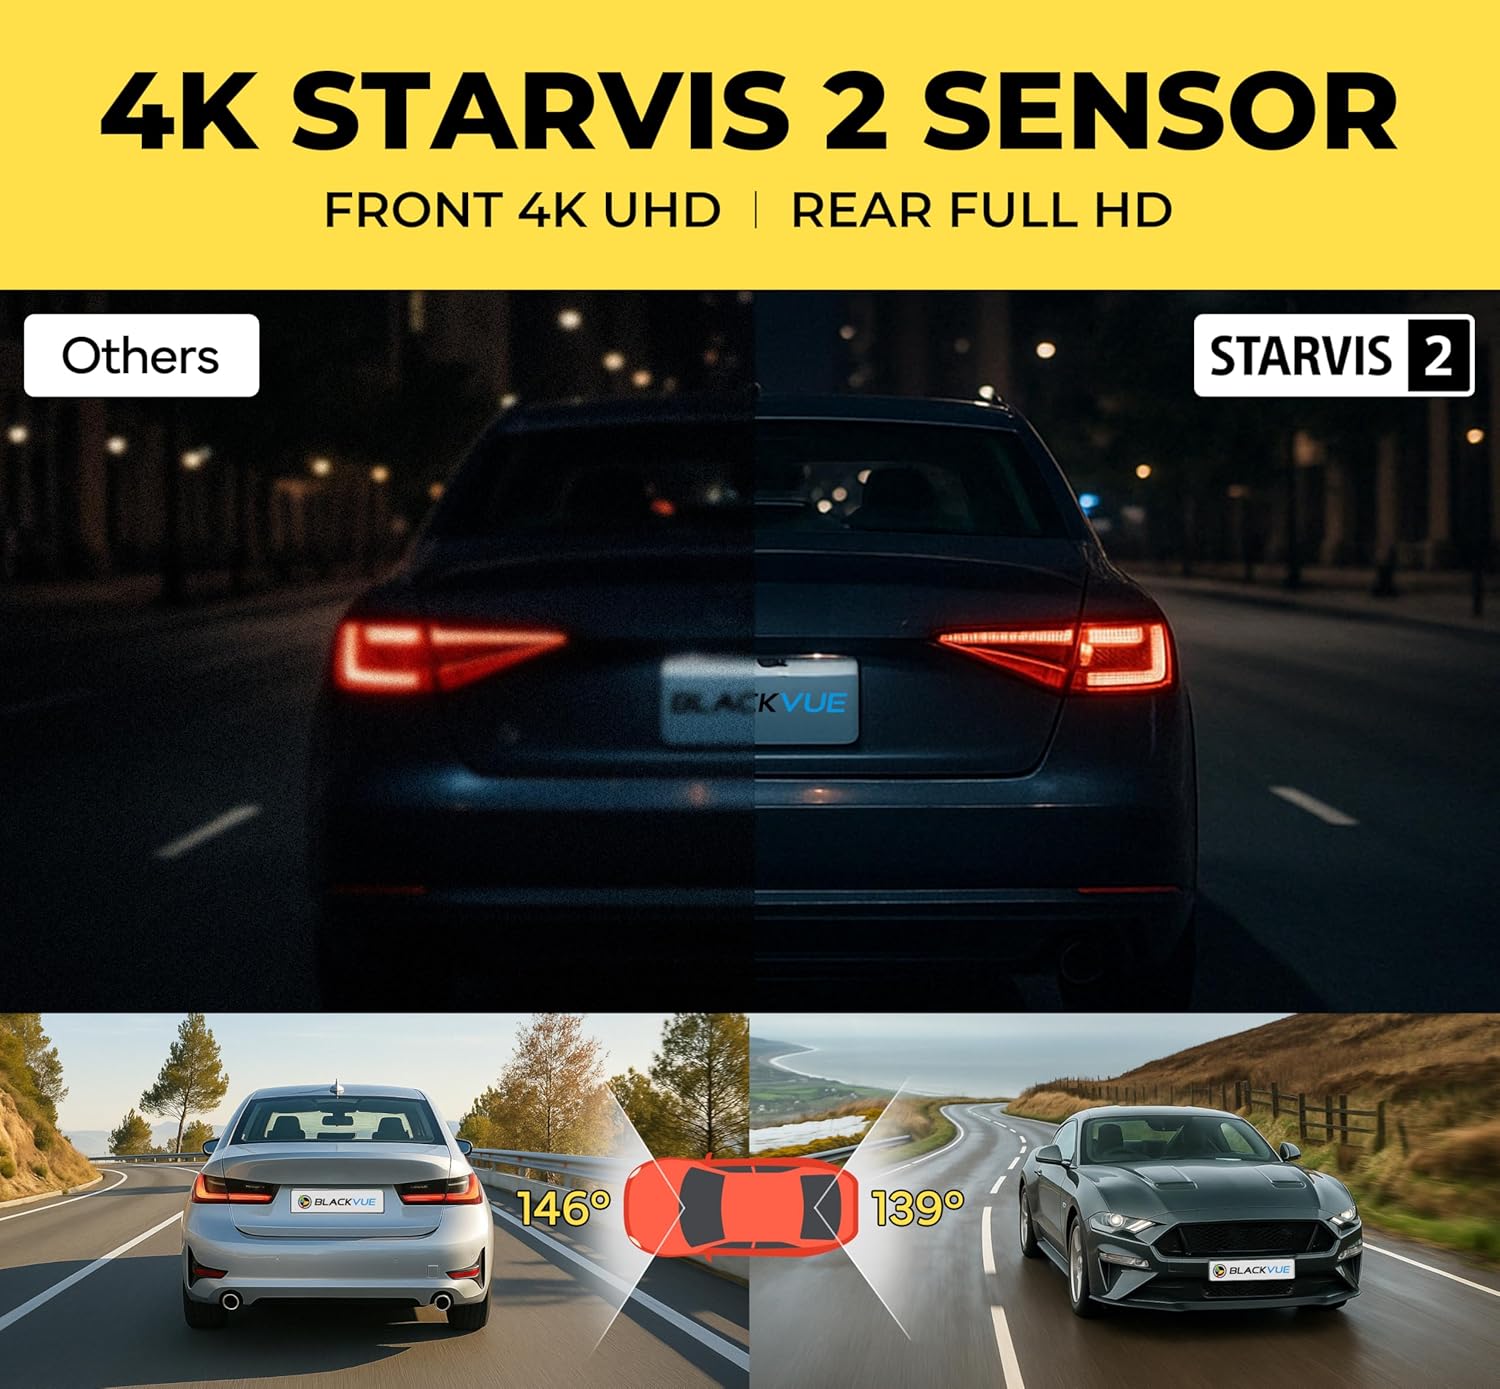
Image: The image shows the BlackVue DR970X-1CH Plus II dash cam discreetly installed on the upper center of a car's windshield, behind the rearview mirror, demonstrating a typical mounting position.
3.2 Power Connection
Connect the dash cam to your vehicle's power supply using either the included cigarette lighter power cable or the hardwiring power cable for Parking Mode functionality.
- Cigarette Lighter Power Cable: Plug one end into the dash cam's power port and the other into your vehicle's 12V cigarette lighter socket.
- Hardwiring Power Cable: For continuous power and Parking Mode, connect the hardwiring cable to your vehicle's fuse box. Consult a professional for installation if you are unsure.

Image: This image illustrates the hassle-free installation process, showing the dash cam connected via a USB-C power cable to a cigarette lighter adapter plugged into a car's power outlet.
3.3 MicroSD Card Insertion
The dash cam requires a MicroSD card for recording. Insert the provided MicroSD card into the designated slot on the dash cam until it clicks. Ensure the card is inserted correctly to avoid damage.
3.4 BlackVue App Pairing (Wi-Fi)
To access settings, view live footage, and download recordings, connect your smartphone to the dash cam via Wi-Fi using the BlackVue App.
- Download App: Download the BlackVue App from the Apple App Store or Google Play Store.
- Power On Dash Cam: Turn on your vehicle's ignition to power the dash cam.
- Activate Wi-Fi: Press the Wi-Fi button on the dash cam (if applicable, refer to Quick Start Guide for exact button location).
- Connect to Wi-Fi: On your smartphone, go to Wi-Fi settings and select the BlackVue network (e.g., "BlackVue_XXXXXX"). Enter the default password (usually "blackvue").
- Launch App: Open the BlackVue App and follow the on-screen instructions to register your dash cam and access its features.

Image: This image illustrates the seamless pairing process, showing a smartphone displaying the BlackVue app interface with options for Cloud, Wi-Fi, and other settings, while a hand holds the phone in a car interior with the dash cam visible.
4. Operating Instructions
4.1 Basic Recording (Loop Recording)
The DR970X-1CH Plus II automatically begins recording when powered on. It utilizes loop recording, continuously overwriting the oldest files when the MicroSD card is full, ensuring uninterrupted recording. Important event files are protected from being overwritten.

Image: The image depicts the concept of 'Endless Loop Recording', showing a film strip with various driving scenes looping around the BlackVue dash cam, indicating continuous recording without manual intervention.
4.2 Parking Mode
When your vehicle's ignition is turned off, the dash cam automatically switches to Parking Mode (requires hardwiring installation). It records events based on:
- Collision Detection: Records when an impact is detected.
- Motion Detection: Records when movement is detected in the camera's field of view.
- Low Bitrate Recording: Records continuously at a lower bitrate to save storage space during extended parking sessions.
You can adjust Parking Mode settings, including voltage cut-off and timer, via the BlackVue App.

Image: This graphic explains the 'Parking Mode' functionality, showing three scenarios: a collision being detected, low bitrate recording indicated by a Wi-Fi signal, and motion detection with a person walking near a parked car. It highlights the ability to set voltage cutoff and timer via the BlackVue App.
4.3 Event Recording
The dash cam detects key driving events such as sudden impacts or rapid changes in speed and saves these recordings separately to prevent them from being overwritten by loop recording. It captures 10 seconds before impact and continues recording after, protecting up to 50 event files.

Image: The image illustrates 'Smart Event Recording', depicting a car collision and the dash cam capturing the incident, emphasizing its ability to detect and record key driving events.
4.4 Cloud Features
With an optional CM100G LTE module (sold separately) or a mobile hotspot, you can unlock BlackVue Cloud features:
- Live View: Monitor your vehicle in real-time from anywhere.
- Remote Playback: Access and play recorded videos remotely.
- Auto Backup: Automatically upload important event files to the cloud.
- Push Notifications: Receive real-time alerts for detected events.
- GPS Tracking: View your vehicle's location and route history.

Image: This image showcases the 'Cloud Dashcam, Always ON!' feature, displaying a smartphone with the BlackVue app showing a map and various cloud functionalities like Live View, Push Notifications, Cloud Backup, Download Videos, Change Settings, and Update Firmware.
4.5 Video Playback
Videos can be played back directly on your smartphone via the BlackVue App (Wi-Fi connection required) or by removing the MicroSD card and inserting it into a computer with the BlackVue Viewer software.
5. Maintenance
5.1 MicroSD Card Management
The BlackVue DR970X-1CH Plus II is designed for endless loop recording, which reduces SD card errors and extends lifespan, minimizing the need for frequent formatting or replacements. However, it is still recommended to periodically check the card's health and ensure sufficient free space for new recordings.

Image: The image highlights 'Extended Storage', showing BlackVue branded microSD cards floating near the dash cam's port, indicating support for up to 1TB cards for longer recordings.
5.2 Firmware Updates
Regularly check for firmware updates via the BlackVue App or the official BlackVue website. Updating the firmware ensures optimal performance, new features, and bug fixes. Follow the instructions provided with the firmware update carefully.
5.3 Cleaning
Gently wipe the dash cam's lens and body with a soft, dry, lint-free cloth. Avoid using harsh chemicals or abrasive materials that could scratch the lens or damage the device.
6. Troubleshooting
- Dash Cam Not Powering On: Check the power cable connection to both the dash cam and the vehicle's power source. Ensure the vehicle's ignition is on if using the cigarette lighter adapter.
- No Recording: Verify that a MicroSD card is properly inserted and formatted. Check the BlackVue App for any error messages.
- Wi-Fi Connection Issues: Ensure the dash cam's Wi-Fi is activated. Try restarting both the dash cam and your smartphone. Confirm the correct Wi-Fi password.
- Parking Mode Not Activating: Ensure the dash cam is hardwired to the vehicle's power supply. Check Parking Mode settings in the BlackVue App.
- Poor Video Quality: Clean the camera lens. Ensure the firmware is up to date. Check recording resolution settings in the BlackVue App.
7. Specifications
| Feature | Detail |
|---|---|
| Model Name | DR970X-1CH Plus II |
| Video Capture Resolution | 2160p (4K UHD) |
| Frame Rate | 30fps |
| Sensor | STARVIS 2 |
| HDR Support | Yes |
| Connectivity | Wi-Fi, Cloud (via optional LTE module) |
| Storage | Supports MicroSD cards up to 1TB |
| Power Input | USB-C |
| Parking Mode | Yes (Collision, Motion, Low Bitrate) |
| Product Dimensions | 7.8 x 4.9 x 4 inches |
| Item Weight | 1.43 pounds |
| Color | Black |
| Manufacturer | Pittasoft |
| UPC | 889186013093 |
8. Accessory Compatibility
The BlackVue DR970X-1CH Plus II is compatible with various accessories to enhance its functionality. Refer to the table below for compatibility details:
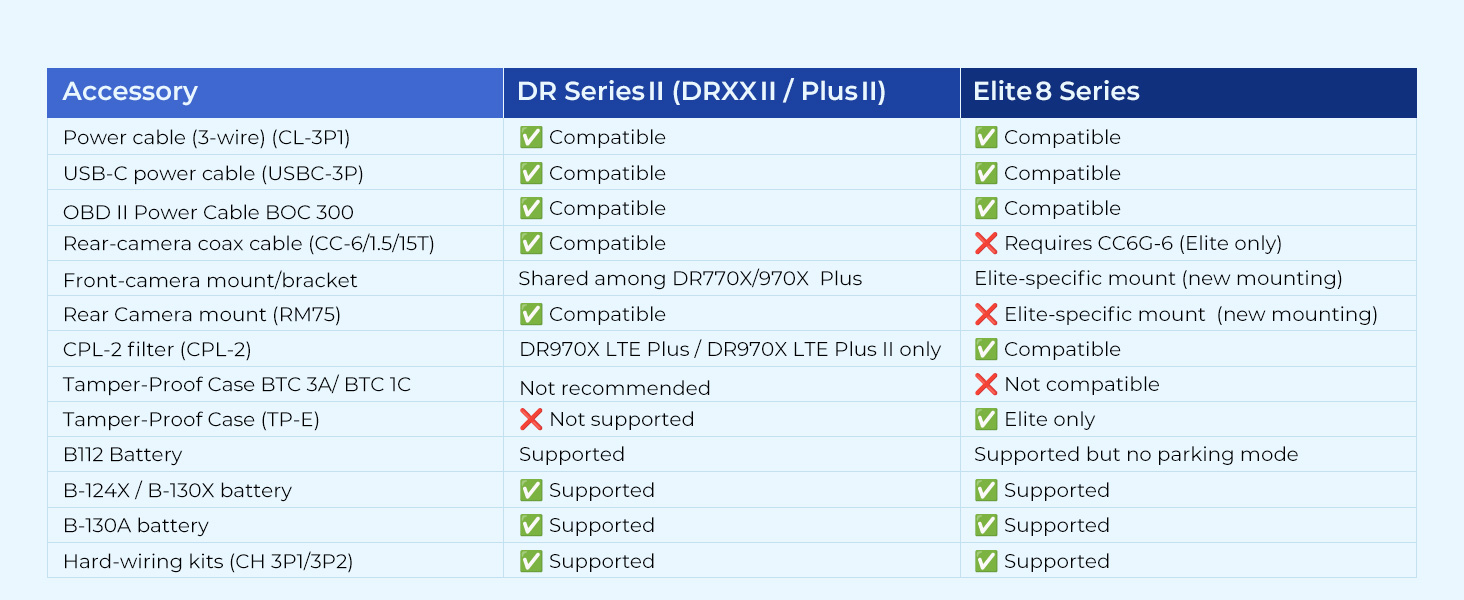
Image: This image displays a compatibility table for BlackVue accessories, detailing which accessories are compatible with DR Series II (DRXXII / Plus II) and Elite 8 Series dash cams. It lists items like power cables, rear-camera coax cables, mounts, CPL filters, tamper-proof cases, and batteries, indicating compatibility with checkmarks or specific notes.
| Accessory | DR Series II (DRXXII / Plus II) |
|---|---|
| Power cable (3-wire) (CL-3P1) | Compatible |
| USB-C power cable (USBC-3P) | Compatible |
| OBD II Power Cable BOC 300 | Compatible |
| Rear-camera coax cable (CC-6/1.5/T) | Compatible |
| Front-camera mount/bracket | Shared among DR770X/970X Plus |
| Rear Camera mount (RM75) | Compatible |
| CPL-2 filter (CPL-2) | DR970X LTE Plus / DR970X LTE Plus II only |
| Tamper-Proof Case BTC 3A/ BTC 1C | Not recommended |
| Tamper-Proof Case (TP-E) | Not supported |
| BT12 Battery | Supported |
| B-124X / B-130X battery | Supported |
| B-130A battery | Supported |
| Hard-wiring kits (CH 3P1/3P2) | Supported |
9. Support & Warranty
For technical support, warranty information, or further assistance, please visit the official BlackVue website or contact BlackVue customer service. Keep your purchase receipt as proof of purchase for warranty claims.
BlackVue Website: www.blackvue.com