
1. Introduction
Thank you for choosing the MYPIN MJ-HS0467 Smart Fingerprint Keyless Door Lock. This intelligent lock provides advanced security and convenience with multiple access methods. This manual will guide you through the installation, setup, operation, and maintenance of your new smart lock, ensuring optimal performance and security for your home.
2. Safety Information
- Read all instructions carefully before installation and use.
- Keep physical backup keys in a safe location outside your home, accessible only to trusted individuals.
- Do not expose the lock to direct water or corrosive substances.
- Ensure all components are securely fastened during installation to prevent malfunction.
- Replace batteries promptly when low battery warnings appear to avoid being locked out.
3. Package Contents
Verify that all items listed below are included in your package:

Image: Packing list Included. This image displays the various components of the smart lock, including the exterior and interior assemblies, key fobs, backup keys, user manual, latch bolt, door magnet, screws, strike plate, and mounting plate.
- Exterior Assembly
- Interior Assembly
- Key Fobs (x2)
- Backup Keys (x2)
- User Manual
- Latch Bolt
- Door Magnet
- Screws (various sizes)
- Strike Plate
- Mounting Plate
4. Product Overview
The MYPIN MJ-HS0467 Smart Fingerprint Door Lock offers a comprehensive keyless experience with multiple advanced features:
- 6 Unlocking Methods: Fingerprint, Keypad Code (via TT LOCK App), Physical Key, App Control, Key Fobs, and Apple Watch compatibility.
- Smart App and Remote Control: Connect via Bluetooth for control within 2 meters using the TT LOCK app. Remote control functionality requires the optional G2 Gateway (sold separately).
- Automatic Lock/Unlock: One-touch operation for locking/unlocking. Configurable auto-lock feature for added convenience.
- Automatic Left/Right Door Detection: The lock intelligently detects the door's opening direction (left/right) during installation, adapting the latch bolt trajectory without manual configuration.
- AI Self-Learning Fingerprint Recognition: Fast and accurate fingerprint recognition in less than 0.3 seconds, enhanced by AI learning for improved reliability over time.
5. Installation
5.1 Pre-installation Checks
Before beginning installation, ensure your door meets the following specifications:
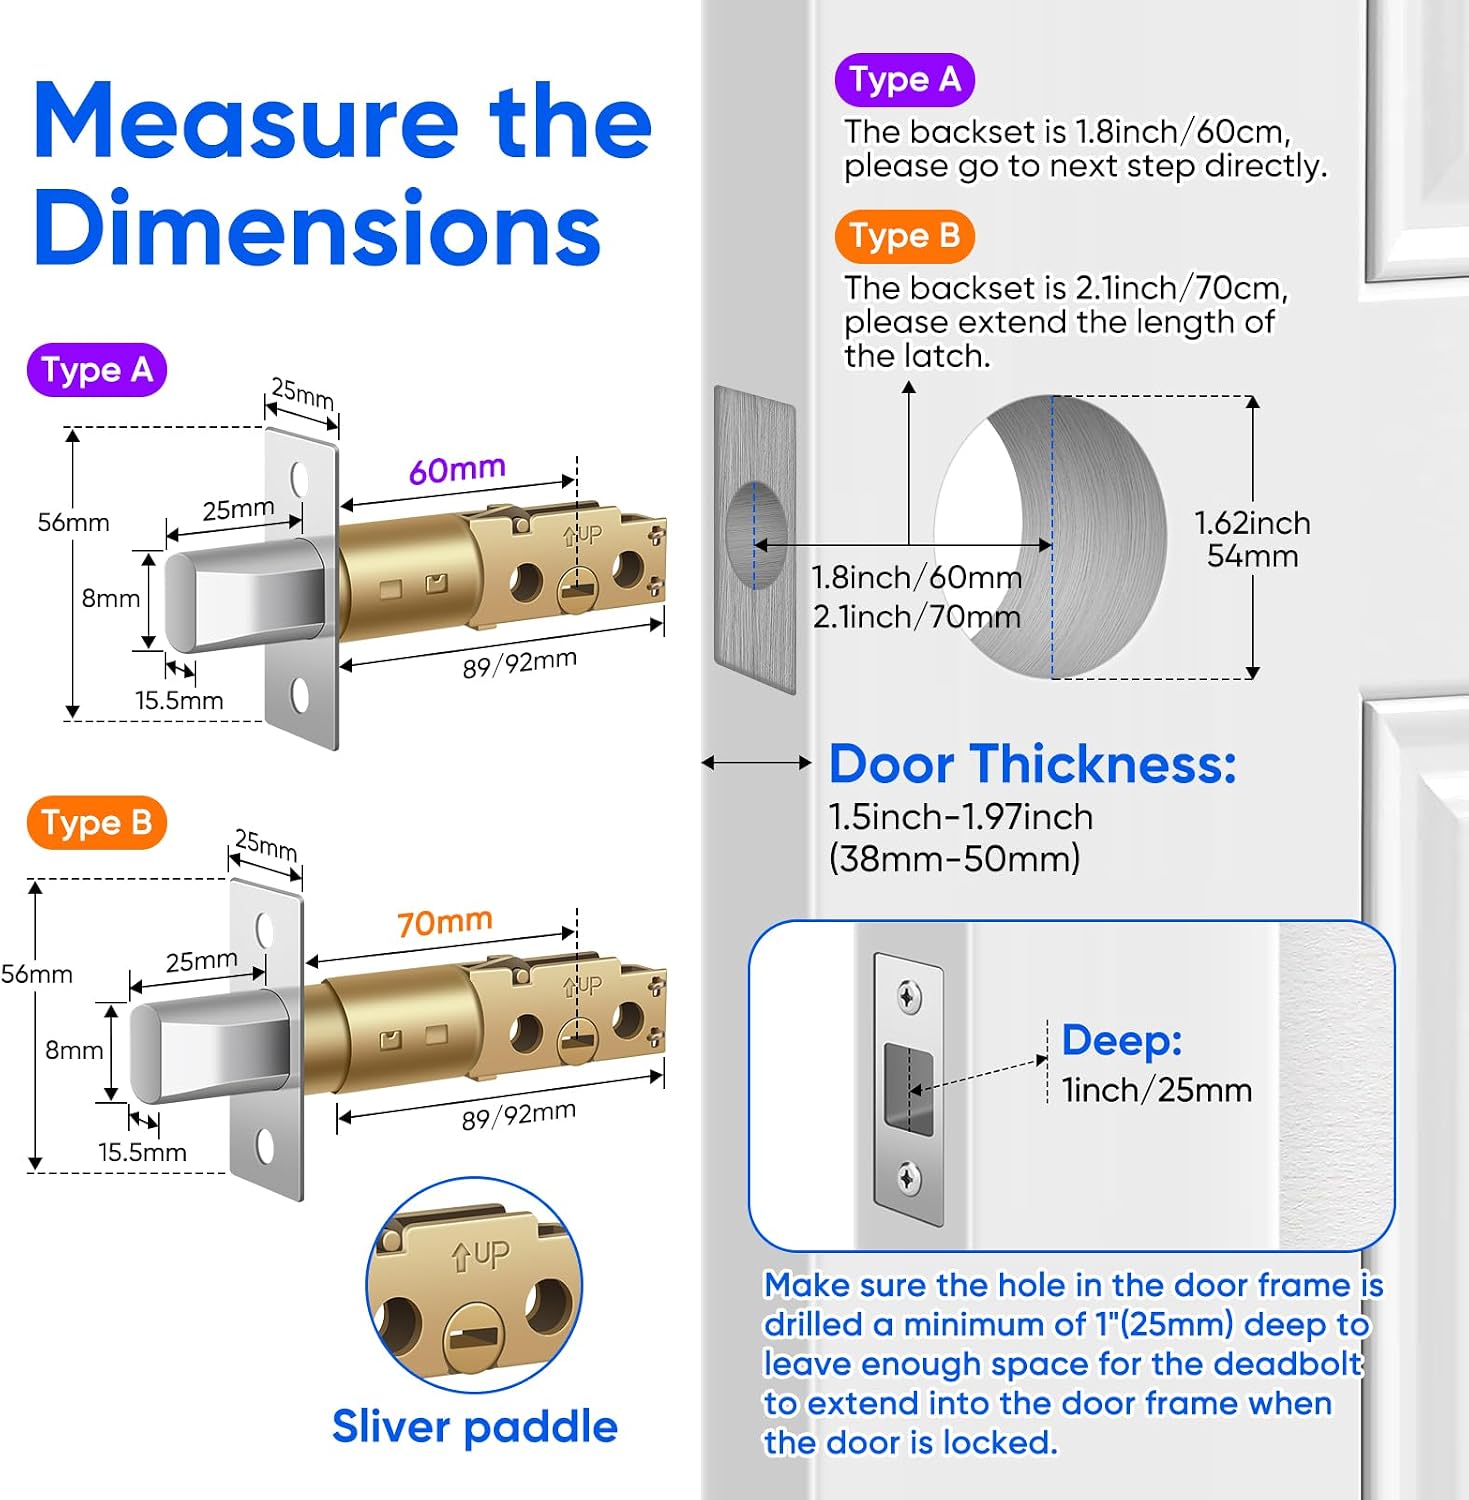
Image: Measure the Dimensions. This diagram shows how to measure the backset (Type A: 1.8 inch/60mm, Type B: 2.1 inch/70mm) and door thickness (1.5-1.97 inches / 38-50mm) for proper installation.
- Door Thickness: Compatible with doors between 1.5 inches (38mm) and 1.97 inches (50mm) thick.
- Backset: The distance from the door edge to the center of the bore hole should be either 1.8 inches (60mm) or 2.1 inches (70mm). Adjust the latch bolt accordingly.
- Door Frame Hole: Ensure the hole in the door frame for the deadbolt is at least 1 inch (25mm) deep to allow full extension of the latch.
5.2 Installation Steps
Follow these general steps for installation. Refer to the detailed diagrams in the included user manual for specific instructions:
- Remove Existing Lock: Carefully remove your old door lock hardware.
- Install Latch Bolt: Insert the new latch bolt into the door edge. Ensure the 'UP' arrow on the latch bolt faces upwards. Adjust the backset if necessary.
- Install Exterior Assembly: Place the exterior lock assembly onto the door, feeding the cable through the bore hole.
- Install Mounting Plate: Secure the mounting plate to the door using the provided screws, ensuring it aligns with the exterior assembly.
- Connect Cables: Connect the cable from the exterior assembly to the interior assembly.
- Install Interior Assembly: Attach the interior assembly to the mounting plate, securing it with screws.
- Install Batteries: Insert 4 AAA batteries (not included) into the battery compartment of the interior assembly.
- Test Operation: Test all locking and unlocking functions to ensure proper installation and alignment.
6. Setup
6.1 App Download and Pairing

Image: Smart App To Manage. This image shows the TT LOCK app interface, highlighting features like keyless entry, one-touch lock, auto-lock, emergency charge, view history, share access, and remote passcode generation.
- Download App: Search for "TT LOCK" in your smartphone's app store (iOS or Android) and install it.
- Create Account: Open the app and register a new account.
- Add Lock: Enable Bluetooth on your phone. In the TT LOCK app, tap "Add Lock" and select your MYPIN MJ-HS0467 lock from the list of nearby devices.
- Pairing: Follow the on-screen prompts to pair the lock with your app. You may need to touch the lock's keypad to activate it for pairing.
6.2 Adding Access Methods

Image: Semiconductor Fingerprint Recognition. This image highlights the lock's semiconductor fingerprint sensor and its rapid recognition speed (0.1s, 0.35s, 0.37s).

Image: Stay in Control With Smart APP. This image illustrates the comprehensive control offered by the smart app, including reviewing access logs, creating short-lived codes, getting real-time notifications, monitoring battery levels, unlocking remotely, and user management.
- Adding Fingerprints: In the TT LOCK app, navigate to "Fingerprints" and tap "Add Fingerprint." Follow the on-screen instructions to scan your finger multiple times from different angles for accurate recognition.
- Adding Passcodes: From the app, select "Passcodes" to generate permanent, timed, one-time, or custom passcodes. You can share these codes with guests or family members.
- Adding Key Fobs: Go to "Cards" in the app and tap "Add Card." Present the key fob to the lock's sensor when prompted to register it.
- Apple Watch Setup: Ensure your Apple Watch is paired with your iPhone and the TT LOCK app is installed on both. The lock can then be controlled directly from your Apple Watch for one-touch access.
7. Operating Instructions

Image: Multiple Keyless Access. This image visually demonstrates the six different ways to unlock the smart door lock: using a fingerprint, the mobile app, an Apple Watch, the keypad, a key fob, or a traditional mechanical key.

Image: Grant Access to Those You Trust. This image illustrates how the smart lock allows users to grant access to various trusted individuals, such as family, friends, delivery services, and pet sitters, using the app's passcode generation feature.
- Fingerprint Unlock: Place your registered finger on the fingerprint sensor. The lock will unlock if the fingerprint is recognized.
- Keypad Unlock: Enter your registered passcode on the keypad, then press the '#' key. The lock will unlock.
- App Unlock: Open the TT LOCK app on your smartphone. When within Bluetooth range, tap the unlock icon to open the door.
- Apple Watch Unlock: If configured, tap the unlock icon on your Apple Watch to open the door.
- Key Fob Unlock: Present a registered key fob to the designated sensor area on the lock. The lock will unlock.
- Mechanical Key Unlock: In case of emergency or battery depletion, use the provided physical backup key to manually unlock the door.
- Automatic Locking: The lock can be configured via the TT LOCK app to automatically lock after a set period (e.g., 5, 10, 15 seconds) once the door is closed.
- Remote Control: For remote unlocking and management from anywhere, the G2 Gateway (sold separately) must be connected to your home Wi-Fi and paired with the lock.
8. Maintenance
- Battery Replacement: The lock will provide low battery warnings. Replace all 4 AAA batteries promptly to ensure continuous operation. In case of complete battery depletion, use the emergency power port (USB-C) or the mechanical key.
- Cleaning: Wipe the lock's exterior with a soft, dry cloth. Avoid using abrasive cleaners, solvents, or harsh chemicals, as these can damage the finish and electronic components.
- Fingerprint Sensor Care: Keep the fingerprint sensor clean and free of dirt or moisture for optimal recognition performance.
- Regular Checks: Periodically check all screws and components to ensure they remain tight and secure.
9. Troubleshooting
- Lock Not Responding: Check battery levels. If batteries are low or depleted, replace them or use the emergency power port.
- Fingerprint Not Recognized: Ensure your finger is clean and dry. Try scanning from different angles. If issues persist, delete and re-register your fingerprint in the app.
- Keypad Not Working: Verify that the passcode is correct. Check battery levels. Ensure the keypad is not damaged.
- App Connectivity Issues: Ensure Bluetooth is enabled on your phone and you are within range of the lock. Restart the app or your phone. If using remote control, check the G2 Gateway's internet connection.
- Door Not Locking/Unlocking Properly: Check for any obstructions in the door frame or latch bolt path. Ensure the lock is correctly aligned with the strike plate.
- Lock Beeps Continuously: This may indicate a low battery warning or a system error. Check battery levels first.
10. Specifications
| Feature | Specification |
|---|---|
| Model Number | MJ-HS0467 |
| Brand | MYPIN |
| Dimensions (L x W x H) | 6.7 x 4.6 x 15.7 cm |
| Weight | 820 grams |
| Material | Aluminum |
| Color | Black |
| Lock Type | Biometric, Keypad |
| Special Features | Fingerprint, Remote Control, Automatic Lock, Voice Assistant Compatible |
| Control Method | Application, Touch |
| Connectivity Protocol | Bluetooth |
| Recommended Use | Home |
| Door Thickness Compatibility | 1.5 - 1.97 inches (38 - 50 mm) |
11. Warranty Information
The MYPIN MJ-HS0467 Smart Fingerprint Keyless Door Lock comes with a 2-year availability for spare parts. Please retain your proof of purchase for any warranty claims.
12. Support
For further assistance, technical support, or inquiries not covered in this manual, please refer to the contact information provided with your product packaging or visit the official MYPIN website.