
1. Introduction
This manual provides detailed instructions for the safe and efficient installation, operation, and maintenance of your Jebao Jecod DCS Series Variable Flow DC Water Pump with Controller, specifically the DCS2000 model. This pump is designed for use in both marine reef and freshwater aquarium environments, offering adjustable flow rates and energy-efficient performance. Please read this manual thoroughly before operating the device.
2. Safety Instructions
- Always disconnect the power supply before performing any maintenance, installation, or disassembly.
- Ensure the pump is fully submerged in water during operation. Running the pump dry can cause damage.
- This pump is designed for internal (submersible) use only. Do not operate it outside of water.
- The pump and controller are designed for DC24V power. Use only the provided power adapter.
- Do not operate the pump if the power cord or plug is damaged.
- Keep the controller dry and away from water splashes.
- Ensure all connections are secure before powering on the unit.
- The pump contains no copper elements, making it safe for both marine and freshwater applications.
- Children should be supervised to ensure they do not play with the appliance.
3. Package Contents
Verify that all components are present and undamaged upon opening the package:
- Jebao Jecod DCS2000 DC Water Pump
- DC Pump Controller
- Power Adapter
- Inlet and Outlet Adapters/Fittings (various sizes)
- Front Grille/Strainer
- Anti-slip Shock Absorber Nails (pre-installed or separate)

Image: The Jebao Jecod DCS2000 DC Water Pump and its accompanying controller. The pump features a grey and black housing with threaded inlet/outlet, while the controller has a digital display and control buttons.
4. Setup and Installation
4.1 Attaching Faucet Joints/Adapters
Select the appropriate faucet joint (adapter) for your plumbing setup. The DCS2000 model typically uses specific adapters. Ensure a snug fit to prevent leaks.
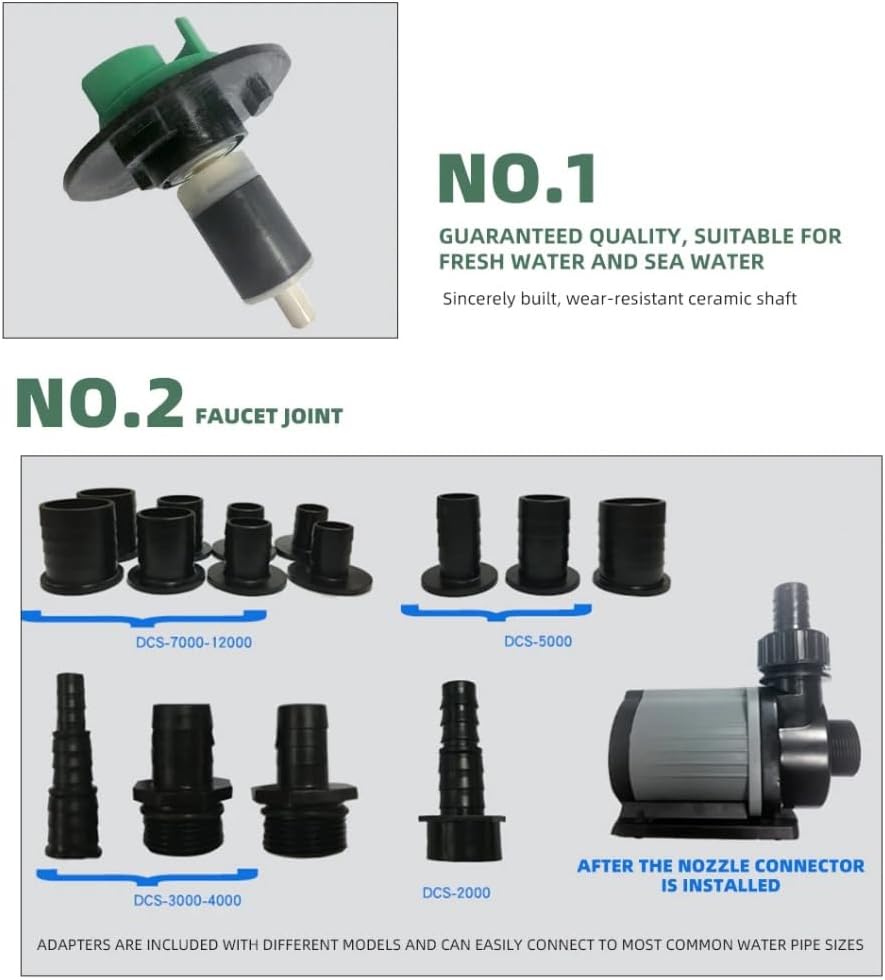
Image: A collection of various faucet joints and adapters, categorized by pump model (DCS-2000, DCS-3000-4000, DCS-5000, DCS-7000-12000). The image also shows a pump with an adapter installed, illustrating how they connect to the nozzle.
4.2 Installing the Front Grille
The front grille acts as a strainer to prevent larger debris from entering the pump. It is easy to install and remove for cleaning.
- Align the screw interface of the front grille with the pump's inlet.
- Gently screw or twist the grille into place until it is secure.

Image: A close-up of a circular front grille with a mesh pattern, alongside two illustrations showing the pump before and after the front grille is screwed onto the inlet. The text indicates it is easy to install and remove.
4.3 Positioning the Pump
The pump features an easy-to-remove base with anti-slip shock absorber nails to minimize vibration and noise. Place the pump securely on a flat surface within your aquarium or sump, ensuring it is fully submerged.

Image: The pump shown with its base, which can be easily removed. An inset image highlights the anti-slip shock absorber nails on the base, designed to reduce vibration.
4.4 Connecting the Controller and Power
- Connect the pump's cable to the DC Pump Controller.
- Connect the power adapter to the controller.
- Plug the power adapter into a suitable electrical outlet.
5. Operating Instructions
The DC Pump Controller allows for precise control over the pump's flow rate and includes special functions.

Image: The Jebao Jecod DC Pump Controller and pump. The controller features a display with indicator lights, plus and minus buttons for adjustment, and a 'FEED' button. A table of specifications for various DCS models is also included.
5.1 Power On/Off
Once connected to power, the pump will initiate a soft start, gradually building up to the set flow rate. To turn off, disconnect the power.
5.2 Flow Rate Adjustment
The DCS2000 model offers 8 different flow regulation settings. Use the + and - buttons on the controller to increase or decrease the flow rate. The indicator lights on the controller will show the current setting.
5.3 Feed Mode
Press the FEED button to activate the 10-minute pause function. This temporarily stops the pump, allowing fish to feed without food being immediately drawn into filtration. The pump will automatically restart after 10 minutes. Pressing the FEED button again will resume normal operation immediately.
6. Maintenance
Regular maintenance ensures optimal performance and longevity of your pump. Always disconnect power before maintenance.
6.1 Disassembly for Cleaning
The pump is designed for easy disassembly to facilitate cleaning of the impeller and pump housing.
- Disconnect the pump from power.
- Remove the front grille by twisting or unscrewing it.
- For DCS2000-4000 models, the pump housing can be detached by rotating it easily. For DCS5000 and above, screws fix the housing, which need to be removed.
- Carefully remove the impeller assembly.
- Clean all components (impeller, housing, ceramic shaft, grille) with a soft brush and clean water. Avoid harsh chemicals.
- Inspect the wear-resistant ceramic shaft for any damage.
- Reassemble the pump in reverse order, ensuring all parts are securely fitted.

Image: An illustration showing the pump's rear section and how it can be disassembled. It highlights that DCS2000-4000 models can be detached by rotation, while DCS5000 and larger models are fixed with screws for disassembly.
7. Troubleshooting
The controller incorporates electronic detection of error conditions and provides visual warnings via its indicator lights. Refer to the table below for common issues and their solutions.
Image: The Jebao Jecod DC Pump Controller with various indicator light patterns and corresponding troubleshooting information. This includes explanations for over/under voltage, controller overheating, water pump stuck, pump idling, abnormal current, and key lock/unlock conditions.
| Indicator Lights | Condition | Abnormal Elimination (Solution) |
|---|---|---|
| Blue lights (e.g., all blue) | Normal operation | No action required. |
| Red lights (e.g., alternating red/blue) | Over voltage / Under voltage | Check the input power supply voltage. Ensure it is stable and within the specified range. |
| Red lights (e.g., specific pattern) | Controller overheating | Check whether the controller is in direct sunlight or a high-temperature environment. Relocate if necessary. |
| Red lights (e.g., specific pattern) | Water pump stuck | Check whether foreign objects are stuck in the water pump or if there are wiring errors. Disconnect power, inspect, and clean the impeller. |
| Red lights (e.g., specific pattern) | Pump idling for a long time (no water) | Check whether the water pump is idling (running dry). Ensure the pump is fully submerged. |
| Red lights (e.g., specific pattern) | Controller working current abnormal | Check for a short circuit in the wiring of the water pump or if the controller itself is abnormal. Contact support if issue persists. |
| Blue lights (e.g., flashing after 2 seconds) | Key lock or unlock | Long press the + or - button for about 2 seconds. The button stops flashing after 2 flashes, and the button lock or unlock LED flashes at the current speed. If the light does not flash, the key may be damaged. |
8. Specifications (DCS2000)
The following table details the specifications for the DCS2000 model, along with other models in the series for comparison.
| Model | Voltage | Watts | Q max. (L/H) | H max. (m) | In / Out (Ømm) |
|---|---|---|---|---|---|
| DCS-1200 | DC 24V | 12 | 1200 | 1.5 | Out Ø25 |
| DCS-2000 | DC 24V | 20 | 2000 | 2.2 | Out Ø25 |
| DCS-3000 | DC 24V | 25 | 3200 | 2.8 | Ø20 25 |
| DCS-4000 | DC 24V | 30 | 4000 | 3.2 | Ø20 25 |
| DCS-5000 | DC 24V | 40 | 5000 | 3.5 | Ø20 25 32 38 |
| DCS-7000 | DC 24V | 55 | 7200 | 4.0 | Ø20 25 32 38 |
| DCS-9000 | DC 24V | 65 | 9000 | 5.2 | Ø20 25 32 38 |
| DCS-12000 | DC 24V | 80 | 12000 | 5.5 | Ø20 25 32 38 |
9. Warranty and Support
For warranty information or technical support, please refer to the documentation provided with your purchase or contact the seller/manufacturer directly. Keep your purchase receipt as proof of purchase.