1. Safety Information
Please read and understand this entire manual before attempting to assemble, operate, or install the product. Failure to do so could lead to electric shock, fire, or other injuries.
- Ensure the main power supply is disconnected before installation or maintenance.
- All electrical connections must be in accordance with local codes and ordinances, and national electrical codes. If you are unfamiliar with electrical wiring, consult a qualified electrician.
- The mounting structure must be capable of supporting the weight of the fan (approximately 9.09 pounds).
- Do not operate the fan with damaged blades or housing.
- Keep hands, clothing, and other objects away from the fan blades when the fan is in operation.
2. Package Contents
Verify all components are present before beginning installation.

Image: Overview of Kviflon 46-inch ceiling fan components including fan body, blades, remote, receiver, and mounting hardware.
- Fan Motor Assembly
- Hanging Board / Mounting Plate
- Fan Blades (3 pieces)
- Lampshade
- Receiver
- Remote Control (2 AAA batteries included)
- Screw Bag (Mounting hardware)
- Instructions (User Manual)
Note: The screws for the blades are pre-installed on the motor.
3. Specifications
| Brand | Kviflon |
| Model Name | 8922 |
| Product Dimensions | 46"D x 46"W x 9.45"H |
| Size | 46 IN |
| Color | Black - 3 Blades |
| Electric Fan Design | Ceiling Fan |
| Power Source | DC |
| Style | Modern |
| Special Features | App Operable, LED Light, Quiet Operation, Remote Controlled, Reversible |
| Noise Level | 30 Decibels |
| Wattage | 24 watts |
| Voltage | 110 Volts |
| Number of Blades | 3 |
| Number of Power Levels | 6 |
| Installation Type | Flush Mount |
4. Installation
Follow these steps for proper installation. It is recommended to install the fan blades and light fixtures first, then install the fan to the ceiling.
4.1 Mounting Plate Installation
- Detach the mounting plate from the fan motor assembly.
- Securely attach the mounting plate to the ceiling junction box using appropriate screws. Ensure the mounting structure can support the fan's weight.
- Utilize the safety hook on the mounting plate to temporarily hang the fan body during wiring, providing hands-free convenience.
4.2 Blade and Light Assembly
- Remove the pre-installed screws from the motor part where the blades attach.
- Align each fan blade with the screw holes on the motor and secure them using the removed screws. Ensure all blades are tightly fastened.
- Install the LED light panel into the fan body. Connect the LED light wires to the corresponding connectors from the fan motor.
- Attach the lampshade to cover the LED light panel.
4.3 Wiring and Final Mounting
- With the fan body temporarily hung from the safety hook, connect the electrical wires from the ceiling to the fan's wiring. Match the black live wire, yellow ground wire, and white neutral wire as indicated.
- Carefully tuck all wires into the ceiling junction box.
- Align the fan body with the mounting plate and secure it with the remaining screws.
Installation Video
Video: Step-by-step installation guide for the Kviflon 3-blade ceiling fan with light.
5. Operating Instructions
Your Kviflon ceiling fan can be controlled via remote, a dedicated mobile app, or a standard wall switch.
5.1 Remote Control
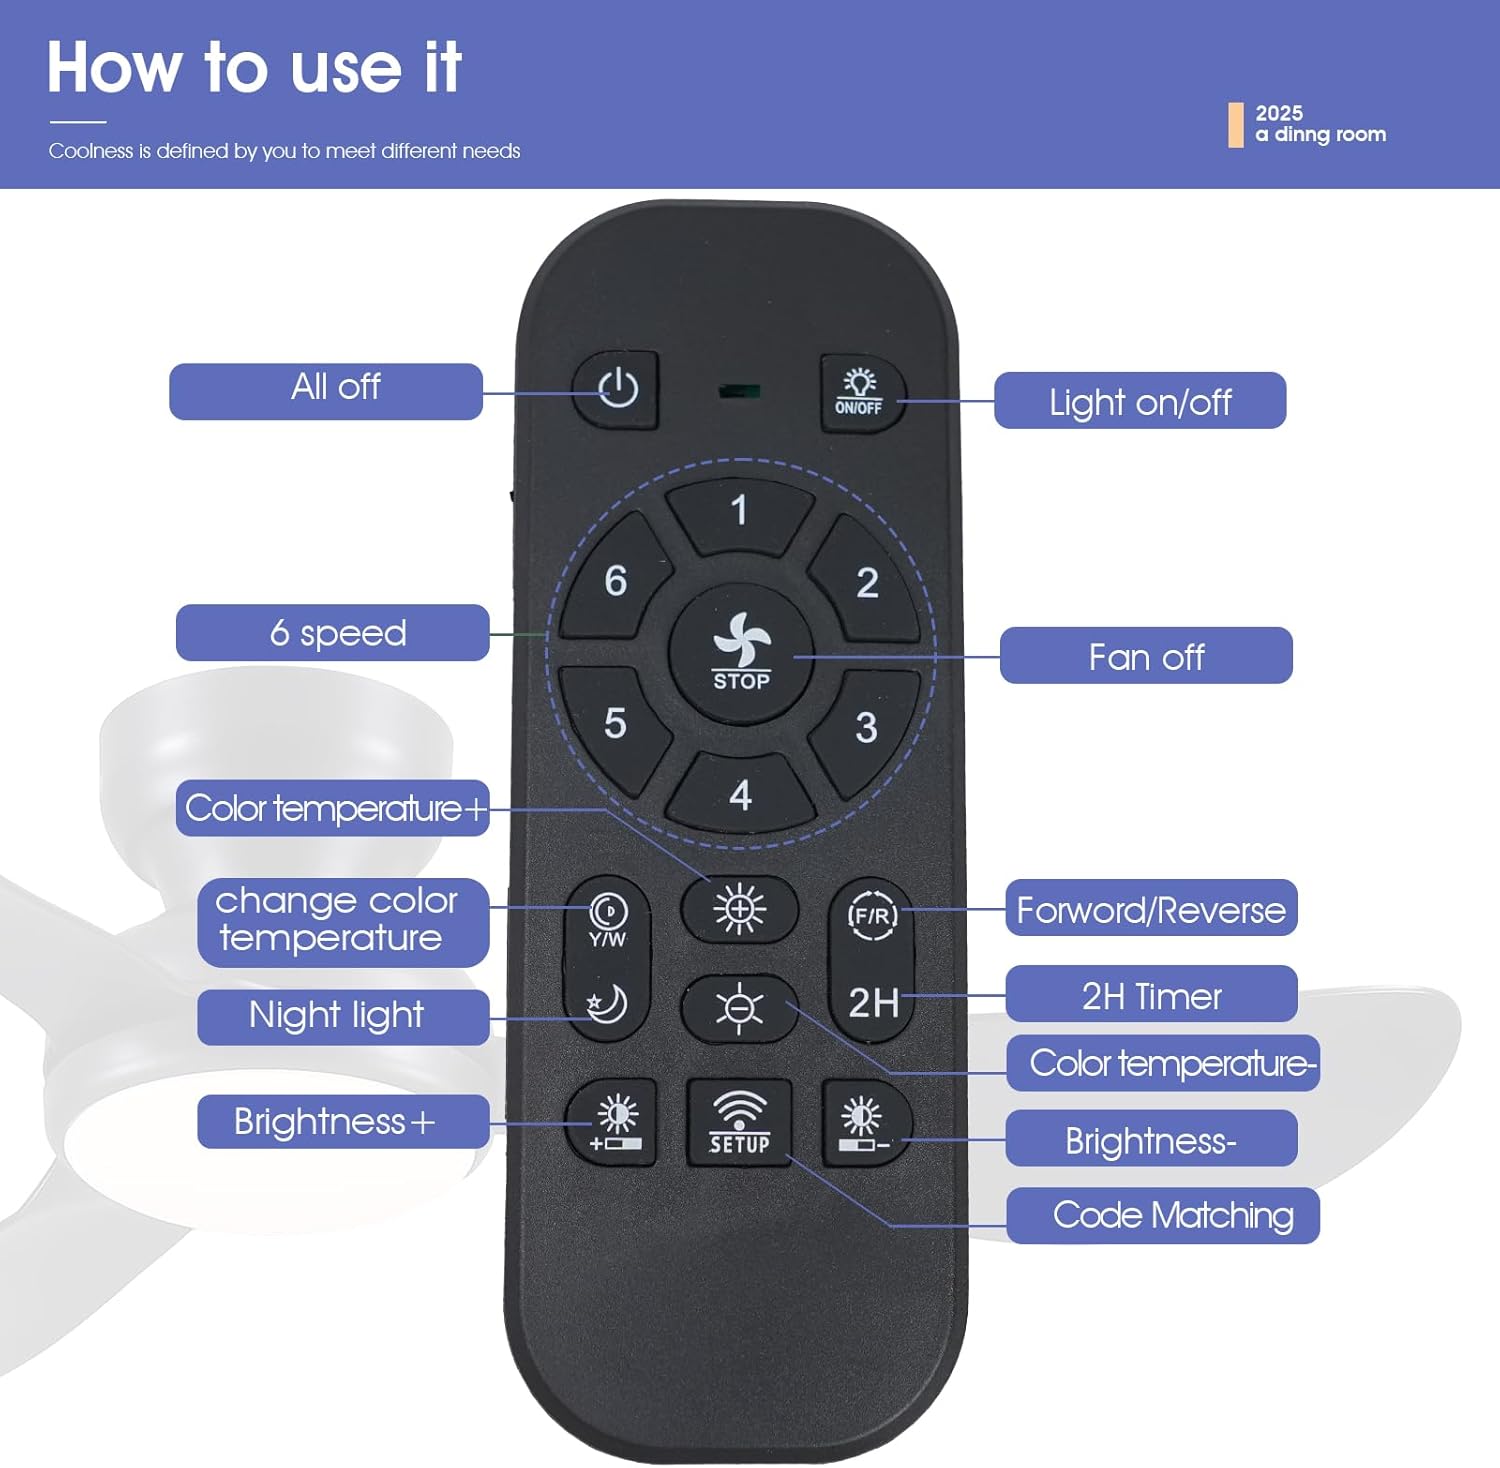
Image: Diagram of the remote control with labeled buttons for fan speed, light control, and other functions.
- Power On/Off: Use the power button to turn the fan and light on or off.
- Fan Speed: Select from 6 fan speeds (1-2 for sleep, 3-4 for leisure, 5-6 for fitness).
- Light Control: Turn the light on/off, adjust brightness (20% to 100%), and change color temperature (3000K Warm, 4500K Natural, 6000K White).
- Reversible Function: Press the F/R button to switch between summer (forward) and winter (reverse) modes. The fan will stop completely and then automatically reverse.
- Timer: Set a timer for 2 hours (fan only).
- Code Matching: Follow instructions in the manual for pairing the remote with the fan.
5.2 App Control
Download the "Fan Lamp Pro" app to control your fan from your smartphone.
- Scan the QR code provided in the manual or on the product page to download the "Fan Lamp Pro" app.
- Ensure Bluetooth is enabled on your phone.
- Open the app and follow the on-screen instructions to add a new fan device.
- Turn on the main power to the fan. Within 5 seconds, click the connect button in the app. The fan light will blink twice or beep to indicate a successful connection.
- Once connected, you can adjust fan speed, light brightness, color temperature, and set timers via the app.
For app download and instruction video, please refer to the product page or scan the QR code: http://www.jasonghost.com/fanlamppro/
5.3 Wall Control
The fan is compatible with conventional wall switches for basic on/off control of the light. It is NOT compatible with dimmer switches or fan gear switches.
6. Maintenance
- Always disconnect power before cleaning or performing any maintenance.
- Clean the fan housing and blades with a soft, damp cloth. Do not use abrasive cleaners or solvents.
- Regularly check all connections and screws for tightness.
7. Troubleshooting
| Problem | Possible Cause | Solution |
|---|---|---|
| Fan does not start | No power supply; Loose wiring; Remote/App not paired | Check circuit breaker; Verify wiring connections; Re-pair remote/app. |
| Light does not work | Loose wiring; LED panel issue | Check light wiring connections; Contact customer support if LED panel is faulty. |
| Fan makes noise | Loose screws; Blades unbalanced | Tighten all screws; Ensure blades are securely attached and balanced. |
| Remote/App not responding | Batteries low/dead; Not paired; Interference | Replace remote batteries; Re-pair remote/app; Reduce interference sources. |
8. Warranty and Support
This Kviflon ceiling fan comes with a 1-year warranty from the date of purchase.
For technical support, warranty claims, or any questions regarding your product, please contact Kviflon customer service through the retailer where you purchased the product.


