1. Introduction
Thank you for choosing the VEVOR Room to Room Fan. This adjustable dual airflow through-the-wall fan is designed to improve air circulation and equalize temperatures between rooms. Featuring 10-speed settings, remote control, and temperature monitoring, it provides efficient and quiet ventilation for various indoor spaces such as living rooms, bedrooms, bathrooms, garages, and laundry rooms. Please read this manual thoroughly before installation and operation to ensure proper use and safety.
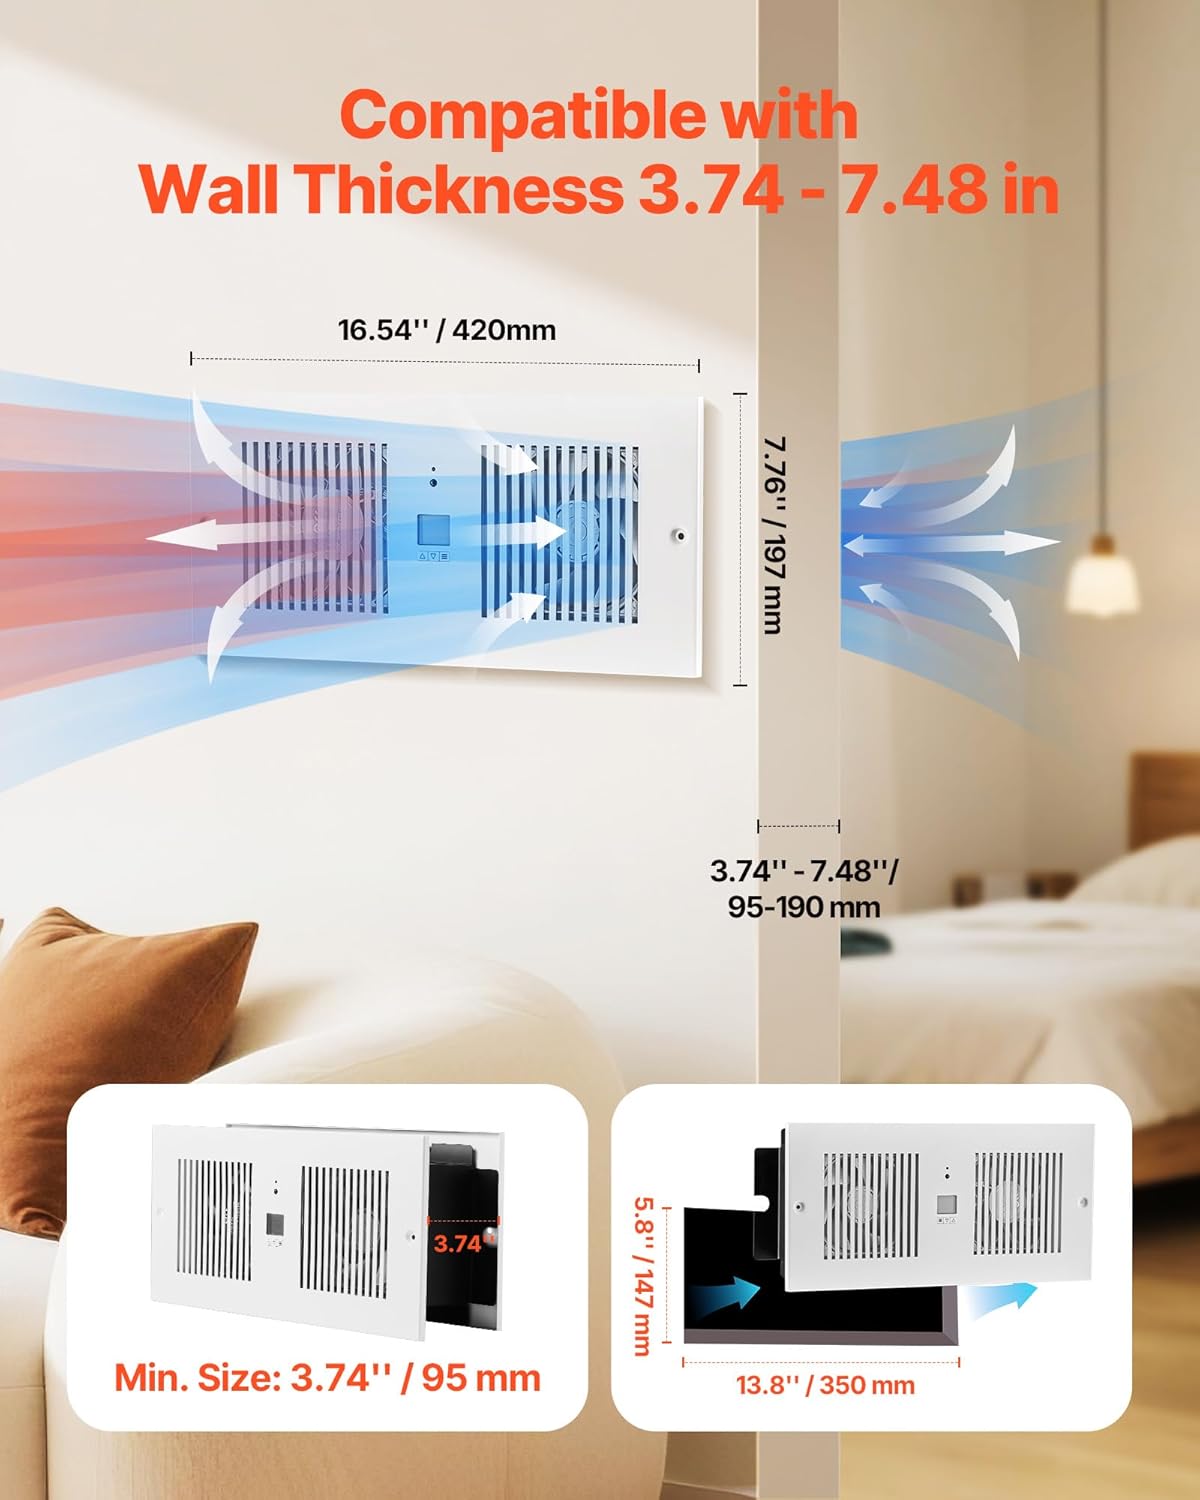
Figure 1: VEVOR Room to Room Fan installed, illustrating air movement between rooms.
2. Safety Information
Always follow basic safety precautions when using electrical appliances to reduce the risk of fire, electric shock, and injury to persons.
- Read all instructions before installing or using this fan.
- Ensure the power supply matches the fan's specifications (AC120V 60Hz).
- Disconnect power before servicing or cleaning the unit.
- Do not operate any fan with a damaged cord or plug. Discard fan or return to an authorized service facility for examination and/or repair.
- Do not run cord under carpeting. Do not cover cord with throw rugs, runners, or similar coverings. Arrange cord away from traffic area and where it will not be tripped over.
- Avoid placing fingers or foreign objects into any ventilation or exhaust opening.
- This fan is intended for indoor use only. Do not use outdoors.
- Do not use in wet or moist locations such as bathrooms without proper electrical safety measures.
- Keep children and pets away from the fan during operation.
3. Setup and Installation
The VEVOR Room to Room Fan is designed for through-the-wall installation and is compatible with wall thicknesses ranging from 3.74 inches to 7.48 inches (95mm to 190mm).
3.1 Required Tools and Components
Before beginning installation, ensure you have the following:
- Drill
- Measuring tape or ruler
- Pencil or marker
- Saw (for cutting wall opening)
- Screwdriver
- Wire strippers (if wiring directly)
- Safety glasses and gloves
Included Accessories:
- User Manual x 1
- Remote Control x 1
- Main Unit (No Power Cord) x 1
- Rear Grille x 1
- Rear Grille Bracket x 1
- Plastic Expansion Screws x 8
- Large Flat-Head Self-Tapping Screws x 8
3.2 Installation Steps
- Mark the Installation Position: Use a leveling tool and ruler to mark the desired location on the wall. The fan dimensions are 16.54 inches (420mm) in length and 7.76 inches (197mm) in height. Ensure the marked area is clear of electrical wires, pipes, and studs.
- Cut the Opening: Carefully cut the marked opening in the wall. The minimum required opening size is 5.8 inches x 13.8 inches (147mm x 350mm).
- Secure Rear Grille Bracket: Attach the rear grille bracket to the wall using the provided expansion bolts.
- Install the Main Unit: Insert the main fan unit into the wall opening. Secure it in place with screws.
- Electrical Wiring: It is recommended to hire a professional for electrical wiring. Connect the fan to an AC120V 60Hz power source. Ensure proper grounding (Green wire), live (Black wire), and neutral (White wire) connections.
- Attach Rear Grille: Use screws to attach the rear grille to the rear grille bracket, covering the internal components.
Video 1: Installation guide for the VEVOR Through-the-Wall Ventilation Fan.

Figure 2: Step-by-step installation process for the VEVOR Room to Room Fan.
4. Operating Instructions
The VEVOR Room to Room Fan offers versatile control options via its smart display and included remote control.
4.1 Smart Display Functions
The integrated display allows for direct adjustment of various settings:
- Airflow Direction: Adjust the direction of air movement (inward or outward).
- Temperature Control: Set desired temperature range for automatic operation (14℉ to 212℉ / 0°C to 60°C).
- Speed Settings: Choose from 10 fan speeds.
- Protection Lock: Activates a lock to prevent accidental changes.
- Cooling Mode: Operates to cool the room.
- Heating Mode: Operates to warm the room.
- Sleep Mode: Reduces fan speed and noise for quiet operation.
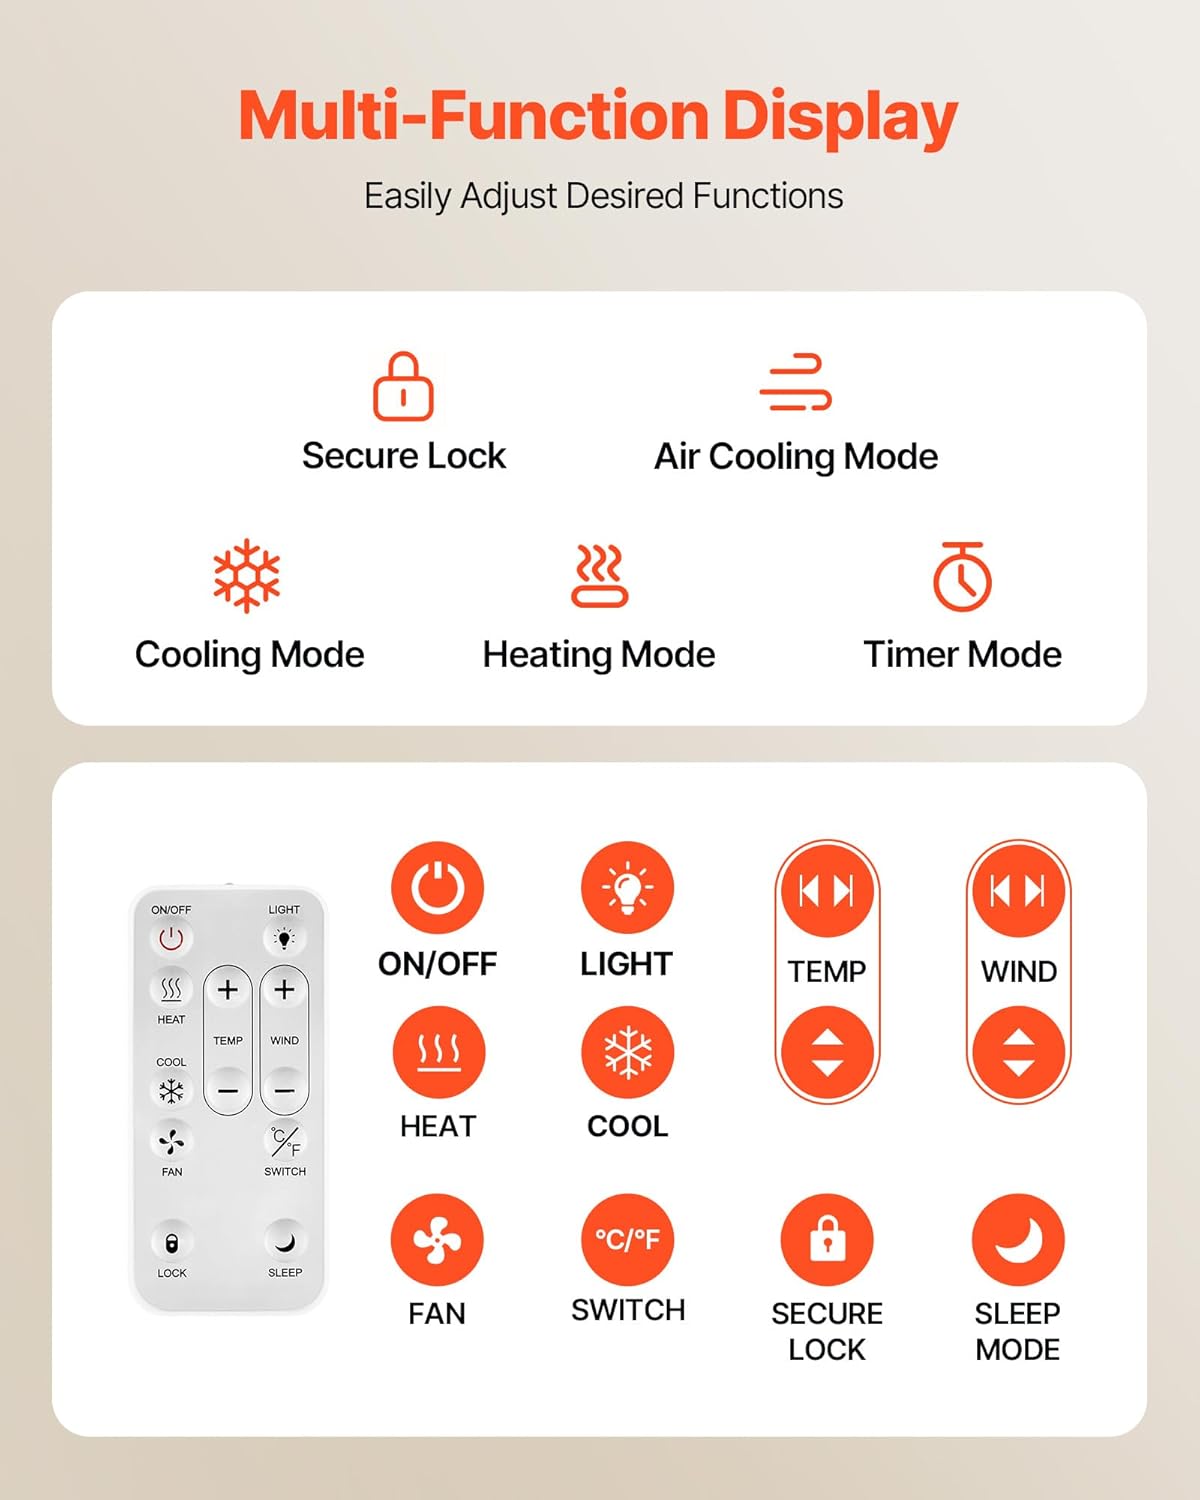
Figure 3: Multi-function display and remote control overview.
4.2 Remote Control Operation
The remote control provides convenient access to all fan functions from a distance. It requires dry batteries (sold separately).
- ON/OFF: Power the fan on or off.
- LIGHT: Control the display backlight.
- TEMP +/-: Adjust the target temperature.
- WIND +/-: Adjust the fan speed (1-10).
- HEAT/COOL: Select heating or cooling mode.
- FAN: Activate fan-only mode.
- °C/°F: Switch between Celsius and Fahrenheit temperature units.
- SECURE LOCK: Lock/unlock the controls.
- SLEEP MODE: Activate quiet operation.
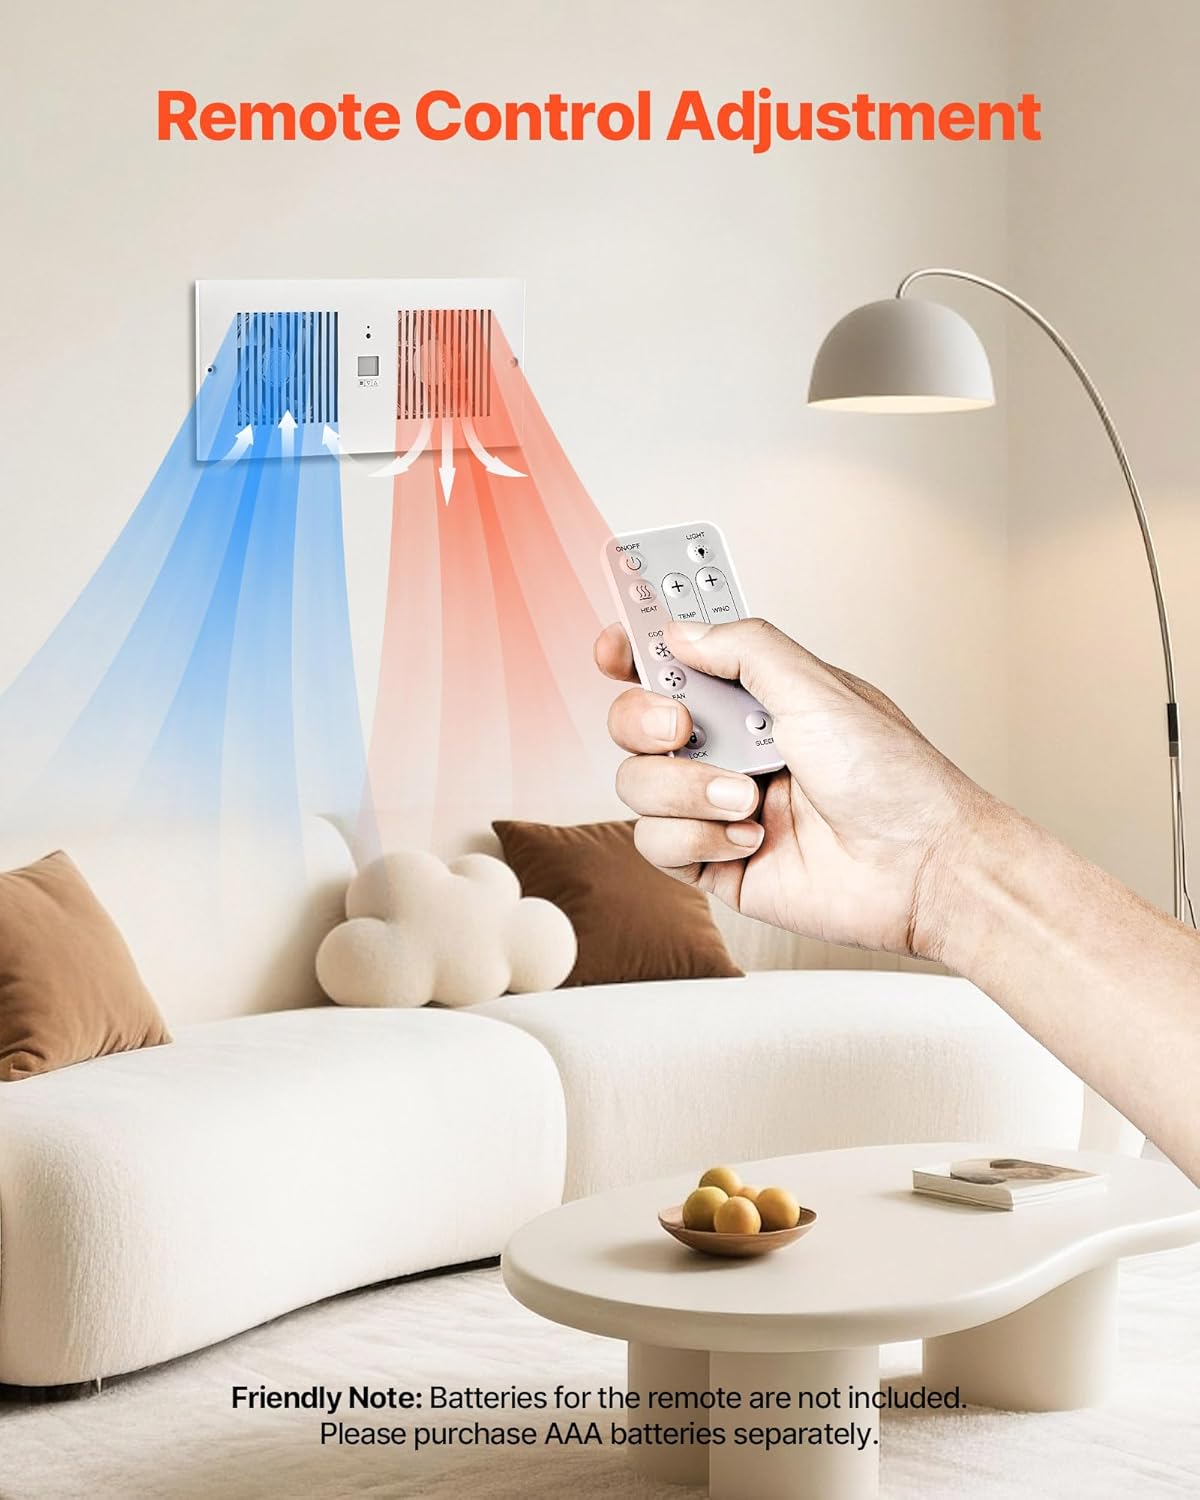
Figure 4: Remote control in use, demonstrating airflow adjustment.
4.3 Dual Airflow Adjustment
The fan features dual airflow adjustment, allowing you to control the direction of ventilation to suit your needs. This is particularly useful for balancing temperatures between rooms, moving warm air from one room to another in winter, or cool air in summer.

Figure 5: Bi-directional airflow and control options.
4.4 Timer Mode
The 20-hour timer mode allows you to set a countdown for automatic shut-off, helping to conserve energy and prevent unnecessary operation. The fan operates quietly, with a noise level of ≤46dB, ensuring minimal disturbance.

Figure 6: Timer mode and quiet operation details.
5. Maintenance
Regular maintenance ensures the longevity and efficient operation of your VEVOR Room to Room Fan.
- Cleaning: Disconnect the power before cleaning. Use a soft, damp cloth to wipe down the exterior surfaces. Do not use abrasive cleaners or solvents.
- Grille Cleaning: Periodically remove the grilles and gently clean any accumulated dust or debris from the fan blades using a soft brush or vacuum cleaner.
- Inspection: Regularly check the power cord for any signs of damage. Ensure all screws are tight and the unit is securely mounted.
- Storage: If storing the fan for an extended period, ensure it is clean and dry. Store in a cool, dry place away from direct sunlight.
6. Troubleshooting
If you encounter issues with your VEVOR Room to Room Fan, refer to the following common problems and solutions:
| Problem | Possible Cause | Solution |
|---|---|---|
| Fan does not turn on | No power supply; Power cord not connected; Unit is off. | Check power outlet and circuit breaker; Ensure power cord is securely plugged in; Press the ON/OFF button on the unit or remote. |
| Weak airflow | Fan speed is too low; Grilles are obstructed by dust. | Increase fan speed using the controls; Clean the grilles and fan blades. |
| Remote control not working | Batteries are dead or incorrectly inserted; Remote is too far or obstructed. | Replace batteries (AAA, sold separately) and ensure correct polarity; Move closer to the fan and remove any obstructions. |
| Unusual noise during operation | Loose components; Obstruction in fan blades. | Disconnect power and check for loose screws or internal components; Remove any foreign objects from the fan blades. |
If the problem persists after attempting these solutions, please contact VEVOR customer support.
7. Specifications
Detailed technical specifications for the VEVOR Room to Room Fan (Model: BT-RTR42-ECG).
| Feature | Specification |
|---|---|
| Model Number | BT-RTR42-ECG |
| Voltage Frequency | AC120V 60Hz |
| Power | 12W |
| Color | White |
| Maximum Airflow | 300 CFM |
| Temperature Control Range | 32°F - 140°F / 0°C - 60°C |
| Item Dimensions (L x W x H) | 16.54" x 4.53" x 7.76" (420 x 115 x 197 mm) |
| Compatible Wall Thickness | 3.74" - 7.48" (95 - 190 mm) |
| Net Weight | 8.27 lbs (3.75 kg) |
| Main Material | SPCC |
| Noise Level | 46 Decibels |
| Control Method | Remote |
| Special Features | 10-Speed Settings, Adjustable Duct Length, Dual Airflow Adjustable, Remote Control, Temperature Control |

Figure 7: Product dimensions and included accessories.
8. Warranty and Support
VEVOR products are designed for durability and performance. For specific warranty details, please refer to the warranty card included with your product or visit the official VEVOR website.
If you require technical assistance, have questions about installation, operation, or maintenance, or need to report a defect, please contact VEVOR customer support. Have your model number (BT-RTR42-ECG) and purchase information ready when contacting support.
For more information, visit the VEVOR Store on Amazon.


