
Introduction
Thank you for purchasing the chartustriable 65-inch 8-Drawer Dresser. This manual provides detailed instructions for assembly, operation, maintenance, and troubleshooting to ensure safe and proper use of your new furniture. Please read all instructions carefully before beginning assembly and retain this manual for future reference.
Safety Information
- Two-Person Assembly Recommended: Due to the size and weight of this dresser, assembly by two adults is strongly recommended to prevent injury and damage to the product.
- Anti-Tipping Device: An anti-tipping device is included to prevent accidental tipping of the dresser. It is crucial to install this device as instructed to ensure a safe environment, especially in households with children.
- Weight Limits: Do not overload drawers or the top surface. Refer to the specifications for maximum weight capacities.
- Stable Surface: Always place the dresser on a flat, level, and stable surface.
- Keep Away from Moisture: Avoid placing the dresser in areas with high humidity or direct exposure to water.
Anti-Tipping Device Importance
Furniture tip-over can cause serious or fatal crushing injuries to children. Always secure this unit to the wall using the provided anti-tipping device. Follow the installation steps carefully.

Image: Protecting Your Children and Furniture with an Anti-Tipping Device.
Assembly Instructions
Please ensure all parts and hardware are present before beginning assembly. It is recommended to install this product on carpets to effectively reduce friction damage between the board and the ground.
Assembly Video Guide
Video: Detailed assembly guide for the chartustriable 8-Drawer Dresser.
Step-by-Step Assembly
- Preparation: Unpack all components. Sort parts into designated boxes or areas to easily identify them. Carefully cut open packaging tape to avoid scratching boards.
- Assemble Drawer Slides (Side Panels): Attach Part CL and Part CR to Board NO. 9 (x3) and Board NO. 10 (x2) using Part G screws.
- Assemble Base Frame: Fix Part A to Board NO. 11 and Board NO. 15. Then, install Board NO. 11 and Board NO. 15 to the assembled Board NO. 9 pieces. Secure with Part I screws.
- Install Vertical Supports: Attach Board NO. 10 to the base frame. Secure with Part B.
- Install Side Panels: Attach Board NO. 4 and Board NO. 6 to the frame. Fix Part A to boards 3, 4, 5, 6, 7, 8. Then, attach Part CR and Part CL to boards 3, 4, 6, 7, 8. Secure with Part G screws.
- Install Internal Shelves: Install Board NO. 12, Board NO. 13, and 2pcs NO. 14 boards. Secure with Part B. Fix Part H and Part J to Board NO. 10 and Board NO. 13.
- Install Back Panels: Attach Board NO. 29 and Board NO. 30 to the back of the dresser using Part H screws.
- Install Top Panel: Attach Board NO. 1 to the top of the dresser. Fix Part A, Part K, and Part L to Board NO. 1. Secure with Part B.
- Assemble Drawers: For each drawer, install Board NO. 26 and Board NO. 28 with Part I. Install Board NO. 27 and Board NO. 28 with Part I. Install Board NO. 24 and Board NO. 25. Fix Part B to the drawer box. Attach Part DL and Part DR to the drawer box using Part G screws. Fix Part E and Part O to the drawer front.
- Insert Drawers: Carefully slide all assembled drawers into their respective slots in the dresser frame.
Anti-Tipping Installation
- Position the dresser in its desired location.
- Mark the wall where the anti-tipping brackets will be installed, ensuring they align with the top rear edge of the dresser.
- Drill pilot holes into the wall at the marked positions.
- Secure the anti-tipping brackets to the wall using appropriate screws.
- Attach the straps to the dresser and then to the wall brackets, ensuring they are taut.
Operating Instructions
Drawer Usage
- The dresser features 4 deep drawers (8.2" depth) and 4 standard drawers (5.6" depth) for varied storage needs.
- Drawers are designed to glide smoothly. Avoid forcing them open or closed.
- Distribute weight evenly within drawers to prevent strain on the slides.
TV Stand Functionality
The dresser's large top surface is designed to accommodate televisions up to 75 inches. Ensure the TV's base fits securely on the dresser top and does not exceed the dresser's weight capacity.

Image: Multi-scene Applications, including use as a TV stand.
Care and Maintenance
- Cleaning: Wipe the dresser surface with a soft, damp cloth. Avoid using harsh chemicals, abrasive cleaners, or polishes that may damage the finish.
- Dusting: Regularly dust with a dry, soft cloth.
- Spills: Blot spills immediately with a clean, dry cloth.
- Sunlight Exposure: Avoid prolonged exposure to direct sunlight to prevent fading or discoloration of the wood finish.
- Heat and Moisture: Keep the dresser away from direct heat sources and areas of high humidity. Use coasters under hot or wet items placed on the top surface.
- Hardware: Periodically check and tighten all hardware to ensure stability.
Troubleshooting
- Drawers not closing smoothly:
- Check if the drawer slides are properly aligned and securely fastened.
- Ensure no objects are obstructing the drawer's path.
- Verify that the drawer box itself is assembled correctly and is not warped.
- Confirm that all screws on the drawer slides are flush and not protruding.
- Dresser feels unstable:
- Ensure all cam locks and screws are fully tightened.
- Verify the dresser is on a level surface. Adjust the feet if applicable.
- Confirm the anti-tipping device is correctly installed and secured to the wall.
- Missing or damaged parts:
- Refer to the parts list in the assembly instructions.
- Contact customer support for replacements.
Product Specifications
| Feature | Detail |
|---|---|
| Brand | chartustriable |
| Model Name | Dressers & Chests of Drawers |
| Product Dimensions | 20"D x 65"W x 36"H |
| Color | Light Rustic Oak |
| Material | Engineered Wood |
| Finish Type | Brushed |
| Number of Drawers | 8 (4 deep, 4 standard) |
| Item Weight | 117 pounds |
| Assembly Required | Yes |
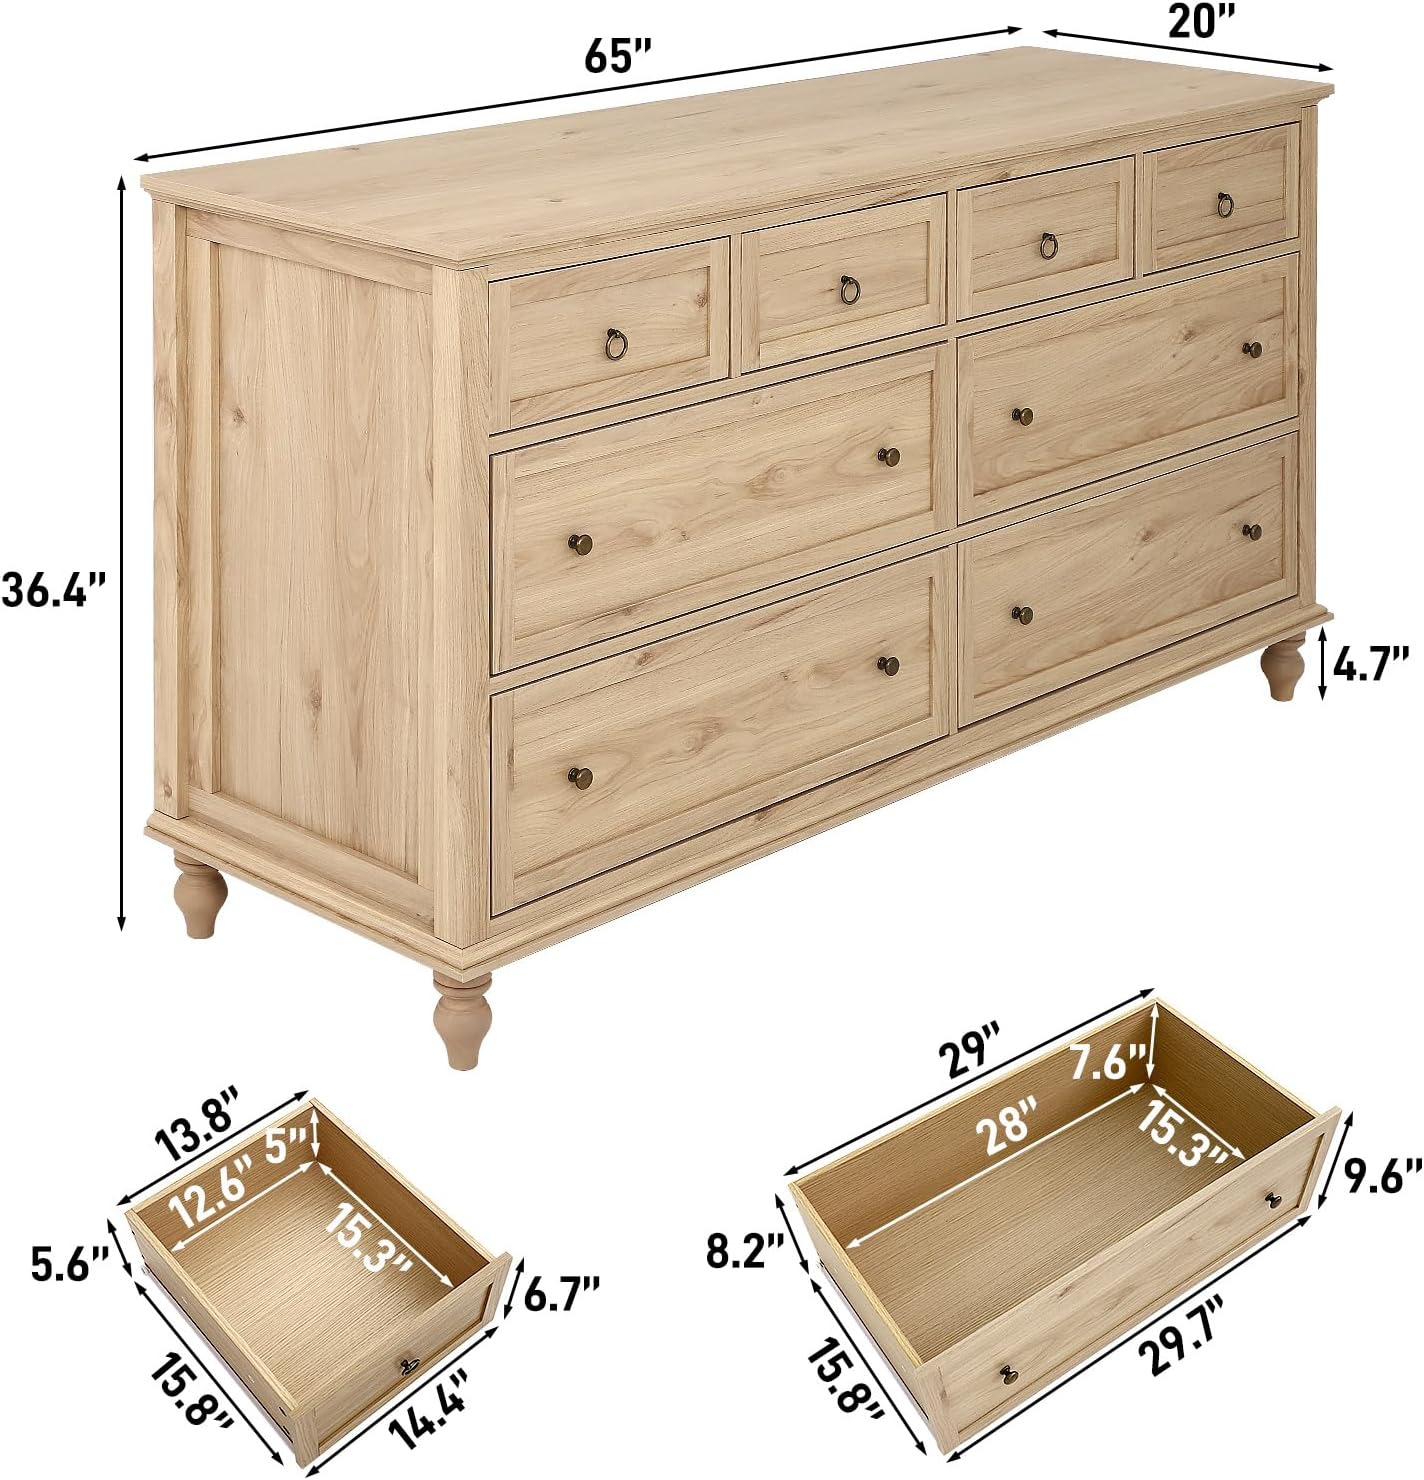
Image: Detailed product dimensions.
Warranty and Support
For any questions regarding assembly, missing parts, or product issues, please contact chartustriable customer support. Refer to your purchase documentation for specific warranty details and contact information.