
GEEKOM GEEKOM A9 MAX
Contents
GEEKOM A9 MAX AI Mini PC User Manual
Model: GEEKOM A9 MAX
1. Introduction
The GEEKOM A9 MAX AI Mini PC is a high-performance computing device designed for a wide range of applications, from AI development and gaming to business and creative tasks. It features the advanced AMD Ryzen AI 9 HX 370 processor, offering significant AI processing capabilities and robust integrated graphics. Its compact design, coupled with extensive connectivity options and an efficient cooling system, makes it a versatile solution for modern computing needs.

Figure 1.1: GEEKOM A9 MAX Mini PC, showcasing its compact size and connectivity options.
Key Features:
- AI Performance: Equipped with AMD Ryzen AI 9 HX 370 processor and dedicated XDNA 2 AI engine, delivering up to 80 TOPS of AI processing power for advanced AI tasks and next-generation Copilot+ experiences.
- Integrated Graphics: Features AMD Radeon 890M integrated graphics (RDNA3.5 architecture, 16CU), providing performance comparable to entry-level dedicated GPUs for gaming and 3D rendering.
- Memory & Storage: Supports dual-channel DDR5-5600MHz memory up to 128GB and dual PCIe Gen4 x4 NVMe SSD slots (M.2 2280 + M.2 2230) for up to 8TB of expandable storage.
- Cooling System: Utilizes the "IceBlast 2.0" thermal system with a large copper heatsink, dual heat pipes, and a high-performance low-noise fan for sustained high performance.
- Connectivity: Includes two USB4 ports (40Gbps, PD charging, DP-Alt mode), multiple USB-A ports (3.2 Gen2, 2.0), two HDMI 2.1 ports, dual 2.5GbE LAN ports, SD 4.0 card reader, Wi-Fi 7, and Bluetooth 5.4.
2. Setup Guide
Follow these steps to set up your GEEKOM A9 MAX Mini PC for the first time.
2.1 Package Contents
Before you begin, ensure all items are present in the package:
- GEEKOM A9 MAX Mini PC Unit
- Power Adapter
- HDMI Cable
- VESA Mount (with screws)
- User Manual (this document)
2.2 Connecting Peripherals
- Connect Display(s): Use the provided HDMI cable or a USB4 (Type-C) cable to connect your monitor(s) to the Mini PC. The device supports up to four 8K displays simultaneously.
- Connect Keyboard and Mouse: Plug your USB keyboard and mouse into any available USB-A ports.
- Connect to Network: For a wired connection, connect an Ethernet cable from your router or modem to one of the 2.5GbE LAN ports. For wireless, ensure your Wi-Fi network is available during initial setup.
- Connect Power: Plug the power adapter into the DC power input port on the Mini PC, then connect the adapter to a power outlet.

Figure 2.1: Port layout of the GEEKOM A9 MAX Mini PC. Includes power button, audio jack, USB-A, USB4 Type-C, HDMI 2.1, 2.5G RJ45 LAN, SD card slot, and Kensington lock.
2.3 Initial Boot
After connecting all peripherals and power, press the power button located on the front of the unit. The system will boot up, and you will be guided through the Windows 11 Pro setup process. Follow the on-screen instructions to complete the operating system configuration.
3. Operating Instructions
3.1 Power On/Off
- Power On: Press the power button once.
- Power Off: Click the Start button in Windows, then select Power > Shut down. Alternatively, press and hold the power button for 5 seconds to force a shutdown (use only when necessary).
3.2 Display Configuration
The GEEKOM A9 MAX supports up to four independent displays with 8K resolution via its two HDMI 2.1 ports and two USB4 Type-C ports (DP-Alt mode). To configure multiple displays:
- Connect your monitors to the available video output ports.
- Right-click on the desktop and select "Display settings."
- Windows will detect the connected displays. You can arrange them, change resolution, and set display modes (e.g., Extend, Duplicate) from this menu.

Figure 3.1: Multi-display setup with the GEEKOM A9 MAX, demonstrating its capability for design, gaming, movies, and office work.
3.3 Network Connectivity
- Wired Connection: Ensure an Ethernet cable is securely connected to one of the 2.5GbE LAN ports. The system will automatically establish a connection.
- Wi-Fi Connection: Click the network icon in the system tray, select your desired Wi-Fi network, enter the password, and click "Connect." The device supports Wi-Fi 7 for high-speed wireless connectivity.
- Bluetooth: To connect Bluetooth devices, go to Windows Settings > Bluetooth & devices, and turn on Bluetooth. The device supports Bluetooth 5.4.
4. Maintenance
Proper maintenance ensures the longevity and optimal performance of your GEEKOM A9 MAX Mini PC.
4.1 Cooling System
The Mini PC features the IceBlast 2.0 cooling system, designed to prevent overheating and thermal throttling. To ensure efficient cooling:
- Ensure the ventilation openings on the sides and rear of the unit are not obstructed.
- Place the Mini PC in a well-ventilated area.
- Regularly clean dust from the vents using compressed air. Do not open the casing unless you are performing a component upgrade.
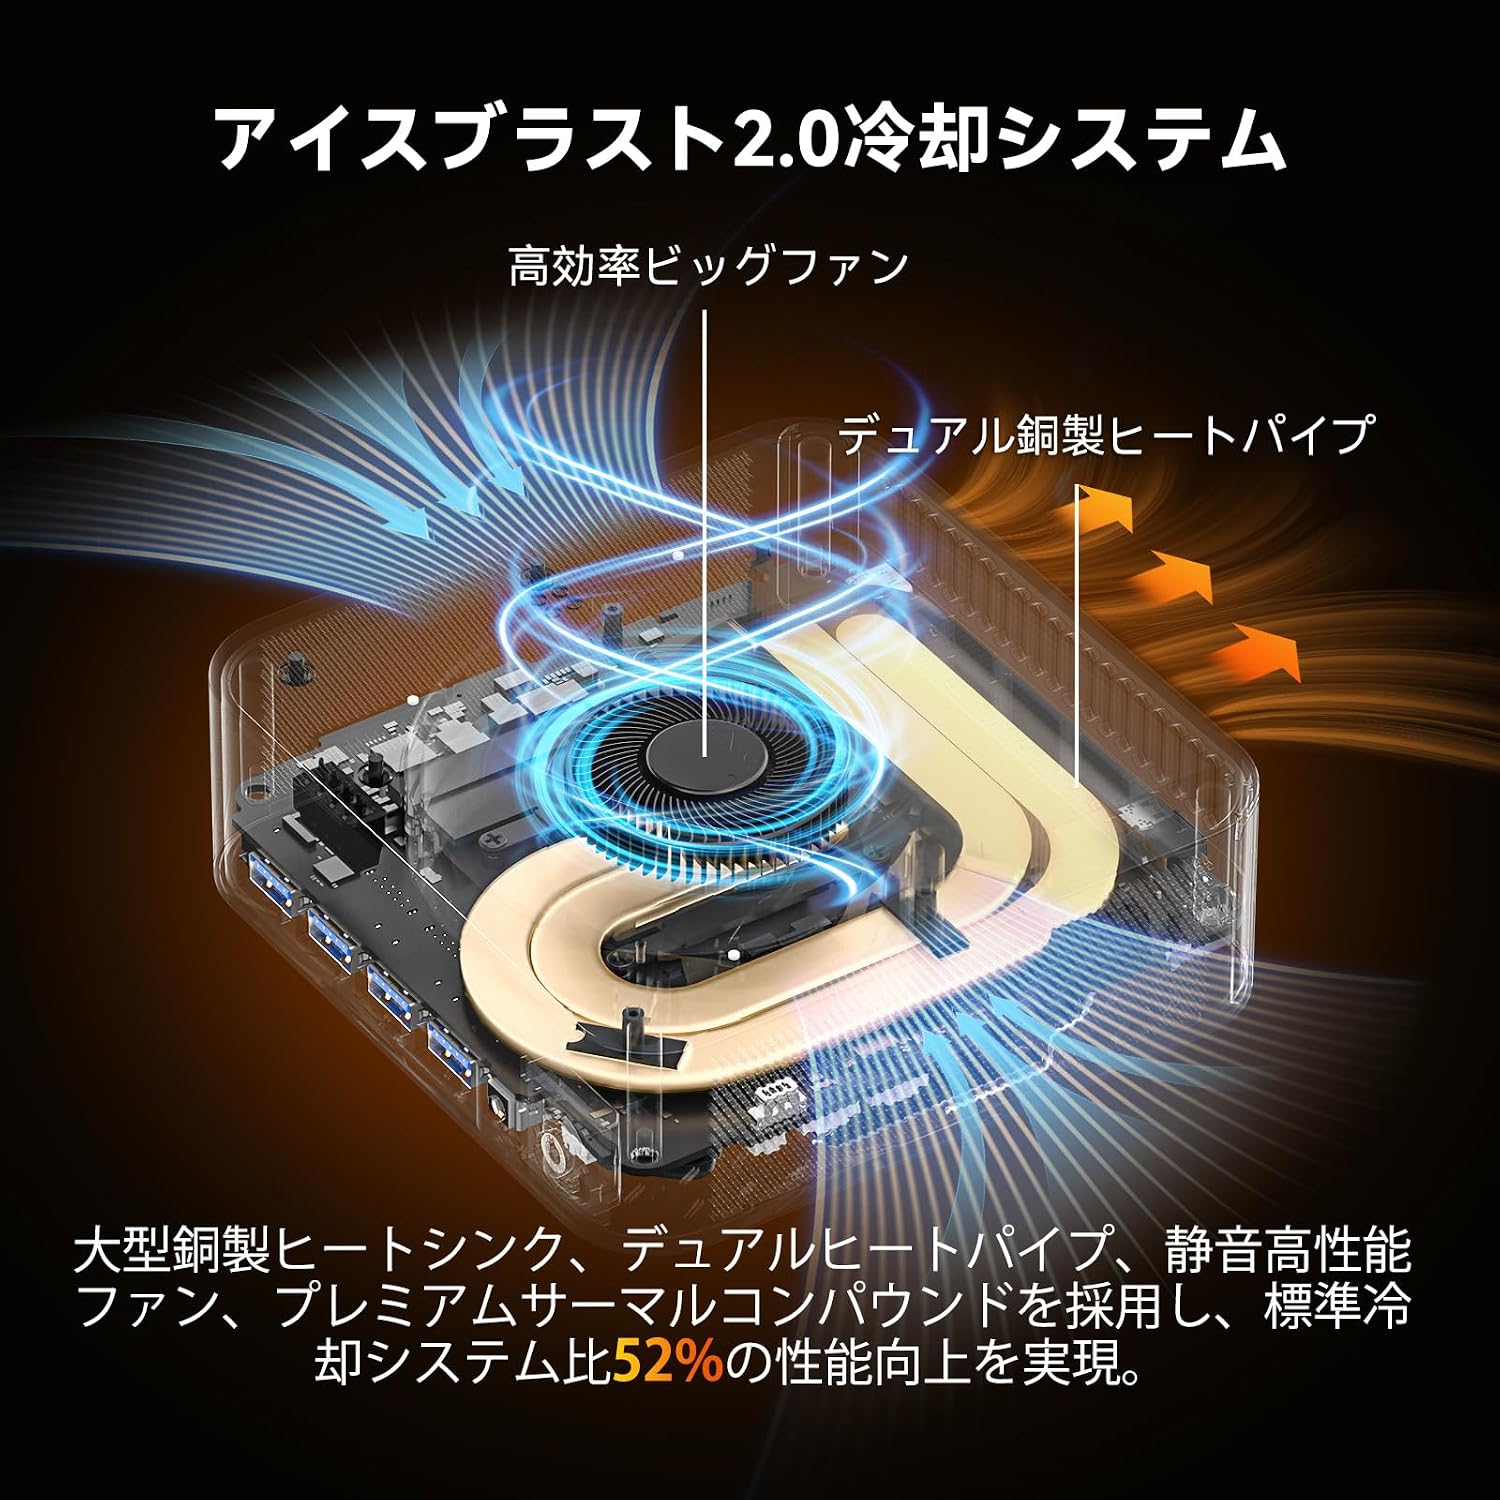
Figure 4.1: Internal view of the IceBlast 2.0 cooling system, highlighting the large copper heatsink and dual heat pipes.
4.2 General Care
- Keep the device away from liquids and excessive humidity.
- Avoid exposing the device to direct sunlight or extreme temperatures.
- Clean the exterior with a soft, dry cloth. Do not use harsh chemicals or abrasive materials.
5. Troubleshooting
This section addresses common issues you might encounter with your GEEKOM A9 MAX Mini PC.
5.1 No Power / No Display
- Check Power Connection: Ensure the power adapter is securely connected to both the Mini PC and a working power outlet.
- Check Display Cable: Verify that the HDMI or USB4 cable is firmly connected to both the Mini PC and the monitor. Try a different cable or monitor if possible.
- Monitor Input: Ensure your monitor is set to the correct input source (e.g., HDMI 1, DisplayPort).
5.2 Overheating or Performance Throttling
While the IceBlast 2.0 cooling system is highly efficient, prolonged heavy loads in poor ventilation can lead to increased temperatures.
- Ensure Proper Ventilation: Make sure the Mini PC's vents are not blocked and it is placed in an area with good airflow.
- Clean Vents: Dust accumulation can impede airflow. Use compressed air to clear any dust from the vents.
- Reduce Workload: If the system consistently overheats under heavy load, consider reducing the intensity of tasks or ensuring background applications are closed.
5.3 Network Connectivity Issues
- Wired: Check the Ethernet cable connection. Restart your router/modem.
- Wi-Fi: Ensure Wi-Fi is enabled in Windows settings. Verify your Wi-Fi password. Restart your router.
- Driver Issues: If network adapters are not detected, check Device Manager in Windows for any driver issues. You may need to download the latest drivers from the GEEKOM support website using another device.
6. Specifications
| Feature | Specification |
|---|---|
| Brand | GEEKOM |
| Model | GEEKOM A9 MAX |
| Processor | AMD Ryzen AI 9 HX 370 (2 GHz CPU Speed, 1 Processor) |
| Graphics | AMD Radeon 890M (Integrated, DDR5 SDRAM, 32 VRAM) |
| Memory (RAM) | DDR5, Max 128 GB |
| Storage | SSD (PCIE x 4 interface), 2 drives (expandable up to 8TB) |
| Operating System | Windows 11 Pro |
| USB Ports | 2x USB4 (Type-C), 5x USB 3.0 (USB-A 3.2 Gen2), 1x USB 2.0 (USB-A) |
| Video Output | 2x HDMI 2.1 (8K@60Hz), 2x USB4 (DP-Alt Mode) |
| Network | 2x 2.5GbE LAN, Wi-Fi 7, Bluetooth 5.4 |
| Other Ports | 3.5mm Audio Jack, SD 4.0 Card Reader, Kensington Lock |
| Dimensions | 19.8 x 19.2 x 12 cm |
| Weight | 1.66 kg |
| Certifications | PSE, TELEC, CE, FCC, RoHS |
7. Warranty and Support
GEEKOM is committed to providing high-quality products and excellent customer service.
7.1 Manufacturer's Warranty
Your GEEKOM A9 MAX Mini PC comes with a 3-year manufacturer's warranty from the date of purchase. This warranty covers defects in materials and workmanship under normal use. In the event of a malfunction, GEEKOM offers prompt repair or replacement services.
7.2 Customer Support
For any inquiries, technical assistance, or warranty claims, please contact GEEKOM customer support:
- Email Support: You can reach our support team by sending an email to service@geekom.com. We aim to respond as quickly as possible.
- Amazon Support: If you purchased your product through Amazon, you can also seek support by logging into your Amazon account, finding your order, and clicking 'Get Support'.
GEEKOM ensures reliable design, quiet performance, and long-life specifications, backed by comprehensive after-sales service to ensure your long-term satisfaction.
Ask a question about this manual
Ask about setup, troubleshooting, compatibility, parts, safety, or missing instructions. Manuals+ will review the question and use this page’s manual context to help answer it.