1. Introduction
The NEEWER Basics HGS01 is an efficient and simple hydroponic growing system designed for indoor soilless gardening. It supports up to 12 plants simultaneously, featuring adjustable lighting with three growing modes, a smart quiet pump, and a telescopic design for optimal plant growth. This manual provides essential information for setting up, operating, and maintaining your hydroponics system.
2. Package Contents
Please verify that all items listed below are included in your package:
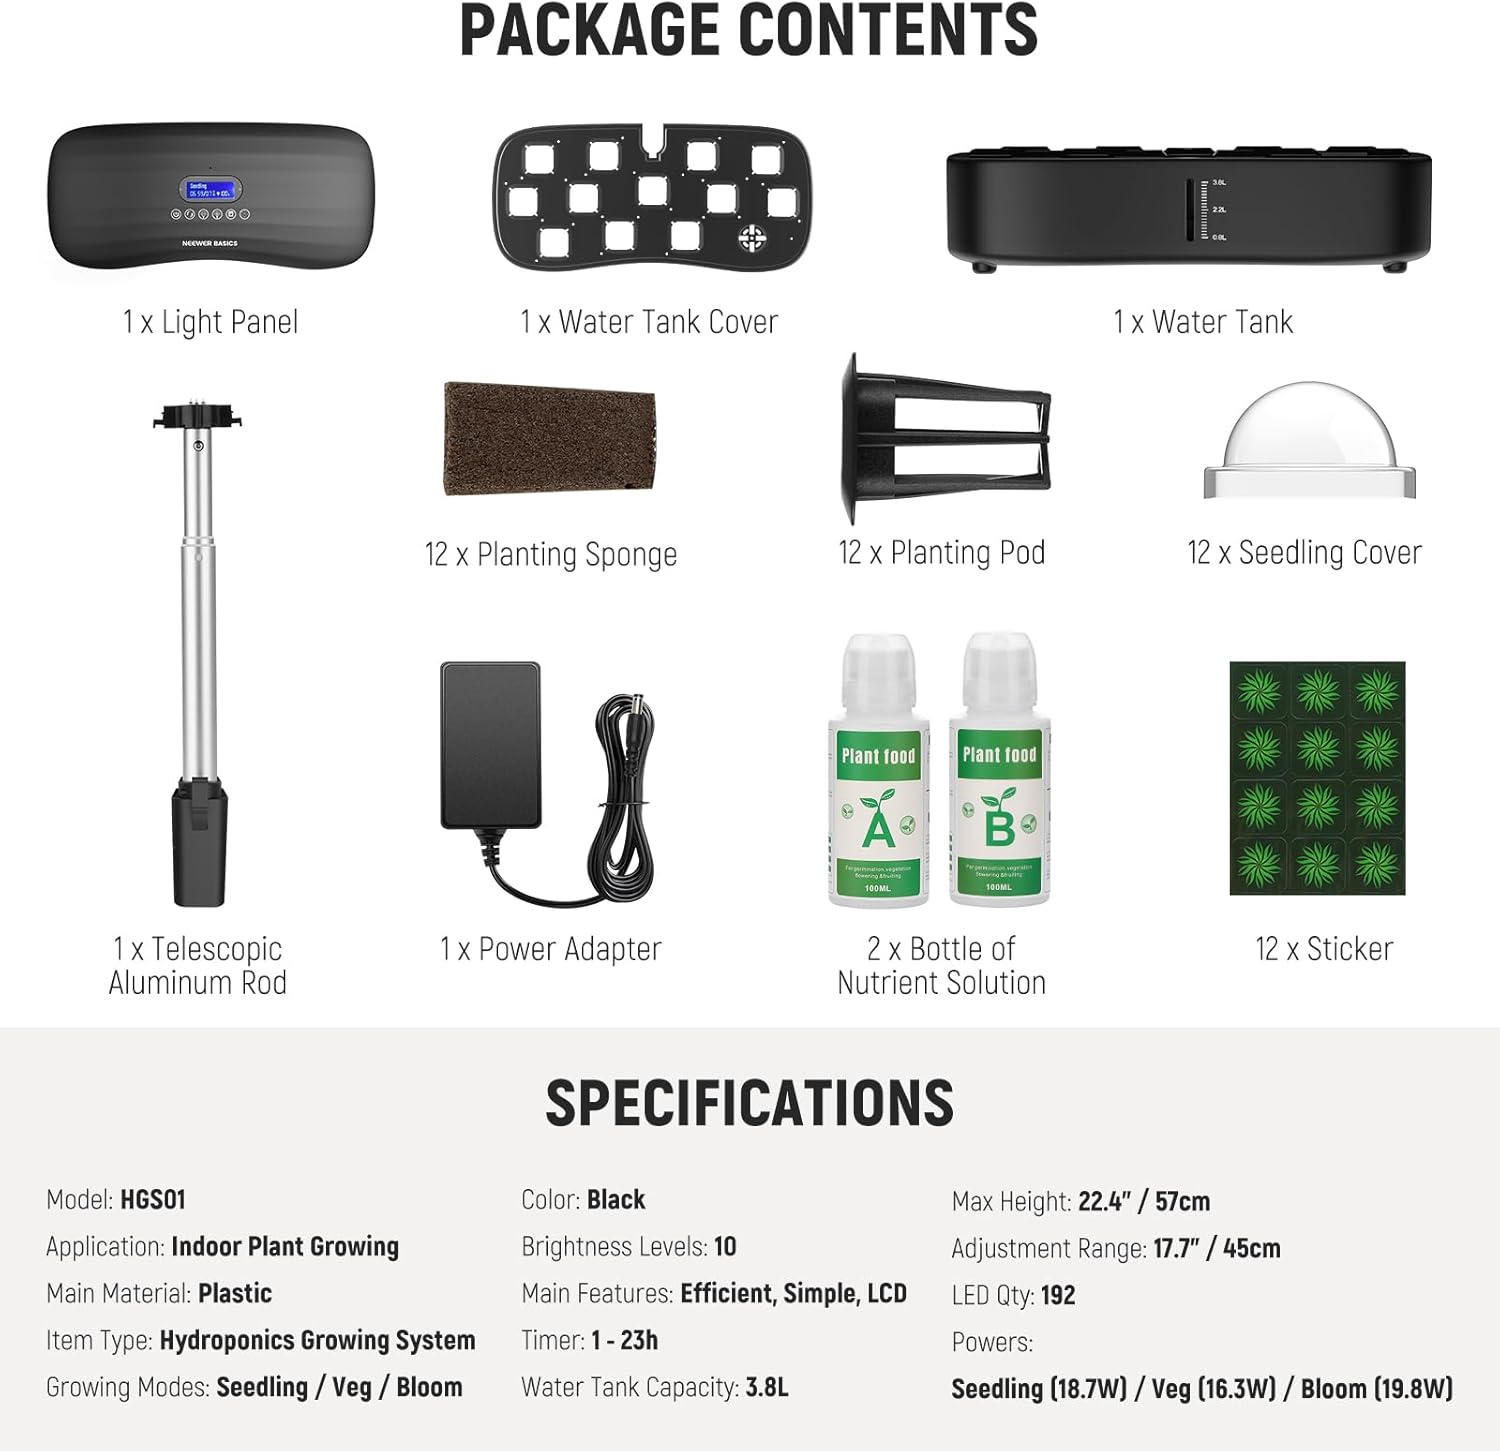
Image showing all components included in the NEEWER Basics HGS01 Hydroponics Growing System Kit: Light Panel, Water Tank Cover, Water Tank, Planting Sponges (12), Planting Pods (12), Seedling Covers (12), Telescopic Aluminum Rod, Power Adapter, 2 Bottles of Nutrient Solution, and 12 Stickers.
- 1 x Light Panel
- 1 x Water Tank Cover
- 1 x Water Tank
- 12 x Planting Sponge
- 12 x Planting Pod
- 12 x Seedling Cover
- 1 x Telescopic Aluminum Rod
- 1 x Power Adapter
- 2 x Bottle of Nutrient Solution (A & B)
- 12 x Sticker
3. Product Features
3.1. LED Plant Light & Growing Modes
The system features 192 high-performance LEDs, offering simulated daylight with 10 brightness levels and 3 distinct growing modes: Seedling, Vegetative, and Bloom. The light height is adjustable up to 17.7 inches (45cm) to accommodate different plant growth stages. For best results, position the light panel 6-8 inches (15-20cm) above the plants.
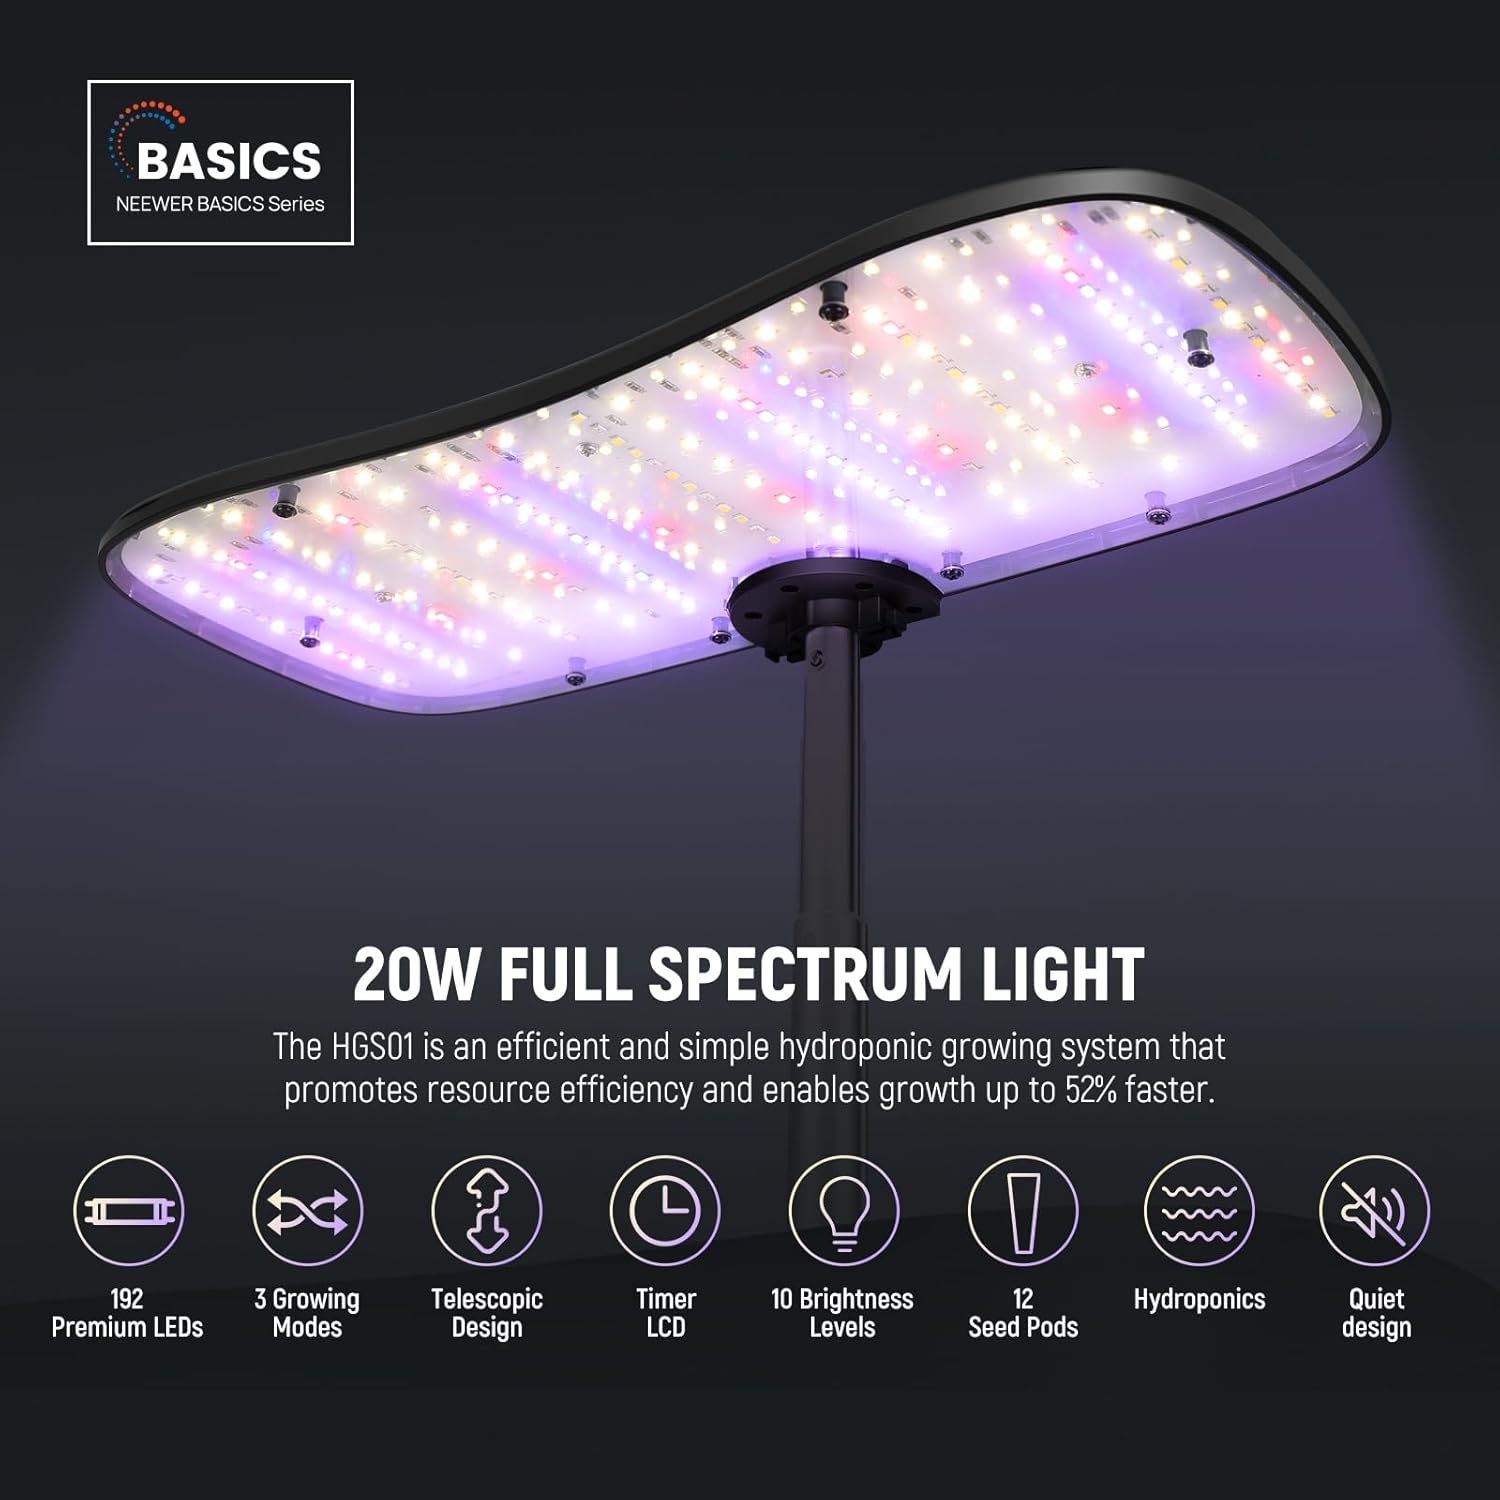
Close-up view of the 20W full spectrum LED grow light panel, highlighting its 192 premium LEDs, 3 growing modes, telescopic design, timer, LCD, 10 brightness levels, 12 seed pods, hydroponics capability, and quiet design.

Illustration demonstrating the three growing modes (Seedling, Veg, Bloom) with corresponding plant sizes and the LCD control panel showing current mode, timer, and brightness settings.
3.2. Rapid Growth & 12 Pods
Designed for soilless cultivation, this hydroponic system promotes plant growth up to 52% faster than traditional soil methods, ensuring higher yields without soil mess. It includes 12 growing pods, allowing for simultaneous cultivation of various plants like herbs, vegetables, and flowers year-round.

Graphic illustrating a hydroponic system with flowering plants, showing a 52% growth rate increase compared to traditional methods, with elemental symbols (O2, P, Ca, Mg) indicating nutrient delivery.
3.3. Smart Quiet Pump
The integrated whisper-quiet pump automatically activates for 1 hour every 24 hours in a cycle, or can be manually controlled. This efficient operation minimizes disturbance to your living environment.

Image of the hydroponic system with flowering plants in a living room setting, emphasizing its quiet operation with a 'No sound' icon.
3.4. 3.8L Water Tank & Adjustable Timer
The system features a spacious 3.8L water tank with a transparent water level gauge for easy monitoring. The optimal water level is 3L, and it should not exceed 3.8L or fall below 2.2L. A built-in timer allows automated light cycles from 1 to 23 hours for consistent growth.
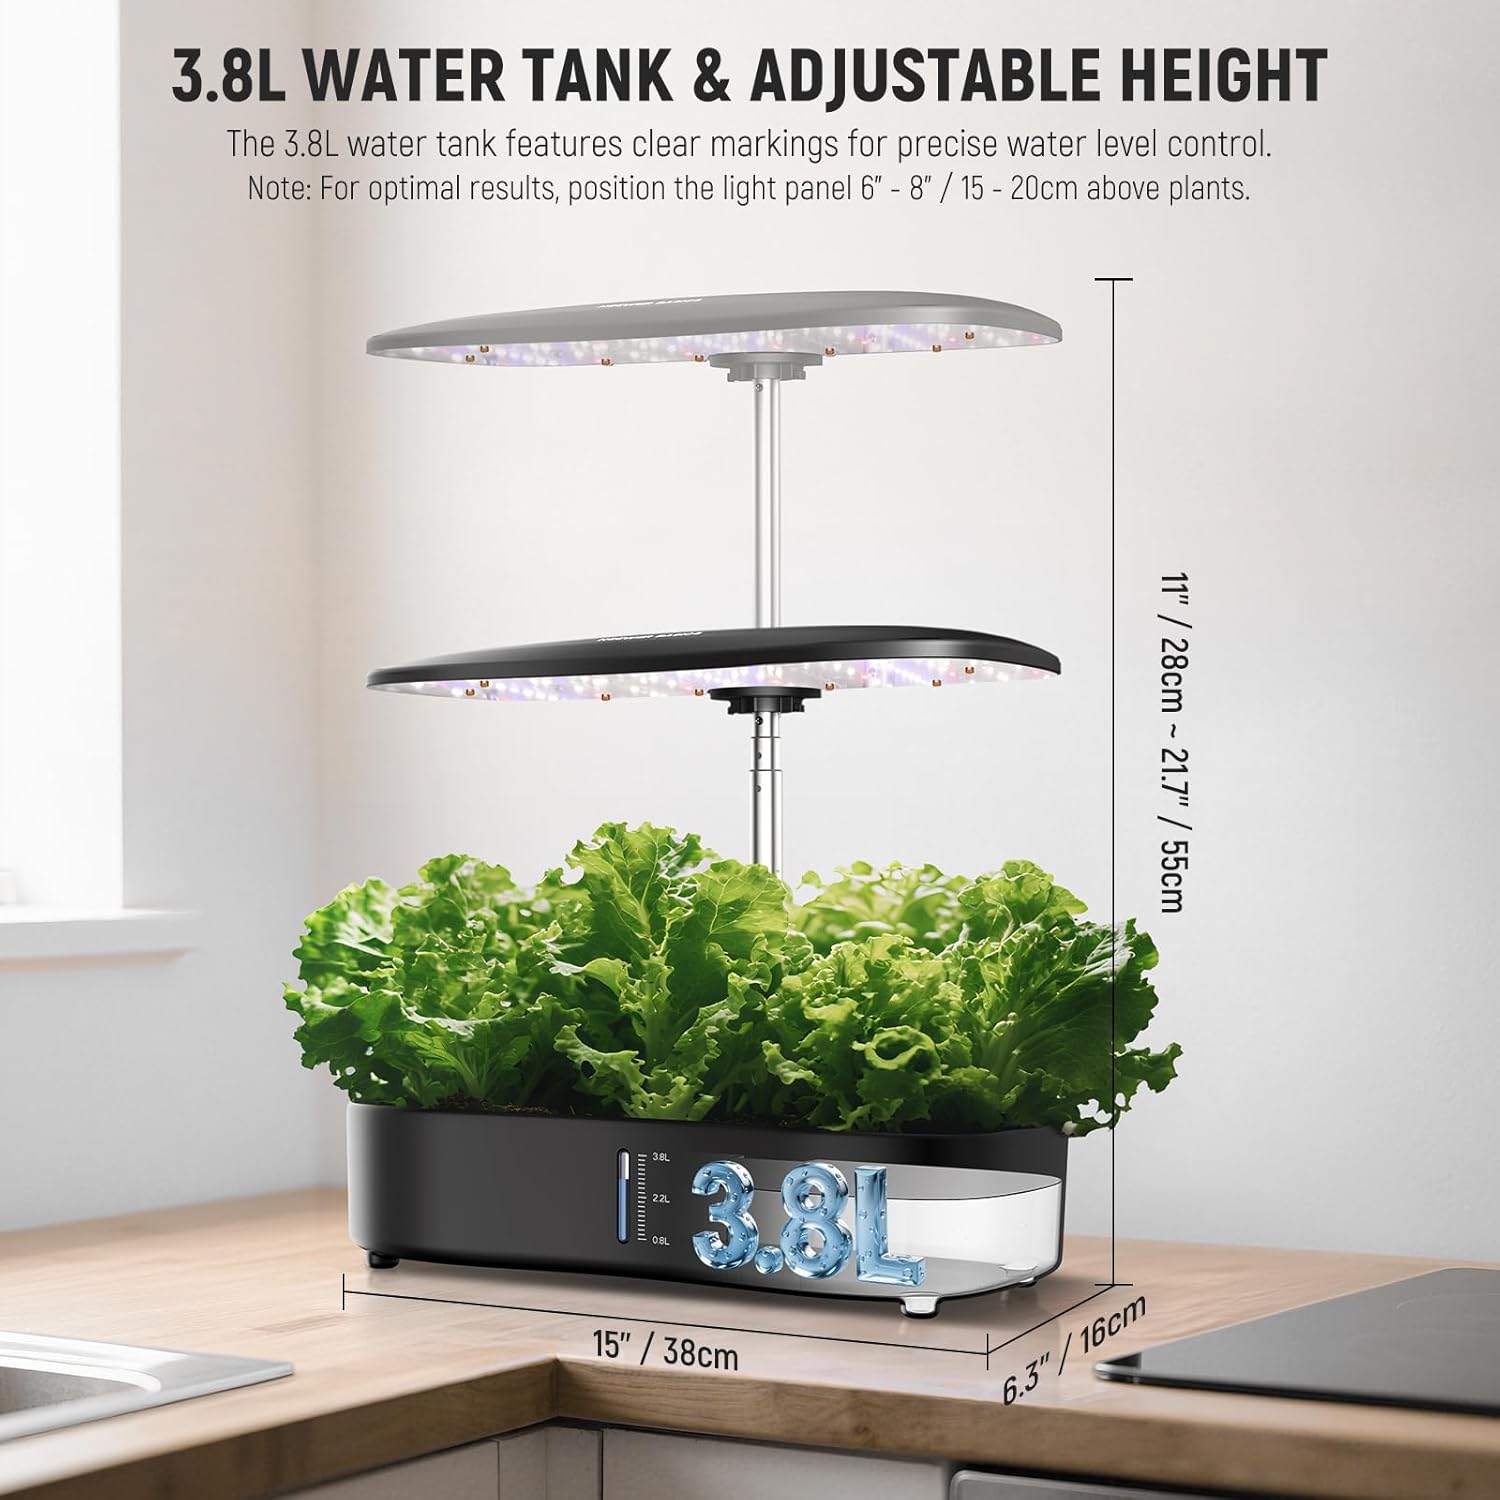
Image showing the hydroponic system with lettuce plants, highlighting the 3.8L water tank capacity with clear markings and the adjustable height of the LED light panel (11-21.7 inches / 28-55cm).
4. Setup Instructions
Follow these steps to assemble and prepare your NEEWER Basics HGS01 Hydroponics Growing System:

Detailed product diagram labeling key components: LED light panel, telescopic rod, switch button, mode switch button, brightness/timing decrease, brightness/timing increase, water pump on/off, power port, planting pod, water inlet, air hole, and water storage tank.
4.1. Assembly
- Unpack all components and verify them against the package contents list.
- Insert the telescopic aluminum rod into the designated slot on the water tank base.
- Attach the LED light panel to the top of the telescopic rod.
- Place the water tank cover onto the water tank base, ensuring it aligns correctly.
- Insert the planting pods into the openings on the water tank cover.
- Place a planting sponge into each planting pod.
- Connect the power adapter to the power port on the system and plug it into an electrical outlet.
4.2. Initial Fill & Seed Planting
- Fill the water tank with tap water through the water inlet. Monitor the transparent water level gauge; aim for approximately 3L.
- Add the recommended amount of nutrient solutions A and B to the water tank as per the nutrient solution manufacturer's guidelines.
- Place seeds into the planting sponges within the pods.
- Cover the planted pods with seedling covers to create a humid environment for germination.
- Use the provided stickers to cover any unused planting pod openings to block light and prevent algae growth in the water reservoir.
5. Operating the System
The system features an intuitive LCD screen and touch buttons for easy control.
5.1. Control Panel Functions
- Power On/Off: Press the power button to turn the system on or off.
- Adjusting Brightness: Use the brightness increase/decrease buttons to select from 10 brightness levels.
- Selecting Growing Modes: Press the mode switch button to cycle through Seedling, Vegetative, and Bloom modes. Each mode provides specific light spectrums optimized for different growth stages.
- Setting the Timer: Use the timing increase/decrease buttons to set the automated light cycle duration from 1 to 23 hours.
- Water Pump Control: The smart quiet pump automatically runs for 1 hour every 24 hours. It can also be manually activated or deactivated using the pump on/off button.
6. Maintenance
6.1. Water Level Management
Regularly check the water level gauge. Refill the water tank when the level drops below 2.2L, ensuring it does not exceed 3.8L. Use the water inlet for convenient refilling.
6.2. Nutrient Solution Replenishment
Replenish nutrient solutions A and B according to the plant's growth stage and the nutrient solution manufacturer's guidelines. Typically, this involves adding a small amount with each water refill or a full water and nutrient change every 2-3 weeks for optimal plant health.
6.3. Cleaning & Algae Prevention
Periodically clean the water tank and components to prevent algae buildup. Ensure the system is unplugged before cleaning. Remove any algae from the tank and pods using a soft brush or cloth. Keep unused planting pods covered with the provided stickers to block light and prevent algae growth in the water reservoir.
7. Troubleshooting
If you encounter issues with your hydroponics system, consider the following common solutions:
- Slow Growth: Ensure adequate light intensity and duration for the current growth stage. Verify nutrient levels are correct and water pH is within the optimal range for your plants. Check for proper water circulation.
- Algae Growth: Algae typically indicates too much light reaching the water or insufficient water circulation. Ensure all unused pod openings are covered and the pump is functioning correctly. Clean the system thoroughly.
- Pump Not Working: Check if the pump is properly connected and if there are any obstructions in the water circulation path. Ensure the system is powered on.
- Light Not Working: Verify the power connection and check the light settings on the control panel. Ensure the timer is set correctly.
8. Specifications
| Attribute | Detail |
|---|---|
| Model | HGS01 |
| Application | Indoor Plant Growing |
| Main Material | Plastic |
| Item Type | Hydroponics Growing System |
| Growing Modes | Seedling / Veg / Bloom |
| Color | Black |
| Brightness Levels | 10 |
| Main Features | Efficient, Simple, LCD |
| Adjustment Range | 17.7" / 45cm |
| LED Quantity | 192 |
| Timer | 1-23h |
| Water Tank Capacity | 3.8L |
| Maximum Height | 22.4" / 57cm |
| Product Dimensions | 11.81 x 4.72 x 3.15 inches |
| Item Weight | 4.2 pounds |
| Manufacturer | NEEWER |
9. Warranty and Support
For warranty information, product support, or technical assistance, please refer to the official NEEWER website or contact NEEWER customer service directly. Keep your purchase receipt for warranty claims.

