Introduction
This manual provides detailed instructions for the assembly, operation, and maintenance of your Virubi 60-inch Kitchen Island. Please read all instructions carefully before assembly and use to ensure safe and proper functionality. Keep this manual for future reference.
The Virubi Kitchen Island is designed to enhance your kitchen space with versatile storage, a convenient charging station, and a discreet trash can compartment. Its features include a drop-leaf countertop, multiple drawers, cabinet organizers, and mobility with lockable wheels.

Image: The Virubi 60-inch Kitchen Island with its various storage compartments, including drawers, cabinets, and a pull-out trash can, all open to display functionality.
Safety Guidelines
- Always assemble the product on a soft, clean surface to prevent scratches.
- Ensure all hardware is securely tightened before use. Periodically check and re-tighten as necessary.
- Do not exceed the stated weight capacities for the tabletop, shelves, or drop leaf.
- Keep small parts and packaging materials away from children and pets to prevent choking hazards.
- Use caution when moving the island, especially on uneven surfaces. Lock the wheels when the island is in a stationary position.
- Avoid placing hot items directly on the wooden surfaces without protection.
- Do not allow liquids to stand on the wood surfaces for extended periods.
Package Contents
Before beginning assembly, verify that all components are present and undamaged. If any parts are missing or damaged, please contact customer support.
- Main Island Panels (Side, Back, Bottom)
- Rubber Wood Countertop
- Drop Leaf Extension and Supports
- Drawer Components (Fronts, Sides, Backs, Bottoms)
- Cabinet Doors and Hinges
- Pull-out Cabinet Organizers
- Trash Can Pull-out Mechanism
- Charging Station Unit (2 AC, 1 USB, 1 Type-C)
- Caster Wheels (5 total, 2 lockable)
- Spice Rack and Towel Rack
- Hardware Pack (screws, dowels, cam locks, drawer slides, handles, etc.)
Setup and Assembly
Estimated assembly time: 40-60 minutes. Two people are recommended for assembly.
Tools Required (Not Included):
- Phillips Head Screwdriver
- Hammer (optional, for dowels)
Assembly Steps:
- Prepare the Base: Attach the side panels to the bottom panel using the provided hardware (dowels and cam locks/screws). Ensure the correct orientation for cabinet and drawer openings.
- Install Drawer Slides: Securely attach the drawer slides to the interior side panels of the island according to the pre-drilled holes.
- Assemble Drawers: Construct the three drawers by attaching the sides, back, and bottom to the drawer front. Install the corresponding drawer slides onto the assembled drawers. Insert the drawers into their respective compartments.
- Assemble Cabinet Sections: Install the internal shelves and pull-out organizers within the cabinet sections. Attach the cabinet doors using the hinges provided.
- Install Trash Can Pull-out: Assemble the pull-out mechanism for the trash can compartment and secure it within the designated area.
- Attach Countertop: Carefully place the rubber wood countertop onto the assembled base. Secure it from underneath using the provided screws.
- Install Drop Leaf: Attach the drop leaf extension to the side of the countertop using the hinges. Install the wave-shaped support boards underneath the drop leaf.
- Mount Charging Station: Integrate the charging station unit into its designated cutout on the countertop or side panel, ensuring proper wiring and secure fit.
- Attach Wheels: If desired for mobility, attach the five caster wheels to the bottom of the island. Ensure the two lockable wheels are positioned for easy access. For a stationary island, omit this step.
- Install Accessories: Attach the spice rack and towel rack to the designated side panels of the island.
- Final Checks: Verify all connections are tight and the island is stable.
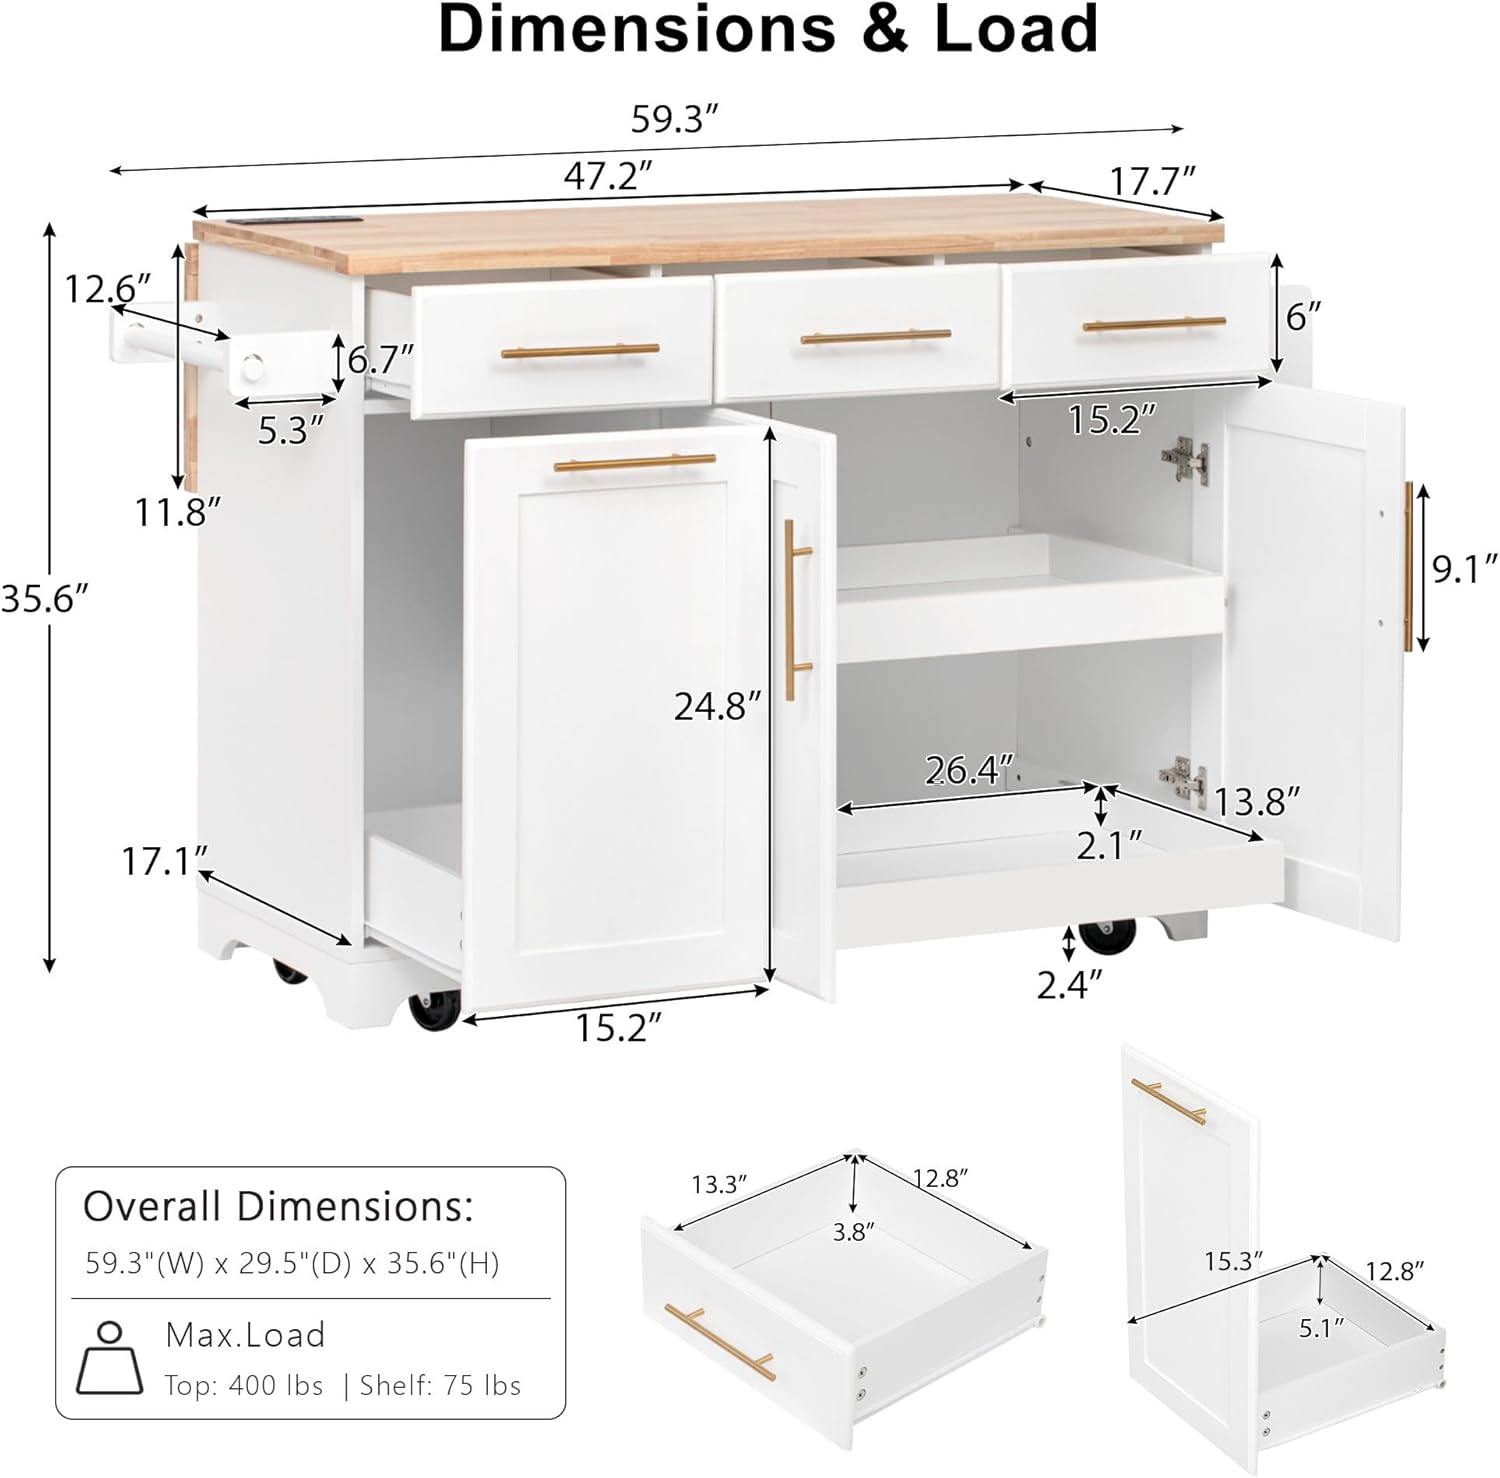
Image: A detailed diagram illustrating the overall dimensions and load capacities of the kitchen island, along with specific measurements for drawers and internal compartments.

Image: A close-up of one of the caster wheels, highlighting its locking mechanism, which allows the island to be moved or kept stationary.
Operating Instructions
Drop Leaf Countertop
The drop leaf countertop can be extended to provide additional workspace or folded down to save space. To extend, gently lift the leaf and pull out the support boards underneath until they lock into place. To fold, push the support boards back in and lower the leaf.

Image: Visual guide demonstrating how the drop leaf countertop extends and folds, supported by metal hinges for stability.
Charging Station
The integrated charging station includes 2 AC outlets, 1 USB port, and 1 Type-C port. Plug the island's power cord into a standard wall outlet. You can then use the outlets and ports to power or charge small kitchen appliances and electronic devices.
Storage Compartments
- Drawers: Use the three deep drawers for storing utensils, cutlery, or other small kitchen items.
- Cabinets with Pull-out Organizers: The two main cabinets feature pull-out shelves for easy access to spices, cookware, or dishes. Gently pull the shelves forward to access contents.
- Trash Can Cabinet: The dedicated pull-out cabinet is designed to hold one 10-gallon trash can or two 5-gallon trash cans, keeping waste out of sight.

Image: A visual representation of the pull-out trash can compartment, detailing its dimensions and capacity for different trash can sizes.
Mobility and Locking Wheels
The island is equipped with five caster wheels, two of which are lockable. To move the island, ensure both lockable wheels are disengaged. To keep the island stationary, press down on the locking levers of the two lockable wheels until they click into place.
Maintenance
Cleaning
Wipe the surfaces with a soft, dry cloth. Avoid the use of harsh chemicals, abrasive cleaners, or household cleaners, as they may damage the finish of the wood and painted surfaces.
Hardware Check
Hardware may loosen over time with regular use. Periodically check that all connections, including screws, cam locks, and hinges, are tight. Re-tighten as needed to maintain stability and structural integrity.
Troubleshooting
- Island is Wobbly: Ensure all assembly hardware is securely tightened. Check that the island is on a level surface. If wheels are installed, ensure they are properly seated.
- Drawers or Cabinet Doors Stick: Check that drawer slides are properly aligned and free of obstructions. Ensure hinges on cabinet doors are correctly installed and adjusted.
- Charging Station Not Working: Verify that the island's power cord is securely plugged into a functional wall outlet. Check for any tripped circuit breakers.
- Drop Leaf Does Not Stay Up: Ensure the support boards are fully extended and locked into position underneath the leaf. Check hinges for damage or misalignment.
Specifications
| Feature | Detail |
|---|---|
| Overall Product Dimensions | 59.3" W x 29.5" D x 35.6" H |
| Product Weight | 125.55 LBS |
| Tabletop Weight Capacity | 400 LBS |
| Trash Can Capacity | 50 LBS |
| Shelf Weight Capacity | 75 LBS |
| Drop Leaf Weight Capacity | 33 LBS |
| Material | P2 Grade Environmental MDF, Rubber Wood |
| Charging Station | 2 AC Outlets, 1 USB Port, 1 Type-C Port |
| Mobility | 5 Caster Wheels (2 Lockable) |
| Assembly Required | Yes |
| Country of Origin | China |
Warranty and Support
For any questions, concerns, or assistance with your Virubi Kitchen Island, please contact the manufacturer's customer support. Please refer to your purchase documentation for specific warranty details and contact information.