
1. Introduction
This manual provides comprehensive instructions for the assembly, operation, and maintenance of your Pamray 71-inch U-shaped computer desk. Designed for home office, work, and gaming environments, this desk offers a spacious workspace and integrated power solutions. Please read these instructions carefully before assembly and use to ensure proper setup and longevity of your product.

Image 1: Overview of the Pamray 71-inch U-shaped computer desk.
2. Setup and Assembly
Your Pamray U-shaped desk is designed for straightforward assembly. All necessary tools and clear installation instructions are included in the accessory box. For visual guidance, comprehensive installation videos are available by scanning the QR code provided on the product packaging.
2.1 Unpacking and Component Check
- Carefully unpack all components and hardware from the box.
- Verify that all parts listed in the instruction manual are present and undamaged.
- Keep packaging materials until assembly is complete in case of missing parts or returns.
2.2 Assembly Steps
- Begin by assembling the main frame components according to the provided diagrams.
- Attach the desktop panels securely to the frame. Ensure all screws are tightened.
- Install the integrated power outlet unit into the designated slot on the desktop.
- Attach the "X"-shaped back braces to reinforce stability.
- Screw in the adjustable leg pads at the bottom of each leg.
2.3 Adjustable Leg Pads
The desk features adjustable leg pads to ensure stability on uneven floors. Rotate each leg pad clockwise or counter-clockwise to raise or lower the corresponding corner of the desk until it is level and stable.

Image 2: Adjustable leg pads for stability.
2.4 Assembly Video
For a detailed visual guide on assembly, please refer to the official product video below:
Video 1: Official Pamray "U shaped desk" assembly and feature overview. This video demonstrates the desk's design and features, including its U-shape and potential setup configurations.
3. Operating Instructions
3.1 Utilizing the U-Shaped Workspace
The U-shaped design provides three distinct desktop areas, allowing for versatile organization. You can dedicate one section for computer work, another for gaming, and a third for writing or other tasks. This maximizes your functional workspace by utilizing corner areas efficiently.

Image 3: Example setup demonstrating the spacious U-shaped desktop.
3.2 Integrated Power Outlets and USB Ports
The desk includes a built-in power strip with 4 AC outlets (125V/12A) and 2 USB charging ports (5V/2A), with a rated power of 1500W. This allows for convenient charging of phones, laptops, gaming gear, and other electronic devices directly from your desktop.
- Connect the desk's power cord to a wall outlet.
- Plug your devices into the AC outlets or USB ports as needed.
- Avoid overloading the power strip; ensure total wattage does not exceed 1500W.

Image 4: Integrated power outlets and USB charging ports.
3.3 Pegboard Storage
Some models may include a pegboard for additional storage. Utilize the provided hooks to hang headphones, controllers, or other small accessories, keeping your workspace organized and clutter-free.

Image 5: Pegboard for accessory storage.
4. Maintenance
4.1 Cleaning
The desk surface is designed to be water-resistant. For general cleaning, wipe the surface with a soft, damp cloth. Avoid using harsh chemicals or abrasive cleaners, which can damage the finish. For spills, wipe immediately to prevent staining.

Image 6: Water-resistant desktop surface.
4.2 Structural Integrity
Periodically check all screws and connections to ensure they remain tight. If any looseness is detected, re-tighten them using the appropriate tools. This helps maintain the desk's stability and extends its lifespan.
5. Troubleshooting
5.1 Instability/Wobbling
- Check Leg Pads: Ensure all adjustable leg pads are properly adjusted to compensate for uneven flooring.
- Tighten Screws: Verify that all assembly screws, especially those connecting the frame and desktop, are securely tightened.
- "X"-Braces: Confirm that the "X"-shaped back braces are correctly installed and tightened, as they contribute significantly to stability.
5.2 Power Outlets Not Functioning
- Main Power Connection: Ensure the desk's power cord is securely plugged into a functional wall outlet.
- Overload: Check if too many high-power devices are connected, potentially tripping an internal circuit breaker (if present) or the wall outlet's breaker. Reduce the load.
- Damage: Inspect the power strip for any visible damage. If damaged, discontinue use and contact support.
If you encounter issues not covered here, please refer to the contact information in the Support section.
6. Specifications
| Feature | Detail |
|---|---|
| Model Number | S9 |
| Product Dimensions (D x W x H) | 39.37" x 70.87" x 30.79" |
| Item Weight | 18.63 Kilograms |
| Color | Grey |
| Top Material Type | FSC-Certified Wood |
| Base Material | Metal |
| Maximum Weight Recommendation | 150 Pounds |
| AC Outlets | 4 (125V/12A) |
| USB Ports | 2 (5V/2A) |
| Rated Power | 1500W |
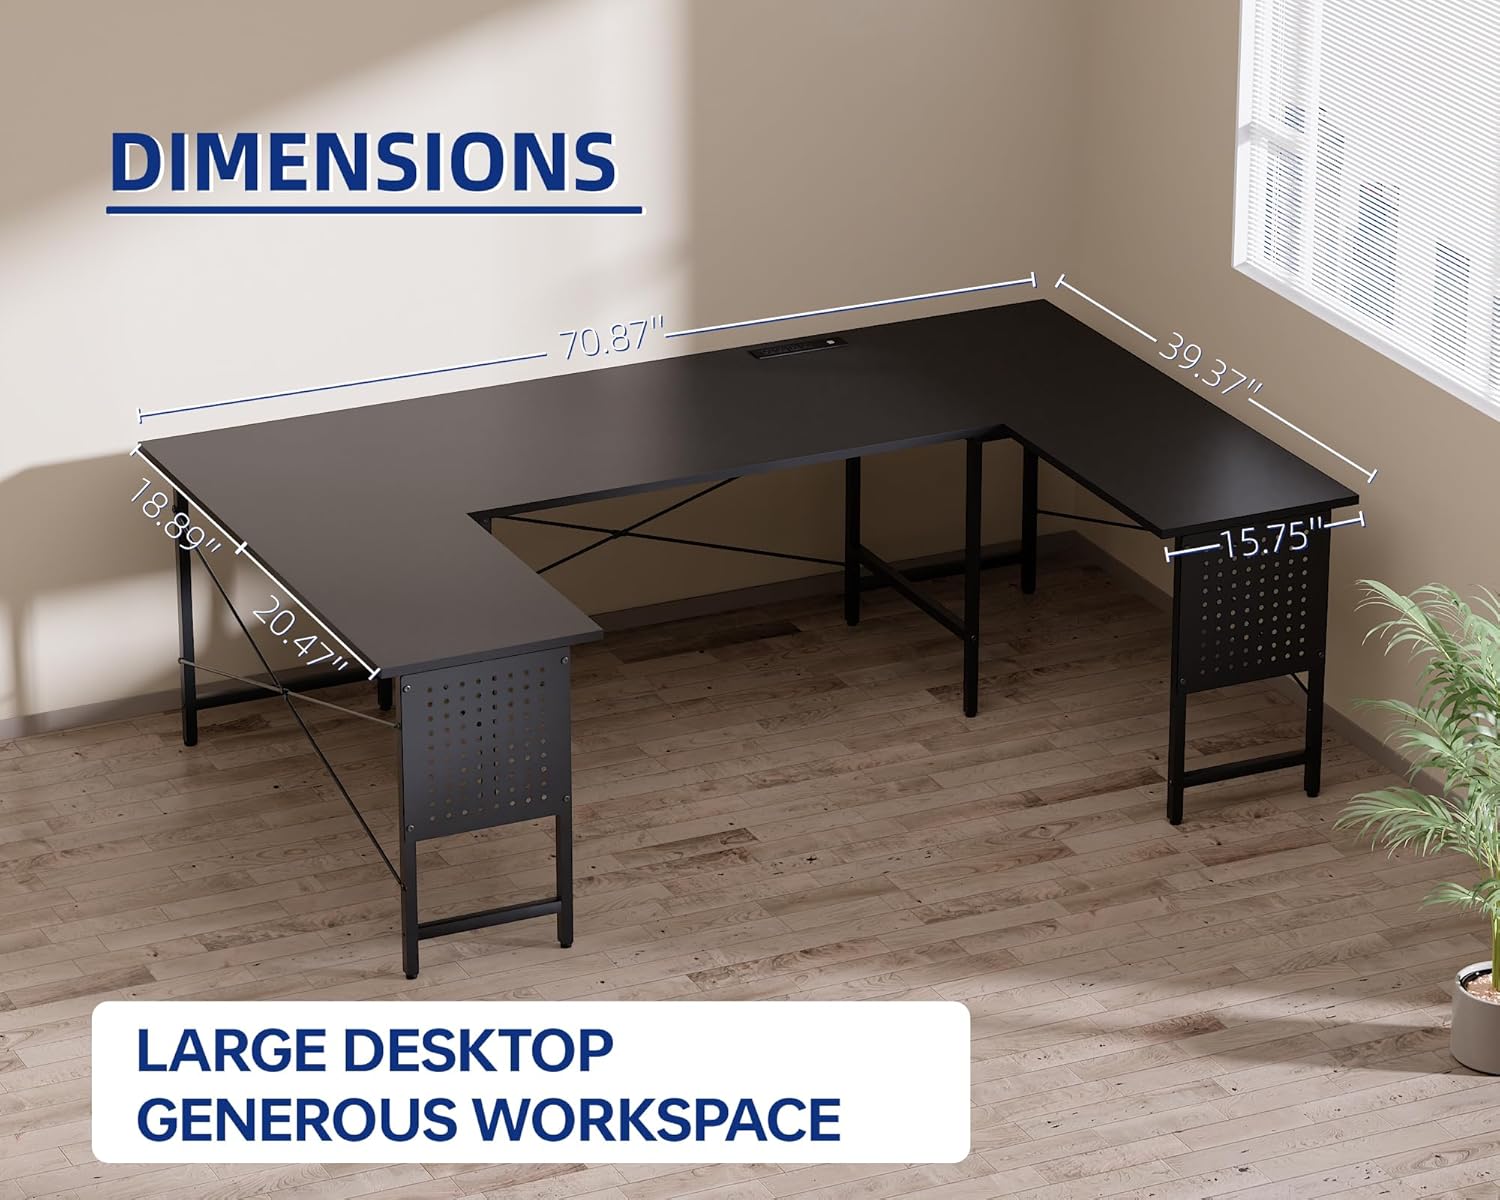
Image 7: Desk dimensions overview.
7. Warranty and Support
Pamray is committed to providing quality products. While specific warranty details are not provided in this manual, please retain your proof of purchase for any warranty claims. For product support, missing parts, or troubleshooting assistance, please contact the seller, Xstone, through your purchase platform.
For additional information or to explore other Pamray products, visit the official Pamray store online.