1. Introduction
The bokman Portable Level 1 & Level 2 EV Charger (Model BKL21620) provides a versatile and reliable charging solution for your electric vehicle. Designed for convenience and safety, this charger supports both Level 1 (120V) and Level 2 (240V) charging, offering adjustable current settings and a robust, all-weather design. Its portability makes it an ideal companion for home use, road trips, or as an emergency charging option.
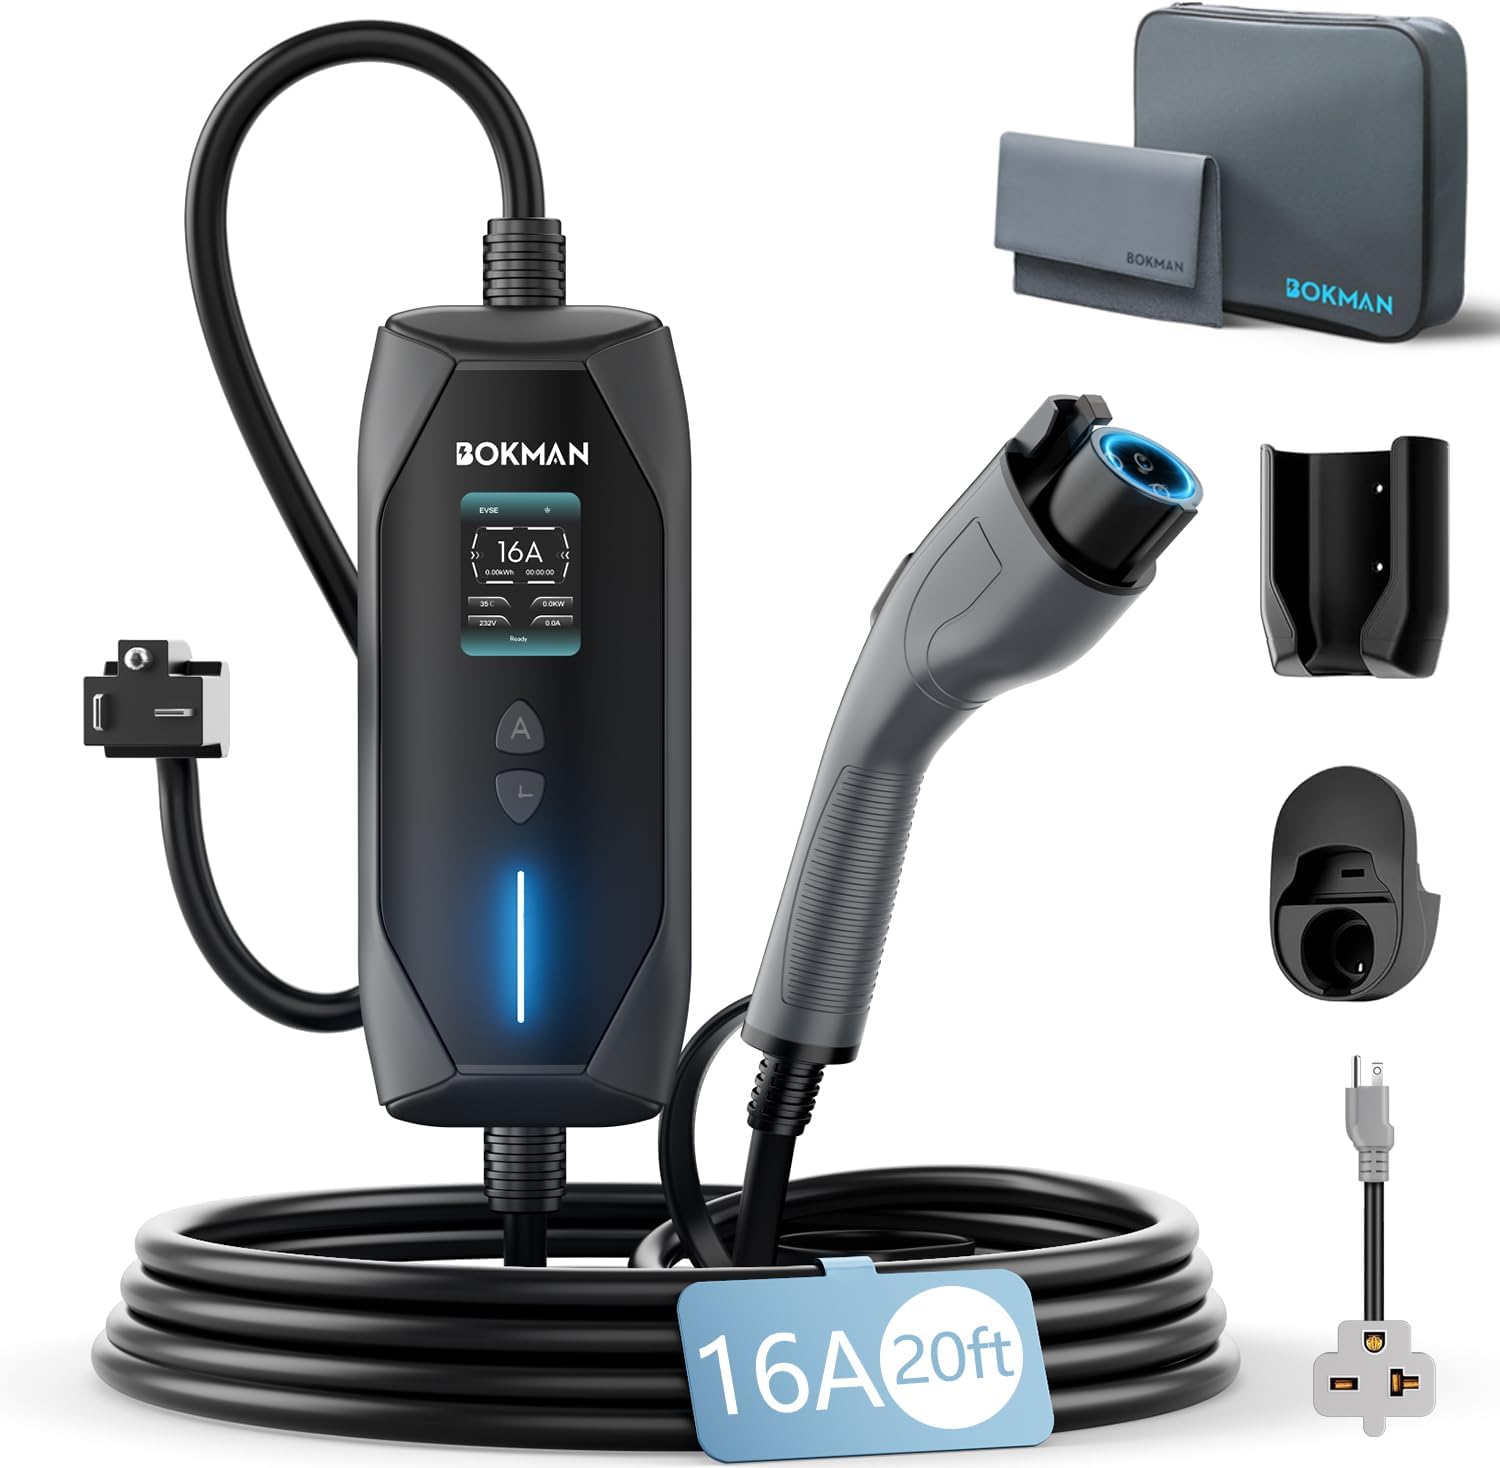
Image 1: bokman Portable EV Charger kit with control box, J1772 connector, NEMA 6-20 plug, NEMA 5-15 adapter, and carry bag.
2. Package Contents
Please verify that all items are present in your package:
- 1x EV Charger Control Box with 20ft Flexible Cable
- 1x J1772 Charging Connector
- 1x NEMA 6-20 Plug (integrated)
- 1x NEMA 5-15 Adapter for Household Socket
- 1x Carry Bag
- 1x Charger Holder
- 1x Wallbox Holder
- 1x User Manual
- 1x Double-Sided Microfiber Towel

Image 2: All components included in the bokman Portable EV Charger package.
3. Setup and Installation
3.1 Mounting the Control Box and Charger Holder
The charger includes a wallbox holder for the control box and a separate holder for the J1772 connector. These can be mounted to a wall or a charging pedestal using the pre-drilled holes for a neat and organized charging station.
3.2 Connecting to Power
The bokman EV Charger supports two charging levels:
- Level 2 Charging (240V, 16A): Use the integrated NEMA 6-20 plug to connect to a compatible 240V outlet. This provides a faster charging rate.
- Level 1 Charging (120V): Attach the included NEMA 5-15 adapter to the NEMA 6-20 plug, then connect to a standard 120V household socket. This offers a slower, but universally accessible charging option.

Image 3: Dual charging mode with NEMA 6-20 for Level 2 and NEMA 5-15 adapter for Level 1.
3.3 Connecting to Your Electric Vehicle
- Ensure the charger is securely plugged into the appropriate power outlet.
- Open your vehicle's charging port.
- Insert the J1772 charging connector firmly into your vehicle's charging port. A click indicates a secure connection.

Image 4: Step-by-step guide for connecting the EV charger.
4. Operating Instructions
4.1 LCD Display and Controls
The control box features an LCD display and two buttons for adjusting settings:
- LCD Display: Shows selected current (Amperage), charged capacity (kWh), temperature, charging voltage, charging timer, charging power (kW), and charging current (A).
- Adjustable Current Button (A): Allows you to toggle between 6A, 8A, 10A, 12A, and 16A (for 120V operation, maximum current should adhere to NEC guidelines, typically 12A for a 15A circuit).
- Time Schedule Button (L): Enables setting a delay for charging, from 1 to 12 hours. This is useful for utilizing off-peak electricity rates.
Image 5: Control box with LCD display and control buttons.
4.2 LED Indicators
The LED light on the control box indicates the charger's status:
- Solid Light: Charging completed.
- Flashing Light: Charging in progress.
- Solid Light (different color/pattern): Power on.
- Flashing Light (different color/pattern): Schedule mode active.
4.3 National Electrical Code (NEC) Compliance
For continuous loads (operating for 3 hours or more), the maximum current should not exceed 80% of the branch circuit ampere rating. For a NEMA 5-15 (15A) household socket, this means a maximum of 12A (15A * 80% = 12A) for Level 1 charging.

Image 6: NEC guidelines for Level 1 and Level 2 charging.
5. Compatibility
The bokman EV Charger features a J1772 connector, making it universally compatible with all J1772 EV and PHEV models. For Tesla vehicles, a separate J1772 to Tesla charging adapter is required (not included with this product).

Image 7: Compatibility with various J1772 EV and PHEV models.
Video 1: Overview of the bokman Level 2 EV Charger, demonstrating its features and use with a Tesla (requires adapter).
6. Safety Features
Your bokman EV Charger is engineered with multiple safety protections to ensure a secure charging experience for both the unit and your vehicle:
- Overtemperature Protection: Prevents overheating during operation.
- Overvoltage/Overcurrent Protection: Safeguards against electrical surges and excessive current.
- Ground Fault Monitoring: Detects and mitigates ground fault hazards.
- Fire-Resistant Materials: Constructed with materials designed to resist fire.
- IP65 Waterproof Rating: Provides protection against dust and water jets, suitable for outdoor use.
- Physical Durability: Withstands 1-meter drops and up to 2 tons of vehicle pressure.

Image 8: All-weather charging capabilities of the bokman EV charger.
7. Charging Speed
The charging speed varies depending on the power level and your vehicle's battery capacity. For this 16A model, here's an approximate charging speed based on a Mustang Mach-E (88 kWh):
| Charging Level | Amperage/Voltage | Charging Time (0-100%) | Miles Added/Hour |
|---|---|---|---|
| Level 2 | 16A (240V) | 25.4 Hours | 12.6 Miles |
| Level 1 | 120V | 67.7 Hours | 4.7 Miles |
Note: Charging times and miles added per hour are estimates and may vary based on vehicle model, battery condition, and environmental factors.

Image 9: Charging speed comparison for Level 1 and Level 2.
8. Maintenance
To ensure the longevity and optimal performance of your bokman EV Charger, follow these maintenance guidelines:
- Regular Cleaning: Use the provided microfiber towel to gently clean the control box, cable, and connectors. Ensure all components are dry before use.
- Cable Care: Avoid kinking or excessive bending of the cable. Store it neatly in the carry bag or on the cable holder when not in use. The cable is designed to remain flexible in cold weather.
- Environmental Protection: While the charger is IP65 waterproof, it is recommended to avoid prolonged exposure to extreme weather conditions when possible. Ensure the charging port and connector are dry before connecting.
- Storage: Store the charger in its carry bag in a cool, dry place when not in use, especially during extended periods of non-operation.
9. Troubleshooting
If you encounter any issues with your bokman EV Charger, please consider the following general troubleshooting steps:
- No Power/Display Off: Ensure the charger is securely plugged into a functional power outlet. Check the circuit breaker if using a household outlet.
- Charging Not Initiating: Verify that the J1772 connector is fully inserted into your vehicle's charging port. Check the LCD display for any error messages. Ensure the selected current is compatible with your power source.
- Slow Charging: Confirm you are using the appropriate power outlet (240V for Level 2) and that the current setting is optimized for your vehicle and circuit.
- Overheat Warning: Disconnect the charger immediately and allow it to cool down. Ensure there is adequate ventilation around the control box.
For persistent issues or technical support, please refer to the contact information provided in your product packaging or visit the official bokman website.
10. Specifications
| Feature | Detail |
|---|---|
| Brand | bokman |
| Model Number | BKL21620 |
| Charging Levels | Level 1 (120V), Level 2 (240V) |
| Max Current | 16A |
| Adjustable Current | 6A, 8A, 10A, 12A, 16A |
| Cable Length | 20 feet |
| Connector Type | J1772 |
| Power Plugs | NEMA 6-20 (integrated), NEMA 5-15 (adapter) |
| Special Features | Charging Indicator, Physical Buttons, Short Circuit Protection, Water Resistant IP65 |
| Item Weight | 9.53 pounds |
| Package Dimensions | 14.53 x 13.3 x 5.59 inches |
11. Warranty and Support
For information regarding product warranty, returns, or technical assistance, please refer to the warranty card included in your product packaging or contact bokman customer support directly. Keep your purchase receipt for warranty claims.

