BEELINK EX Mate Mini
BEELINK EX Mate Mini-B Dock & Stand User Manual
Model: Mate Mini
1. Introduction
Thank you for choosing the BEELINK EX Mate Mini-B Dock & Stand. This high-performance docking station is specifically designed to complement your Mac Mini M4/M4 Pro, expanding its connectivity and storage capabilities. With blazing-fast 80Gbps transfer speeds, extensive NVMe SSD expansion, and a comprehensive array of ports, the Mate Mini-B transforms your setup into a powerful workstation.
This manual provides detailed instructions for setting up, operating, maintaining, and troubleshooting your Mate Mini-B to ensure optimal performance and longevity.

Figure 1.1: The Mate Mini-B Dock & Stand seamlessly integrated with a Mac Mini.
2. Key Features
The Mate Mini-B Dock & Stand offers a robust set of features to enhance your computing experience:
- 80Gbps Blazing-fast Dock: One USB-C port delivers blazing 80Gbps transfer speeds for Mac Mini M4 Pro, and 40Gbps transfer speeds for Mac Mini M4, enabling rapid data transfer for large files.
- Massive 8TB Expandable Storage: Features a single PCIex4 slot, supporting M.2 2280 PCIe3.0/4.0/5.0 SSDs, expandable up to 8TB (SSD not included).
- High-Speed Connectivity Hub: Transforms your Mac Mini into a workstation with 7 ports, including 80Gbps USB-C port (x1), USB3.0 (x2), 2.5G LAN (x1), SD4.0 (300MB/s) (x1), 3.5mm Audio Jack (x1), and Type-C (PD3.0) (x1).
- Built-in Quiet Fan & Supplementary Power Port: A heat sink and 360° cooling vents ensure the Mate Mini remains cool under load. The Type-C PD3.0 port supports an external PD adapter for peripherals requiring over 15W.
- Seamless Integration: Designed to match the Mac Mini M4/M4 Pro's dimensions (5x5x0.6 inches) and aesthetics with an aluminum alloy shell. Compatible with any mini PC, laptop, all-in-one, or desktop computer with a Thunderbolt 3/4/5 or USB 4 port.

Figure 2.1: Visual summary of the Mate Mini-B's core features.

Figure 2.2: Illustration of the high-speed M.2 SSD expansion capability.

Figure 2.3: The integrated SD4.0 card slot for creators.
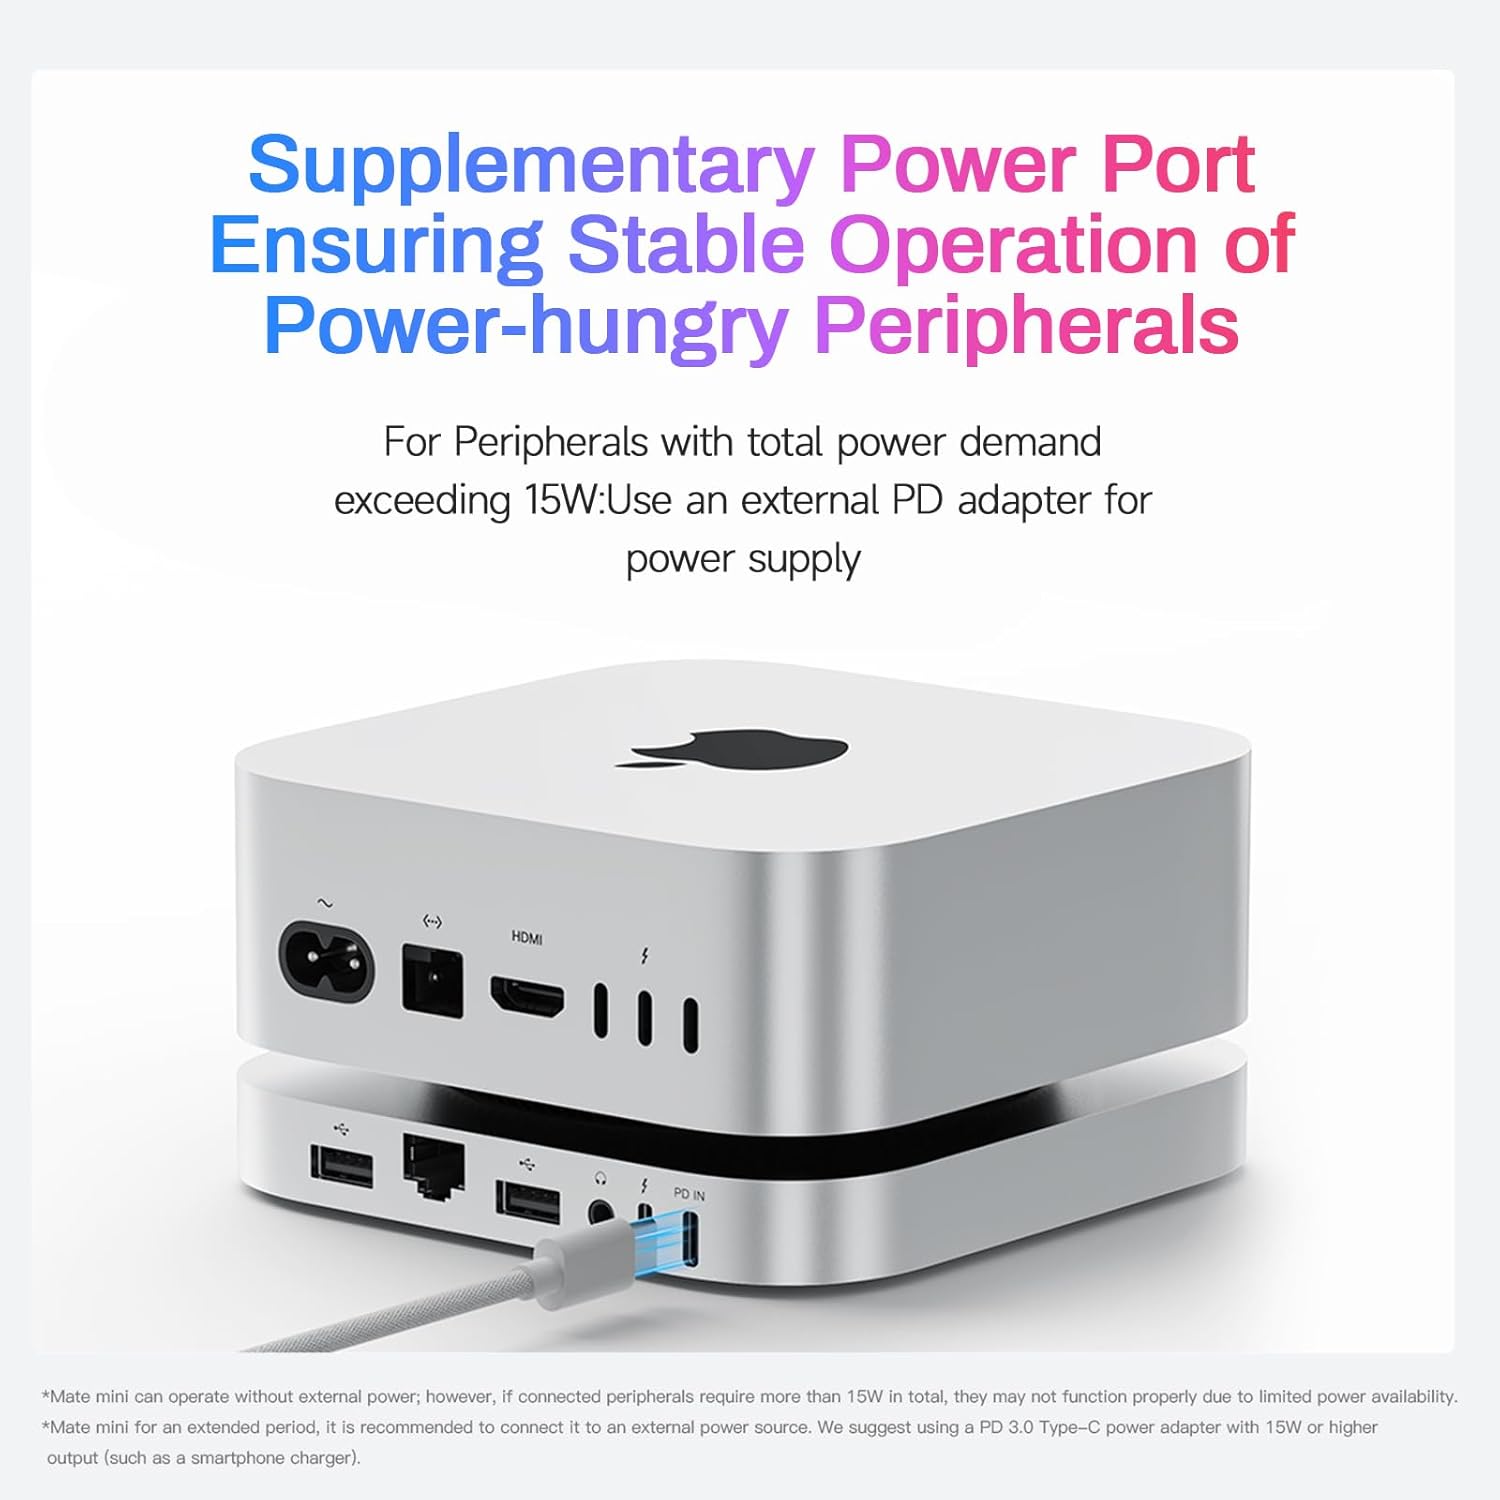
Figure 2.4: Details on the 2.5G Ethernet port and 3.5mm audio jack.

Figure 2.5: The cooling system designed to maintain optimal performance.
Video 2.1: Official overview and unboxing of the Beelink EX Mate Mini for Mac Mini M4 Dock.
3. Setup Guide
3.1. Package Contents
Before you begin, please verify that all items are present in the package:
- BEELINK EX Mac Mini M4 Dock (Model: Mate Mini-B)
- 2*80Gbps USB-C Cables (use this cable to connect Mac Mini)
- User Manual

Figure 3.1: What's included in the Mate Mini-B package.
3.2. Physical Connection
- Place your Mac Mini M4/M4 Pro directly on top of the Mate Mini-B Dock & Stand, ensuring proper alignment. The dock is designed to perfectly match the Mac Mini's footprint.
- Connect one of the supplied 80Gbps USB-C cables from the 80Gbps USB-C port on the Mate Mini-B to a Thunderbolt/USB4 port on your Mac Mini. This single cable handles all data, video, and power passthrough.
- Connect any desired peripherals (e.g., external drives, keyboard, mouse, monitor) to the available ports on the Mate Mini-B.
- If connecting power-hungry peripherals (total power demand exceeding 15W), connect an external PD adapter (not included) to the Type-C (PD3.0) port on the Mate Mini-B for supplementary power.
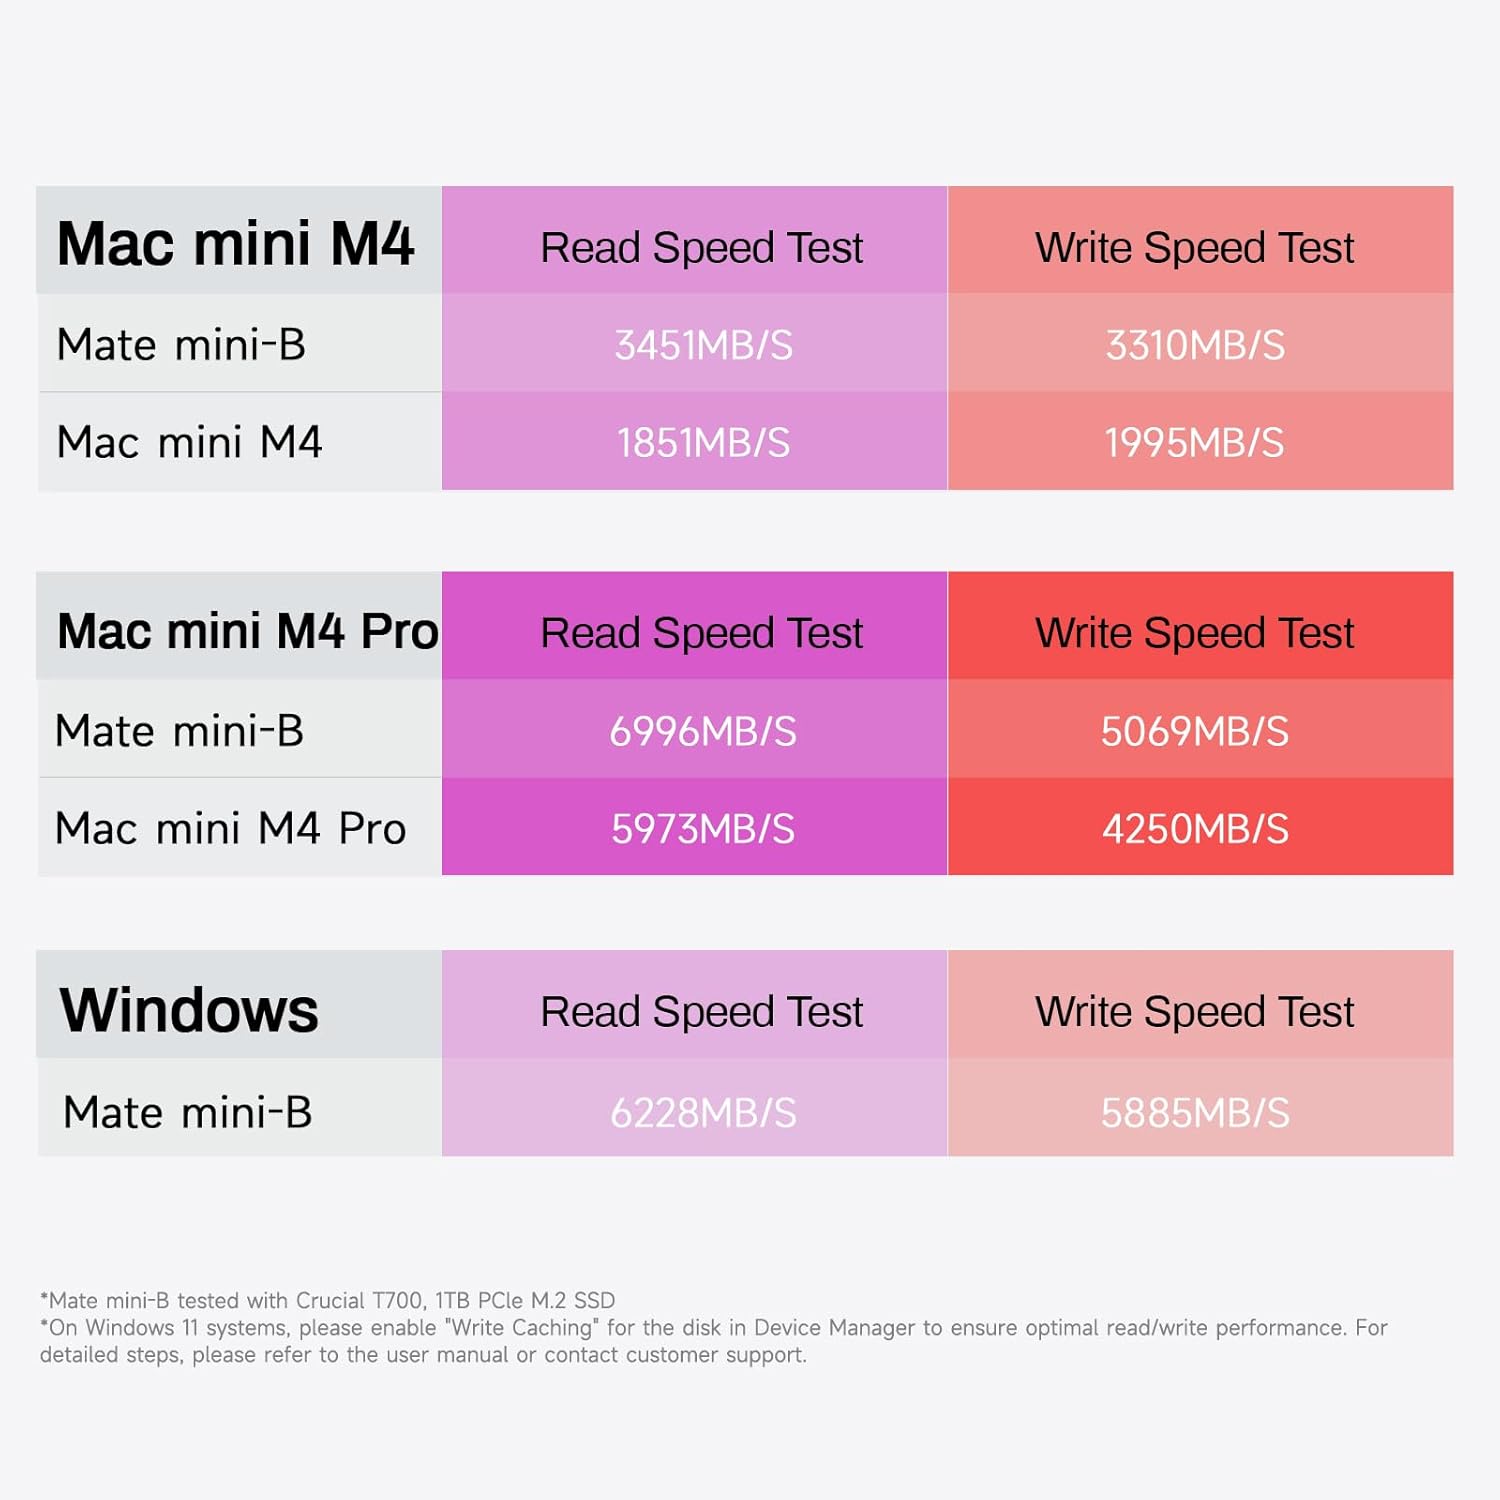
Figure 3.2: The Type-C PD3.0 port for supplementary power.
3.3. SSD Installation (Optional)
The Mate Mini-B supports a single M.2 2280 PCIe3.0/4.0/5.0 SSD up to 8TB for expanded storage. Follow these steps carefully:
- Preparation: Power off and disconnect the Mate Mini-B from your Mac Mini and all peripherals.
- Accessing the SSD Bay: Carefully remove the silicone pads on the bottom of the Mate Mini-B. You may need a thin tool like a razor blade to gently lift them. Be aware that this may damage the pads.
- Unscrewing the Base: Remove the small screws securing the bottom panel of the Mate Mini-B. Keep track of all screws as they are tiny.
- Insert SSD: Locate the M.2 slot inside. Gently insert your M.2 2280 SSD into the slot at an angle, then press it down.
- Secure SSD: Secure the SSD with a screw to the interior post. Note: A screw for securing the SSD is typically not supplied with the Mate Mini-B. You may need to source a compatible M.2 screw separately.
- Reassemble: Carefully reattach the bottom panel and secure it with the screws. Replace the silicone pads.
Important Note: The process of removing the silicone pads and handling the small screws can be challenging. Exercise caution to avoid damaging the device or losing components.
4. Operating Instructions
4.1. Port Overview
Figure 4.1: Detailed diagram of all available ports on the Mate Mini-B.
- 80Gbps USB-C Port (x1): Connects to your Mac Mini for primary data and power passthrough. Also supports high-speed peripherals.
- USB-A 3.0 Ports (10Gbps, x2): For connecting standard USB devices such as keyboards, mice, and external storage.
- 2.5G LAN Port (x1): Provides high-speed wired network connectivity, up to 2.5 times faster than standard Gigabit Ethernet.
- SD4.0 Card Reader (x1): Supports ultra-fast data transfer from SD cards (up to 300MB/s), ideal for photographers and videographers.
- 3.5mm Audio Jack (x1): For connecting headphones or speakers. Note that the Mac Mini's front port can be used for headphones, and the Mate Mini's rear port for speakers, allowing easy switching.
- Type-C (PD3.0) Port (x1): A power delivery port for connecting an external power adapter to supply additional power to the dock and connected peripherals, especially those exceeding 15W.
4.2. SSD Performance
Once an SSD is installed and recognized by your operating system, you can utilize it for high-speed storage. Performance will vary based on the SSD model and your Mac Mini/PC configuration.
Figure 4.2: Example read/write speed test results for Mate Mini-B across different systems.
5. Maintenance
- Cleaning: Use a soft, dry cloth to wipe the exterior of the dock. Avoid liquid cleaners or abrasive materials.
- Ventilation: Ensure the cooling vents are not obstructed to allow for proper airflow and prevent overheating. The built-in fan helps maintain optimal temperature.
- Cable Management: Keep cables organized and free from kinks or excessive bending to prevent damage.
- Storage: When not in use for extended periods, store the dock in a cool, dry place away from direct sunlight.
6. Troubleshooting
- Device Not Recognized:
- Ensure the 80Gbps USB-C cable is securely connected between the Mate Mini-B and your Mac Mini/PC.
- Try connecting to a different Thunderbolt/USB4 port on your computer.
- Restart your Mac Mini/PC.
- SSD Not Detected After Installation:
- Double-check that the SSD is correctly seated in the M.2 slot and secured.
- Verify that the SSD is compatible (M.2 2280 PCIe3.0/4.0/5.0).
- For Windows 11 systems, ensure "Write Caching" for the disk is enabled in Device Manager for optimal read/write performance. Refer to your operating system's documentation for detailed steps.
- Ensure the SSD is properly initialized and formatted in Disk Utility (macOS) or Disk Management (Windows).
- Peripherals Not Functioning or Unstable:
- If total power demand of peripherals exceeds 15W, connect an external PD adapter to the Type-C (PD3.0) port.
- Try connecting the peripheral directly to your Mac Mini/PC to rule out the peripheral itself.
- Ensure drivers for specific peripherals are up to date.
- Slow Data Transfer Speeds:
- Ensure you are using the provided 80Gbps USB-C cable.
- Verify that your Mac Mini/PC port supports Thunderbolt 3/4/5 or USB4 for maximum speeds.
- Check the specifications of your connected devices (e.g., external SSDs, USB drives) to ensure they support the desired speeds.
7. Specifications
| Attribute | Value |
|---|---|
| Product Dimensions | 5 x 5 x 0.6 inches |
| Item Weight | 8.8 ounces |
| ASIN | B0FHW8R4F2 |
| Item model number | Mate Mini |
| Manufacturer | Shenzhen AZW Technology Co., Ltd. |
| Brand | BEELINK EX |
| Color | Frost Silver |
| Hardware Interface | 3.5mm Audio, Ethernet, MicroSD, USB 3.0, USB Type C |
| Compatible Devices | Any mini PC, laptop, all-in-one, desktop PC equipped with Thunderbolt 3/4/5 or USB4 ports, Mac Mini M4/ M4 Pro |
| Total USB Ports | 4 |
8. Warranty and Support
For warranty information and technical support, please refer to the documentation included with your purchase or visit the official BEELINK EX website. Keep your proof of purchase for any warranty claims.
If you encounter issues not covered in this manual, please contact BEELINK EX customer support for assistance.
Related Documents - Mate Mini
 |
Satechi Mac Mini M4 Stand & Hub with NVMe Enclosure: Installation Guide A quick guide for the Satechi Mac Mini M4 Stand & Hub with NVMe Enclosure. Provides step-by-step instructions for installing an NVMe SSD, connecting to your M4 Mac Mini, and details on its ports and connectors. |
 |
Satechi Mac Mini M4 Stand & Hub with NVMe Enclosure Quick Guide A quick guide detailing the installation of an NVMe SSD into the Satechi Mac Mini M4 Stand & Hub, along with an overview of its ports and connectors. |
 |
Satechi Stand & Hub for Mac Mini with SSD Enclosure: Installation Guide Step-by-step instructions for installing an M.2 SATA SSD into the Satechi Stand & Hub for Mac Mini, and connecting peripherals. Includes compatibility notes and formatting guidance. |
 |
Acer 12-Port USB-C Mini Dock User Manual | Connect & Expand Your Laptop Comprehensive user manual for the Acer 12-port USB-C mini dock. Learn how to connect your laptop, expand display options with HDMI and DisplayPort, utilize USB 3.2 ports, Gigabit Ethernet, and card readers. |
 |
Qwiizlab USB-C Hub with SSD Enclosure: Quick Start Guide A concise guide to setting up and using the Qwiizlab USB-C Hub with SSD Enclosure, featuring PD 100W, HDMI 4K@60Hz, and multiple USB ports. Includes installation instructions and FAQs. |
 |
Satechi Mac Mini M4 Stand & Hub with NVMe Enclosure Quick Guide Comprehensive quick guide for the Satechi Mac Mini M4 Stand & Hub, detailing NVMe SSD installation and explaining the functionality of its various ports, including SD 4.0, USB-A 10Gbps, and USB 2.0. |
Ask a question about this manual
Ask about setup, troubleshooting, compatibility, parts, safety, or missing instructions. Manuals+ will review the question and use this page’s manual context to help answer it.