1. Introduction
This manual provides detailed instructions for the setup, operation, and maintenance of your CYSSJF Queue Management System. This system is designed to efficiently manage customer queues in various environments such as clinics, post offices, supermarkets, restaurants, and more, utilizing an Italian voice call feature for clear communication.

Image: The queue management system in a restaurant environment, showing the display and keypad in use.
2. Package Contents
Please verify that all items listed below are included in your package:
- 1 x Queue Display (with Italian voice call)
- 1 x Keypad Transmitter
- 2 x Power Adapters (one for the display, one for the keypad, with different voltages)
- 1 x Remote Control (with integrated AAA alkaline battery)
- 1 x Italian Instruction Manual (includes QR code for operational video)
3. Setup
Follow these steps to set up your queue management system:
- Unpack Components: Carefully remove all components from the packaging.
- Connect Power: Connect the appropriate power adapters to the display and the keypad. Ensure they are securely plugged into a power outlet.
- Power On: Press the power button on the remote control once to turn on the display and keypad. The display will show "HELLO" and then the current number.
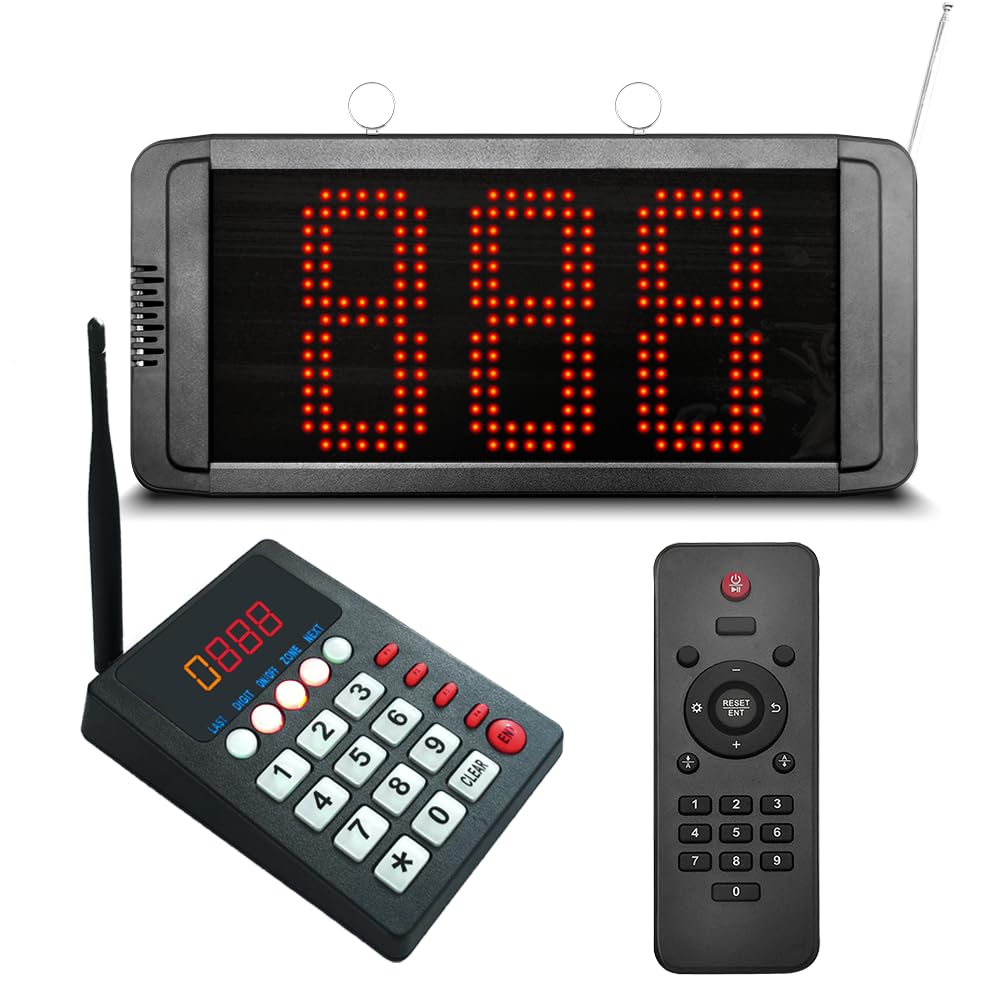
Image: The main components of the CYSSJF Queue Management System: the display unit and the keypad transmitter.
Initial Power On (Video Guide)
Video: Demonstrates how to power on the system using the remote control and the initial display sequence.
4. Operating Instructions
This section details the various functions and operations of your queue management system.
4.1 Basic Calling Functions
The keypad allows for flexible number calling:
- Call Specific Number: Enter the desired 3-digit number (e.g., 152) and press ENT. The display will show the number and announce it.
- Call Previous Number: Press LAST then ENT.
- Call Next Number: Press NEXT then ENT.

Image: Detailed view of the keypad, highlighting the number keys and function buttons like LAST, NEXT, and ENT.
Basic Calling Functions (Video Guide)
Video: Demonstrates how to call specific numbers, the previous number, and the next number using the keypad.
4.2 Pause/Resume Signal Reception
The display can be paused to temporarily stop receiving call signals. This is useful during breaks or when the service is temporarily unavailable.
- Pause: Press the power button on the remote control once while the system is active. The display will show "PAUSE".
- Resume: Press the power button on the remote control again to restore normal operation.

Image: The remote control indicating the ON/OFF function, which also controls the pause/resume state of the display.
Pause/Resume Signal Reception (Video Guide)
Video: Illustrates how to pause and resume signal reception on the display using the remote control.
4.3 Adjusting Call Repetition (F6-E2)
You can modify how many times each call is announced. By default, each call is announced once.
- Enter Settings: Press the F6 button on the remote control, then press E2.
- Select Repetitions: Use the number buttons (1-9) to select the desired number of repetitions (e.g., 3 for three announcements).
- Exit Settings: Press the F6 button again to save and exit.
Adjusting Call Repetition (Video Guide)
Video: Shows the process of changing the number of call repetitions from 1 to 3 using the remote control.
4.4 Setting Zone Parameters (F7-E1)
For the display and keypad to communicate, their ZONE parameters must match. The keypad's default ZONE is 0.
- Enter Display Zone Settings: Press the F7 button on the remote control, then press E1.
- Select Display Zone: Use the number buttons (0-9) to set the desired ZONE for the display (e.g., 1).
- Exit Display Zone Settings: Press the F7 button again to save and exit.
- Set Keypad Zone: On the keypad, press and hold the ZONE button. While holding, use the number buttons to set the desired ZONE (e.g., 1). Release the ZONE button.
- Verify: Ensure both the display and keypad have the same ZONE value for proper operation.
Setting Zone Parameters (Video Guide)
Video: Demonstrates how to adjust the ZONE parameter on both the display and the keypad to ensure they are synchronized.
4.5 Voice Settings (F6-E1 and F8-E2)
The system offers different voice announcement modes and customizable location names.
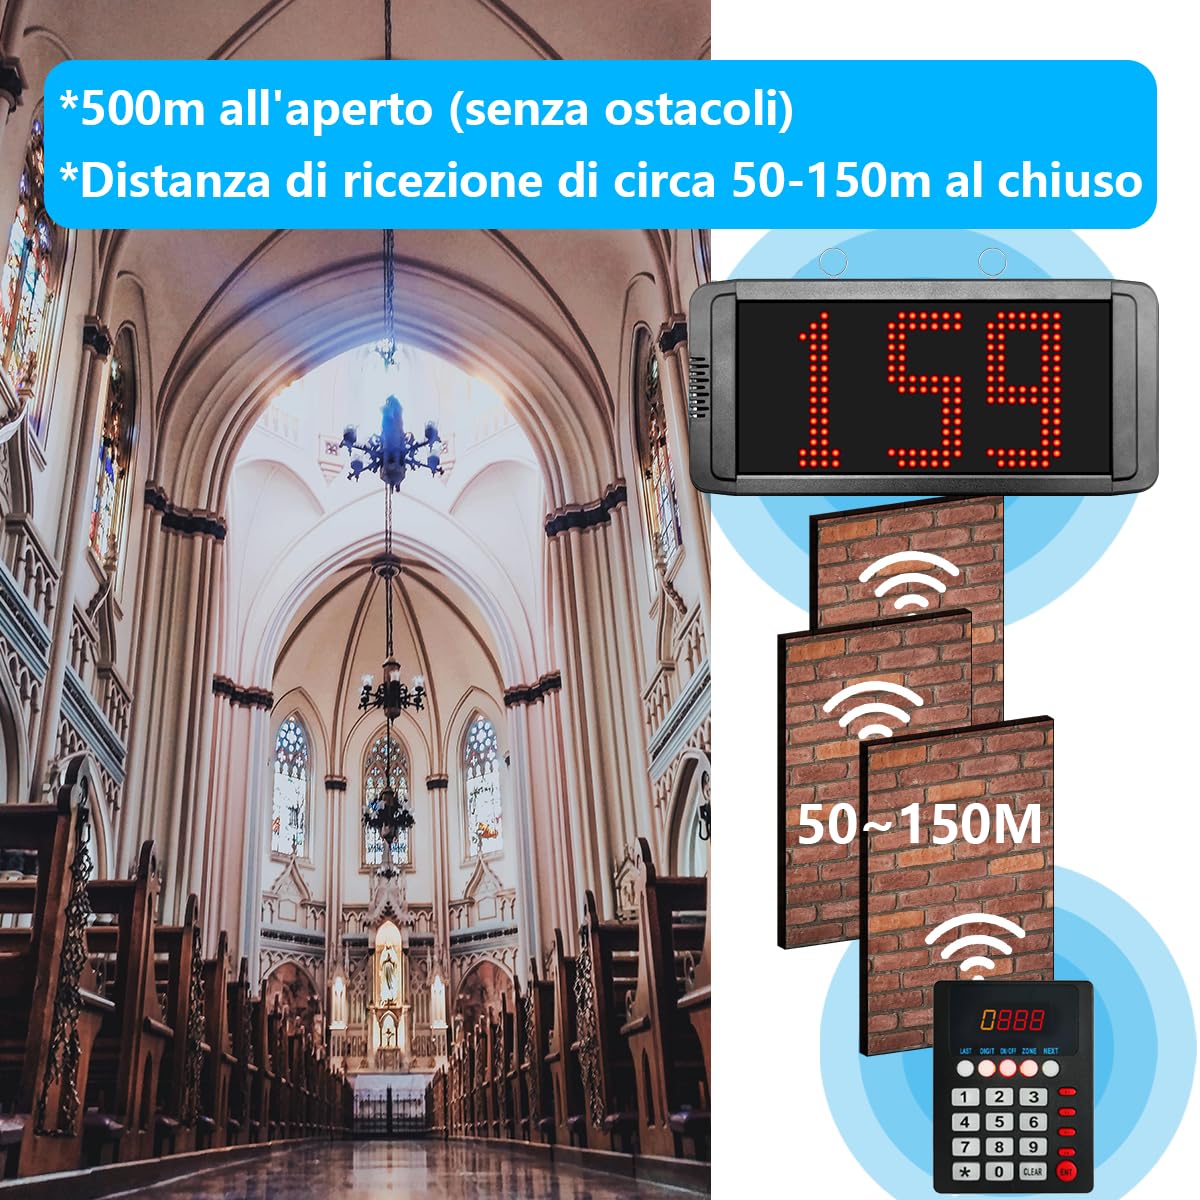
Image: The display showing options for call tones and voice settings, including customizable location names.
4.5.1 Voice Mode (F6-E1)
You can choose between two voice modes:
- Mode 2- (Default): Announces "Numero xxx" (Number xxx).
- Mode 2+: Announces "Per favore, numero xxx andare al [location]" (Please, number xxx go to [location]).
- Enter Voice Mode Settings: Press the F6 button on the remote control, then press E1.
- Select Mode: Use the + or - buttons to switch between Mode 2- and Mode 2+.
- Exit Settings: Press the F6 button again to save and exit.
4.5.2 Customizing Location Name (F8-E2)
If Mode 2+ is selected, you can customize the location name (e.g., "sportello", "ambulatorio", "stanza", "reception").
- Enter Location Settings: Press the F8 button on the remote control, then press E2.
- Select Location Code: Use the number buttons to enter the 2-digit code for the desired location (e.g., 83 for "ambulatorio").
- Confirm: Press ENT to save the selection.
Voice Settings (Video Guide)
Video: Demonstrates how to change the voice mode and customize the location name for announcements.
4.6 General Usage Flow

Image: A visual guide showing the typical workflow of the queue management system, from customer arrival to service completion.
4.7 Signal Coverage

Image: Illustrates the signal coverage of the system, indicating a range of 50-150m indoors and up to 500m outdoors without obstacles.
5. Specifications
| Feature | Detail |
|---|---|
| Manufacturer | Quanzhou Shuojiang Electronic Commerce Co., Ltd. |
| Part Number | IT-K-302-DM+K-999 |
| Item Weight | 1.25 Kilograms |
| Product Dimensions | 28 x 6 x 37 cm |
| Model Number | 1schermo+1tastiera |
| Included Components | Display + Keypad |
| Batteries Required | No (for main units, remote includes AAA) |
| ASIN | B0FHQD7YLJ |
6. Maintenance
To ensure the longevity and optimal performance of your CYSSJF Queue Management System, please follow these maintenance guidelines:
- Cleaning: Use a soft, dry cloth to clean the display and keypad. Avoid abrasive cleaners or solvents that could damage the surfaces.
- Power Supply: Always use the original power adapters provided with the system. Using incompatible adapters may cause damage.
- Environment: Operate the system in a dry environment, away from direct sunlight, extreme temperatures, and high humidity.
- Antenna: Ensure the antenna on the keypad is not bent or damaged to maintain optimal signal range.
7. Troubleshooting
If you encounter any issues with your queue management system, please refer to the following common troubleshooting steps:
- No Display/Power:
- Check if the power adapters are correctly connected to both the display and the keypad.
- Ensure the power outlets are functional.
- Press the power button on the remote control to turn on the system.
- No Signal/Communication:
- Verify that the ZONE settings on both the display and the keypad match (refer to Section 4.4).
- Ensure the display is not in "PAUSE" mode (refer to Section 4.2).
- Check for any large obstacles between the keypad and the display that might be blocking the signal.
- Ensure the keypad's antenna is upright and undamaged.
- Incorrect Voice Announcement:
- Check the voice mode settings (F6-E1) to ensure the desired announcement style is selected (refer to Section 4.5.1).
- If using Mode 2+, verify the location name setting (F8-E2) is correct (refer to Section 4.5.2).
- Call Not Repeating:
- Adjust the call repetition setting (F6-E2) to the desired number of repetitions (refer to Section 4.3).
If the problem persists after attempting these steps, please contact customer support.
8. Warranty and Support
Your CYSSJF Queue Management System comes with a standard manufacturer's warranty. Please refer to the warranty card included in your package for specific terms and conditions.
For technical support, service, or warranty claims, please contact CYSSJF customer service through the retailer where you purchased the product or visit the official CYSSJF website for contact information.
