Introduction
This manual provides detailed instructions for the safe and efficient operation and maintenance of your WantJoin Commercial Milk Frother & Beverage Heater. Please read this manual thoroughly before initial use and retain it for future reference.
Important Safeguards
- Read all instructions before using the appliance.
- Do not touch hot surfaces. Use handles or knobs.
- To protect against electrical hazards, do not immerse cord, plugs, or the appliance in water or other liquid.
- Close supervision is necessary when any appliance is used by or near children.
- Unplug from outlet when not in use and before cleaning. Allow to cool before putting on or taking off parts, and before cleaning the appliance.
- Do not operate any appliance with a damaged cord or plug or after the appliance malfunctions or has been damaged in any manner.
- The use of accessory attachments not recommended by the appliance manufacturer may cause injuries.
- Do not use outdoors.
- Do not let cord hang over edge of table or counter, or touch hot surfaces.
- Do not place on or near a hot gas or electric burner, or in a heated oven.
- Always attach plug to appliance first, then plug cord into the wall outlet. To disconnect, turn any control to "off", then remove plug from wall outlet.
- Do not use appliance for other than intended use.
- This appliance is for commercial and home use.
- Ensure the power supply matches the appliance's voltage (110V-120V/60Hz).
Product Overview
The WantJoin Commercial Milk Frother & Beverage Heater is a multi-functional appliance designed for efficient beverage preparation in commercial and home settings. It features rapid frothing, beverage heating, and hot water dispensing capabilities.

Figure 1: Front view of the WantJoin Commercial Milk Frother and Beverage Heater, showing the control panel, hot water spout, and steam wand.
Key Components:
- Control Panel: Smart LED display for real-time temperature and pressure monitoring.
- Hot Water Outlet: Dispenses hot water for various beverages.
- Steam Outlet Nozzle: For milk frothing and steaming.
- Removable Drip Tray: Collects spills and is easy to clean.
- Water Inlet: Connection point for automatic water supply.
- Power Cord Plug: For electrical connection.

Figure 2: Labeled diagram of the WantJoin Commercial Milk Frother, highlighting the control panel, boiling water outlet, steam outlet nozzle, removable drip tray, power cord plug, and water inlet.
Setup Instructions
- Unpacking: Carefully remove the appliance from its packaging. Retain packaging materials for future transport if needed.
- Placement: Place the machine on a stable, level surface, ensuring adequate clearance around it for ventilation and operation.
- Water Connection:
This machine features an auto-fill system. Connect the provided 3/4" NPT inlet pipe to a clean, potable water source. Ensure the connection is secure to prevent leaks.

Figure 3: Illustration of the automatic water supply connection, showing the water inlet and internal water flow.
- Power Connection: Plug the power cord into a grounded electrical outlet that matches the specified voltage (110V-120V/60Hz).
- Initial Rinse: Before first use, run hot water through the system to clean any manufacturing residues. Follow the "Hot Water Dispensing" steps in the Operation section.
Operating Instructions
The WantJoin Commercial Milk Frother offers multiple functions controlled via its LED display panel.

Figure 4: Close-up of the smart LED screen, showing real-time temperature, timer, pressure values, and a low water alert.
1. Powering On/Off
- Press the POWER button on the LED panel to turn the machine on or off.
- The LED display will illuminate, showing current water and cup temperatures, and pressure.
2. Hot Water Dispensing
- Ensure the machine is powered on and has reached the desired water temperature (displayed on the LED panel).
- Place a cup or container under the hot water outlet.
- Turn the hot water knob (typically labeled with a cup icon) to dispense hot water.
- Turn the knob back to the closed position to stop dispensing.
Figure 5: The machine dispensing hot water from the left spout into a glass.
3. Milk Frothing/Steaming
The machine is capable of producing dense milk foam in approximately 20 seconds due to its 1800W power and 1.25 BAR steam pressure.
- Fill a stainless steel frothing pitcher with cold milk. Do not fill more than halfway.
- Position the steam wand into the milk, just below the surface.
- Turn the steam knob (typically labeled with a steam icon) to release steam.
- Move the pitcher up and down slightly to incorporate air and create foam.
- Once the desired foam consistency and temperature are reached, turn the steam knob off.
- Immediately wipe the steam wand with a damp cloth to prevent milk residue from drying.

Figure 6: A hand holding a pitcher under the steam wand, frothing milk. The image highlights rapid heating and dense foam creation.
Note: The steam wand features 360° rotation for ease of use.
4. Beverage Heating
This machine can also function as an electric beverage heater.
- For heating beverages, use the hot water dispensing function to add hot water to your drink, or use the steam wand to directly heat liquids in a heat-resistant container.
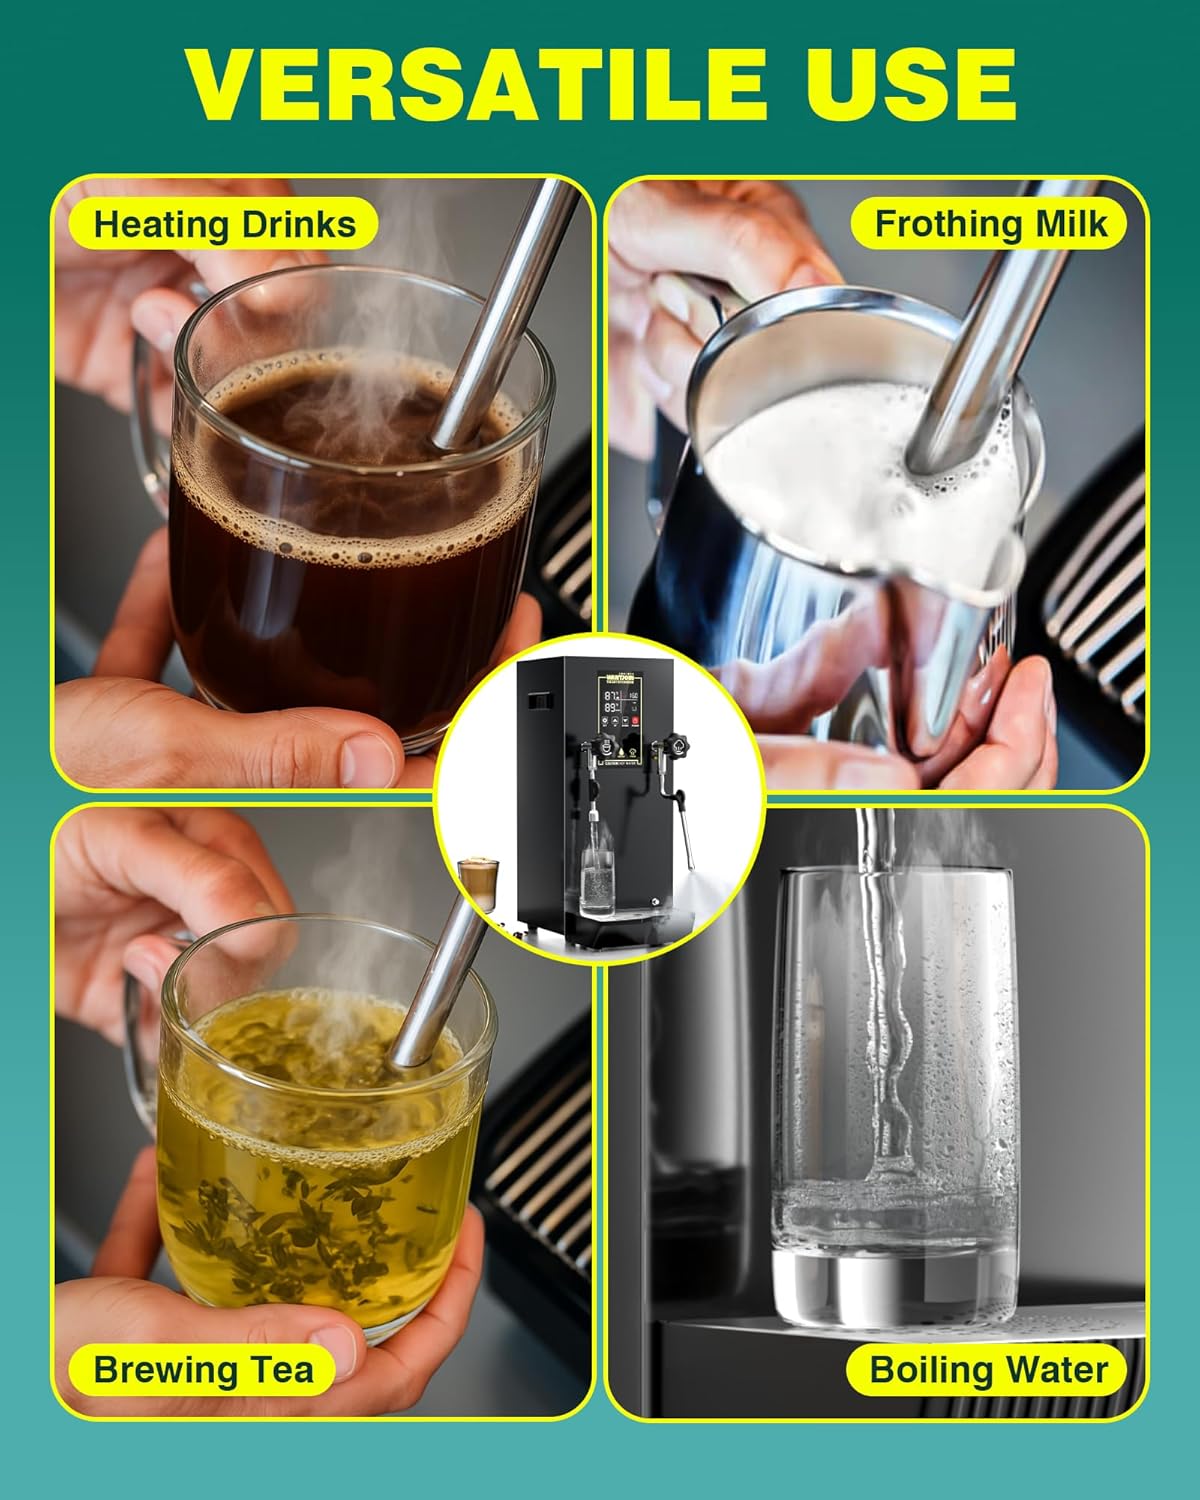
Figure 7: Collage showing the versatile uses of the machine, including heating drinks, frothing milk, brewing tea, and boiling water.
Maintenance and Cleaning
Regular cleaning ensures optimal performance and longevity of your appliance.
1. Daily Cleaning
- Steam Wand: Immediately after each use, wipe the steam wand with a damp cloth to remove any milk residue. Purge a small amount of steam to clear any internal blockages.
- Drip Tray: The removable drip tray should be emptied and cleaned daily. It can be hand washed with mild detergent and warm water.
- Exterior: Wipe the exterior surfaces of the machine with a soft, damp cloth. Do not use abrasive cleaners or immerse the unit in water.
Figure 8: Diagram illustrating the auto water supply and the detachable sink/catch tray for effortless cleaning.
2. Descaling
Depending on water hardness, descaling may be required periodically to remove mineral buildup. Consult a qualified technician or the manufacturer's support for descaling procedures to avoid damaging the internal components.
3. Storage
If storing the machine for an extended period, ensure it is clean, dry, and unplugged. Store in a cool, dry place away from direct sunlight.
Troubleshooting
Before contacting customer support, please refer to the following common issues and solutions:
| Problem | Possible Cause | Solution |
|---|---|---|
| Machine does not power on. | No power supply; power cord not properly connected. | Ensure the power cord is securely plugged into a working outlet. Check circuit breaker. |
| No steam or weak steam. | Insufficient water; steam wand clogged; machine not heated to operating temperature. | Check water supply. Clean steam wand. Allow machine to fully heat up. |
| Water not dispensing. | Water supply disconnected; low water level (if applicable); water outlet clogged. | Verify water connection. Check for low water alert on LED. Clean water outlet. |
| LED display shows error. | Internal malfunction or specific error condition. | Refer to the LED display error codes (if provided in a separate guide) or contact customer support. |
Specifications
| Feature | Detail |
|---|---|
| Brand | WantJoin |
| Model Name | Milk Frother Machine |
| Power | 1800W |
| Voltage | 110V-120V/60Hz |
| Material | Alloy Steel (304 Stainless Steel tank) |
| Special Feature | Auto Shut-Off, LED Display, Automatic Pressure Relief |
| Recommended Use | Commercial |
| Product Care | Hand Wash Only |
| Item Weight | 23.2 pounds |
| Package Dimensions | 27.1 x 18.5 x 13.2 inches |
| UPC | 723747192363 |

Figure 9: Dimensions of the WantJoin Commercial Milk Frother, showing height, width, depth, and the 3/4" NPT inlet pipe.
Warranty and Support
WantJoin offers a one-year coverage for this product. For technical assistance, troubleshooting, or warranty claims, please contact WantJoin customer support. Professional one-on-one technical support is available to assist you with any issues.
Please retain your proof of purchase for warranty validation.