Introduction
The BEELINK EX Mate Mini-A is a high-performance docking station designed to expand the connectivity and storage capabilities of your Mac Mini M4, Mac Mini M4 Pro, or any mini PC, laptop, all-in-one, or desktop computer equipped with Thunderbolt 3/4/5 or USB4 ports. This manual provides detailed instructions for setting up, operating, and maintaining your docking station.
Package Contents
- 1x Mate Mini-A Docking Station
- 2x 80Gbps USB-C Cables (for connecting to Mac Mini/PC)
- 1x User Manual

An illustration showing the dimensions of the Mate Mini-A (127mm x 127mm x 16mm) and the contents of the package, including the Mate Mini-A unit, two 80Gbps USB-C cables, and the user manual.
Product Overview
The Mate Mini-A docking station integrates seamlessly with your host device, providing a range of high-speed ports and storage expansion capabilities.

An illustration showing the BEELINK EX Mate Mini-A Docking Station positioned beneath a Mac Mini M4, highlighting its compact design and integration.
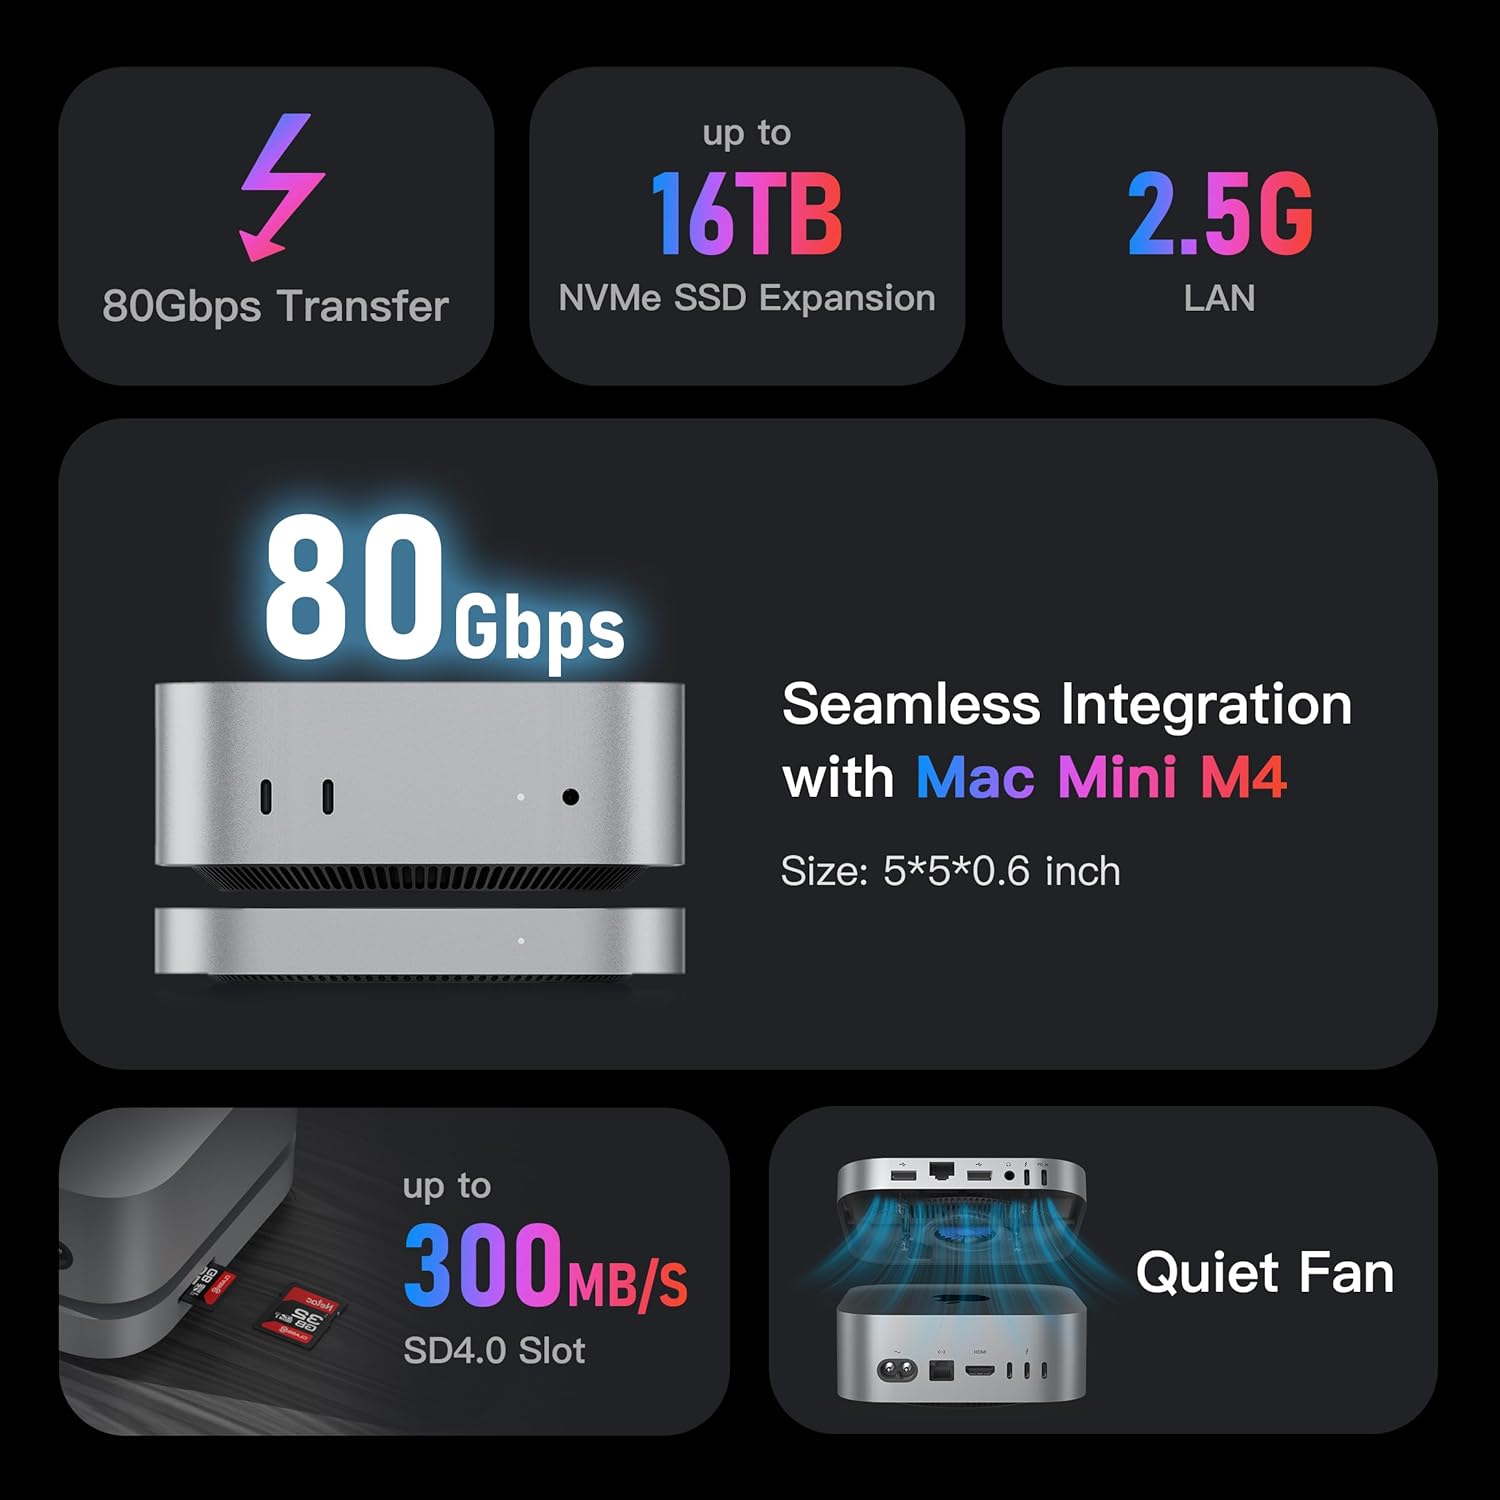
An infographic summarizing the main features of the docking station, including 80Gbps data transfer, up to 16TB NVMe SSD expansion, 2.5G LAN, 300MB/s SD4.0 slot, and a quiet active cooling fan.
Port Layout

A detailed diagram labeling all ports on the docking station, including the SD4.0 Card Slot, USB-A 3.0 Ports, 2.5Gbps Ethernet Port, 3.5mm Audio Jack, 80Gbps USB-C Port, and Power Input.
- 1x 80Gbps USB-C Port: For ultra-fast data transfer and connection to the host device.
- 2x USB-A 3.0 Ports (5Gbps): For connecting standard USB peripherals.
- 1x 2.5Gbps Ethernet Port: For high-speed wired network connectivity.
- 1x SD 4.0 Card Slot: Supports high-speed memory card access (up to 300MB/s).
- 1x 3.5mm Audio Jack: For connecting headphones or speakers.
- 1x PD3.0 Power Input Port: For supplementary power when using high-demand peripherals.
Setup
1. Connecting the Docking Station
- Place the Mate Mini-A docking station on a stable, flat surface.
- Position your Mac Mini or compatible mini PC directly on top of the docking station, ensuring proper alignment.
- Connect one of the provided 80Gbps USB-C cables from the 80Gbps USB-C port on the docking station to a Thunderbolt/USB4 port on your host device.
- The power indicator on the docking station will glow white when active.
2. Installing M.2 SSDs (Optional)
The Mate Mini-A features dual M.2 2280 PCIe x2 slots for storage expansion, supporting PCIe 3.0/4.0/5.0 SSDs up to 16TB (2x 8TB). SSDs are not included.
- Carefully open the docking station to access the M.2 SSD slots. Refer to the product diagram for the exact location.
- Insert your M.2 2280 SSDs into the available slots, ensuring they are seated correctly.
- Secure the SSDs with the provided fasteners (if any).
- Close the docking station cover securely.
- After installation, the SSDs will need to be initialized and formatted through your operating system's disk management utility before use.

An internal view of the docking station revealing two M.2 2280 PCIe x2 slots for SSD expansion, capable of supporting up to 16TB (2x 8TB) storage. SSDs are not included.
Operating Instructions
1. Using the Ports
- USB-C (80Gbps): Connect high-speed external drives or other compatible USB-C devices for rapid data transfer.
- USB-A (5Gbps): Use these ports for keyboards, mice, USB flash drives, and other standard USB-A peripherals.
- 2.5G Ethernet: Connect an Ethernet cable for a stable and fast wired network connection.
- SD 4.0 Card Slot: Insert SD cards for quick photo and video transfers.
- 3.5mm Audio Jack: Plug in headphones or external speakers for audio output.

An illustration highlighting the high-speed data transfer capabilities of the dock, including 80Gbps via USB-C, 5Gbps via USB-A, and up to 300MB/s via the SD4.0 card slot.

An image highlighting the 2.5G Ethernet port for enhanced network speed and the 3.5mm rear audio jack for connecting speakers or headphones.
2. Power Considerations
The Mate Mini-A is powered directly by your host device for peripherals with a total power demand of less than 15W. If your connected peripherals require more than 15W of total power, an external PD (Power Delivery) adapter must be used. Connect a PD 3.0 Type-C power adapter (15W or higher, such as a smartphone charger) to the PD IN port on the docking station.
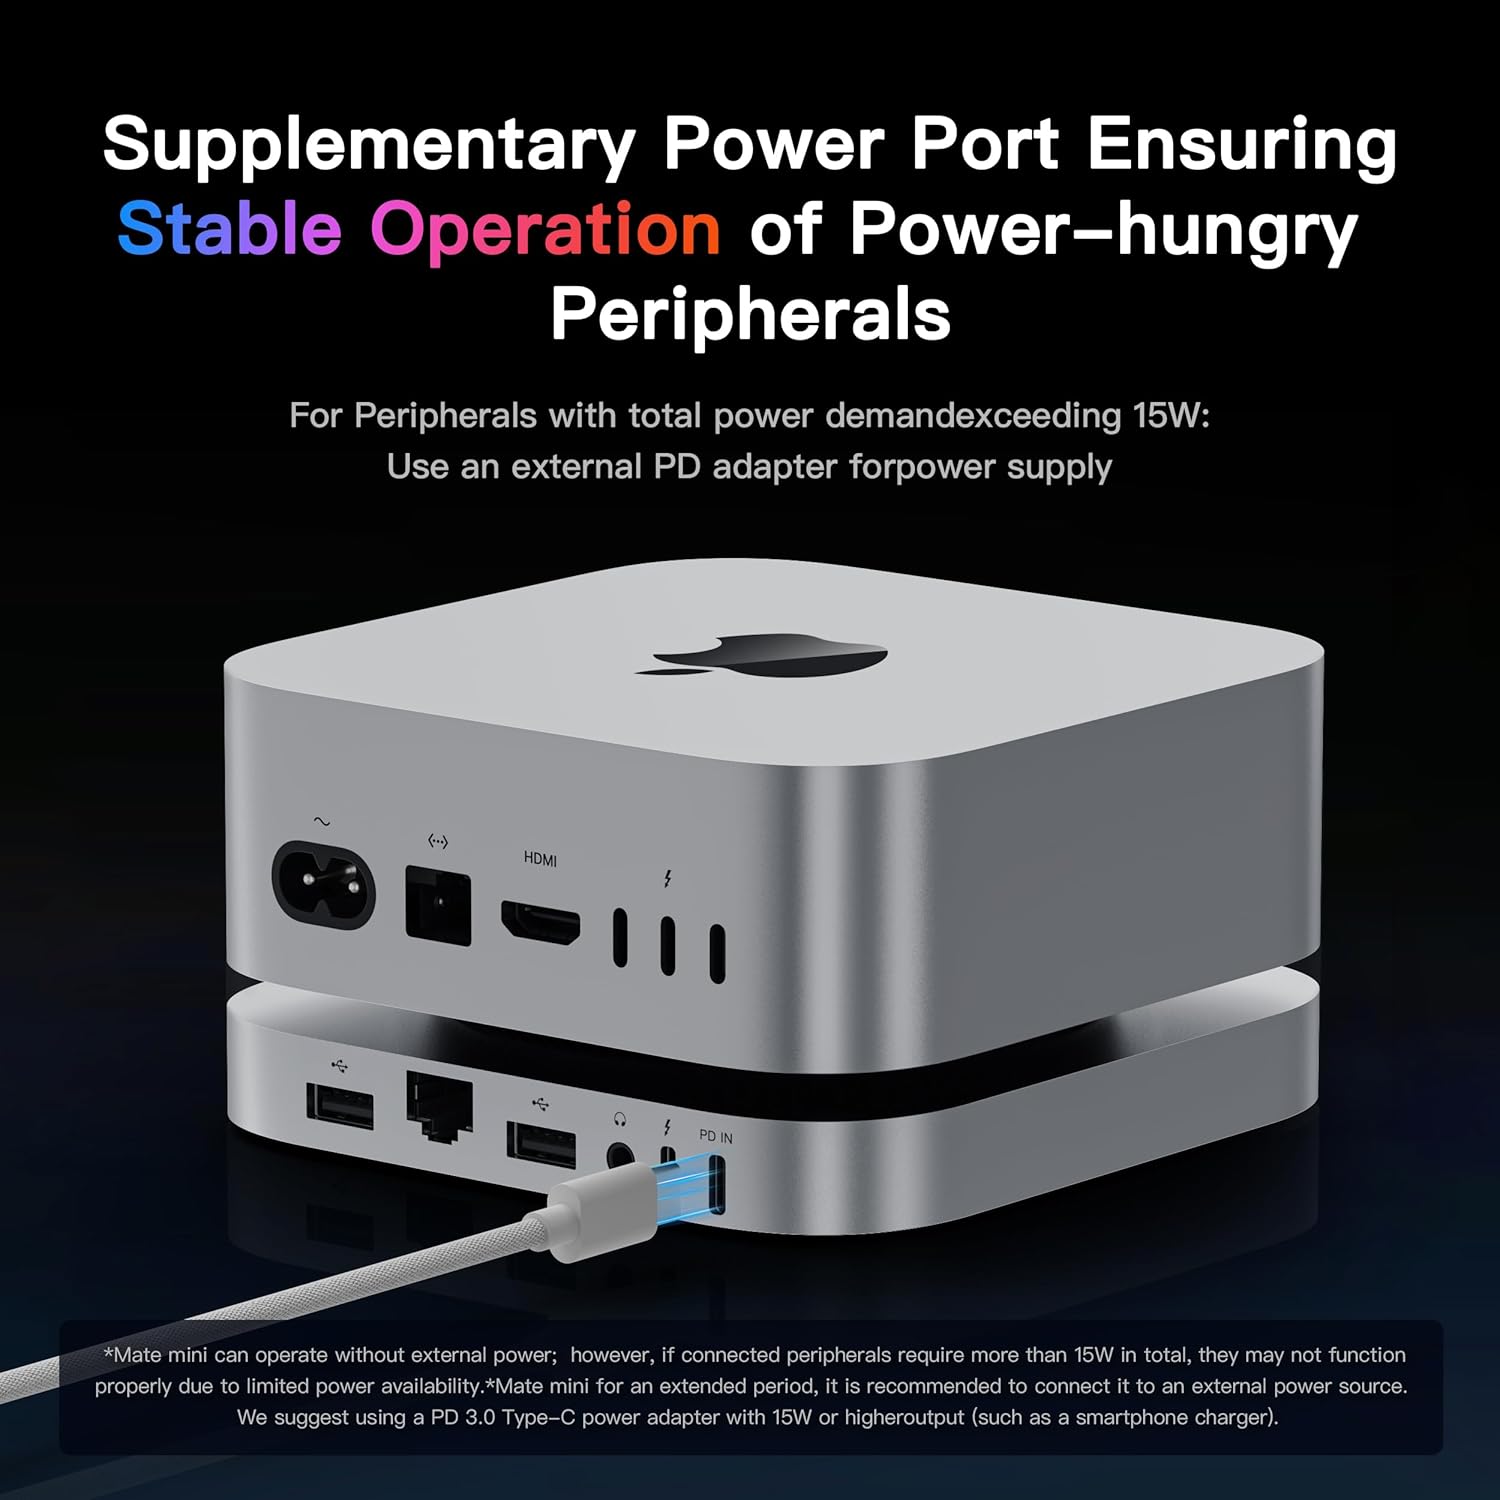
The docking station with an external power adapter connected to its PD IN port, illustrating the supplementary power option for high-power peripherals.
Cooling System
The Mate Mini-A is equipped with an active cooling system, featuring a heat sink and 360-degree cooling vents. This design ensures efficient heat dissipation, allowing SSDs to operate at low temperatures and maintaining stable performance even during extended use, all while minimizing fan noise.

A cutaway view of the docking station showing its internal heat sink and 360-degree cooling vents, designed for efficient heat dissipation and stable operation.
Maintenance
- Keep the docking station clean and free from dust. Use a soft, dry cloth for cleaning.
- Ensure the cooling vents are not obstructed to maintain optimal airflow.
- Avoid exposing the device to extreme temperatures, humidity, or direct sunlight.
- Do not attempt to disassemble the unit beyond SSD installation, as this may void the warranty.
Troubleshooting
- No Power/Indicator Light Off:
Ensure the USB-C cable is securely connected to both the docking station and your host device. If using high-power peripherals, verify that an external PD adapter is connected to the PD IN port and is functioning correctly. - Peripherals Not Detected:
Check all cable connections. Try connecting the peripheral directly to your host device to confirm it is functional. Ensure that the docking station is receiving adequate power, especially for power-hungry devices. - SSD Not Recognized:
Verify that the M.2 SSDs are correctly installed and secured within the slots. Ensure the SSDs are compatible (M.2 2280 PCIe 3.0/4.0/5.0). Check your operating system's disk management utility to initialize and format new SSDs. - Intermittent Connectivity/Disconnections:
Ensure the 80Gbps USB-C cable connecting the dock to your host device is the one provided and is securely connected. For Mac Mini users, ensure your system is updated. If using an external power supply, confirm it meets the specifications. - Slow Data Transfer:
Ensure you are using the correct ports for high-speed transfers (e.g., 80Gbps USB-C). Check the specifications of your connected devices and cables to ensure they support the desired speeds. - Network Issues (2.5G LAN):
Verify the Ethernet cable is securely connected. Check your network settings on the host device. Ensure your router/switch supports 2.5G Ethernet.
Specifications
| Feature | Detail |
|---|---|
| Product Dimensions | 5 x 5 x 0.6 inches (127 x 127 x 16 mm) |
| Item Weight | 8.8 ounces (0.25 Kilograms) |
| Model Number | Mate Mini |
| Brand | BEELINK EX |
| Color | Frost Silver |
| Hardware Interface | 3.5mm Audio, Ethernet, MicroSD, USB 3.0 Type A, USB Type C |
| Compatible Devices | Any mini PC, laptop, all-in-one, desktop PC with Thunderbolt 3/4/5 or USB4 ports, Mac Mini M4/M4 Pro |
| Total USB Ports | 4 (1x USB-C, 2x USB-A) |
| Number of Ports | 7 (1x USB-C, 2x USB-A, 1x Ethernet, 1x SD, 1x Audio, 1x PD In) |
| Wattage | 15 watts (for direct power from host) |
| SSD Expansion | 2x M.2 2280 PCIe x2 slots, up to 16TB (2x 8TB) |
| UPC | 810180173490 |

A comparison table detailing read and write speed tests for Mate Mini-A and Mate Mini-B models on Mac mini M4, Mac mini M4 Pro, and Windows systems, using various SSDs.
Warranty and Support
This BEELINK EX product is covered by a standard manufacturer's warranty. For specific warranty terms and conditions, please refer to the warranty card included in your package or visit the official BEELINK EX website. For technical support, troubleshooting assistance, or any product-related inquiries, please contact BEELINK EX customer service through their official support channels.


