1. Introduction
Thank you for choosing the Pawfly Automatic Aquarium Fish Feeder, Model CW2865. This device is designed to provide timely and precise feeding for your fish, ensuring they are fed consistently even when you are away. It features a 108 mL capacity food dispenser with 15 compartments, suitable for various dry foods like pellets, powder, and granules. The feeder is battery-powered and offers adjustable timer settings for customized feeding schedules.

Image 1.1: Overview of the Pawfly Automatic Aquarium Fish Feeder.
2. Safety Information
- Ensure the feeder is securely installed to prevent it from falling into the aquarium.
- Use only 3 AA batteries (not included). Do not mix old and new batteries, or different types of batteries.
- Do not fill the food dispenser with dry shrimp or flakes, as this can cause clogging. The feeder is designed for powder, pellets, and strips.
- Never add food directly to the outlet compartment to prevent blockages.
- Keep the feeder away from water splashes to prevent damage to electronic components.
- This product is intended for indoor use only.
3. Package Contents
Please check the package for the following items:
- Pawfly Automatic Aquarium Fish Feeder Unit (Model CW2865)
- Adjustable Support Bracket
- 4 Suction Cups
- Instruction Manual
4. Product Overview
4.1 Components

Image 4.1: Control Panel and Buttons.
- Switch Button: Power on/off the device.
- Setting Button: Enter setting mode for various parameters.
- Manual Feeding/Saving Button: Dispense food manually or save current settings.
- Clock Button: Adjust the current time.
- Timing Button: Set automatic feeding times.
- Feeding Portion Button: Adjust the amount of food dispensed per feeding.
- LCD Display: Shows current time, battery level, feeding icons, interval, and portion.
4.2 Food Container
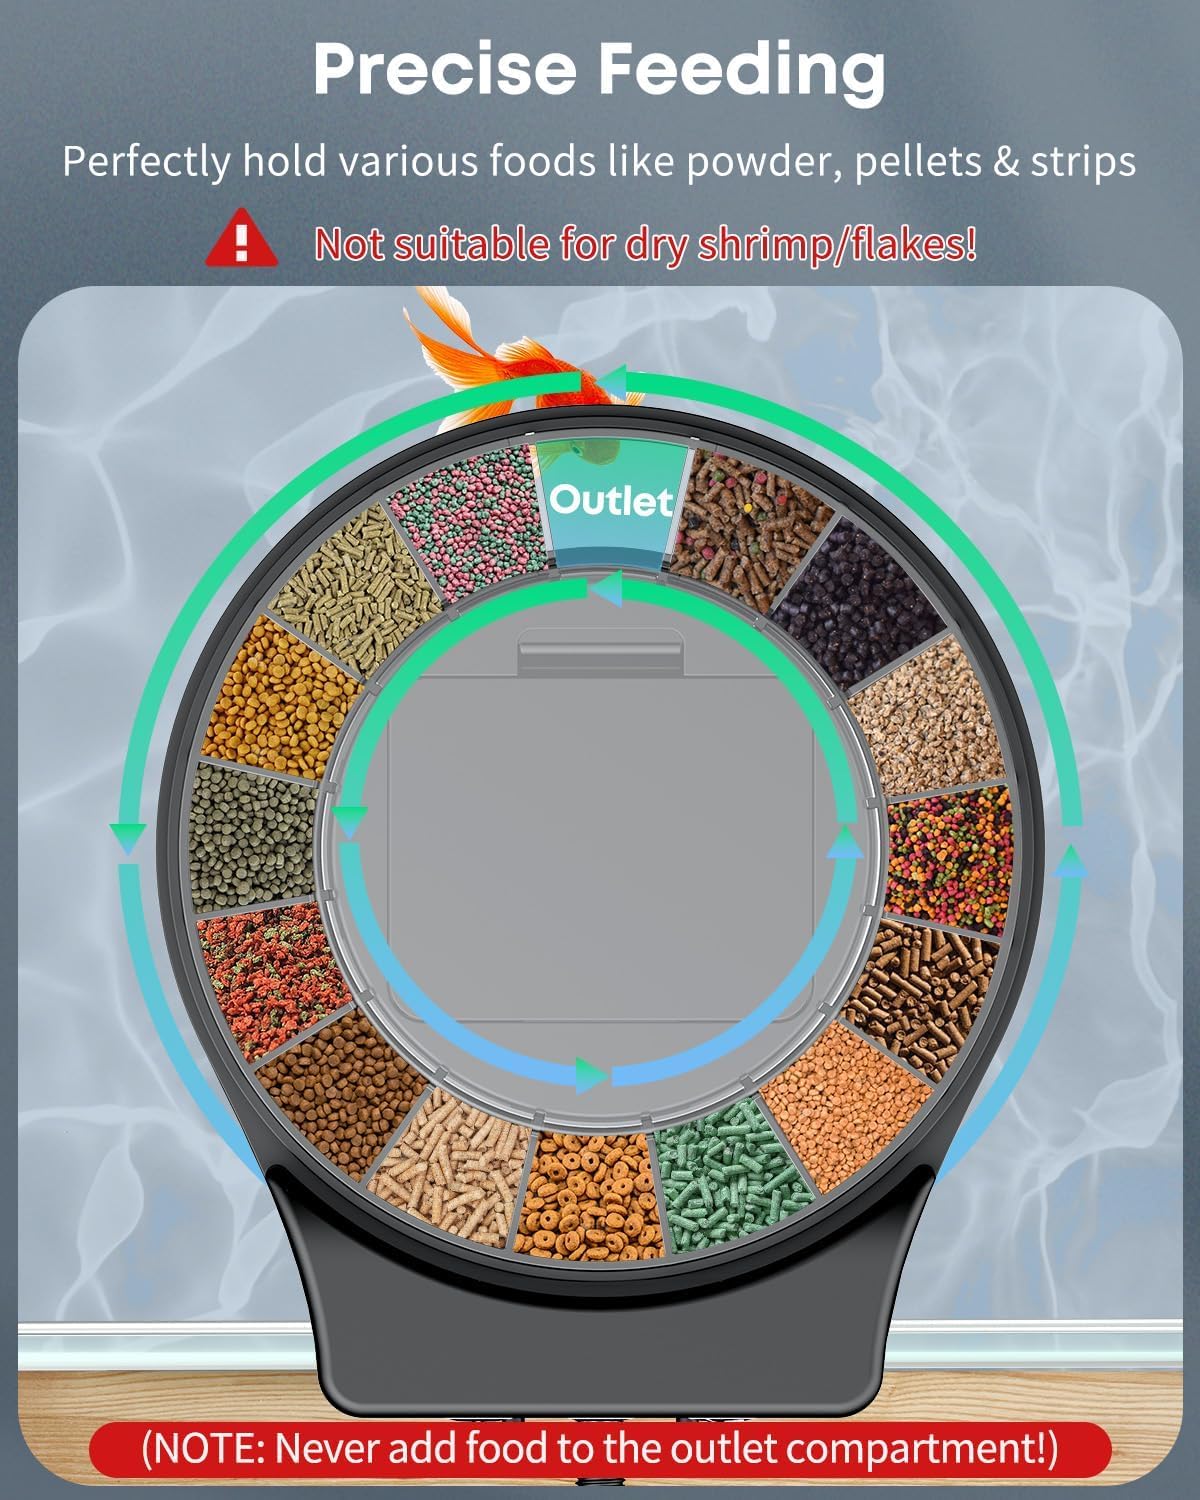
Image 4.2: Detachable Food Container with 15 Compartments.
The feeder features a detachable food container with 15 compartments, designed for precise feeding. Each portion dispenses approximately 2 grams of food. The total capacity is 108 mL.
5. Setup
5.1 Battery Installation
- Take off the top cover of the feeder.
- Pull out the food container.
- Remove the battery case cover located at the bottom of the feeder unit.
- Install 3 AA batteries (not included) into the battery compartment, ensuring correct polarity.
- Replace the battery case cover.
- Restore the food container and top cover.
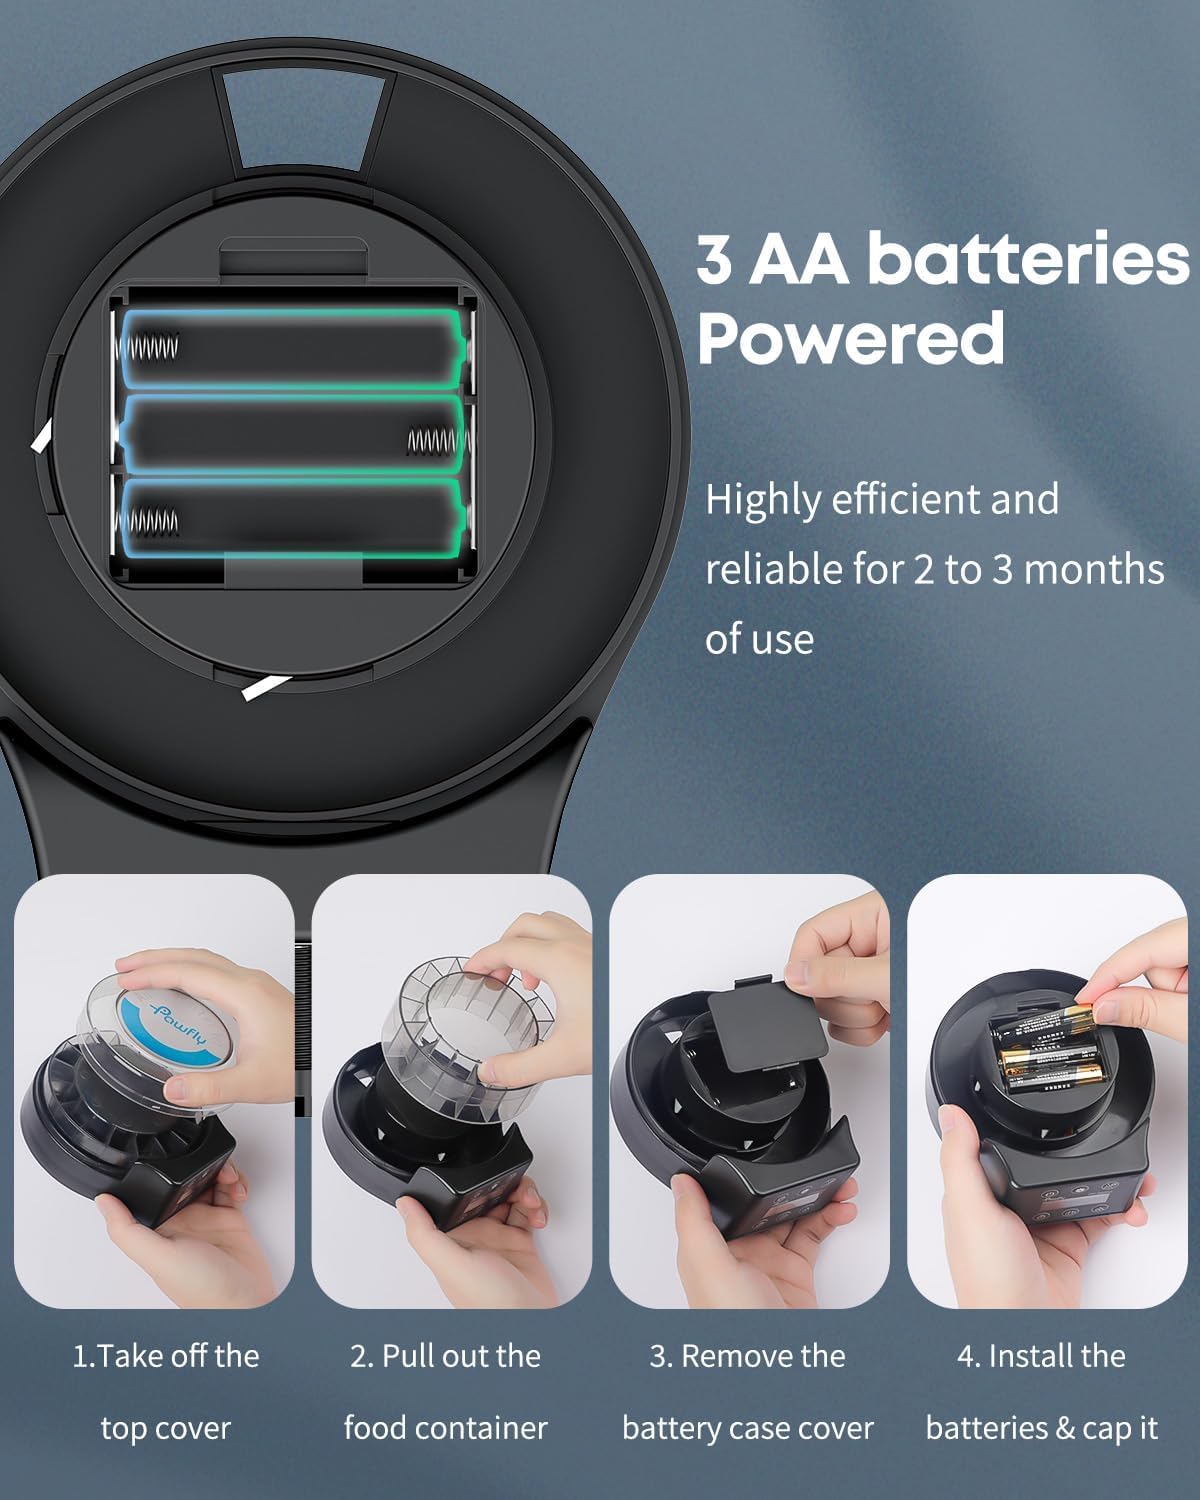
Image 5.1: Battery Installation Steps.
5.2 Loading Food
- Remove the top cover and the food container.
- Add suitable dry fish food (pellets, powder, strips) into the compartments of the food container. Do not overfill.
- Ensure no food enters the central outlet compartment.
- Replace the food container and top cover securely.
5.3 Installation Methods
The feeder offers two installation options:

Image 5.2: Two Installation Methods.
- Tank Wall Mounting: Attach the adjustable support bracket to the feeder. Mount the feeder onto the edge of the aquarium wall and tighten the screw to secure it.
- Tank Lid Attachment: Install the four suction cups onto the designated spots on the bottom of the feeder. Attach the feeder to a clean, flat surface on your aquarium lid.
5.4 Setup Video Guide
Video 5.1: A visual guide demonstrating battery installation, food loading, and both tank wall and tank lid installation methods for the Pawfly Automatic Fish Feeder.
6. Operation
6.1 Power On/Off
Press the Switch Button (power icon) to turn the feeder on or off. The LCD will display information when powered on.
6.2 Clock Time Calibration
- Press the Clock Button (clock icon) and then the Setting Button (gear icon).
- Press the Clock Button again to adjust the hour.
- Press the Timing Button (calendar icon) to adjust the minute.
- Press the Manual Feeding/Saving Button (hand icon) to save the settings.

Image 6.1: Clock Time Calibration Steps.
6.3 Auto-Feeding Hour Setting
The feeder can be programmed for up to 12 feedings daily.
- Press the Timing Button (calendar icon) and then the Setting Button (gear icon).
- Press the Timing Button again to set the desired feeding hour.
- Press the Setting Button and then the Timing Button to move to the next feeding time slot.
- Press the Manual Feeding/Saving Button (hand icon) to save the settings.

Image 6.2: Auto-Feeding Hour Setting Steps.
6.4 Feeding Portion Setting
You can set up to 9 portions per feeding.
- Press the Feeding Portion Button (three dots icon) and then the Setting Button (gear icon).
- Press the Feeding Portion Button again to adjust the number of portions.
- Press the Setting Button and then the Feeding Portion Button to move to the next setting.
- Press the Manual Feeding/Saving Button (hand icon) to save the settings.
6.5 Feeding Interval Setting
The feeder can dispense food daily or at intervals up to 7 days (Default: 0 for daily).
- Press the Setting Button (gear icon) for 3 seconds, then press it repeatedly until the feeding interval setting appears.
- Use the Feeding Portion Button (three dots icon) to adjust the interval (0-7 days).
- Press the Manual Feeding/Saving Button (hand icon) to save the settings.

Image 6.3: Feeding Portion and Interval Setting Steps.
6.6 Manual Feeding
To dispense food instantly, press the Manual Feeding/Saving Button (hand icon) once. The feeder will dispense one portion of food.
7. Maintenance
7.1 Cleaning the Food Container
The food container is detachable for easy cleaning.
- Remove the top cover and the food container from the main unit.
- Rinse the food container with clean water. Do not use harsh detergents.
- Ensure the container is completely dry before refilling with food and reattaching to the feeder unit.

Image 7.1: Detachable Components for Cleaning.
7.2 Battery Replacement
When the battery level indicator on the LCD is low, replace the 3 AA batteries following the steps in Section 5.1. The feeder is designed for long working times, typically 2 to 3 months on a single set of batteries.
8. Troubleshooting
- Feeder not turning on: Check if batteries are installed correctly and have sufficient charge. Replace batteries if necessary.
- Food not dispensing:
- Ensure the food container is not clogged. Remove and clean if needed.
- Verify that the type of food used is suitable (pellets, powder, strips). Avoid flakes or dry shrimp as they can cause blockages.
- Check if the feeding schedule is correctly set.
- Incorrect time or feeding schedule: Refer to Section 6 for detailed instructions on setting the clock and feeding parameters.
- Feeder falls into tank: Ensure the installation method (adjustable support or suction cups) is securely fastened to the aquarium.
- Food getting wet: Ensure the top cover is properly sealed and the feeder is positioned to avoid water splashes.
9. Specifications
| Feature | Detail |
|---|---|
| Model Name | CW2865 |
| Brand | Pawfly |
| Item Weight | 10.8 ounces |
| Product Dimensions (LxWxH) | 6.03 x 2.64 x 5.23 inches |
| Food Container Capacity | 108 mL (15 compartments) |
| Power Source | 3 AA batteries (not included) |
| Feeding Frequency | Up to 12 times daily |
| Feeding Portions | Up to 9 portions per feeding |
| Feeding Interval | Daily or up to 7-day intervals |
| Suitable Food Types | Powder, Pellets, Strips (avoid flakes/dry shrimp) |
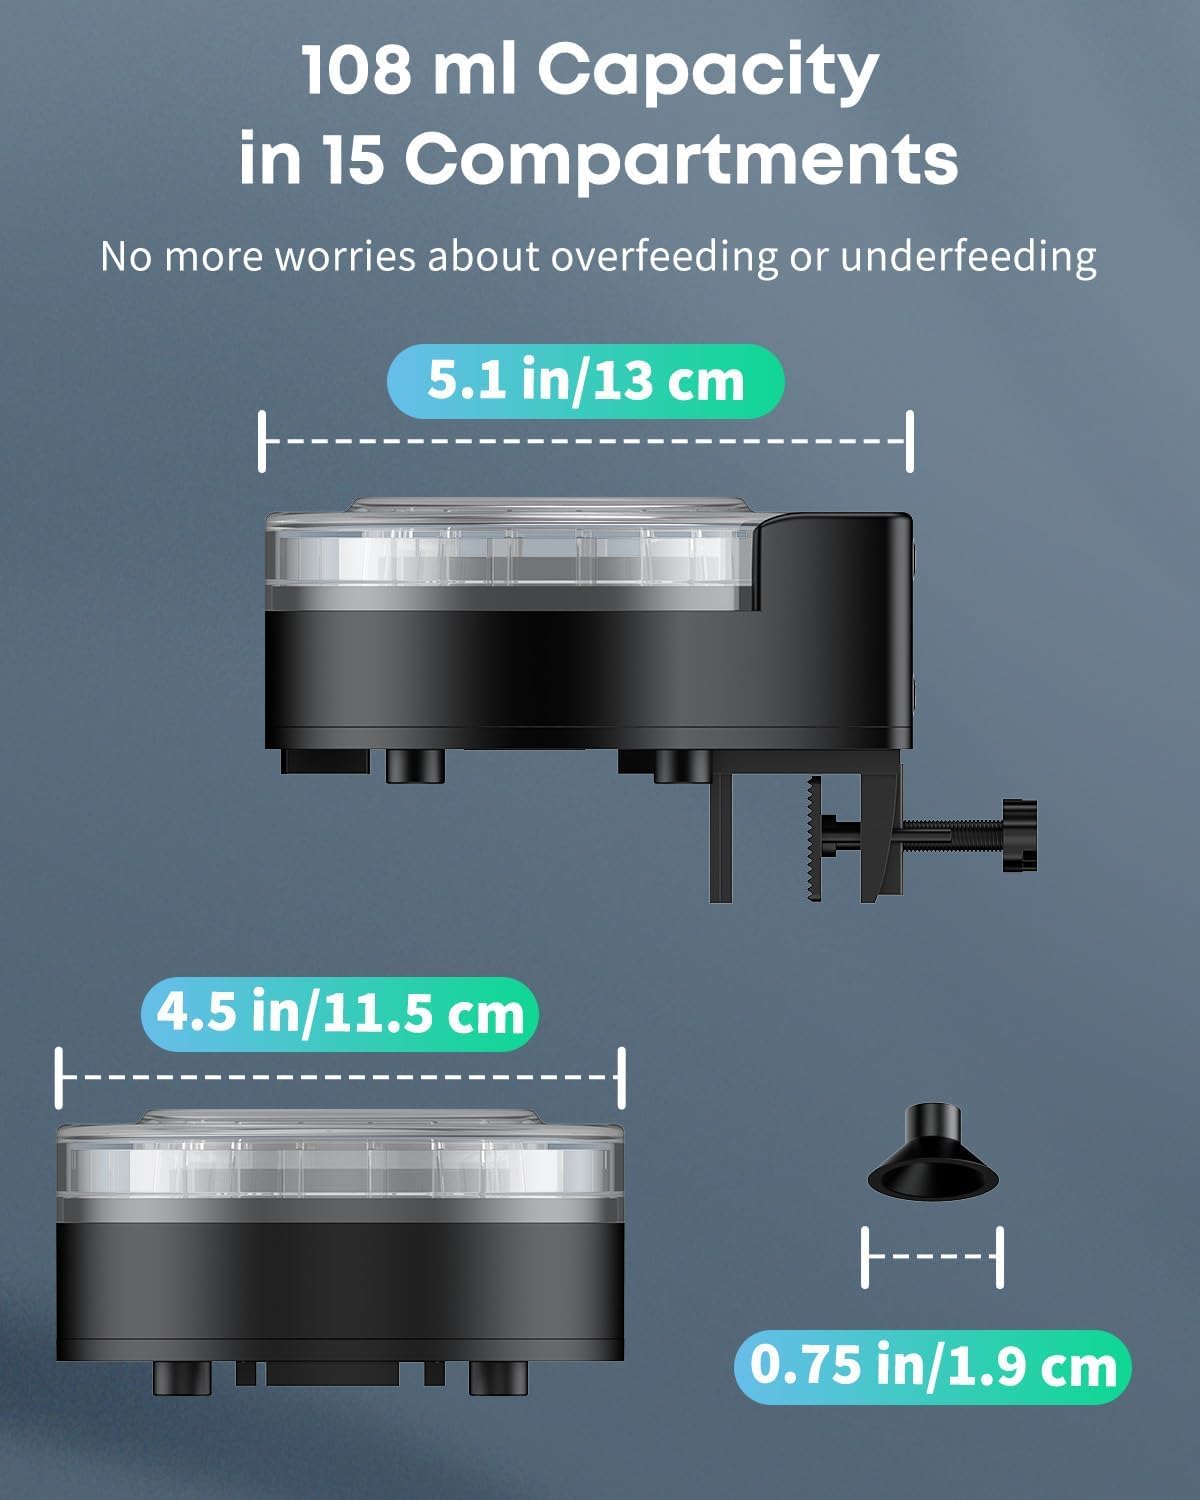
Image 9.1: Product Dimensions.
10. Warranty and Support
The Pawfly Automatic Aquarium Fish Feeder (Model CW2865) comes with a 1 Year Warranty from the date of purchase.
For technical support, warranty claims, or any questions regarding your product, please contact Pawfly customer service through the retailer's platform or visit the official Pawfly website for contact information.
