1. Introduction
This manual provides essential information for the safe and efficient operation, maintenance, and troubleshooting of your AGT KX12-CD(B) Mini Excavator. Please read this manual thoroughly before operating the machine to ensure proper usage and to prevent injury or damage. Keep this manual accessible for future reference.
2. Safety Information
Operating heavy machinery requires strict adherence to safety protocols. Failure to follow these guidelines can result in serious injury or death.
- Read the Manual: Always read and understand the entire operator's manual before starting, operating, or performing maintenance on the excavator.
- Personal Protective Equipment (PPE): Always wear appropriate PPE, including a hard hat, safety glasses, hearing protection, safety boots, and gloves.
- Machine Inspection: Before each use, perform a thorough inspection of the machine for any damage, leaks, loose parts, or malfunctions. Do not operate if any issues are found.
- Work Area Safety: Ensure the work area is clear of bystanders, obstacles, and overhead power lines. Maintain a safe distance from trenches and unstable ground.
- Engine Operation: Operate the engine in a well-ventilated area to avoid carbon monoxide poisoning.
- Stability: Always operate the excavator on stable, level ground. Be aware of the machine's center of gravity and avoid sudden movements that could cause tipping.
- Maintenance Safety: Turn off the engine, remove the key, and allow the machine to cool before performing any maintenance or adjustments. Relieve hydraulic pressure before working on hydraulic components.
3. Components and Controls
Familiarize yourself with the main components and control layout of the AGT KX12-CD(B) Mini Excavator.

Figure 3.1: Side view of the AGT KX12-CD(B) Mini Excavator, showcasing the main body, tracks, boom, arm, and bucket assembly. The operator's seat and control levers are visible.

Figure 3.2: Side view of the excavator with the front blade in the lowered position, used for leveling or stabilization. The compact design is evident.

Figure 3.3: Front three-quarter view highlighting the bucket and the non-hydraulic thumb attachment, designed for gripping and moving various materials.

Figure 3.4: Rear three-quarter view, showing the engine compartment and the robust track system. The compact size allows for operation in confined spaces.
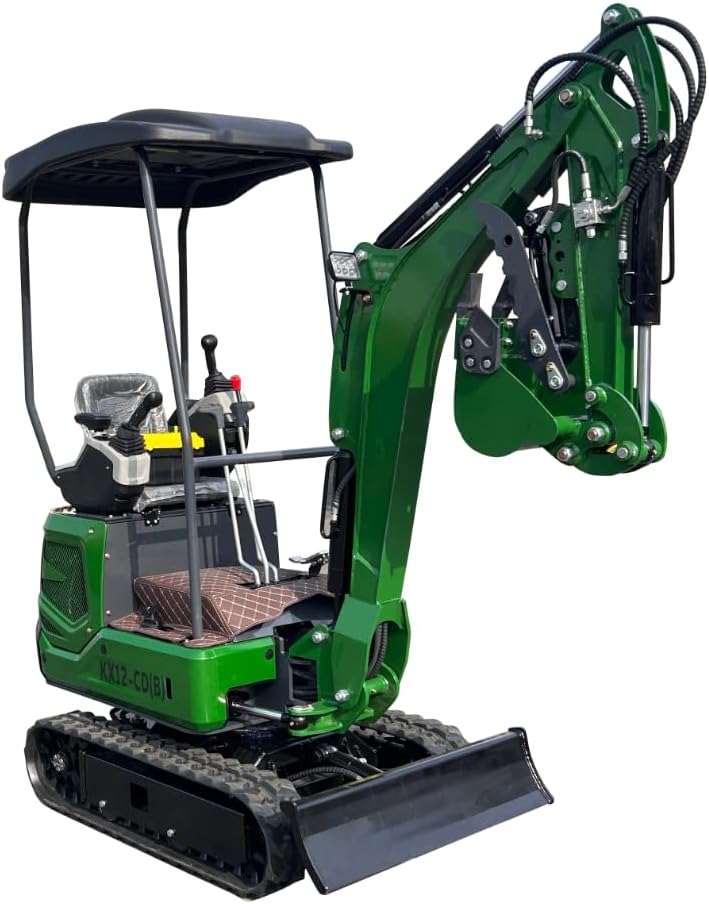
Figure 3.5: Side view with the excavator's arm fully extended, demonstrating its reach and digging capabilities. The hydraulic lines are clearly visible.

Figure 3.6: Rear view of the mini excavator, showing the counterweight and the overall sturdy construction. The rear lights are also visible.
Control Levers and Pedals:
- Left Control Lever: Typically controls boom swing and arm movement.
- Right Control Lever: Typically controls boom lift/lower and bucket curl/dump.
- Travel Levers/Pedals: Control forward and reverse movement of the tracks.
- Blade Control Lever: Controls the raising and lowering of the front blade.
- Engine Throttle: Adjusts engine RPM.
4. Setup
Before operating your mini excavator, ensure proper setup and pre-operation checks are completed.
- Unpacking and Assembly: The AGT KX12-CD(B) typically arrives largely assembled. Refer to the separate assembly guide for any minor attachments or final setup steps.
- Fluid Checks:
- Engine Oil: Check the engine oil level using the dipstick. Add recommended oil if necessary.
- Hydraulic Fluid: Verify the hydraulic fluid level in the reservoir. Ensure it is within the specified range.
- Fuel: Fill the fuel tank with the appropriate diesel fuel. Avoid overfilling.
- Battery Connection: Ensure the battery terminals are clean and securely connected.
- Track Tension: Inspect track tension. Adjust if too loose or too tight according to manufacturer specifications.
- Operator's Seat Adjustment: Adjust the seat for comfortable and safe operation, ensuring all controls are easily reachable.
5. Operating Instructions
Follow these steps for safe and effective operation of your mini excavator.
5.1 Starting the Engine
- Ensure the parking brake is engaged and all control levers are in the neutral position.
- Insert the key into the ignition and turn it to the 'ON' position. Wait for indicator lights to illuminate.
- Turn the key to the 'START' position. Release once the engine starts. Do not crank for more than 10 seconds.
- Allow the engine to warm up for a few minutes before beginning operation.
5.2 Moving the Excavator
- Disengage the parking brake.
- Slowly push the travel levers/pedals forward to move forward, or pull them back to move in reverse.
- To turn, push one lever forward while keeping the other neutral or pulling it back.
- Always travel at a safe speed, especially on uneven terrain.
5.3 Digging Operations
- Position the excavator appropriately for the digging task.
- Use the boom and arm controls to position the bucket.
- Lower the bucket into the material and use the curl function to fill it.
- Lift the filled bucket and swing the boom to the desired dumping location.
- Dump the material by curling the bucket outwards.
5.4 Shutting Down
- Park the excavator on level ground.
- Lower the bucket and blade to the ground.
- Allow the engine to idle for a few minutes to cool down.
- Turn the ignition key to the 'OFF' position.
- Remove the key and engage the parking brake.
6. Maintenance
Regular maintenance is crucial for the longevity and performance of your AGT KX12-CD(B) Mini Excavator.
- Daily Checks: Before each operation, check fluid levels (engine oil, hydraulic fluid, fuel), inspect for leaks, check tire pressure (if applicable, for wheeled models), and ensure all safety guards are in place.
- Engine Maintenance: Follow the engine manufacturer's recommendations for oil changes, air filter replacement, and fuel filter replacement. The engine is a Briggs & Stratton 13.5HP unit.
- Hydraulic System: Regularly check hydraulic hoses and fittings for wear or leaks. Replace damaged components immediately. Keep hydraulic fluid clean.
- Lubrication: Grease all pivot points and moving parts as specified in the lubrication chart (refer to machine decals or a more detailed service manual).
- Cleaning: Keep the machine clean, especially the engine compartment and radiator fins, to prevent overheating and corrosion.
- Track Maintenance: Inspect tracks for damage and proper tension. Clean debris from tracks regularly.
7. Troubleshooting
This section provides solutions for common issues you may encounter.
| Problem | Possible Cause | Solution |
|---|---|---|
| Engine will not start | No fuel; Dead battery; Clogged fuel filter; Ignition switch fault | Check fuel level; Charge/replace battery; Replace fuel filter; Inspect ignition switch |
| Loss of hydraulic power | Low hydraulic fluid; Clogged hydraulic filter; Damaged hydraulic hose | Check/add hydraulic fluid; Replace hydraulic filter; Inspect and replace hose |
| Overheating engine | Low coolant; Clogged radiator fins; Overloaded operation | Check/add coolant; Clean radiator; Reduce load or operate within limits |
| Tracks not moving | Travel levers not engaged; Obstruction in tracks; Hydraulic issue | Ensure levers are fully engaged; Clear obstruction; Check hydraulic system |
8. Specifications
Key technical specifications for the AGT KX12-CD(B) Mini Excavator:
- Model: AGT-KX12-CD(B)
- Model Year: 2025
- Equipment Type: Mini Excavator
- Operation Weight: 1 ton (2205 pounds)
- Operating Weight: Under 3,000 lbs
- Engine: Briggs & Stratton
- Net Horsepower (HP): 13.5HP
- Power Source: Diesel Powered
- Material: Metal
- Product Dimensions (L x W x H): 125.98in x 38.98in x 86.61in (90.55 x 39.37 x 82.68 inches)
- Maximum Excavation Height: 114.17in
- Maximum Digging Radius: 127.95in
- Max Dig Depth: 26'
- Thumb: Non-hydraulic
- Country/Region of Manufacture: China
9. Warranty and Support
AGT INDUSTRIAL is committed to providing reliable products and customer support.
- Protection Plan: A 3-Year Protection Plan is available for this product. Please refer to your purchase documentation for details on coverage and activation.
- Returns: This product is eligible for 30-day easy returns.
- Customer Support: For technical assistance, parts inquiries, or warranty claims, please contact AGT INDUSTRIAL customer support. Refer to your purchase receipt or the official AGT INDUSTRIAL website for contact information.
10. Official Product Videos
No official product videos from the seller were available in the provided data for embedding in this manual. Please refer to the product listing page or the manufacturer's official website for any available video resources.


