
Gevi SSCMA0-BK0A1
Contents
Gevi Single Serve Coffee Maker User Manual
Model: SSCMA0-BK0A1
1. Introduction
Thank you for choosing the Gevi Single Serve Coffee Maker. This appliance is designed to provide a convenient and versatile coffee brewing experience, accommodating both K-Cups and ground coffee. With its multiple brewing modes and adjustable cup sizes, you can customize your coffee to your preference. Please read this manual thoroughly before initial use to ensure proper operation, maintenance, and safety.

Image 1: Gevi Single Serve Coffee Maker in operation.
2. Important Safety Instructions
When using electrical appliances, basic safety precautions should always be followed to reduce the risk of fire, electric shock, and injury to persons, including the following:
- Read all instructions before operating the coffee maker.
- Do not touch hot surfaces. Use handles or knobs.
- To protect against fire, electric shock, and injury to persons, do not immerse cord, plugs, or appliance in water or other liquid.
- Close supervision is necessary when any appliance is used by or near children.
- Unplug from outlet when not in use and before cleaning. Allow to cool before putting on or taking off parts, and before cleaning the appliance.
- Do not operate any appliance with a damaged cord or plug, or after the appliance malfunctions or has been damaged in any manner.
- The use of accessory attachments not recommended by the appliance manufacturer may result in fire, electric shock, or injury to persons.
- Do not use outdoors.
- Do not let cord hang over edge of table or counter, or touch hot surfaces.
- Do not place on or near a hot gas or electric burner, or in a heated oven.
- Always attach plug to appliance first, then plug cord into the wall outlet. To disconnect, turn any control to “off,” then remove plug from wall outlet.
- Do not use appliance for other than intended use.
- Scalding may occur if the K-Cup holder is opened during the brewing cycle.
3. Product Components
Familiarize yourself with the parts of your Gevi Single Serve Coffee Maker:
- Control Panel with Touchscreen Interface
- Water Reservoir (40 oz capacity)
- Lid
- K-Cup Holder / Ground Coffee Filter Basket
- Drip Tray and Drip Tray Plate
- Brew Head
- Power Cord
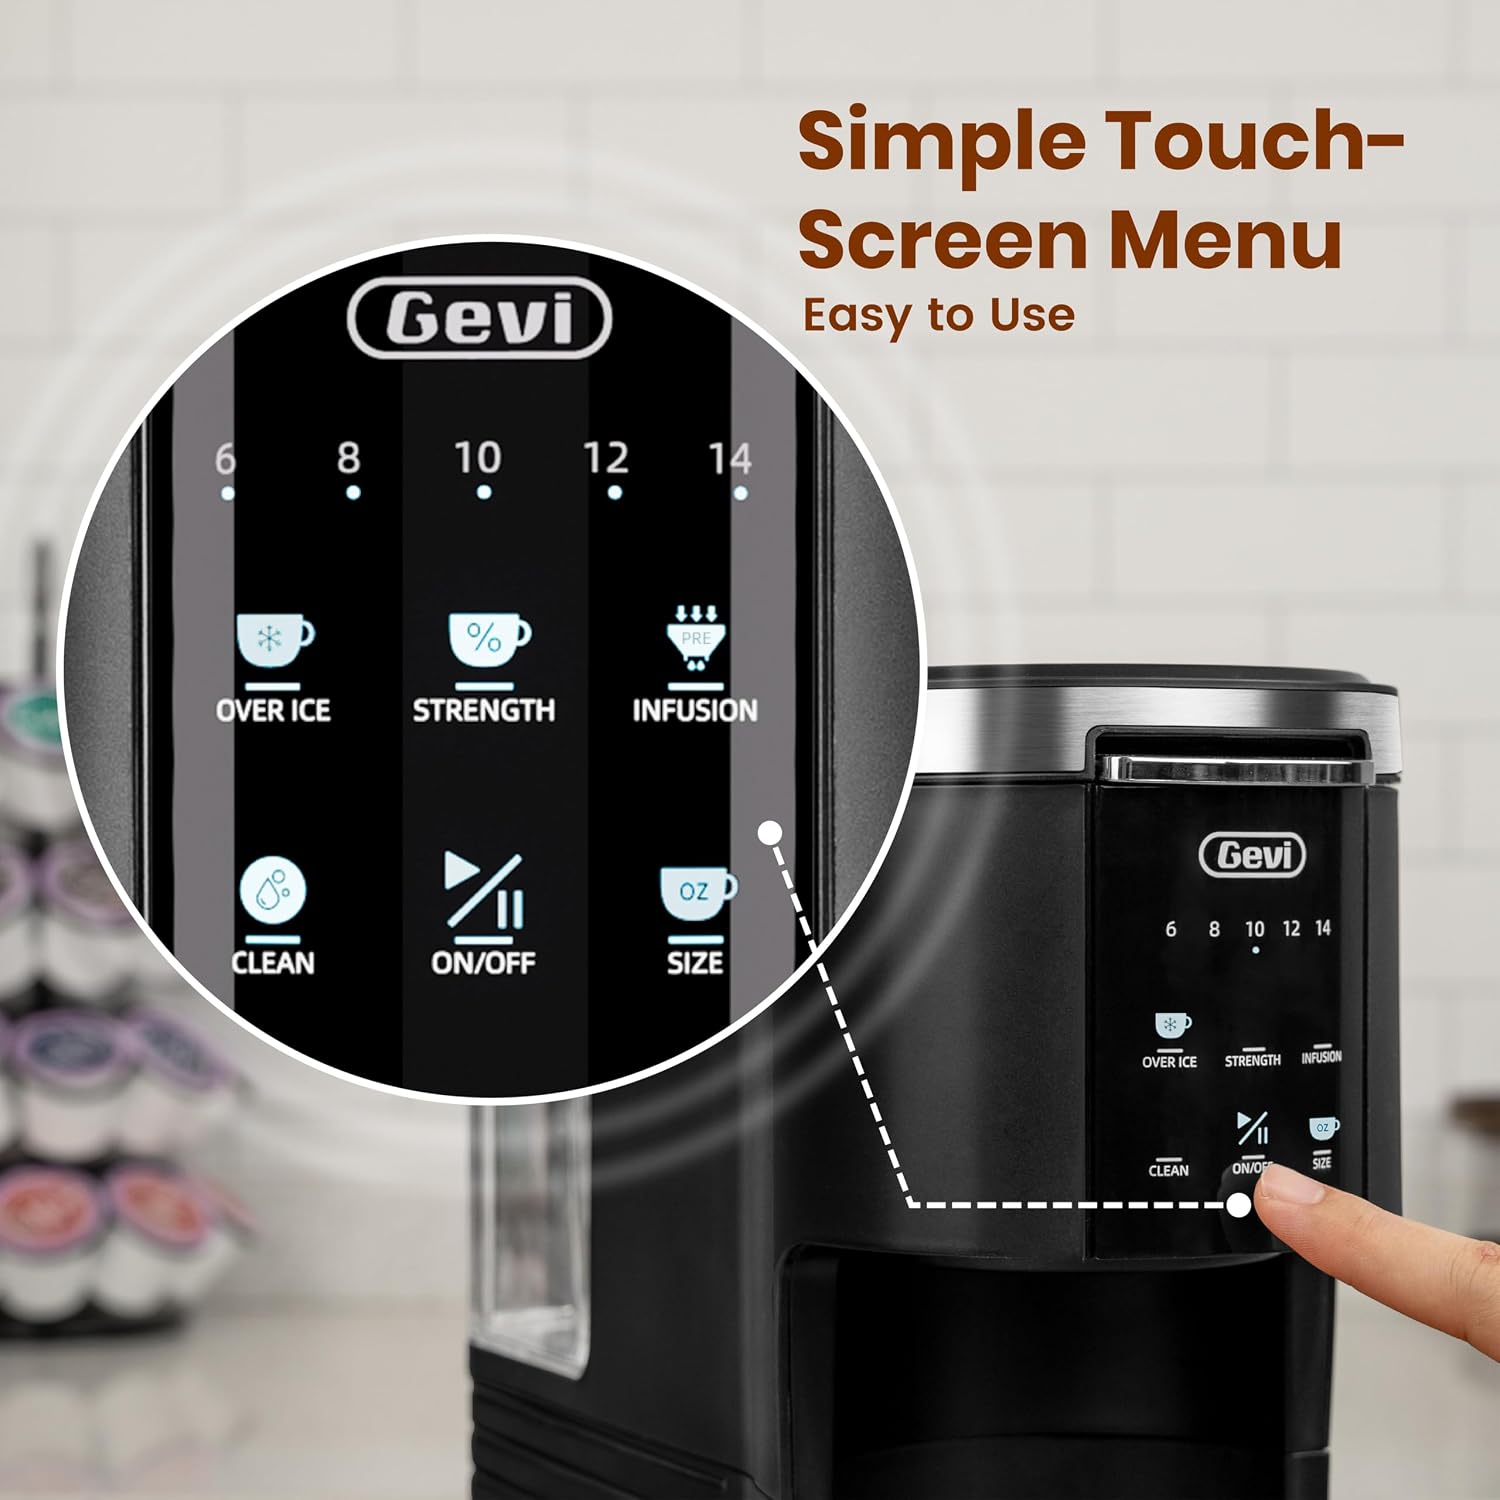
Image 2: Detailed view of the touchscreen control panel.
4. Setup
Before first use, follow these steps to prepare your coffee maker:
- Unpack: Carefully remove all packaging materials and place the coffee maker on a stable, flat surface.
- Clean Components: Wash the water reservoir, K-Cup holder, ground coffee filter basket, and drip tray in warm, soapy water. Rinse thoroughly and dry.
- Fill Water Reservoir: Fill the water reservoir with fresh, filtered water up to the 'MAX' line (40 oz). Ensure the reservoir is properly seated.
- First Clean Cycle:
- Place a large mug or container on the drip tray.
- Do not insert a K-Cup or ground coffee.
- Close the brew head lid.
- Press the 'ON/OFF' button to power on the machine.
- Select a large brew size (e.g., 14 oz) and press the 'ON/OFF' button again to start a hot water cycle.
- Discard the hot water. Repeat this cycle 2-3 times to thoroughly clean the internal components.
5. Operating Instructions
Your Gevi coffee maker offers versatile brewing options. Always ensure the water reservoir is filled before brewing.
5.1 Brewing with K-Cups
- Lift the brew head lid.
- Insert a K-Cup pod into the K-Cup holder. Ensure it is seated firmly.
- Close the brew head lid securely.
- Place your mug on the drip tray.
- Press the 'ON/OFF' button to power on the machine.
- Select your desired brew size (6, 8, 10, 12, or 14 oz) and brewing mode (Over Ice, Classic, Strong, Intense) using the touchscreen.
- Press the 'ON/OFF' button again to start brewing. The machine will automatically stop when the cycle is complete.
5.2 Brewing with Ground Coffee
- Lift the brew head lid.
- Remove the K-Cup holder and insert the reusable ground coffee filter basket.
- Add 1/2 to 1/3 oz (approximately 1-2 tablespoons) of ground coffee into the filter basket. Do not overfill.
- Close the brew head lid securely.
- Place your mug on the drip tray.
- Press the 'ON/OFF' button to power on the machine.
- Select your desired brew size and brewing mode. The 'Infusion' mode is recommended for ground coffee to enhance flavor.
- Press the 'ON/OFF' button again to start brewing.

Image 3: Options for K-Cup pod or ground coffee brewing.
5.3 Brewing Modes
The coffee maker features four distinct brewing modes:
- Over Ice: Brews a concentrated coffee directly over ice for a refreshing iced beverage.
- Classic: Standard hot coffee brew.
- Strong: Brews a more intense cup of coffee.
- Intense: Provides the boldest flavor extraction.

Image 4: Examples of the four brew styles.
5.4 Brew Sizes
Select from five different brew sizes to match your preference and mug size:
- 6 oz
- 8 oz
- 10 oz
- 12 oz
- 14 oz

Image 5: Visual representation of available brew sizes.
6. Maintenance and Cleaning
Regular cleaning ensures optimal performance and extends the life of your coffee maker.
6.1 Daily Cleaning
- Drip Tray: Remove and empty the drip tray after each use or when the indicator floats. Wash with warm, soapy water and rinse.
- K-Cup Holder/Filter Basket: Remove and rinse the K-Cup holder or ground coffee filter basket after each use. Wash with warm, soapy water as needed.
- Exterior: Wipe the exterior of the coffee maker with a damp, soft cloth. Do not use abrasive cleaners.
6.2 Descaling (Self-Cleaning Feature)
Over time, mineral deposits (scale) can build up in your coffee maker, affecting performance and taste. The Gevi coffee maker features a self-cleaning function to facilitate descaling.
- Empty the water reservoir.
- Fill the reservoir with a descaling solution (e.g., white vinegar and water mixture, or a commercial descaling agent) according to the solution's instructions.
- Place a large mug or container on the drip tray.
- Press the 'CLEAN' button on the touchscreen. The machine will initiate a descaling cycle.
- Once the cycle is complete, empty and rinse the water reservoir.
- Fill the reservoir with fresh water and run 2-3 full water cycles (without coffee) to rinse out any remaining descaling solution.
It is recommended to descale your coffee maker every 3-6 months, or more frequently if you have hard water.
7. Troubleshooting
Refer to this section for common issues and their solutions.
| Problem | Possible Cause | Solution |
|---|---|---|
| Coffee maker does not power on. | Not plugged in; power outlet issue. | Ensure the power cord is securely plugged into a working outlet. |
| Coffee is not brewing. | Water reservoir empty; brew head lid not closed; K-Cup/filter not properly inserted. | Fill water reservoir. Ensure brew head lid is securely closed. Check K-Cup or filter basket placement. |
| Coffee tastes weak. | Incorrect brew mode; too much water for coffee amount; old coffee grounds. | Select 'Strong' or 'Intense' brew mode. Use a smaller brew size. Ensure fresh coffee grounds are used. |
| Coffee maker is noisy during brewing. | Normal operation; air in pump. | Some noise is normal. Ensure water reservoir is full. If excessive, run a few water-only cycles. |
| Water leaks from the machine. | Water reservoir not seated correctly; drip tray full. | Ensure the water reservoir is firmly in place. Empty the drip tray. |
8. Specifications
| Brand | Gevi |
| Model Name | SSCMA0-BK0A1 |
| Color | Black |
| Product Dimensions | 11.1"D x 5.5"W x 12.1"H |
| Item Weight | 5.57 pounds |
| Water Reservoir Capacity | 40 oz |
| Brew Sizes | 6, 8, 10, 12, 14 oz |
| Coffee Maker Type | Drip Coffee Machine, Single-Serve |
| Human Interface Input | Touchscreen |
| Special Features | Adjustable Brew Strength, Lightweight, Portable, Removable Tank, Single Cup Brew |
| UPC | 767791889084 |

Image 6: Product dimensions for placement and mug compatibility.
9. Warranty and Support
For warranty information or technical support, please refer to the warranty card included with your product or visit the official Gevi website. You may also contact Gevi customer service directly for assistance with product operation, troubleshooting, or parts replacement.
Please have your model number (SSCMA0-BK0A1) and proof of purchase ready when contacting support.
Ask a question about this manual
Ask about setup, troubleshooting, compatibility, parts, safety, or missing instructions. Manuals+ will review the question and use this page’s manual context to help answer it.