1. Introduction
Thank you for purchasing the Livato HA109 Portable Projector. This manual provides essential information for setting up, operating, and maintaining your device. Please read this manual thoroughly before use to ensure proper operation and to maximize your viewing experience. Keep this manual for future reference.
2. Safety Information
To prevent fire, electric shock, or injury, please observe the following safety precautions:
- Do not expose the projector to rain or moisture.
- Do not open the projector casing. Refer all servicing to qualified service personnel.
- Ensure proper ventilation. Do not block ventilation openings.
- Use only the power cord supplied with the projector.
- Avoid looking directly into the projector lens when the lamp is on, as the bright light may damage your eyes.
- Place the projector on a stable, level surface to prevent it from falling.
- Keep the projector away from heat sources and direct sunlight.
3. Package Contents
Verify that all items are present in your package:
- Livato HA109 Portable Projector
- Power Cord
- Remote Controller
- User Manual (this document)
4. Product Overview
Familiarize yourself with the components and interfaces of your Livato HA109 projector.

Figure 4.1: Front view of the Livato HA109 Portable Projector, showing the lens and the Livato branding. The projector is white with a grey stand.

Figure 4.2: Rear view of the Livato HA109 Portable Projector, highlighting the input/output ports including HD (HDMI), USB, and audio jack. Ventilation grilles are also visible.
4.1 Key Features
- Native HD Resolution + 4K Support: Delivers clear visuals with true native HD resolution and supports 4K playback.
- Freestyle Auto Keystone Correction: Automatically adjusts image angles for optimal alignment.
- Built-in Android 11 System: Access streaming apps like YouTube, Netflix, and Prime Video directly.
- 5000 Lumens Brightness: Provides vibrant and sharp visuals in various lighting conditions.
- Multi-Device Compatibility: Connects to smartphones, laptops, gaming consoles, and USB drives via HDMI, USB, and Wi-Fi.
- Portable & Sleek Design: Compact and lightweight for easy transport and versatile placement.
5. Setup
5.1 Initial Placement
Place the projector on a stable, flat surface. The flexible stand allows for adjustment of the projection angle. Ensure there are no obstructions in front of the lens or around the ventilation grilles.
5.2 Power Connection
- Connect the supplied power cord to the projector's power input port.
- Plug the other end of the power cord into a suitable electrical outlet.
- Press the power button on the projector or the remote control to turn on the device.
5.3 Connecting External Devices
The HA109 supports various connection methods:
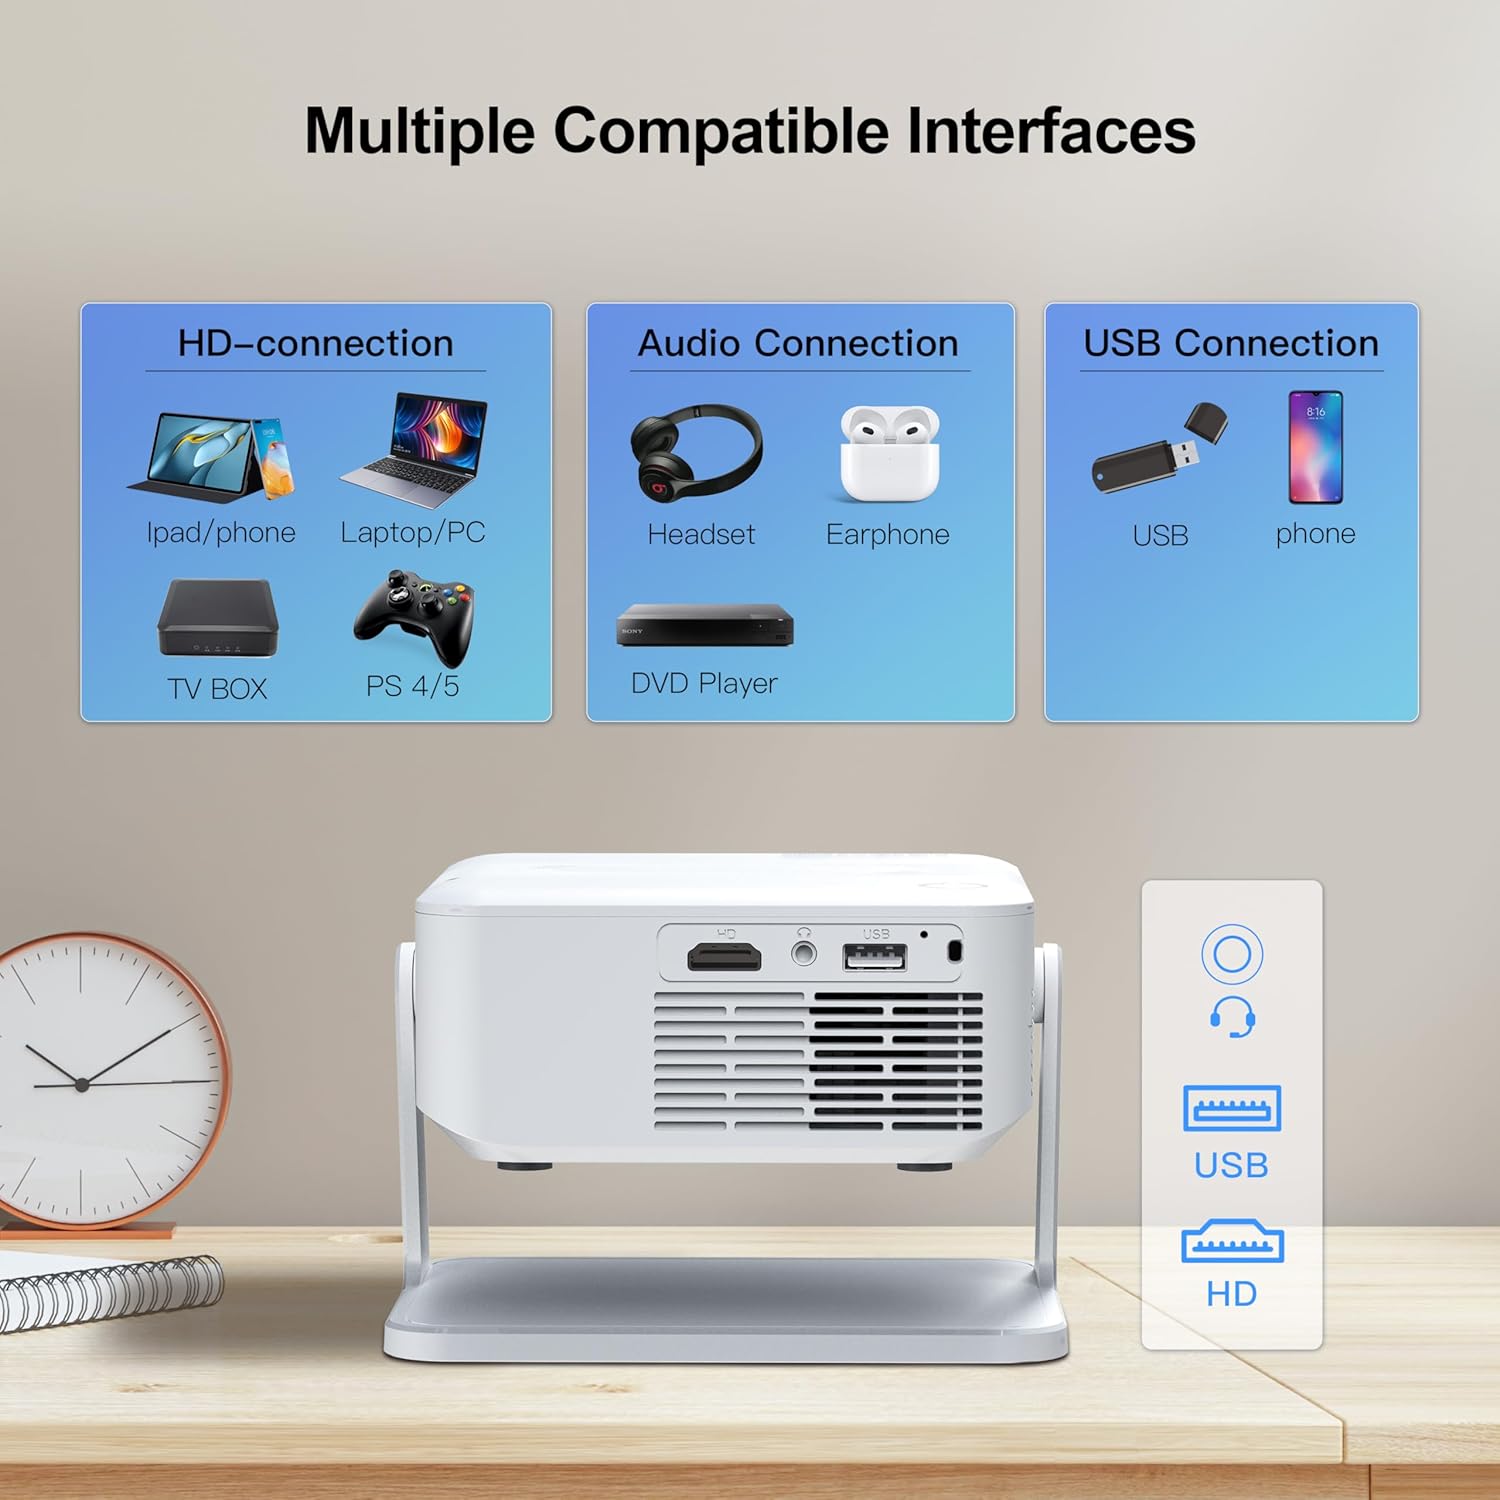
Figure 5.1: Diagram illustrating the multiple compatible interfaces of the Livato HA109 projector, including HD (HDMI) for laptops, TV boxes, and gaming consoles; Audio for headsets and earphones; and USB for USB drives and phones.
- HDMI Connection: Use an HDMI cable to connect devices like laptops, gaming consoles (PS4/PS5), TV boxes, or streaming sticks to the projector's HD port.
- USB Connection: Insert a USB drive into the USB port to play media files directly.
- Audio Output: Connect headphones or external speakers to the 3.5mm audio jack for enhanced sound.
- Wireless Connectivity (Wi-Fi): Connect to your home Wi-Fi network to access online streaming services or use screen mirroring features.
6. Operating Instructions
6.1 Navigating the Android 11 Interface
The Livato HA109 features a built-in Android 11 operating system, allowing direct access to various applications.

Figure 6.1: The projector displaying the Android 11 home screen with pre-installed applications like YouTube, Google Play Store, Netflix, Chrome, WPS Office, Screen Adjust, Memory Clean, and Prime Video. A remote control is shown in the foreground.
- Use the supplied remote control to navigate the on-screen menu. The directional buttons, OK button, and back button are essential for navigation.
- Connect to your Wi-Fi network via the settings menu to enable internet access for streaming applications.
- Select desired applications like YouTube, Netflix, or Prime Video from the home screen to start streaming content.
6.2 Focus and Keystone Correction
- Focus Adjustment: Manually adjust the focus ring on the projector lens until the image appears sharp and clear.
- Auto Keystone Correction: The HA109 features automatic keystone correction. If the projected image appears trapezoidal, the projector will automatically adjust it to a rectangular shape. For manual adjustments or to fine-tune, navigate to the 'Screen Adjust' or 'Keystone' settings within the Android interface.
6.3 Screen Mirroring
The projector supports wireless screen mirroring from compatible smartphones and laptops. Refer to the 'Screen Adjust' or 'Wireless Display' option in the projector's menu for instructions specific to your device (e.g., Miracast for Android, AirPlay for iOS).
7. Maintenance
7.1 Cleaning the Lens
Use a soft, lint-free cloth specifically designed for optical lenses to gently wipe the projector lens. Do not use abrasive cleaners or excessive force, as this can scratch the lens.
7.2 Cleaning the Projector Body
Wipe the exterior of the projector with a soft, dry cloth. For stubborn dirt, a slightly damp cloth can be used, followed by a dry cloth. Avoid using harsh chemicals or solvents.
7.3 Ventilation
Ensure the ventilation grilles are free from dust and debris to prevent overheating. Use a soft brush or compressed air to gently clear any blockages.
8. Troubleshooting
If you encounter issues with your projector, refer to the following common problems and solutions:
- No Power:
- Check if the power cord is securely connected to both the projector and the power outlet.
- Ensure the power outlet is functional.
- No Image / Blank Screen:
- Verify that the projector is powered on.
- Check the input source. Ensure the correct HDMI or USB input is selected if an external device is connected.
- Ensure the lens cap (if any) is removed.
- Fuzzy / Unclear Image:
- Adjust the focus ring on the lens.
- Ensure the projection distance is within the recommended range.
- Check for smudges or dust on the lens and clean if necessary.
- Image is Trapezoidal:
- The projector features auto keystone correction. If needed, manually adjust keystone settings in the menu.
- Ensure the projector is placed as perpendicular to the screen as possible.
- No Sound:
- Check the volume settings on the projector and the connected source device.
- Ensure external speakers or headphones are properly connected if used.
- Verify that the audio output is not muted.
- Remote Control Not Working:
- Ensure the batteries are correctly inserted and not depleted.
- Point the remote directly at the projector's IR receiver.
- Remove any obstructions between the remote and the projector.
9. Specifications
Technical specifications for the Livato HA109 Portable Projector:
| Brand | Livato |
| Model | HA109 |
| Display Type | LCD LED |
| Native Resolution | 1024 x 720 (Native HD) |
| Supported Resolution | Up to 3840 x 2160 (4K) |
| Brightness | 5000 Lumens |
| Operating System | Android 11 |
| Keystone Correction | Freestyle Auto Keystone (Digital Keystone Correction) |
| Connectivity Technology | Wi-Fi |
| Hardware Interface | HDMI, USB |
| Aspect Ratio | 16:9 |
| Refresh Rate | 480 KHz |
| Product Dimensions | 10 x 15 x 12 cm |
| Item Weight | 1.5 kg |
| Form Factor | Portable |
| Mounting Type | Tabletop Mount |
10. Warranty and Support
This product comes with a standard manufacturer's warranty. Please refer to the warranty card included in your package for specific terms and conditions. For technical support, troubleshooting assistance beyond this manual, or warranty claims, please contact Livato customer service through their official channels or the retailer where the product was purchased.

