1. Safety Information
Read all instructions carefully before installation and use. Retain this manual for future reference.
- Ensure the main power supply is disconnected before installation or maintenance.
- Installation must be performed by a qualified electrician or in accordance with local electrical codes.
- Mount the fan securely to a ceiling joist or a suitable support structure capable of holding the fan's weight.
- Do not install any dimmer switch if you intend to use the remote control for dimming. Use a simple on/off wall switch.
- Keep hands and objects clear of the fan blades during operation.
2. Package Contents
Verify that all components are present and undamaged before beginning installation.

Image 2.1: Overview of fan components including motor, blades, light kit, remote, and mounting hardware.
- Fan Motor Assembly
- Fan Blades (3 or 6, reversible brown/black)
- LED Light Kit
- Light Shade (Plastic)
- Remote Control with Receiver
- Mounting Bracket
- Downrod (Optional: 5-inch and 10-inch extensions may be included)
- Canopy
- Hardware Pack (screws, washers, wire nuts)
- User Manual
3. Setup & Installation
Detailed instructions and installation videos are provided to assist with the setup process. Ensure power is off before starting.
3.1 Unboxing and Component Identification
Carefully remove all components from the packaging. Identify each part using the 'Package Contents' section.

Image 3.1: Reversible fan blades, showing both brown wood grain and black sides.

Image 3.2: Detail of the fan's quiet DC motor and integrated LED light.
3.2 Mounting the Bracket
- Attach the mounting bracket to the ceiling electrical box. Ensure it is securely fastened to a structural support.
- Feed the electrical wires from the ceiling box through the center hole of the mounting bracket.
3.3 Assembling the Fan
- If using a downrod, thread the wires from the fan motor through the downrod. Secure the downrod to the motor.
- Carefully lift the fan motor assembly and hang it onto the mounting bracket.
- Connect the electrical wires (live, neutral, ground) from the ceiling to the fan's receiver unit, following the wiring diagram in the manual.
- Attach the fan blades to the motor housing. Ensure they are firmly screwed in. Choose your preferred blade finish (brown or black).
- Connect the LED light kit wires to the fan motor assembly.
- Attach the light shade by twisting it into place or securing it with screws, depending on the design.
3.4 Installation Video
Video 3.1: A detailed video demonstrating the unboxing and installation process of the Asyko Ceiling Fan. This video covers attaching the mounting bracket, assembling the fan motor and blades, wiring connections, and installing the light kit and shade.
4. Operating Instructions
The Asyko Ceiling Fan is controlled via the included remote control, offering various settings for comfort and convenience.
4.1 Remote Control Functions

Image 4.1: The remote control allows adjustment of fan speed, light color temperature, dimming, and timing functions.
- Power On/Off: Turn the fan and light on or off.
- Fan Speed: Select from 6 adjustable fan speeds (Levels 1-2: Low, Levels 3-4: Medium, Levels 5-6: High).
- Light Control:
- Color Temperature: Cycle through 3000K (warm white), 4000K (natural white), and 6000K (cold white).
- Dimming: Adjust light brightness from 10% to 100%.
- The fan and light can be operated independently.
- Timer Function: Set the fan to turn off automatically after 1 or 2 hours.
- Memory Function: The fan remembers the last used brightness, color temperature, and fan speed settings when turned off for at least 10 seconds.
4.2 Reversible Motor Function
The reversible DC motor allows for year-round use:
- Summer Mode (Forward Rotation): Blades rotate counter-clockwise to push cool air downwards, creating a cooling effect.
- Winter Mode (Reverse Rotation): Blades rotate clockwise to draw cool air up, circulating warm air trapped near the ceiling.

Image 4.2: Visual representation of the reversible motor function for summer cooling and winter air circulation.
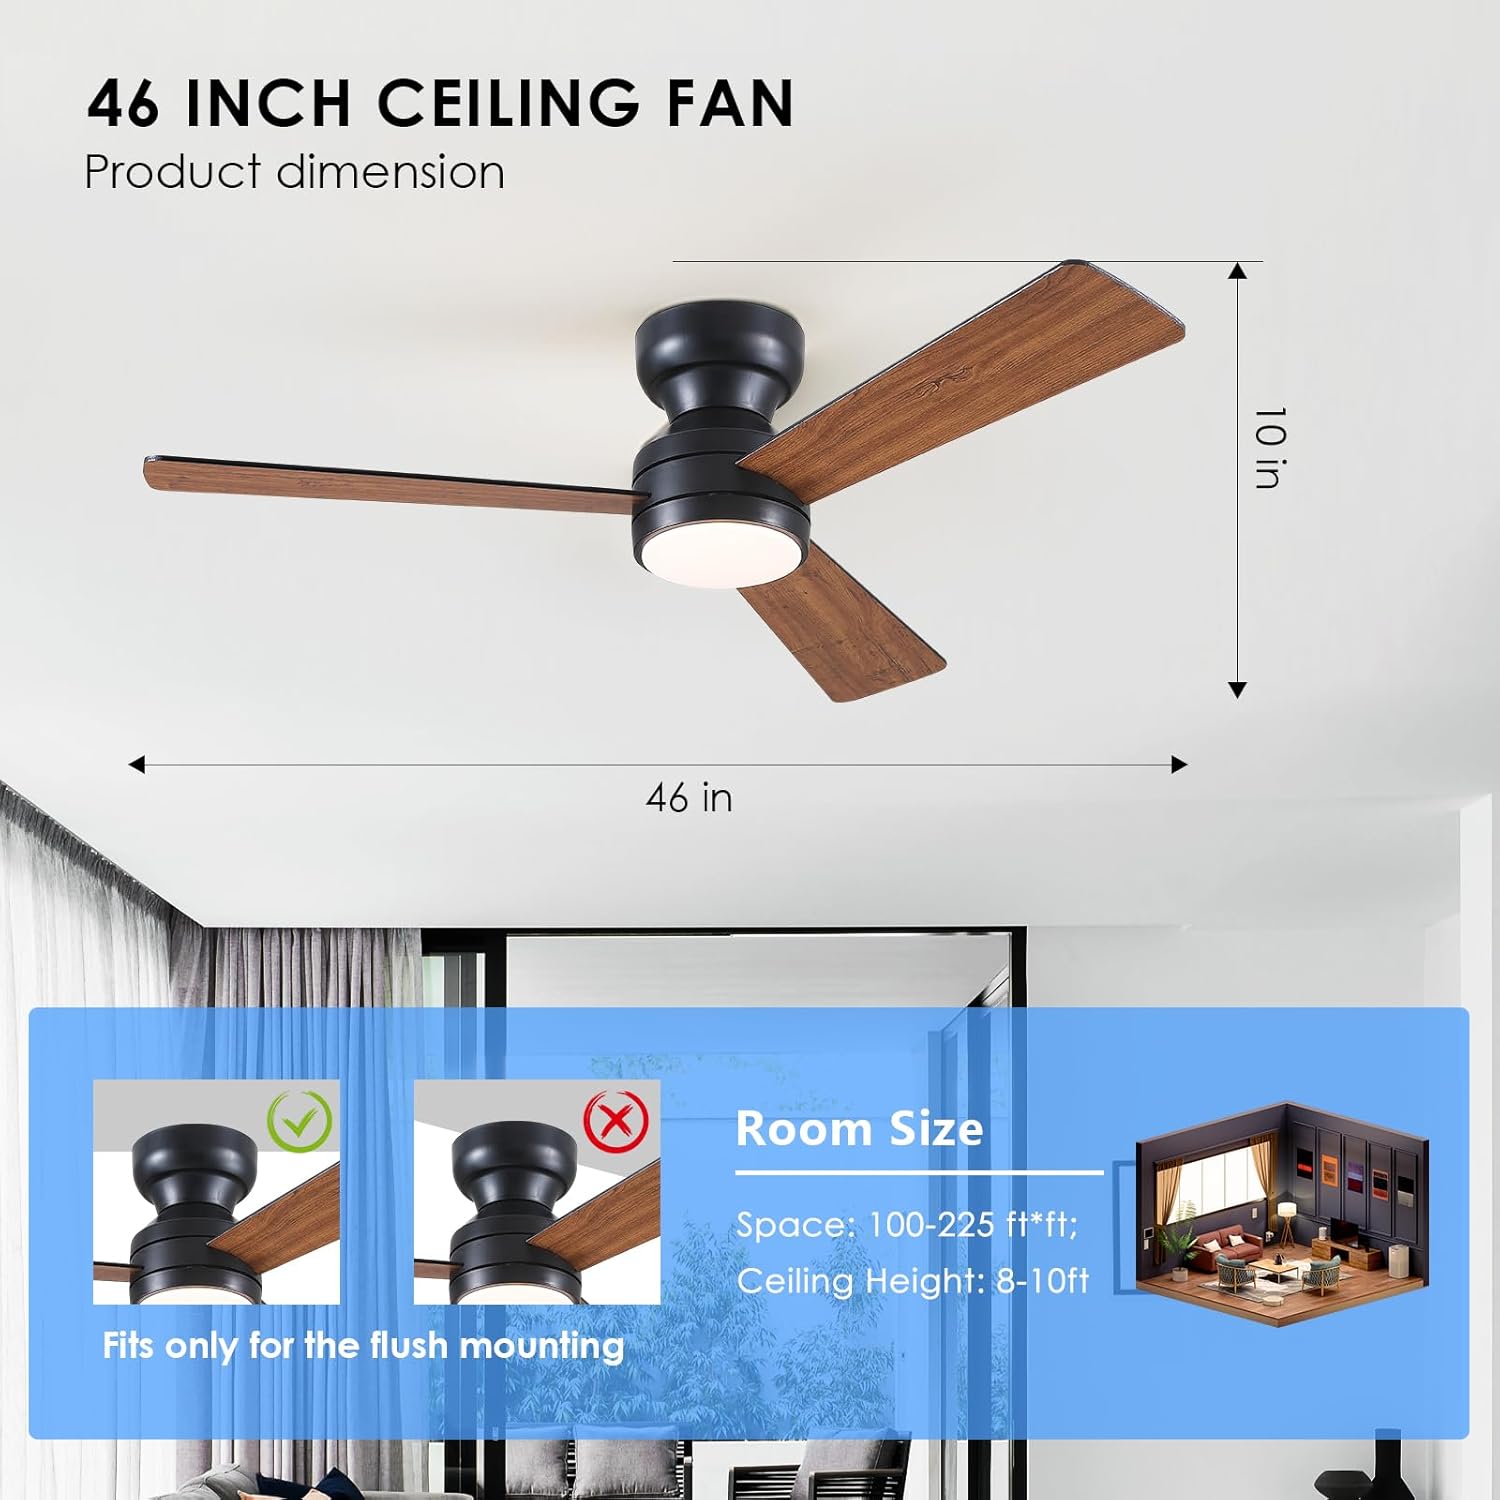
Image 4.3: Explanation of the 6-speed adjustable fan settings.
4.3 Quiet Operation
The fan features a quiet DC motor, ensuring a peaceful environment suitable for bedrooms, living rooms, and offices.
Video 4.4: This video demonstrates the various operational features of the Asyko Ceiling Fan, including fan speed adjustments, light color temperature changes, dimming, and the reversible motor function for different seasons.
5. Maintenance
Regular maintenance ensures optimal performance and longevity of your ceiling fan.
- Cleaning: Use a soft, damp cloth to clean the fan blades and motor housing. Do not use abrasive cleaners or solvents.
- Blade Inspection: Periodically check that all blade screws are tight. Loose screws can cause wobbling and noise.
- Light Shade: Clean the light shade gently with a soft cloth to maintain light output.
- Electrical Connections: Ensure all electrical connections remain secure. If you notice any loose wiring, consult a qualified electrician.
6. Troubleshooting
If you encounter issues with your Asyko Ceiling Fan, refer to the following common problems and solutions:
| Problem | Possible Cause | Solution |
|---|---|---|
| Fan does not operate | No power supply; Loose wiring; Remote control issue | Check circuit breaker; Verify all wire connections; Replace remote batteries or re-pair remote. |
| Light does not work | Loose wiring; LED module failure; Remote control issue | Check light kit connections; Contact customer support for LED module replacement; Verify remote functionality. |
| Fan wobbles or is noisy | Loose blade screws; Unbalanced blades; Improper mounting | Tighten all blade screws; Use a balancing kit (not included) to balance blades; Ensure mounting bracket is secure. |
| Remote control not responding | Dead batteries; Not paired correctly; Interference | Replace batteries; Follow pairing instructions in the manual; Reduce interference from other devices. |
| Light color temperature changes unexpectedly | Power cycle within 10 seconds | Allow at least 10 seconds after turning off the light for the memory function to save the setting. |
7. Specifications
| Feature | Detail |
|---|---|
| Brand | Asyko |
| Model Name | Ceiling Fans with Lights (Model 8511) |
| Electric Fan Design | Ceiling Fan |
| Size | 46 inches (3-Blade) |
| Color | Brown (reversible blades) |
| Power Source | DC |
| Motor Type | Brushless DC (Quiet Operation) |
| Wattage | 40 watts |
| Light Type | Dimmable LED |
| Color Temperatures | 3000K (Warm White), 4000K (Natural White), 6000K (Cold White) |
| Brightness Adjustment | 10%-100% |
| Number of Fan Speeds | 6 |
| Control Method | Remote Control |
| Special Features | Reversible Motor, Memory Function, Timer (1/2 hour) |
| Installation Type | Flush Mount (Self-install) |
| Product Dimensions | 6"D x 6"W x 6"H (Note: This appears to be packaging dimensions, actual fan dimensions are 46" diameter) |
| Item Weight | 7.13 pounds |
| Indoor/Outdoor Usage | Indoor |
8. Warranty & Support
Asyko is committed to customer satisfaction. For any questions, concerns, or warranty claims, please contact our customer support team.
- Customer Support: We offer prompt customer support with a 24-hour response time. Refer to your purchase documentation for specific contact details.
- Warranty: Please refer to the warranty information provided with your purchase for details on coverage and terms.


