1. Introduction
Thank you for choosing the KITCHENARM 29-in-1 Smart Bread Maker. This versatile appliance is designed to simplify your bread-making process with 29 automatic programs, allowing you to create a wide variety of breads, doughs, jams, and yogurts. It offers three loaf weights (900g, 700g, 500g) and three crust settings (dark, medium, light) to suit your preferences. Enjoy the convenience of customizable menus and a user-friendly interface.
This model is exclusively designed for North American electrical standards (120 V, 60 Hz). Please ensure your electrical supply matches these specifications.
2. Safety Instructions
- Electrical Safety: Only connect the bread maker to a grounded 120V, 60Hz power outlet. Do not use adapters or extension cords unless absolutely necessary and rated for the appliance's wattage (550 watts).
- Placement: Always place the bread maker on a stable, flat, heat-resistant surface, away from water, direct sunlight, and heat sources. Ensure adequate ventilation around the appliance.
- Hot Surfaces: The bread maker's exterior, interior, and bread pan become very hot during operation. Always use oven mitts or the provided hook when handling hot parts.
- Children and Pets: Keep the appliance out of reach of children and pets. Close supervision is necessary when the appliance is used near children.
- Cleaning: Always unplug the bread maker and allow it to cool completely before cleaning. Do not immerse the main unit in water.
- Damage: Do not operate the appliance if the cord, plug, or appliance itself is damaged. Contact customer service for repair.
3. Product Overview

Image: Close-up of the KITCHENARM bread maker's control panel with digital display and buttons.
The control panel features a clear digital display showing menu, loaf size, crust color, and remaining time. Buttons include Menu, Loaf Size, Crust Color, Time+/-, Dough, Homemade, and Start/Pause/Stop.

Image: A comprehensive list of the 29 available programs on the bread maker.
The menu list includes various bread types like Basic, Whole Wheat, Gluten-Free, French, Sweet, as well as Dough, Jam, Yogurt, and Homemade options.
Components Included:
- Non-stick bread pan (Teflon, food-grade)
- Kneading paddles (2 included, one for use, one spare)
- Measuring cup
- Measuring spoons
- Metal hook (for removing kneading paddle)
- Instruction manual and recipe booklet

Image: Visual representation of the bread maker's dimensions and included accessories.
The image displays the bread pan, main unit, kneading paddles, metal hook, measuring cups/spoons, and the manual, along with key dimensions of the appliance.
4. Setup
- Unpacking: Carefully remove all packaging materials and accessories. Clean the bread pan and kneading paddles with warm, soapy water, then dry thoroughly. Wipe the exterior of the main unit with a damp cloth.
- Positioning: Place the bread maker on a dry, stable, and level surface. Ensure it is unplugged before proceeding.
- Insert Bread Pan: Place the non-stick bread pan into the main unit. Press down firmly and turn it clockwise until it locks into place.
- Attach Kneading Paddle: Insert the kneading paddle onto the shaft at the bottom of the bread pan.
- Add Ingredients: Follow your recipe carefully. Generally, liquids are added first, followed by dry ingredients, and finally yeast on top, ensuring it does not come into direct contact with liquids or salt initially.
Video: Demonstrates the process of setting up the bread maker and adding ingredients for baking.
This video shows how to place the bread pan, attach the kneading paddle, and add various ingredients into the bread maker, preparing it for the baking cycle.
5. Operating Instructions
- Select Menu: Press the MENU button repeatedly to cycle through the 29 available programs until your desired program number is displayed.
- Select Loaf Size: Press the WEIGHT button to choose your preferred loaf size (900g, 700g, or 500g).
- Select Crust Color: Press the DORAGE (Crust) button to select light, medium, or dark crust.
- Delay Timer (Optional): If you wish to delay the start of the baking process, use the TIMER+ and TIMER- buttons to set the desired delay time, up to 15 hours.
- Start Baking: Press the DÉMARRER (PAUSER) ARRÊTER (Start/Pause/Stop) button to begin the selected program. The bread maker will automatically mix, knead, rise, and bake.
- Keep Warm: After baking, the bread maker will automatically enter a 1-hour keep warm cycle.
- End of Cycle: The machine will beep when the cycle is complete. Use oven mitts to carefully remove the bread pan and then the bread.
Customizable Programs (Homemade)
The KITCHENARM bread maker allows you to create up to four personalized menus using the FAIT MAISON (Homemade) function. This feature enables you to specify the duration for each stage of the bread-making cycle (kneading, resting, rising, baking) and adjust fermentation/baking temperatures to match your unique recipes.

Image: Illustration of different bread loaf sizes (900g, 700g, 500g) and the compact bread pan.
The image shows how the compact bread pan can accommodate three different loaf weights, with estimated bread heights for ordinary white bread.
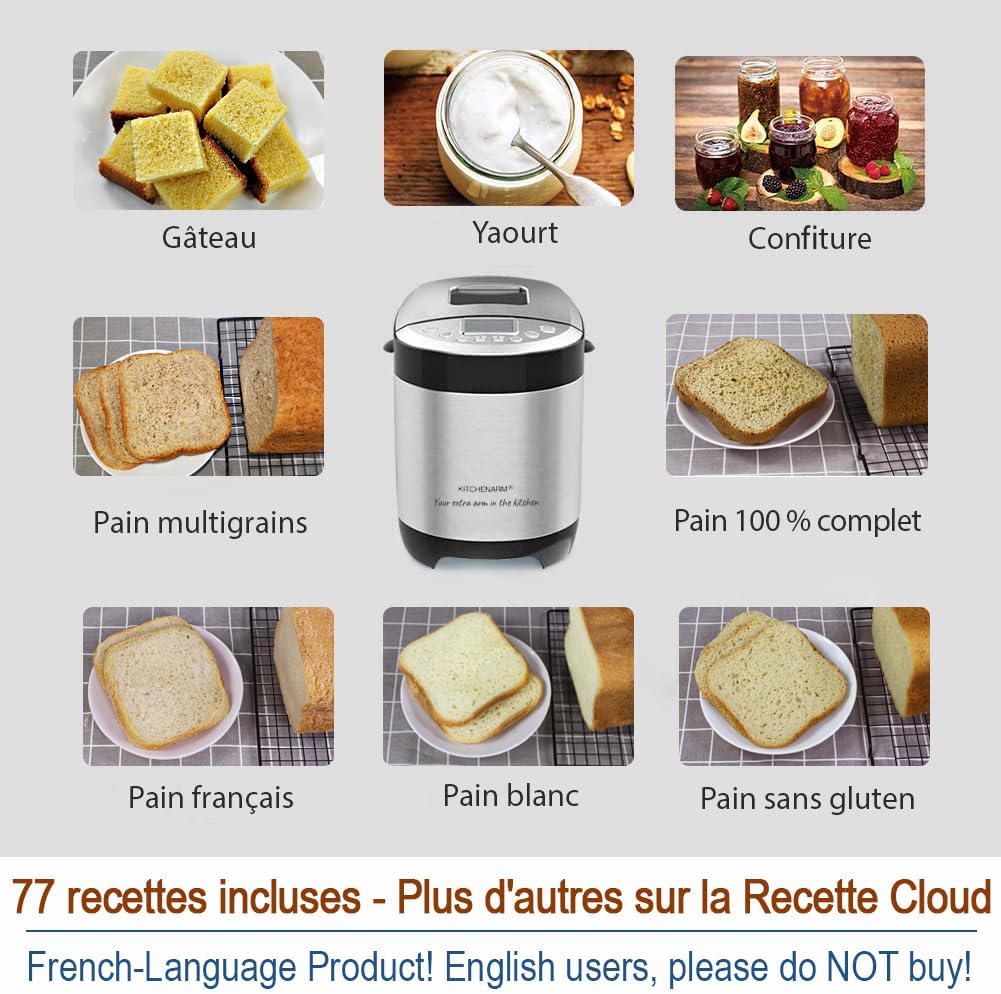
Image: Examples of various items that can be made with the bread maker, beyond just bread.
This visual highlights the versatility of the appliance, showcasing cakes, yogurt, jams, multigrain bread, whole wheat bread, French bread, white bread, and gluten-free bread.
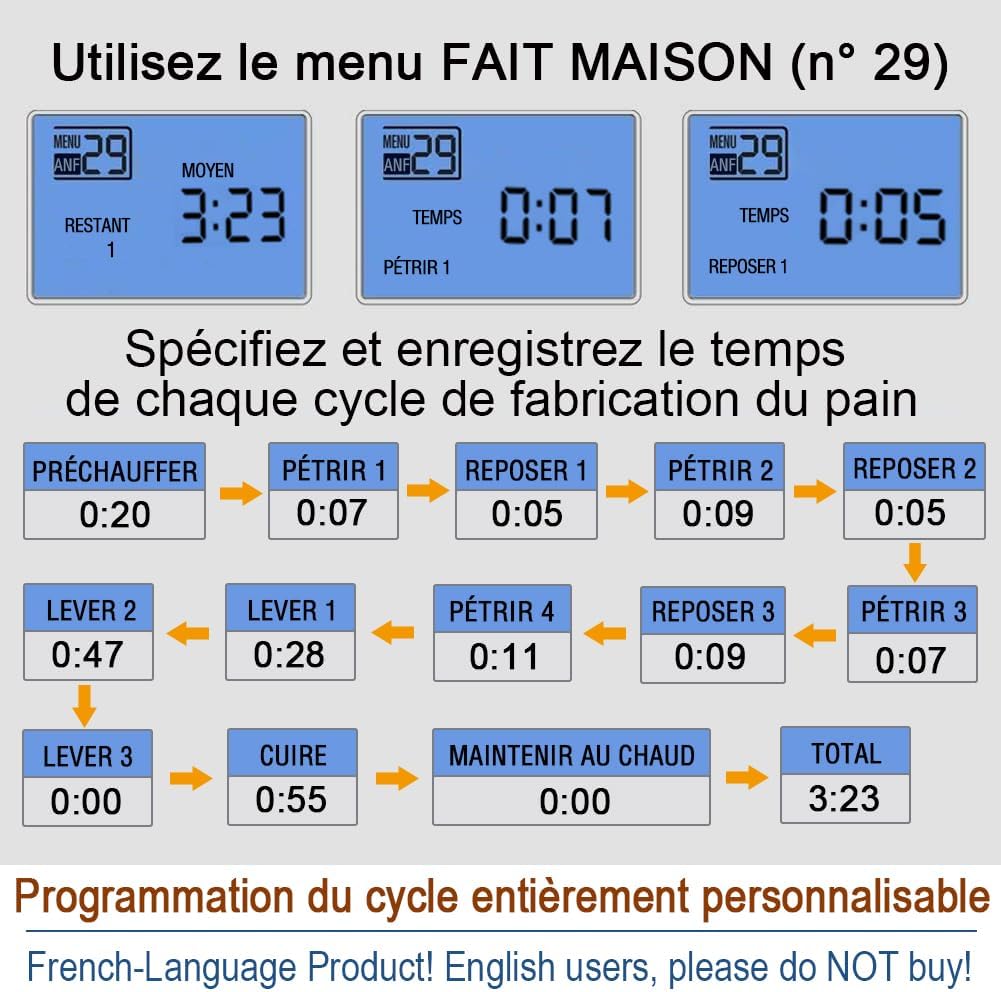
Image: Detailed diagram illustrating the customizable cycle programming for homemade menus.
The diagram shows how users can specify and save times for each stage of bread making: preheat, knead, rest, rise, bake, and keep warm, allowing for fully personalized recipes.
Video: Shows the user interface of a bread maker, demonstrating how to select menu options, loaf size, and crust color.
This video provides a visual guide to navigating the control panel, highlighting the various settings and options available for customizing your baking experience.
6. Maintenance and Cleaning
- Before Cleaning: Always unplug the bread maker from the power outlet and allow it to cool completely before cleaning any part.
- Exterior: Wipe the exterior of the main unit with a soft, damp cloth. Do not use abrasive cleaners or immerse the unit in water.
- Bread Pan and Kneading Paddles: Remove the bread pan and kneading paddles. Wash them with warm, soapy water using a soft sponge or cloth. Avoid using metal scouring pads or abrasive cleaning agents, as these can damage the non-stick coating. Rinse thoroughly and dry completely before reassembling or storing.
- Interior: Wipe the interior of the baking chamber with a damp cloth. Ensure no food debris is left behind.
- Storage: Store the clean and dry bread maker in a cool, dry place.
7. Troubleshooting
| Problem | Possible Cause | Solution |
|---|---|---|
| Bread does not rise | Expired or inactive yeast; incorrect water temperature; too much salt. | Check yeast expiration, use lukewarm water (105-115°F), reduce salt. |
| Bread is too dense | Too much flour; not enough liquid. | Measure ingredients precisely; ensure correct liquid-to-flour ratio. |
| Bread is too sticky/wet | Too much liquid; not enough flour. | Measure ingredients precisely; ensure correct liquid-to-flour ratio. |
| Machine does not start | Power not connected; lid not closed properly. | Check power plug; ensure lid is securely closed. |
| Kneading paddle stuck in bread | Common occurrence. | Use the provided metal hook to carefully remove the paddle after the bread has cooled slightly. |
8. Specifications
- Brand: KITCHENARM
- Model Number: 85203CAFR
- Color: Stainless Steel
- Product Dimensions: 36 x 22.6 x 30.5 cm (14.17 x 8.90 x 12.01 inches)
- Capacity: 900 Grams (2 LB)
- Power/Wattage: 550 watts
- Voltage: 120 Volts, 60 Hz
- Material: Stainless Steel
- Item Weight: 4.35 kg (9.59 lbs)
- Number of Programs: 29
- Certifications: ETL certified for US/Canadian markets
9. Warranty and Support
The KITCHENARM 29-in-1 Smart Bread Maker comes with a 2-year product warranty, ensuring peace of mind regarding manufacturing defects and performance issues.
We are committed to providing lifetime customer service. Should you have any questions, require assistance with recipes, or need help customizing your bread-making experience, please do not hesitate to contact our dedicated support team. Our services include access to cloud recipes and personalized recipe customization guidance.
For support, please refer to the contact information provided in your product packaging or visit the official KITCHENARM website.

