1. Introduction
This manual provides essential information for the installation, configuration, and operation of the GEPRC TAKER F722 45A 32Bit All-In-One (AIO) Flight Controller. Designed for FPV drone applications, this AIO board integrates a high-performance flight controller with a 45A Electronic Speed Controller (ESC) to simplify your build and enhance flight performance. Please read this manual thoroughly before use to ensure proper setup and safe operation.
2. Safety Information
Operating FPV drones and associated electronics requires careful attention to safety. Failure to follow these guidelines may result in damage to equipment, injury, or other hazards.
- Power Source: Always disconnect the battery before performing any installation, maintenance, or wiring changes.
- Soldering: Use appropriate soldering equipment and techniques. Ensure good ventilation and wear protective eyewear.
- Polarity: Double-check all power connections for correct polarity before applying power. Incorrect polarity will damage the board.
- Firmware: Ensure the correct firmware is flashed and configured for your specific drone setup.
- Environment: Keep the flight controller away from moisture, dust, and extreme temperatures.
- Propellers: Remove propellers from motors during testing and configuration to prevent accidental injury.
3. Product Overview
The GEPRC TAKER F722 45A 32Bit AIO is a compact and powerful solution for FPV drone builds, combining a robust F7 flight controller with a high-current 4-in-1 ESC. It features advanced components for stable and responsive flight control.
Key Features:
- High-speed STM32F722 MCU for responsive flight control.
- Precise ICM42688-P gyroscope for stable flight characteristics.
- Integrated 32-bit 45A ESC (55A burst) supporting Dshot600, Oneshot, Multishot protocols.
- Direct plug-in 6-pin port for HD video transmitters (VTX).
- Five full UART ports for connecting receivers, telemetry, GPS, and other peripherals.
- On-board 16Mb Blackbox flash memory for flight data logging.
- Betaflight OSD with AT7456E chip for on-screen display.
- Compatible with 2-6S LiPo batteries.
- Compact dimensions (35mm * 33.5mm) and lightweight (9.2g).
- 25.5mm * 25.5mm mounting hole size (M3 damping to M2 screw).
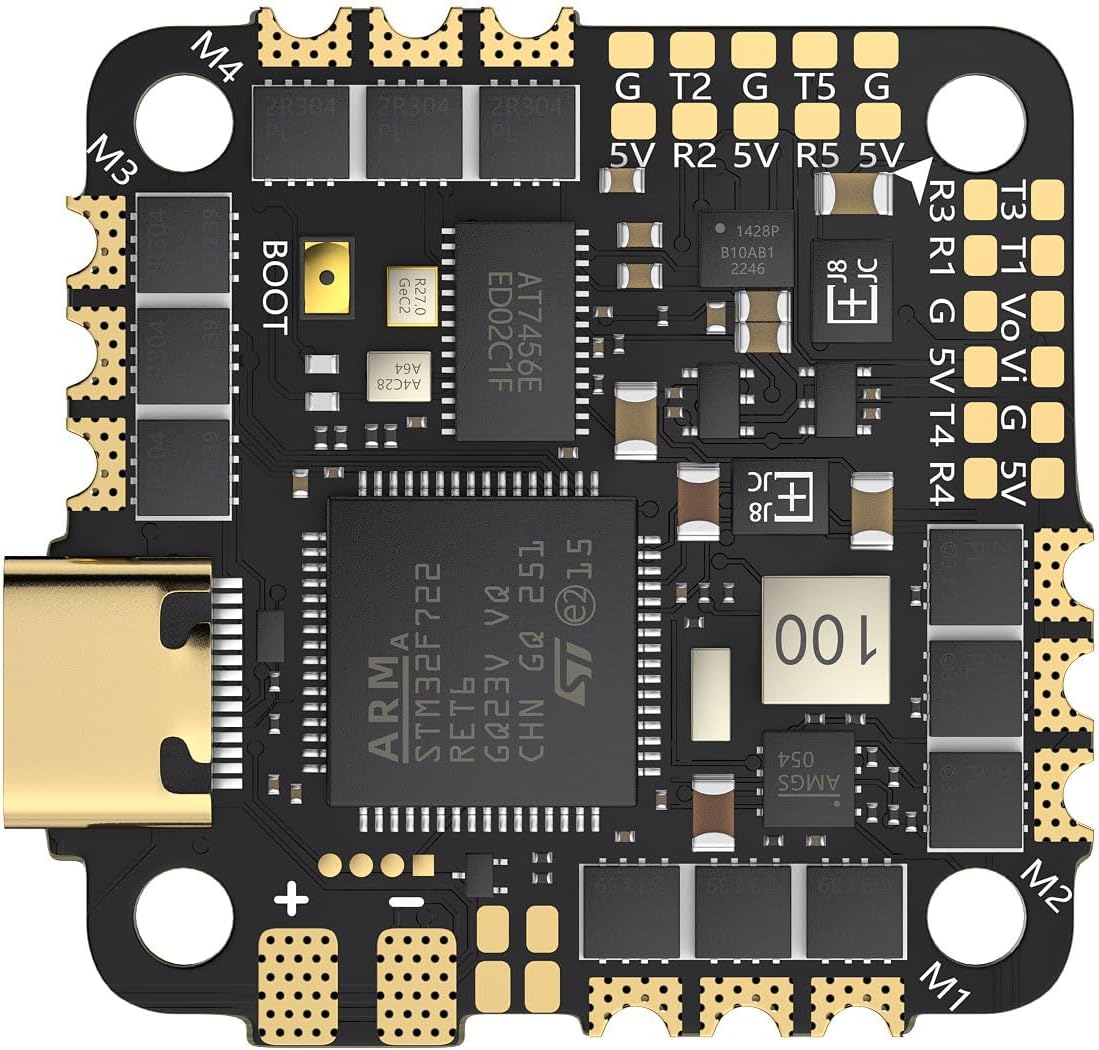
Figure 3.1: Top view of the GEPRC TAKER F722 45A 32Bit AIO Flight Controller, showing the STM32F722 MCU, ICM42688-P gyro, OSD chip, and various pads for connections.

Figure 3.2: Bottom view of the GEPRC TAKER F722 45A 32Bit AIO Flight Controller, illustrating the integrated 45A 32-bit ESC components.
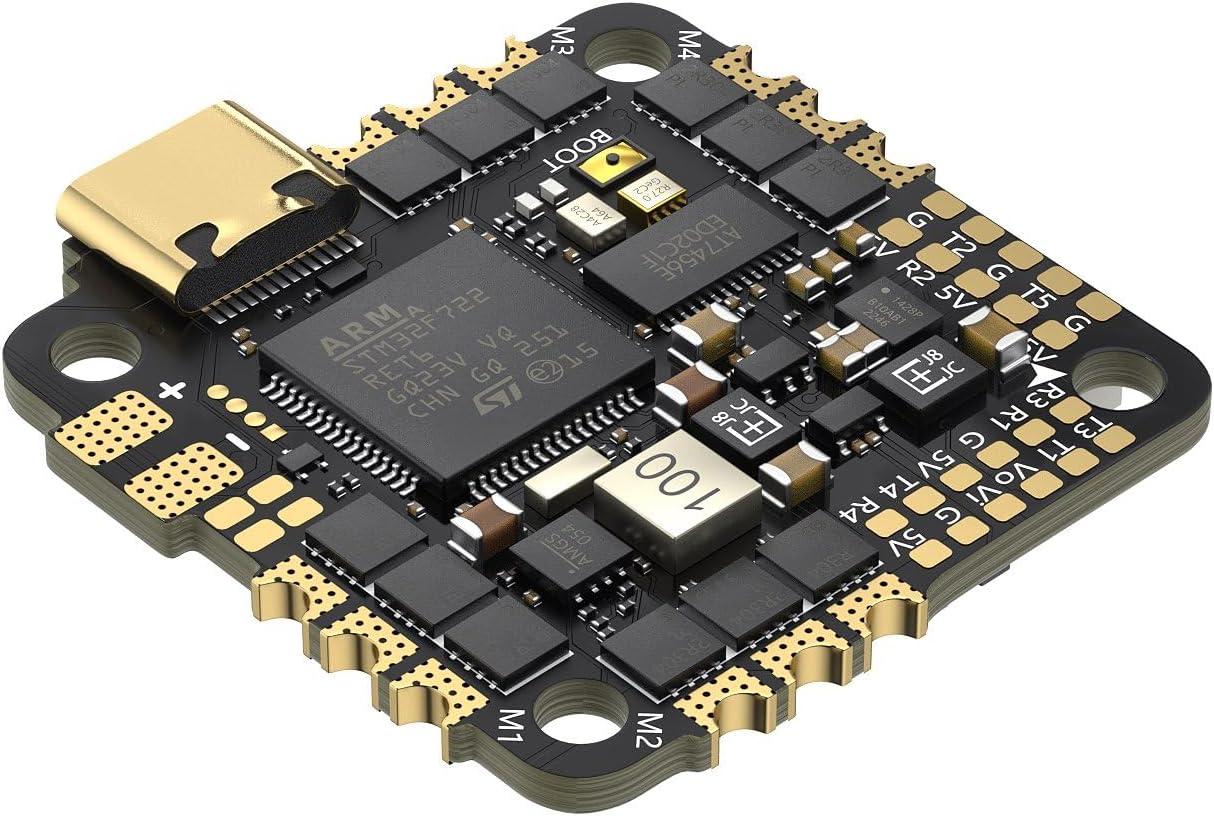
Figure 3.3: Angled view highlighting the Type-C USB port for configuration and firmware updates, along with various connection pads.
4. What's in the Box
Verify that all components are present upon unboxing:
- 1 × TAKER F722 45A AIO FC
- 1 × XT30-18AWG wire-7cm
- 1 × 35V 220μF capacitor
- 1 × SH1.0-6Pin to GH1.25-8Pin adapter cable
- 1 × SH1.0-6Pin cable
- 8 × M2×6.5mm FC dampening balls (black)
5. Setup and Installation
This section outlines the general steps for installing and wiring the AIO flight controller into your drone frame. Specific wiring diagrams may vary based on your frame and peripheral choices.
5.1 Mounting
- Mount the AIO board using the provided M2×6.5mm dampening balls. The mounting hole size is 25.5mm × 25.5mm.
- Ensure the board is oriented correctly according to your chosen flight controller firmware (e.g., Betaflight).
- Avoid overtightening screws to prevent damage to the board or components.
5.2 Wiring Connections
Carefully solder or connect your drone's components to the appropriate pads on the AIO board. Refer to the board's pinout diagram (not included in this manual, typically found on the manufacturer's product page or included with the physical product) for precise connections.
- Power Input: Connect the XT30 power lead to the main battery pads (VBAT and GND). Ensure correct polarity. Connect the 35V 220μF capacitor across the main battery pads to filter power spikes.
- Motors: Solder motor wires to the M1-M4 pads on the bottom of the board.
- Receiver: Connect your receiver (e.g., SBUS, CRSF, ELRS) to one of the available UARTs (R1 T1 / R2 T2 / R3 T3 / R4 T4 / R5 T5).
- Video Transmitter (VTX): Utilize the dedicated 6-pin port for direct plug-in HD VTX connections or solder to VTX pads if using an analog VTX.
- Camera: Connect your FPV camera to the VCC, GND, and Video In (Vo) pads.
- GPS/Other Peripherals: Connect other peripherals like GPS modules, buzzers, or LEDs to the remaining UARTs or dedicated pads as required.
5.3 Firmware Flashing and Configuration
The TAKER F722 AIO typically runs Betaflight firmware. For INAV compatibility, ensure the integrated barometer is supported by the INAV target.
- Connect to PC: Use a Type-C USB cable to connect the AIO board to your computer.
- Betaflight Configurator: Open the Betaflight Configurator software.
- Firmware Update: Select the correct firmware target (GEPRC_F722_AIO) and flash the latest stable firmware version.
- Initial Setup: Follow the Betaflight setup wizard to configure your receiver, ESC protocols (Dshot600 recommended), OSD, and other settings.
- Motor Direction: Verify motor direction in the Betaflight Motors tab (with propellers removed). Adjust using BLHeliSuite32 if necessary.
6. Operating Instructions
Once installed and configured, the GEPRC TAKER F722 AIO is ready for flight. Ensure all pre-flight checks are completed before arming your drone.
- Pre-Flight Checks: Verify battery voltage, control link, GPS lock (if applicable), and OSD functionality.
- Arming: Arm the drone using your configured switch on the remote controller.
- OSD Tuning: Use the Betaflight OSD menu to make real-time adjustments to PID tuning, rates, and other flight parameters.
- Blackbox Logging: The 16Mb on-board flash memory automatically logs flight data. This data can be downloaded via Betaflight Configurator for post-flight analysis and tuning.
- Buzzer/LED: Utilize the integrated buzzer for low voltage warnings or lost model locator, and control LEDs for visual feedback.
7. Maintenance
Regular maintenance helps ensure the longevity and reliable performance of your AIO flight controller.
- Cleaning: Periodically inspect the board for dust, debris, or solder splashes. Use a soft brush and isopropyl alcohol to gently clean the board if necessary.
- Physical Inspection: Check for any loose connections, damaged wires, or cracked components after crashes or hard landings.
- Firmware Updates: Keep your flight controller firmware updated to benefit from performance improvements and bug fixes.
- Storage: Store the drone and AIO board in a dry, cool environment when not in use.
8. Troubleshooting
This section provides general guidance for common issues. For specific problems, consult online communities or GEPRC support resources.
- No Power: Check battery connection, polarity, and ensure the XT30 connector is fully seated. Inspect for shorts.
- No Connection to Betaflight Configurator: Ensure correct USB cable is used (data cable, not charge-only). Try different USB ports. Install necessary drivers (e.g., ImpulseRC Driver Fixer).
- Motors Not Spinning: Verify motor wiring, ESC protocol in Betaflight, and motor direction. Check for continuity in motor wires.
- No Receiver Input: Check receiver wiring to UART, ensure correct UART is enabled in Betaflight, and verify receiver protocol (e.g., SBUS, CRSF) is selected.
- Unstable Flight: Review PID tuning, check for vibrations (soft mounting), and ensure propellers are balanced and undamaged. Analyze Blackbox logs for insights.
- OSD Issues: Check OSD settings in Betaflight. Ensure camera and VTX connections are secure.
9. Specifications
| Model | TAKER F722 45A 32Bit AIO |
| MCU | STM32F722 |
| IMU | ICM 42688-P (SPI) |
| Firmware Target | GEPRC_F722_AIO |
| Blackbox | 16Mb on-board flash memory |
| OSD | Betaflight OSD w/ AT7456E chip |
| UART | R1 T1 / R2 T2 / R3 T3 / R4 T4 / R5 T5 (5 full UARTs) |
| Buzzer | YES |
| LED | YES |
| USB | Type-C USB |
| BEC Output | 5V@1A |
| ESC | 32Bit 45A |
| Continuous Current | 45A |
| Burst Current | 55A (10s) |
| Input Voltage | 2~6S (LIPO) |
| ESC Protocol | Dshot600, Oneshot, Multishot |
| Dimension | 35mm * 33.5mm |
| Mounting Hole Size | 25.5mm * 25.5mm φM3 damping to M2 screw |
| Weight | 9.2g |
10. Warranty and Support
For warranty information, technical support, or further assistance, please refer to the official GEPRC website or contact their customer service directly. Keep your proof of purchase for warranty claims.