
Image: The HITBOX HBM200AZ 140A 4-in-1 welding machine, showcasing its compact design and front panel controls.
Introduction
This manual provides essential instructions for the safe and effective operation of your HITBOX HBM200AZ 140A 4-in-1 welding machine. This versatile unit supports MIG (Flux-Cored), MMA (ARC), and Lift TIG welding processes, and is compatible with a Spool Gun (not included). Please read this manual thoroughly before use to ensure proper setup, operation, and maintenance.
Safety Information
WARNING: Welding can be dangerous. Always follow safety precautions to prevent injury or death.
- Always wear appropriate personal protective equipment (PPE), including a welding helmet with proper shade, flame-resistant clothing, welding gloves, and safety shoes.
- Ensure adequate ventilation to avoid inhaling welding fumes.
- Protect bystanders from arc rays and hot metal.
- Never weld near flammable materials or in explosive atmospheres.
- Ensure the welding machine is properly grounded.
- Disconnect power before performing any maintenance or changing accessories.
- Do not touch electrically live parts.
Package Contents
Verify that all items listed below are included in your package:
- 1 × HITBOX HBM200AZ 230V Welding Machine
- 1 × Separated MIG Torch (2.5m)
- 1 × Electrode Holder (1.5m)
- 1 × Earth Clamp (1.5m)
- 1 × Brush
- 1 × MIG Nozzle
- 5 × Contact Tips (3x 0.8mm, 2x 1.0mm)
- 5 × 2.0mm Welding Rods
- 1 × User Manual
- (Note: Spool Gun and WP17V TIG torch are not included and require separate purchase for full functionality.)
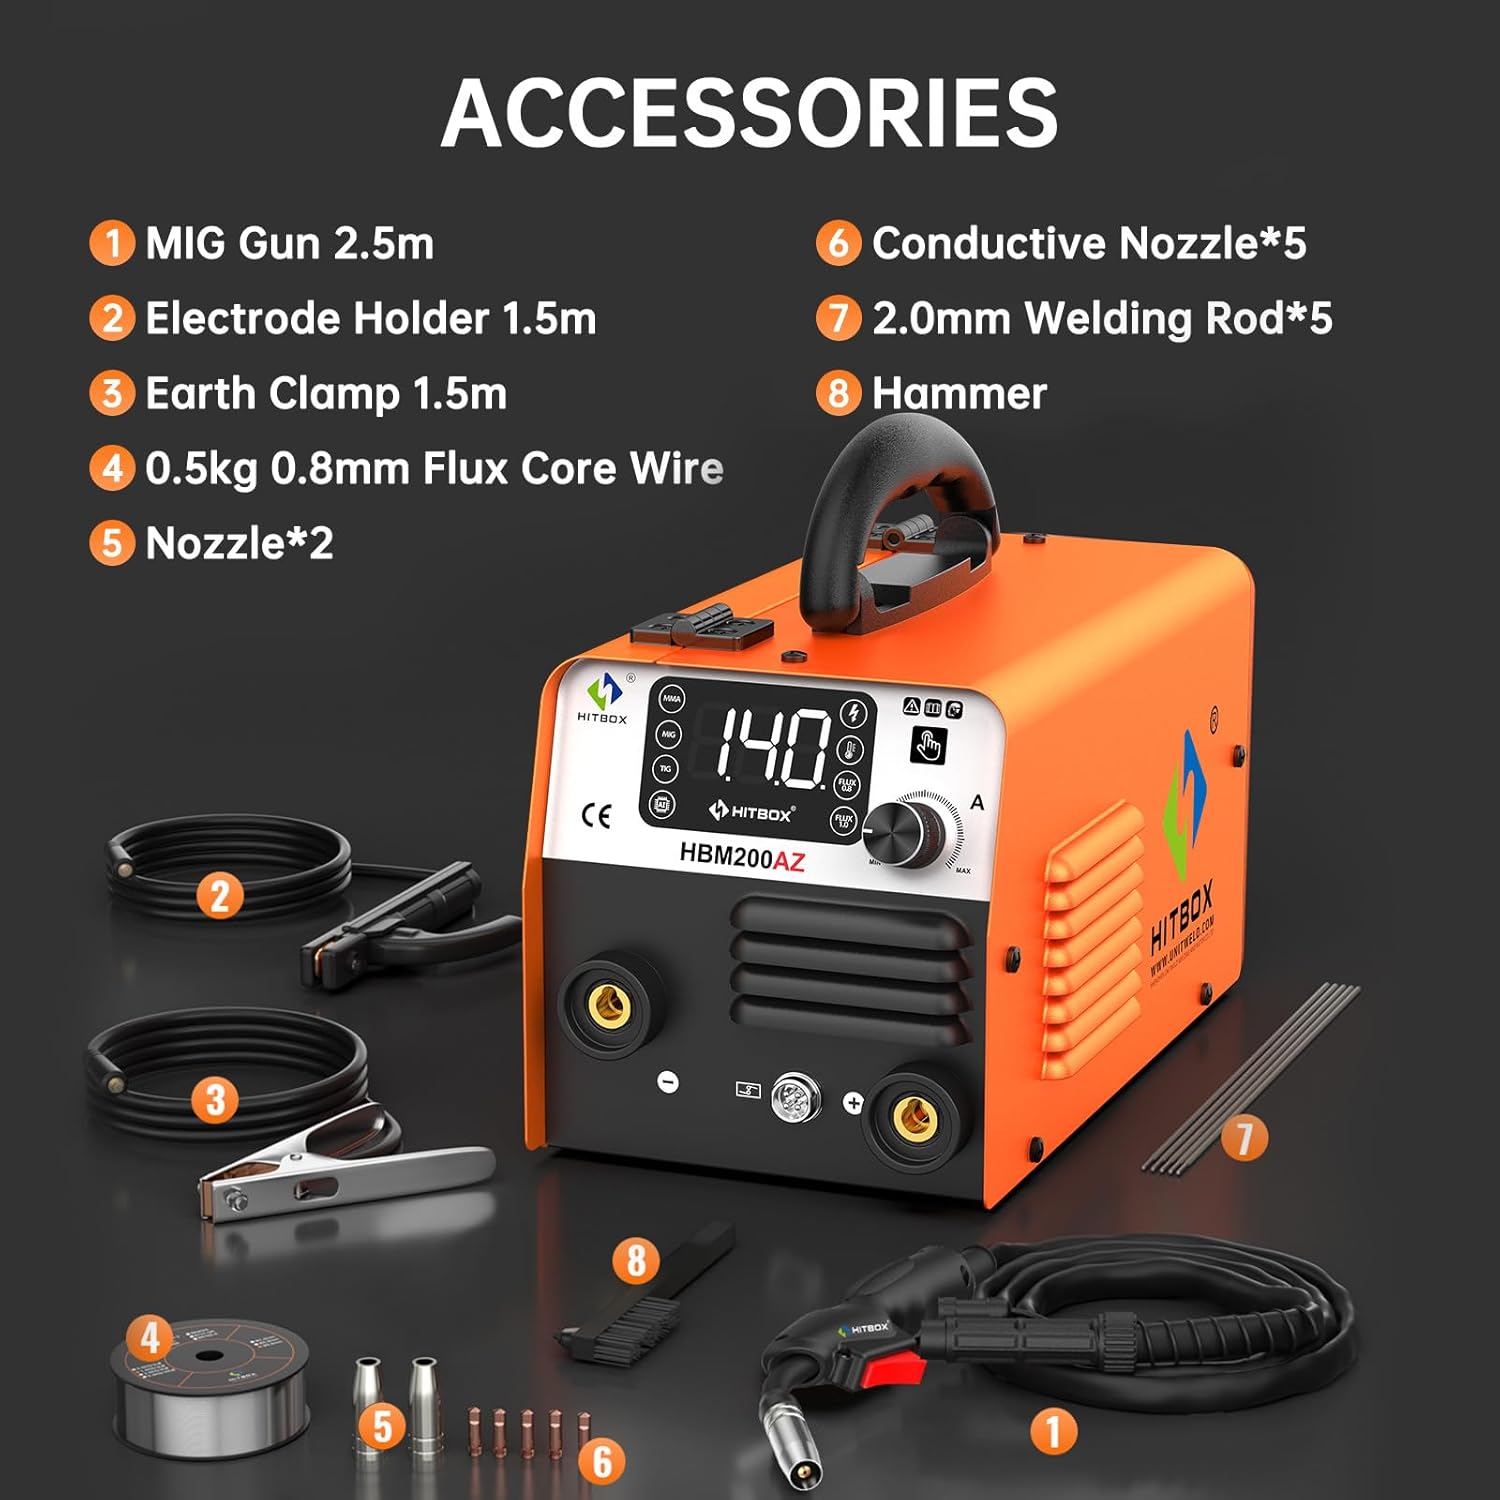
Image: Overview of the HITBOX HBM200AZ welding machine and its complete set of included accessories, such as the MIG torch, electrode holder, earth clamp, brush, contact tips, and welding rods.

Image: Detailed diagram illustrating the various components included in the package, such as the MIG gun, electrode holder, earth clamp, flux core wire, nozzles, contact tips, welding rods, and hammer.
Product Features
The HITBOX HBM200AZ welding machine is designed for versatility and ease of use, offering multiple welding processes in a compact form factor.
- 4-in-1 Welding Capability: Supports Flux-Cored MIG, MMA (Stick), Lift TIG, and is compatible with a Spool Gun for specialized applications.
- User-Friendly Interface: Features an intuitive LED display and single-knob control for easy adjustment of welding parameters. The SYN function automatically adjusts wire feed speed based on selected current and wire diameter.
- Compact and Portable: Weighing approximately 3.7 kg (8.1 lbs) and with dimensions of 28.4 × 15 × 15.4 cm, it is highly portable for various work environments.
- Safety and Durability: Equipped with multiple protection features including overcurrent, overvoltage, undervoltage, and overheating protection. An efficient cooling system and IP21 protection rating enhance reliability and lifespan.

Image: The HITBOX HBM200AZ welding machine highlighting its four primary welding modes: Flux MIG, MMA, Lift TIG, and Spool Gun compatibility.

Image: Visual representation of the four welding processes supported by the HITBOX HBM200AZ: Flux MIG, Stick (MMA), Lift TIG (WP17V torch not included), and Spool Gun compatibility.

Image: Close-up of the HITBOX HBM200AZ's control panel, featuring a digital display showing "140" amps and mode selection buttons for MMA, MIG, and TIG, emphasizing its user-friendly interface.

Image: Illustration of the synergic control feature for MIG welding, showing how to select wire size and adjust current, with automatic matching of wire feeding speed.

Image: The compact size and light weight (3.5kg) of the HITBOX HBM200AZ, shown next to a shoebox for scale, highlighting its portability.

Image: The HITBOX HBM200AZ welding machine placed in a car trunk, illustrating its compact design and ease of transport.

Image: An internal view of the HITBOX HBM200AZ, highlighting its high integration MCU and premium fan for safety and durability, including icons for overvoltage, overcurrent, overheating, and overload protection, plus IP21 rating.

Image: The HITBOX HBM200AZ welding machine displayed with icons representing its reliable and durable protection features: overvoltage, overcurrent, overheating, overload protection, and IP21 rating.

Image: A comparison highlighting the waterproof power switch of the HITBOX HBM200AZ, which prevents water and dust ingress, extends lifespan, and ensures stable operation in high temperatures, contrasted with a non-waterproof switch.
Setup
- Unpacking and Inspection: Carefully remove the welding machine and all accessories from the packaging. Inspect for any damage during transit.
- Power Connection: Connect the machine to a suitable 230V power supply. Ensure the power switch is in the OFF position before plugging in.
- Ground Clamp Connection: Attach the earth clamp securely to the workpiece or welding table. Ensure good electrical contact.
- MIG Torch / Electrode Holder Connection:
- For MIG welding, connect the MIG torch to the appropriate connector on the front panel.
- For MMA welding, connect the electrode holder to the positive (+) terminal and the earth clamp to the negative (-) terminal.
- For Lift TIG welding, connect the TIG torch (not included) to the negative (-) terminal and the earth clamp to the positive (+) terminal.
- Wire Installation (MIG/Flux-Cored):
- Open the wire feed compartment.
- Place the wire spool onto the spindle, ensuring it rotates freely.
- Feed the wire through the guide tube and into the drive roller mechanism.
- Close the drive roller tension arm and adjust tension as needed (not too tight, not too loose).
- Remove the nozzle and contact tip from the MIG torch.
- Press the torch trigger to feed the wire through the torch liner until it emerges from the torch head.
- Reinstall the contact tip and nozzle.

Image: Illustration of the smooth wire feeding mechanism, showing the wire spool, drive rollers, and the path of the flux core wire into the MIG gun. It also indicates the shell switch for MIG/Spool Gun mode and screw adjustment.

Image: Diagram demonstrating the correct installation of flux core wire (0.8mm and 1.0mm) onto the spool holder within the welding machine.

Image: Exploded view of the HITBOX MIG torch head, showing the nozzle, electrode (contact tip), and their assembly. Instructions for removing and installing these parts during wire feeding are also provided.
Operating Instructions
The HITBOX HBM200AZ offers multiple welding modes. Select the appropriate mode and adjust parameters according to the material thickness and welding process.
1. Flux-Cored MIG Welding (No Gas)
- Ensure the flux-cored wire is correctly installed.
- Turn on the machine.
- Press the "MIG" button on the control panel.
- Select the wire diameter (0.8mm or 1.0mm) using the dedicated buttons.
- Adjust the welding current (30-140A) using the main control knob. The machine's SYN function will automatically set the wire feed speed.
- Begin welding, maintaining a consistent arc length and travel speed.
2. MMA (Stick) Welding
- Connect the electrode holder to the positive (+) terminal and the earth clamp to the negative (-) terminal.
- Insert a suitable electrode (e.g., 2.0mm) into the electrode holder.
- Turn on the machine.
- Press the "MMA" button on the control panel.
- Adjust the welding current (30-140A) using the main control knob according to the electrode type and material thickness.
- Strike the arc by lightly tapping or scratching the electrode against the workpiece.
3. Lift TIG Welding
Note: A WP17V TIG torch and shielding gas (99.9% Argon) are required and not included with this machine.
- Connect the TIG torch to the negative (-) terminal and the earth clamp to the positive (+) terminal.
- Ensure a tungsten electrode is correctly installed in the TIG torch.
- Connect the argon gas cylinder to the TIG torch (if applicable for your torch setup).
- Turn on the machine.
- Press the "TIG" button on the control panel.
- Adjust the welding current (30-140A) using the main control knob.
- To initiate the arc, gently touch the tungsten electrode to the workpiece and then lift it slightly (Lift TIG).
Welding Parameter Guide
Refer to the table below for recommended welding parameters based on material thickness and welding mode. These are general guidelines and may require fine-tuning based on specific conditions and operator skill.

Image: A detailed chart providing recommended current settings (Amps) for Flux Core MIG, MMA, and Lift TIG welding modes across various material thicknesses (0.6mm to 4.0mm) and wire/electrode diameters.

Image: An example of a consistent weld bead, demonstrating the quality welding performance achievable with the machine.

Image: Visual examples of various materials that can be welded with the HITBOX HBM200AZ, including mild steel, cast iron, square pipe, stainless steel, sheet metal, and metal cages.
Maintenance
Regular maintenance ensures the longevity and optimal performance of your welding machine.
- Cleaning: Periodically clean the machine's exterior with a dry, soft cloth. Use compressed air to blow out dust from the cooling vents. Ensure the machine is unplugged before cleaning.
- Cable and Connection Inspection: Regularly inspect all cables, connections, and the torch for wear, damage, or loose connections. Replace damaged parts immediately.
- Wire Feed Mechanism: Clean the drive rollers and wire guide regularly to prevent blockages and ensure smooth wire feeding. Check for proper tension.
- Contact Tips and Nozzles: Replace worn contact tips and clogged nozzles as needed to maintain arc stability and weld quality.
- Storage: Store the welding machine in a clean, dry environment, away from dust and moisture, when not in use.
Troubleshooting
This section addresses common issues you might encounter. For problems not listed here, contact customer support.
| Problem | Possible Cause | Solution |
|---|---|---|
| No power to the machine | Power cord unplugged, circuit breaker tripped, faulty power switch. | Check power cord connection, reset circuit breaker, ensure power switch is ON. |
| No arc / Weak arc | Poor ground connection, incorrect current setting, worn contact tip/electrode, wrong welding mode. | Ensure ground clamp is secure, adjust current, replace contact tip/electrode, select correct welding mode. |
| Wire not feeding (MIG) | Wire tangled, drive rollers too loose/tight, clogged liner, worn contact tip. | Check wire spool, adjust drive roller tension, clean/replace liner, replace contact tip. |
| Machine overheats and shuts down | Exceeded duty cycle, blocked ventilation, high ambient temperature. | Allow machine to cool down, ensure clear ventilation, operate in a cooler environment. |
| Poor weld quality (porosity, spatter) | Incorrect parameters, dirty workpiece, improper technique, worn consumables. | Adjust current/voltage, clean workpiece, refine welding technique, replace contact tip/nozzle. |
Specifications
| Feature | Detail |
|---|---|
| Model | HBM200AZ |
| Input Voltage | 230 Volts |
| Welding Current Range | 30-140A |
| Welding Processes | MIG (Flux-Cored), MMA (ARC), Lift TIG, Spool Gun Compatible |
| Dimensions (L×W×H) | 28.4 × 15 × 15.4 cm (11.22 × 5.91 × 6.1 inches) |
| Weight | 3.7 kg (8.1 lbs) |
| Protection Class | IP21 |
| Power Type | DC |
| Manufacturer Reference | H1032037 |
Warranty and Support
For warranty information, technical assistance, or customer service inquiries, please contact HITBOX customer support. Refer to the product packaging or the official HITBOX website for the most current contact details.


