
PATON ProMIG-350-15-4-400V
PATON ProMIG-350-15-4-400V WK 3-in-1 Welding Machine User Manual
1. Introduction
1.1. Product Overview
The PATON ProMIG-350 is a professional-grade 3-in-1 industrial welding machine designed for MIG/MAG, MMA, and TIG DC welding processes. This unit delivers a robust 350A output at a 70% duty cycle, suitable for continuous operation on various materials. Key features include a 4-roller wire feeder for stable wire movement, gasless welding capability, pulse mode for enhanced arc control, and adjustable inductance. It is engineered for industrial applications, offering versatility and durability.
2. Safety Instructions
2.1. General Safety Precautions
Always prioritize safety when operating welding equipment. Failure to follow these instructions can result in serious injury or death.
- Electric Shock: Welding current can kill. Ensure proper grounding. Do not touch live electrical parts. Wear dry welding gloves and protective clothing.
- Fumes and Gases: Welding produces fumes and gases that can be hazardous to health. Work in a well-ventilated area. Use local exhaust ventilation or respirators if necessary.
- Arc Rays: Arc rays can burn eyes and skin. Wear a welding helmet with appropriate shade filter. Protect others in the vicinity with welding screens.
- Fire and Explosion: Welding sparks and hot metal can cause fires. Keep flammable materials away from the welding area. Have a fire extinguisher readily available.
- Burns: Hot metal and slag can cause severe burns. Wear protective clothing, including long sleeves, pants, and safety shoes.
- Noise: Some welding operations can produce high noise levels. Wear hearing protection.
- Work Area: Keep the work area clean and free of clutter. Ensure adequate lighting.
3. Package Contents
Verify that all items listed below are present in your package:
- PATON ProMIG-350 Welding Machine with 4-roller wire feeder and trolley
- Ground clamp with 35 mm² / 3m welding cable
- 35 mm² welding cable, 3 meters long, equipped with an ABICOR BINZEL™ earth clamp
- Cooling unit Cooler-7-400V
- Quick release gas connector
- Roller set for 4 diameters of solid wire
- Roller sets for 2 diameters of aluminum wire
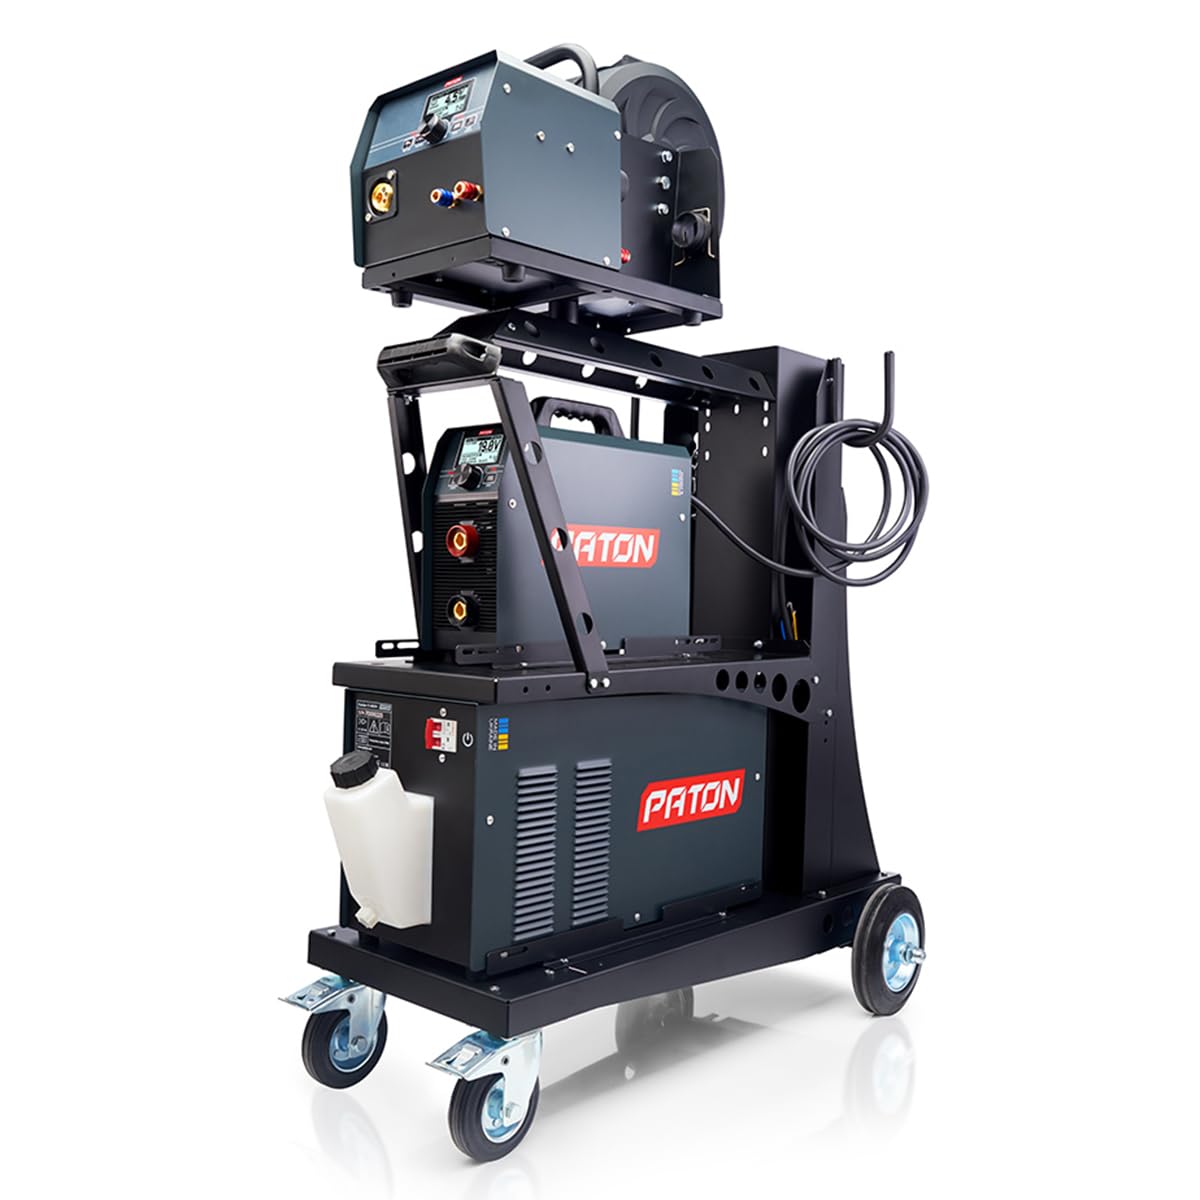
Figure 1: PATON ProMIG-350-15-4-400V WK Welding Machine with included trolley and wire feeder.
4. Setup
4.1. Unpacking and Placement
- Carefully unpack all components from the shipping container.
- Place the welding machine on a stable, level surface. The included trolley facilitates mobility.
- Ensure adequate clearance around the machine for ventilation and operation.
4.2. Electrical Connection
The ProMIG-350 operates on a 400V supply voltage.
- Connect the power cord to a suitable 400V power outlet. Ensure the outlet is properly grounded and rated for the machine's maximum operating current (450 A).
- Verify that the main power switch on the machine is in the "OFF" position before connecting to power.
4.3. Wire Feeder Setup (MIG/MAG)
The machine features a 4-roller wire feeder for precise wire delivery.
- Open the wire feeder compartment.
- Mount the wire spool (5kg, 15kg, or 18kg) onto the spool holder. Ensure the wire unwinds smoothly.
- Thread the welding wire through the guide tube and between the feed rollers. Select the appropriate roller set for your wire diameter (0.6-1.2 mm).
- Adjust the tension on the feed rollers to prevent slipping or crushing of the wire.
- Connect the MIG/MAG torch to the EURO connector on the wire feeder.

Figure 2: Wire feeder compartment with spool and rollers visible.
4.4. Gas Connection (MIG/MAG, TIG DC)
For gas-shielded welding processes:
- Connect the gas hose from your shielding gas cylinder (e.g., Argon, CO2, or Argon/CO2 mix) to the quick-release gas connector on the machine.
- Ensure the gas cylinder is secured and the regulator is properly installed.
- Set the gas flow rate according to your welding process and material requirements.
4.5. Workpiece Connection
Connect the ground clamp to the workpiece. Ensure a clean, secure electrical connection to facilitate proper current flow.
5. Operating Modes
The PATON ProMIG-350 supports three primary welding processes: MIG/MAG, MMA, and TIG DC.
5.1. MIG/MAG Welding (Gas Metal Arc Welding)
This mode is suitable for welding various metals using a continuously fed wire electrode.
- Select Mode: On the control panel, select the MIG/MAG welding mode.
- Wire Feed Speed: Adjust the wire feed speed (2.0–16 m/min) according to the wire diameter and desired welding current.
- Welding Voltage: Set the welding voltage (12–30 V) to achieve the desired arc characteristics.
- Inductance Adjustment: Utilize the 3-stage inductance adjustment to fine-tune arc stability and bead profile.
- Gasless Function: For welding with self-shielded flux-cored wire, ensure the gas supply is off and select the appropriate polarity if required by the wire manufacturer.
- Pulse Welding: The pulse function can be activated for improved arc control, reduced heat input, and better weld quality, especially on thinner materials or when welding out-of-position.
5.2. MMA Welding (Manual Metal Arc Welding / Stick Welding)
This mode uses a consumable electrode coated with flux.
- Select Mode: Switch the machine to MMA welding mode.
- Electrode Holder: Connect the electrode holder to the appropriate terminal (usually positive for most electrodes).
- Welding Current: Adjust the welding current (16–350 A) based on the electrode type and diameter.
- Pulse Welding: Pulse MMA can be used for specific applications requiring better heat control.
5.3. TIG DC Welding (Tungsten Inert Gas Welding - Direct Current)
This mode provides precise welding for various metals, typically using a non-consumable tungsten electrode and separate filler rod.
- Select Mode: Choose TIG DC welding mode.
- TIG Torch: Connect a TIG torch (not included as standard, typically) to the machine.
- Welding Current: Set the desired welding current (16–350 A).
- Gas Flow: Ensure proper Argon gas flow for shielding.
- Pulse Welding: TIG Pulse mode offers enhanced control over the weld puddle and heat input, beneficial for thin materials and critical applications.
6. Maintenance
Regular maintenance ensures optimal performance and extends the lifespan of your welding machine.
- Cleaning: Periodically clean the machine's exterior with a dry, soft cloth. Use compressed air to blow out dust and debris from ventilation openings. Ensure the machine is disconnected from power before cleaning.
- Wire Feeder: Inspect the wire feed rollers for wear and cleanliness. Clean any debris from the wire guide tubes.
- Cables and Connections: Check all welding cables, power cords, and gas hoses for damage, fraying, or loose connections. Replace damaged components immediately.
- Cooling Unit: If using the Cooler-7-400V, regularly check the coolant level and ensure the unit is functioning correctly.
- Storage: Store the machine in a clean, dry environment when not in use.
7. Troubleshooting
This section addresses common issues you might encounter. For problems not listed here, contact customer support.
| Problem | Possible Cause | Solution |
|---|---|---|
| No power to machine | Power cord unplugged, circuit breaker tripped, machine switch off | Check power connection, reset breaker, turn machine on |
| No arc / Weak arc | Poor ground connection, incorrect settings, worn consumables, wrong polarity | Ensure clean ground connection, verify settings (current, voltage), replace consumables, check polarity |
| Wire feeding issues (MIG) | Incorrect roller tension, wrong roller size, clogged liner, tangled wire spool | Adjust roller tension, use correct rollers, clean/replace liner, untangle wire |
| Porosity in weld | Insufficient gas shielding, contaminated workpiece, incorrect gas flow | Check gas supply/flow, clean workpiece, ensure no drafts |
| Machine overheats | Exceeding duty cycle, blocked ventilation | Allow machine to cool, ensure clear ventilation paths, operate within duty cycle limits |
8. Technical Specifications
| Parameter | Value |
|---|---|
| Model | ProMIG-350-15-4-400V WK |
| Part Number | 1254035015 |
| Supply Voltage | 400 V |
| Rated Welding Current | 350 A |
| Maximum Operating Current | 450 A |
| Duty Cycle (MMA) | 70% at 350 A, 100% at 290 A |
| Welding Current Adjustment Range | 16–350 A |
| Welding Voltage Adjustment Range | 12–30 V |
| Wire Feed Speed | 2.0–16 m/min |
| Number of Pressure Rollers | 4 |
| Compatible Wire Diameter | 0.6–1.2 mm |
| Maximum Spool Weight | 18 kg |
| Item Weight | 23.5 kg |
| Item Dimensions (L x W x H) | 540 x 360 x 400 mm |
| Material | Steel |
| Power Source | AC |
| Included Components | As listed in Section 3 |
9. Warranty and Support
9.1. Manufacturer's Warranty
The PATON ProMIG-350-15-4-400V WK welding machine comes with a 3-year manufacturer's warranty. This warranty covers defects in materials and workmanship under normal use and service. Please retain your proof of purchase for warranty claims.
9.2. Customer Support
For technical assistance, warranty claims, or service inquiries, please contact PATON customer support. Refer to the official PATON website or your purchase documentation for contact details.
You can visit the official PATON Store for more information: PATON Store on Amazon.
Related documentsProMIG-350-15-4-400V


Ask a question about this manual
Ask about setup, troubleshooting, compatibility, parts, safety, or missing instructions. Manuals+ will review the question and use this page’s manual context to help answer it.