
1. Introduction
This manual provides essential instructions for the safe and effective operation, setup, and maintenance of your AZZUNO MIG-200L Multi-Process Welder and AZNH-1098 Auto-Darkening Welding Helmet. Please read this manual thoroughly before using the equipment to ensure proper function and personal safety.
The AZZUNO MIG-200L is a versatile 8-in-1 welding machine capable of performing Flux Core MIG, Gas MIG, Gas MAG, Aluminum MIG, Spot MIG, Lift TIG, Stick Welding, and is compatible with a Spool Gun. It operates on both 110V and 220V power supplies.
The AZNH-1098 Auto-Darkening Welding Helmet features a large true-color viewing area and side lenses, designed to provide clear visibility and protection during welding operations.
2. Safety Information
Welding and cutting operations can be hazardous. It is crucial to follow all safety precautions to prevent injury or damage. Always wear appropriate personal protective equipment (PPE) including the welding helmet, gloves, and protective clothing.
- Ensure proper ventilation to avoid inhaling welding fumes.
- Protect eyes and skin from arc rays and sparks.
- Prevent electric shock by ensuring proper grounding and inspecting cables for damage.
- Keep flammable materials away from the welding area.
- Always disconnect power before performing maintenance or changing accessories.
3. Product Overview
3.1 AZZUNO MIG-200L Welder
The MIG-200L features a large LED display for easy parameter adjustment and monitoring. It supports 8 welding modes and offers various control functions for precise welding.
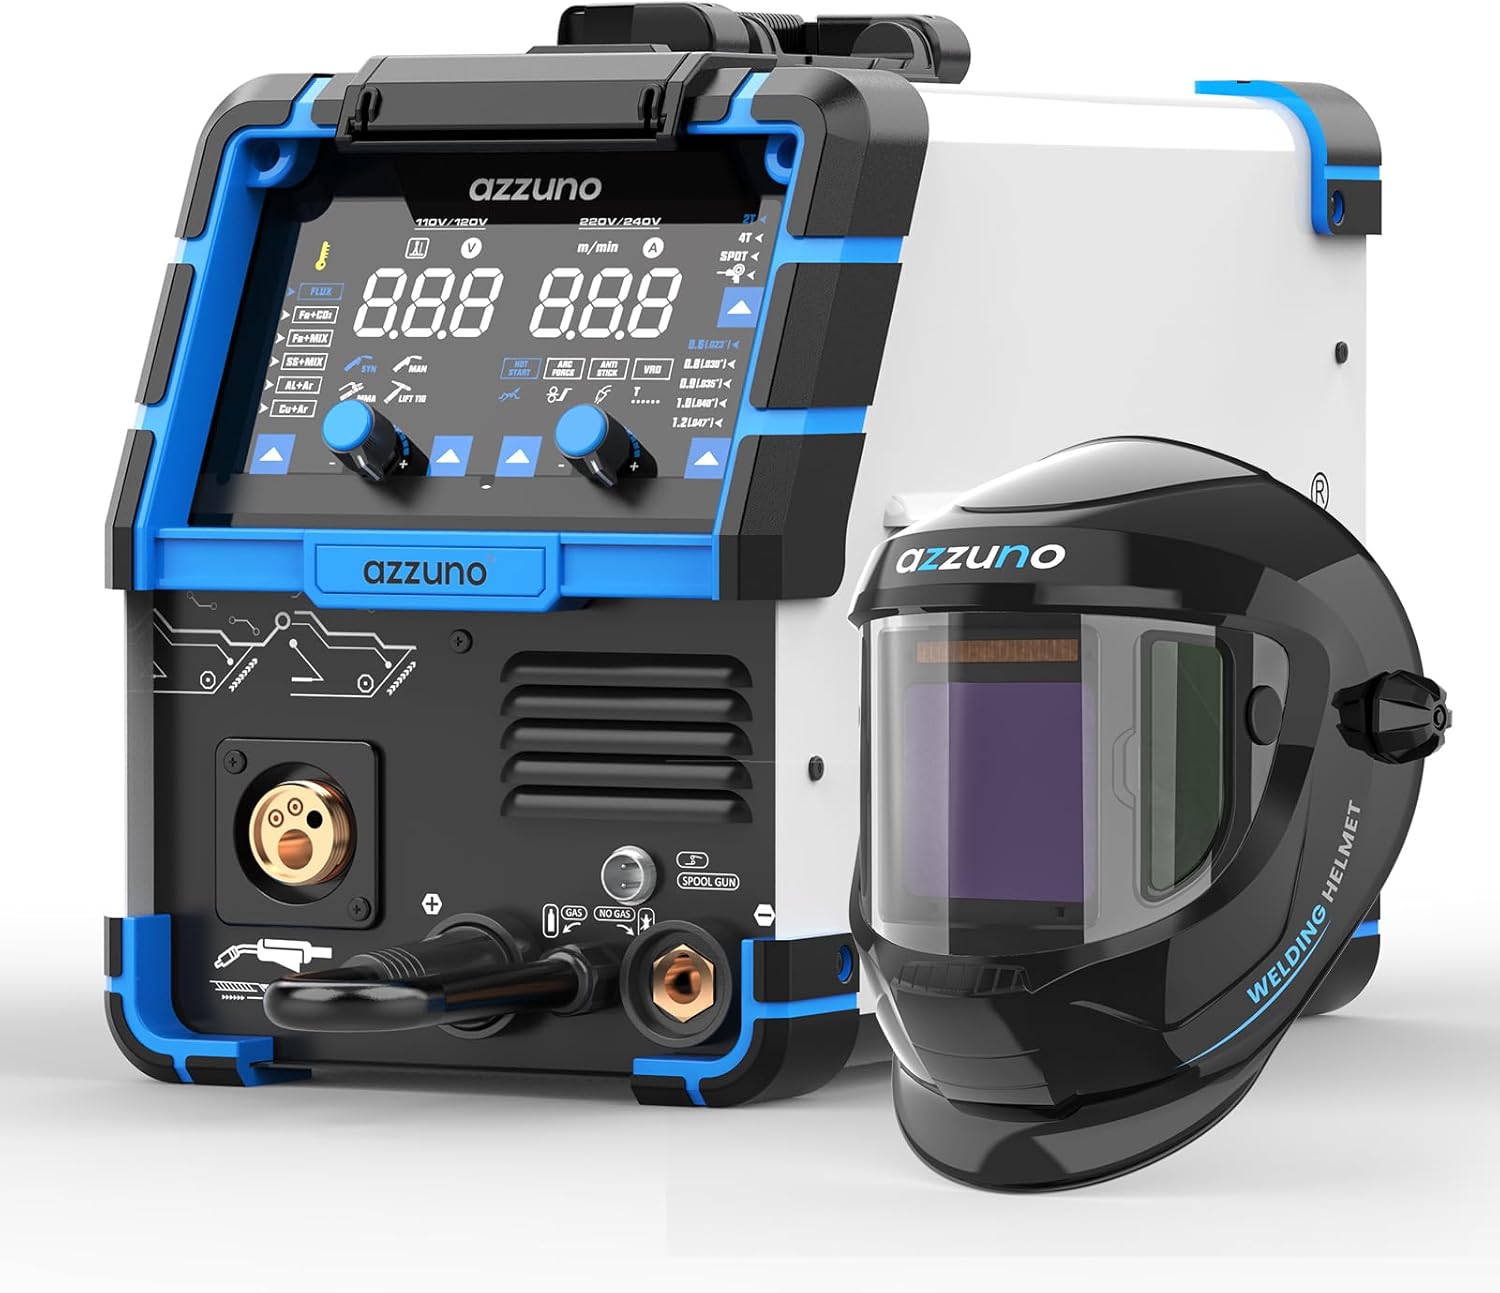
Image 3.1.1: AZZUNO MIG-200L Welder and AZNH-1098 Welding Helmet.

Image 3.1.2: Overview of the 8 welding processes supported by the MIG-200L.
Key Features:
- Large LED Display: Provides clear visibility of welding parameters.
- 8 Welding Modes: Flux Core MIG, Gas MIG, Gas MAG, Aluminum MIG, Spot MIG, Lift TIG, Stick Welding, and Spool Gun compatibility.
- Versatile Material Welding: Supports aluminum welding (with Teflon conduit or spool gun) and copper welding.
- Control Functions: Manual (MAN), Synergic (SYN), 2T (Two-touch), 4T (Four-touch), and Spot welding.
- Wide Wire Compatibility: Accommodates 1 lb to 10 lbs wire spools and various wire diameters including solid, flux core, ER5356 aluminum, and CuSi wires.

Image 3.1.3: Detailed view of the user-friendly large LED control panel on the MIG-200L welder.
3.2 AZNH-1098 Auto-Darkening Welding Helmet
The AZNH-1098 helmet is designed for optimal visibility and protection, featuring true color technology and a wide field of view.
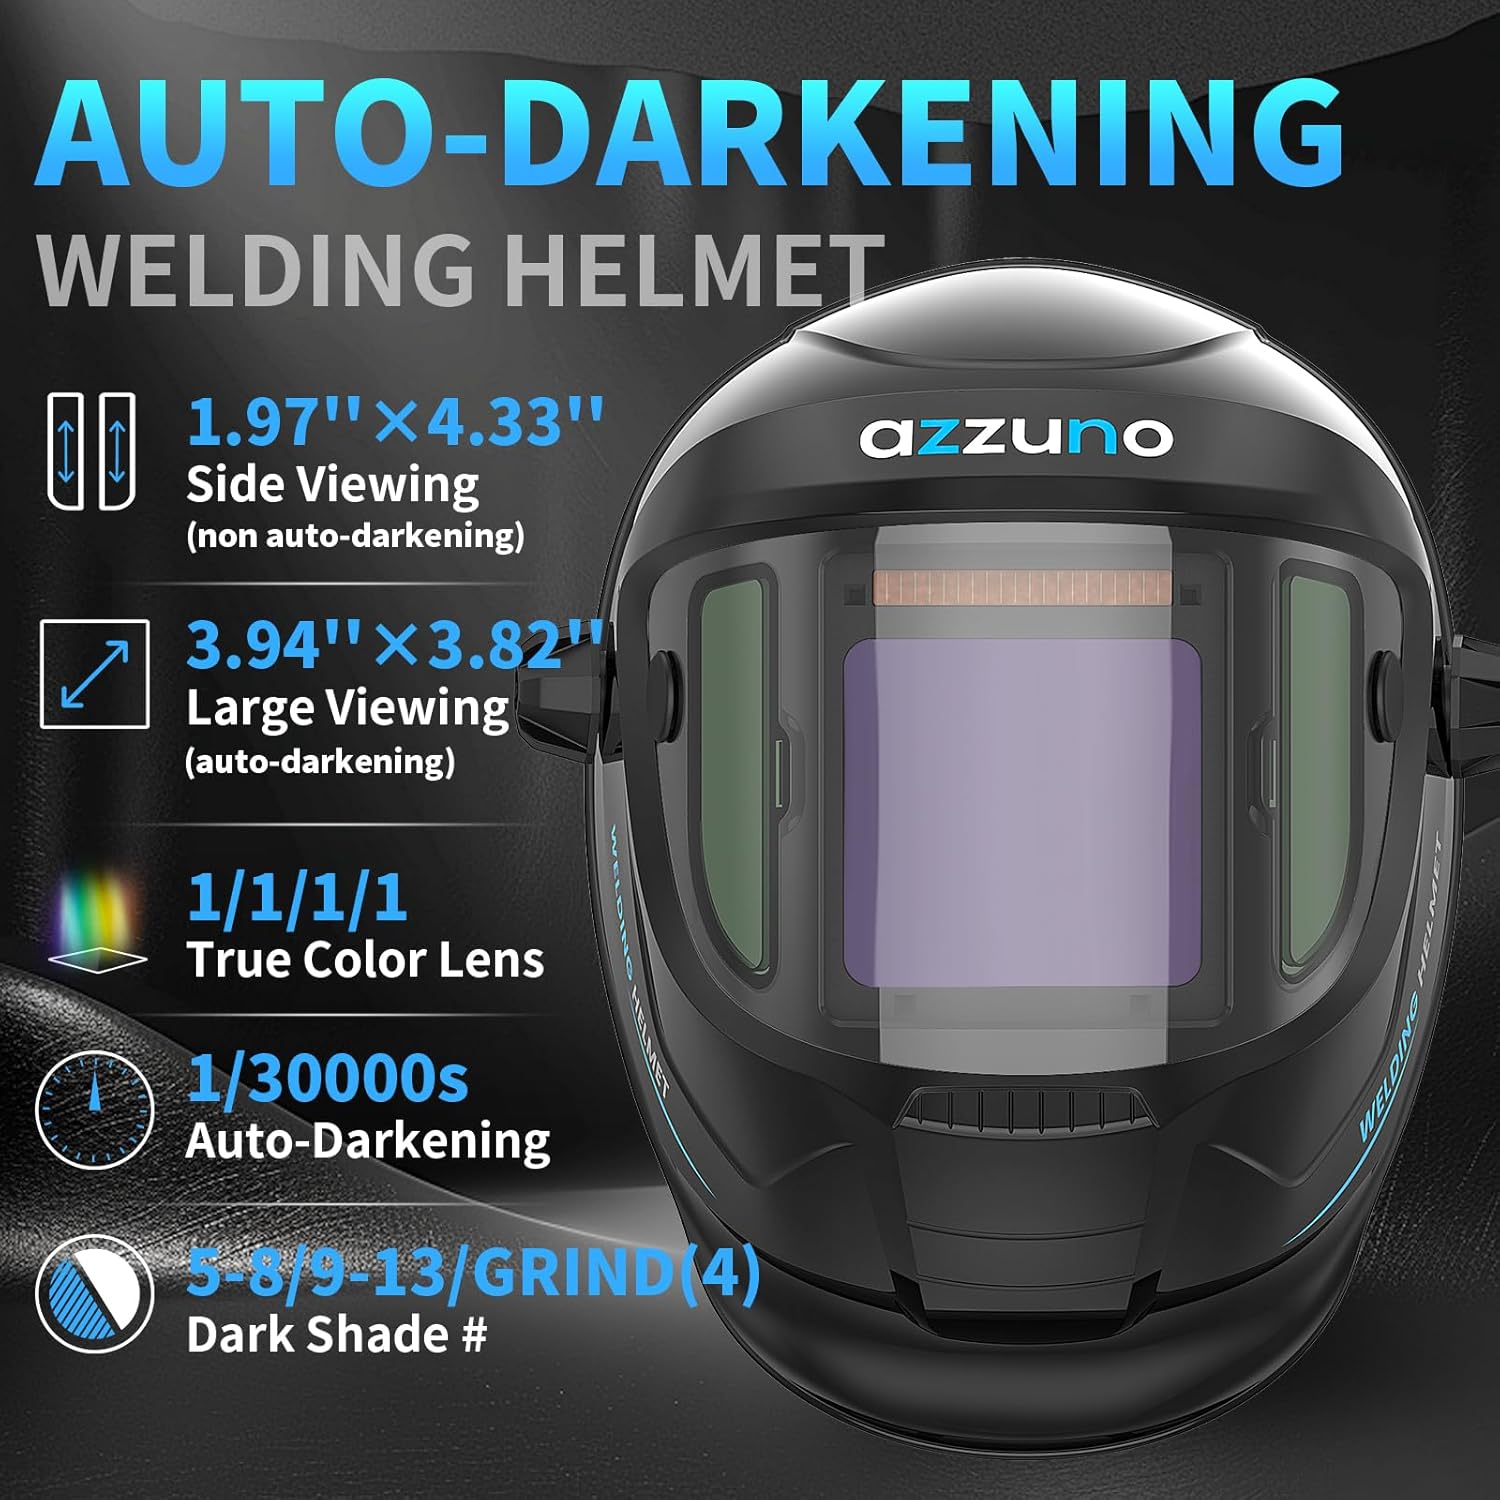
Image 3.2.1: Key features of the AZNH-1098 Auto-Darkening Welding Helmet.
Key Features:
- Main Lens: 3.94" × 3.82" auto-darkening true color lens with 1/1/1/1 optical clarity.
- Side Lenses: Two 1.97" × 3.82" non-auto-darkening side lenses (DIN5).
- Fast Auto-Darkening: Reacts in 1/30000 seconds.
- Adjustable Shade: Dark shade range of 5-8/9-13, with a Grind mode at shade 4.
- User Controls: Sensitivity, Shade, and Delay adjustments, along with a Test button and Low Battery Reminder.
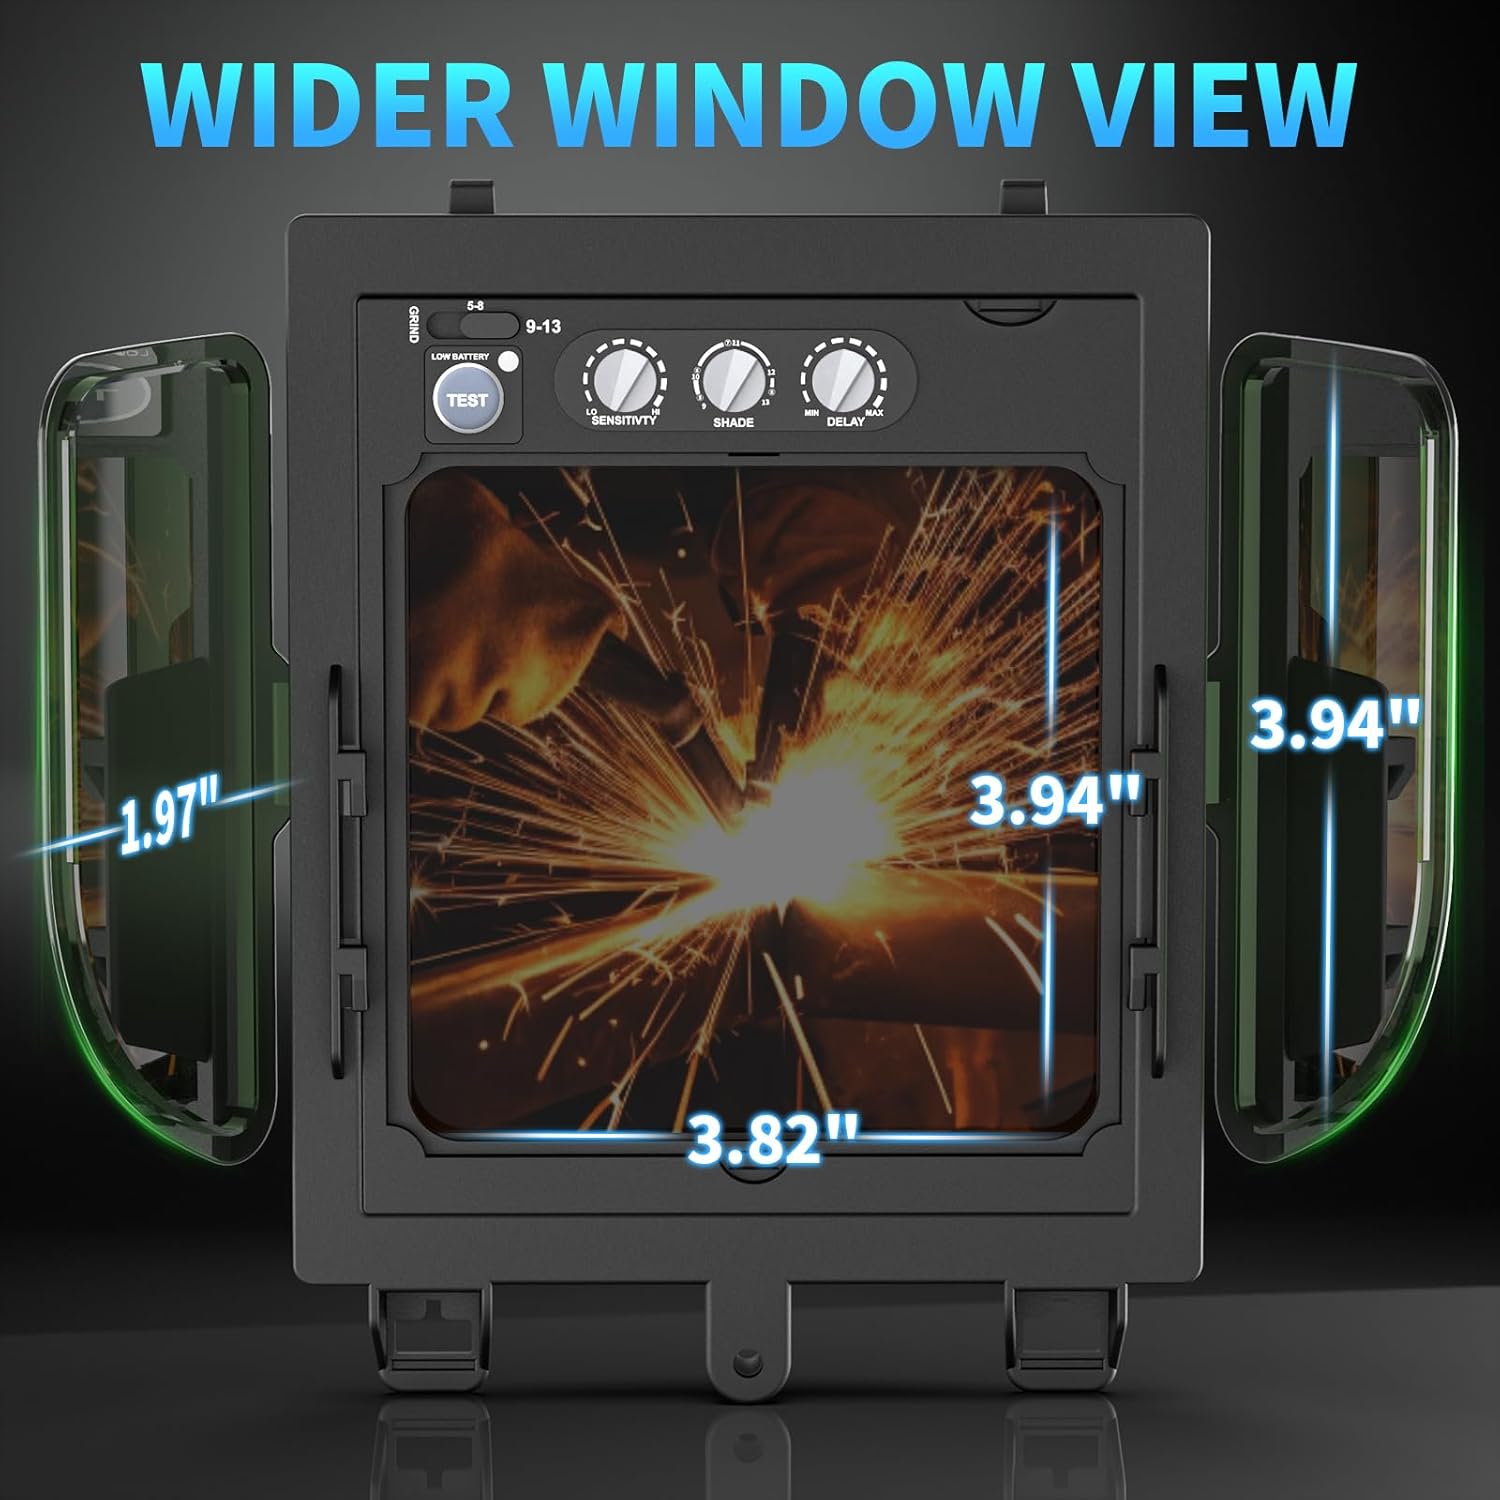
Image 3.2.2: Illustration of the wide viewing window provided by the AZNH-1098 welding helmet.
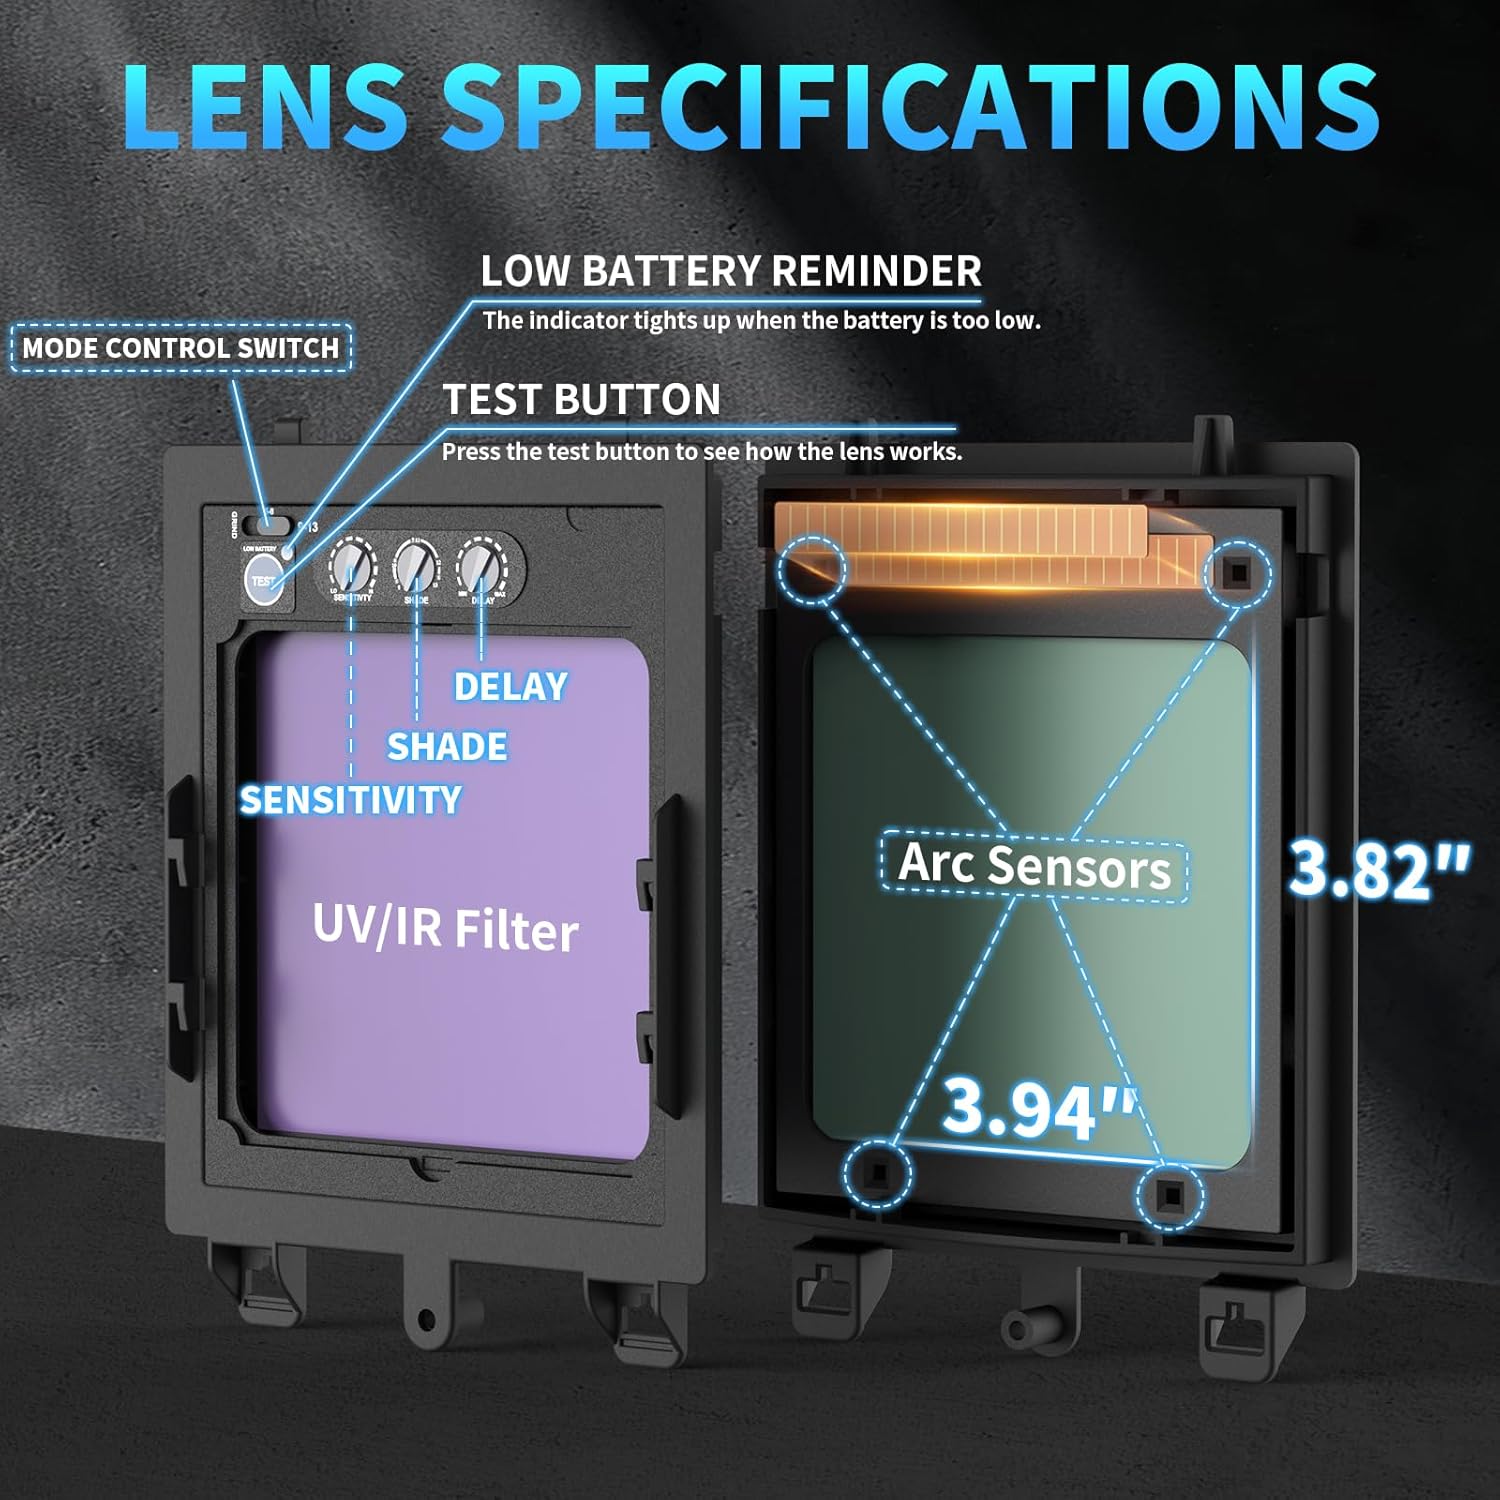
Image 3.2.3: Detailed view of the lens specifications and control knobs on the AZNH-1098 welding helmet.
4. Setup
4.1 Welder Setup
- Power Connection: Connect the welder to a suitable 110V or 220V power outlet. Ensure the correct voltage is selected on the machine if applicable.
- Ground Clamp: Securely attach the ground clamp to the workpiece or welding table, ensuring good electrical contact.
- Wire Spool Installation: Open the wire feed compartment. Install the appropriate wire spool (1 lb to 10 lbs) according to the welding process. Ensure the wire diameter matches the selected drive roller groove.
- Wire Feeding: Thread the welding wire through the drive rollers and into the torch liner. Adjust the drive roller tension to prevent slipping or crushing the wire.
- Gas Connection (for Gas MIG/MAG/Aluminum MIG): Connect the gas hose from your shielding gas cylinder (e.g., CO2, Argon, or Argon/CO2 mix) to the gas inlet on the welder. Ensure all connections are tight and leak-free.
- Torch/Gun Connection: Connect the MIG torch, TIG torch (WP-17V-35-50, not included), or electrode holder for Stick welding to the appropriate connectors on the front panel. For Spool Gun compatibility, connect the spool gun (LBT150, not included) to the Euro connector.

Image 4.1.1: Illustration of the welder's compatibility with 1 lb to 10 lbs wire spools.

Image 4.1.2: The Euro connector for spool gun compatibility on the MIG-200L welder.
4.2 Welding Helmet Setup
- Headgear Adjustment: Adjust the headgear straps for a comfortable and secure fit. Ensure the helmet sits evenly on your head and the viewing area is centered with your eyes.
- Function Selection: Set the helmet to the desired mode (Weld or Grind) using the external switch.
- Sensitivity, Delay, and Shade Adjustment: Use the internal knobs to set the sensitivity of the auto-darkening function, the delay time for returning to light state, and the appropriate shade level for your welding process.
- Test Function: Press the 'Test' button to verify the auto-darkening function is working correctly before starting to weld.
5. Operating Instructions
5.1 Welder Operation
- Power On: Turn on the welder using the main power switch.
- Select Welding Mode: Use the control panel to select one of the 8 welding modes (Flux Core, Gas MIG, Gas MAG, Aluminum MIG, Spot MIG, Lift TIG, Stick, Spool Gun).
- Parameter Adjustment:
- Synergic (SYN) Mode: The machine automatically adjusts voltage and wire feed speed based on the selected wire type and amperage. This simplifies setup for common welding tasks.
- Manual (MAN) Mode: Allows independent adjustment of voltage and wire feed speed for experienced users or specific applications.
- 2T (Two-Touch) Mode: Press and hold the trigger to start welding, release to stop.
- 4T (Four-Touch) Mode: Press and release the trigger to start welding, press and release again to stop. This mode is useful for long welds to reduce hand fatigue.
- Spot Welding: For precise, short welds. The machine delivers a timed weld cycle.
- Begin Welding: With all safety precautions in place and the helmet properly adjusted, initiate the arc according to the selected mode.
5.2 Welding Helmet Operation
- Pre-Weld Check: Before each use, ensure the helmet is clean, the lenses are free from damage, and the auto-darkening function passes the 'Test' button check.
- Shade Selection: Adjust the shade level (5-8/9-13) based on the welding process and amperage. Refer to welding safety standards for recommended shade levels.
- Sensitivity: Adjust the sensitivity to ensure the helmet darkens reliably when the arc is struck, but not from ambient light.
- Delay: Set the delay time for the lens to return to its light state after the arc stops. A longer delay is useful for high amperage welding to protect against afterglow.
- Grind Mode: When grinding, switch the helmet to Grind mode (Shade 4) to prevent the lens from darkening. Remember to switch back to Weld mode before welding.
6. Maintenance
6.1 Welder Maintenance
- Regular Cleaning: Keep the welder clean and free from dust and metal particles. Use compressed air to blow out internal components periodically.
- Wire Feed System: Inspect and clean the drive rollers and wire liner regularly. Replace worn drive rollers or liners to ensure smooth wire feeding.
- Torch/Gun Maintenance: Clean the contact tip, gas nozzle, and diffuser. Replace consumables as they wear out.
- Cable Inspection: Check all welding cables, power cords, and gas hoses for cuts, abrasions, or loose connections. Replace damaged components immediately.
6.2 Welding Helmet Maintenance
- Lens Cleaning: Clean the inner and outer protective lenses with a soft cloth and mild soap solution. Do not use abrasive cleaners.
- Battery Replacement: Replace the helmet's batteries when the low battery indicator appears. Refer to the helmet's specific instructions for battery type and replacement procedure.
- Inspection: Regularly inspect the helmet shell, headgear, and auto-darkening filter for any signs of damage. Replace any damaged parts to maintain protection.
7. Troubleshooting
This section addresses common issues you might encounter. For problems not listed here, contact customer support.
| Problem | Possible Cause | Solution |
|---|---|---|
| No power to welder | Power cord unplugged, circuit breaker tripped, power switch off | Check power connections, reset breaker, turn on power switch |
| No arc/Poor arc starting | Poor ground connection, incorrect settings, worn contact tip, wrong wire feed speed | Ensure good ground, adjust parameters, replace contact tip, adjust wire feed |
| Wire feeding issues (slipping/jamming) | Incorrect drive roller tension, wrong drive roller size, bent liner, dirty liner | Adjust tension, use correct roller, clean/replace liner |
| Welding helmet not darkening | Low battery, sensors blocked, sensitivity too low, helmet in Grind mode | Replace batteries, clean sensors, increase sensitivity, switch to Weld mode |
| Inconsistent shade on helmet | Arc sensors dirty or obstructed, low battery | Clean arc sensors, replace batteries |
8. Specifications
8.1 AZZUNO MIG-200L Welder
- Input Voltage: 110V/220V
- Output Current: Up to 200A
- Welding Modes: Flux Core MIG, Gas MIG, Gas MAG, Aluminum MIG, Spot MIG, Lift TIG, Stick Welding, Spool Gun Compatible
- Wire Spool Capacity: 1 lb to 10 lbs
- Compatible Wire Diameters:
- Solid Wire: .023"/.030"/.035"/.040"
- Flux Core Wire: .023"/.030"/.035"/.040"
- ER5356 Aluminum Wire: .035"/.040"/.047"
- CuSi Wire: .040"
- Control Functions: MAN, SYN, 2T, 4T, Spot
8.2 AZNH-1098 Auto-Darkening Welding Helmet
- Main Viewing Area: 3.94" × 3.82" (Auto-Darkening)
- Side Viewing Area: 1.97" × 3.82" (DIN5, Non-Auto-Darkening)
- Optical Clarity: 1/1/1/1
- Auto-Darkening Speed: 1/30000s
- Dark Shade Range: 5-8/9-13
- Grind Mode Shade: 4
- Features: True Color Lens, Sensitivity Adjustment, Delay Adjustment, Test Button, Low Battery Reminder
9. Warranty Information
For detailed warranty information regarding your AZZUNO MIG-200L Welder and AZNH-1098 Welding Helmet, please refer to the warranty card included with your product or visit the official AZZUNO website. Keep your purchase receipt as proof of purchase for any warranty claims.
10. Customer Support
If you have any questions, require technical assistance, or need to report an issue with your AZZUNO product, please contact AZZUNO customer support. Contact details can typically be found on the product packaging, the official AZZUNO website, or your purchase documentation.


