
1. Introduction
This manual provides essential information for the safe installation, operation, and maintenance of your TEMPWARE 10000-Watt Digital Fan-Forced Ceiling Mount Shop Heater. Please read all instructions carefully before use and retain this manual for future reference.

Image 1.1: The TEMPWARE 10000-Watt Digital Fan-Forced Ceiling Mount Shop Heater, showcasing its main unit, remote control, and a smartphone displaying the control app.
2. Important Safety Information
WARNING: Improper installation, adjustment, alteration, service, or maintenance can cause injury or property damage. Refer to this manual. For assistance or additional information, consult a qualified installer, service agency, or the manufacturer.
- Electrical Installation: This heater requires hardwired installation by a qualified electrician. It must be grounded and connected to a properly sized current protection circuit breaker in accordance with the (US) National Electric Code and local codes. A power cord is not included.
- Overheat Protection: The heater is equipped with a built-in sensor that automatically switches the device off if it overheats. Do not obstruct the air intake or output vents.
- Power Outage Behavior: In the event of a power outage, the heater will default to the OFF position once power is restored. It will not automatically resume its previous settings. Manual restart is required.
- Keep combustible materials, such as furniture, pillows, bedding, papers, clothes, and curtains, at least 3 feet (0.9 meters) from the front of the heater, and keep them away from the sides and rear.
- Do not insert or allow foreign objects to enter any ventilation or exhaust opening as this may cause an electric shock or fire, or damage the heater.
- Do not use this heater in wet or moist locations.

Image 2.1: Visual representation of the heater's overheat protection system.
3. Package Contents
Verify that all components are present and undamaged. If any items are missing or damaged, contact customer support.
- TEMPWARE 10000-Watt Digital Fan-Forced Ceiling Mount Shop Heater
- Remote Control
- Mounting Hardware (included with heater)
- Instruction Manual
4. Product Features
- Multiple Control Options: Remote control, Smart WiFi app control, and intuitive touch control panel.
- High Output Heating: 10,000 watts of power, providing 34,120 BTUs, capable of heating areas up to 1,500 square feet.
- Adjustable Angle & Louvers: Direct air output with variable mounting angles and adjustable louvers.
- ECO Mode: Automatically adjusts operation based on ambient temperature for energy efficiency.
- Timer Function: Programmable auto-off timer (1-12 hours).
- Digital Thermostat: Adjustable temperature range from 45°F to 95°F.
- Overheat Protection: Built-in safety sensor for automatic shutdown.

Image 4.1: Overview of key features including ECO Mode, Thermostat, Remote Control, Safety, Wide Area Heating, Timer, and Multiple Vertical Angles.
5. Setup and Installation
Installation of this heater requires electrical expertise. It is strongly recommended that a qualified electrician performs the installation to ensure compliance with all local and national electrical codes.
5.1 Mounting the Heater
The heater is designed for ceiling mount installation. Use the provided mounting hardware and ensure the mounting surface can support the weight of the heater (approximately 45 pounds). The heater features adjustable louvers and variable mounting angles (0°, 30°, 60°, 90°) to direct airflow as needed.

Image 5.1: Illustration of the heater's adjustable louvers and various mounting angles.
5.2 Electrical Connection
- This is a 240-Volt hardwired unit. A power cord is not supplied.
- Connect the heater directly to a dedicated circuit with a properly sized circuit breaker.
- Ensure the heater is properly grounded to prevent electrical shock.
- Consult the (US) National Electric Code and local codes for specific wiring requirements.

Image 5.2: The 240V hardwired heater mounted, highlighting its 10000W power output.
6. Operating Instructions
The TEMPWARE heater offers three control methods: remote control, WiFi app control, and a touch control panel on the unit.
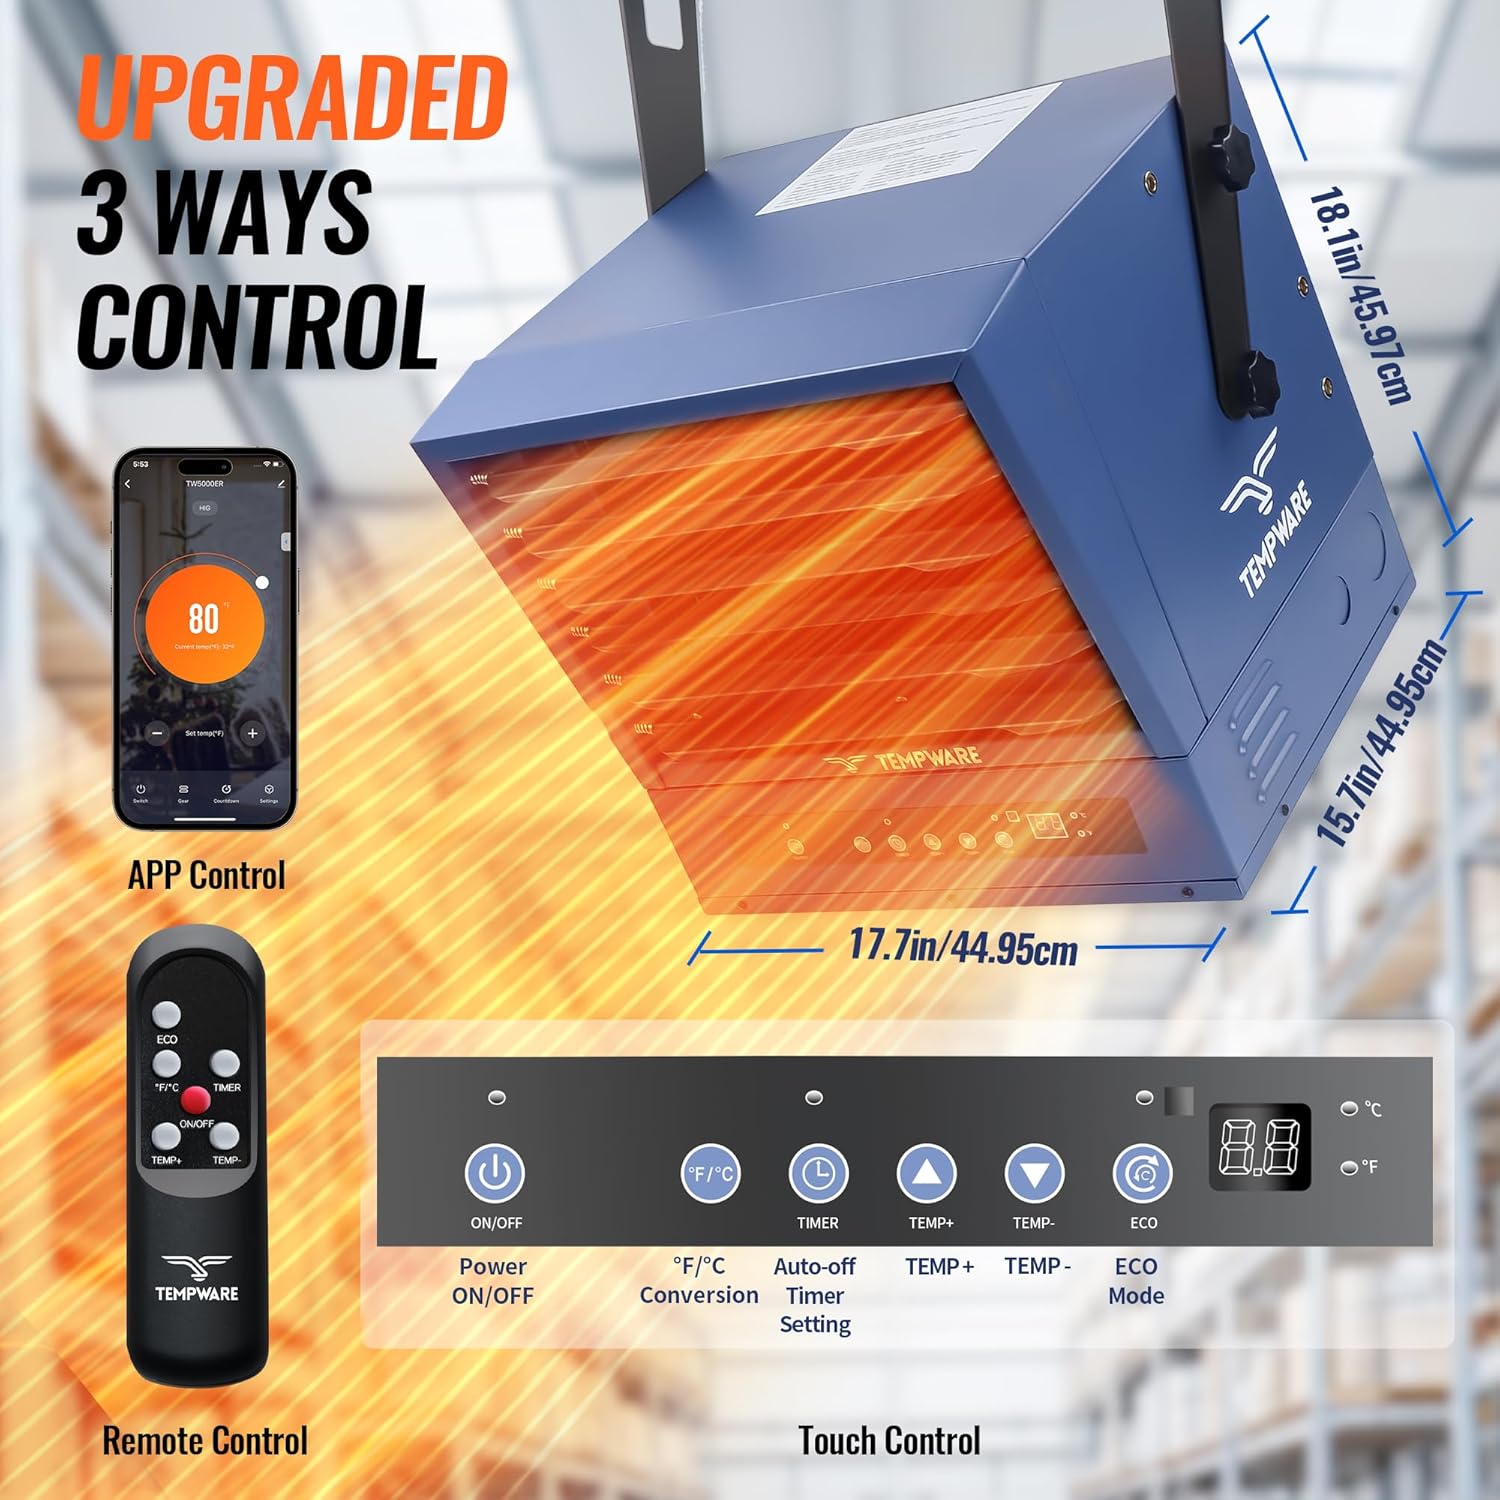
Image 6.1: Overview of the three control methods: App Control, Remote Control, and Touch Control.
6.1 Touch Control Panel
The front panel features an intuitive display and touch buttons for direct control.
- Power ON/OFF: Press the power button to turn the heater on or off.
- Temperature Adjustment: Use the TEMP+ and TEMP- buttons to set the desired temperature between 45°F and 95°F.
- °F/°C Conversion: Switch between Fahrenheit and Celsius display.
- Timer Setting: Set an auto-off timer from 1 to 12 hours.
- ECO Mode: Activate ECO mode for energy-efficient operation.

Image 6.2: Detail of the Smart Digital Thermostat control panel.
6.2 Remote Control
The included remote control allows for convenient adjustment of settings from a distance (up to 27 feet coverage).
- All functions available on the touch control panel are accessible via the remote.
- Ensure line of sight to the heater's sensor for optimal remote performance.

Image 6.3: Remote control in use, demonstrating its range and the heater's coverage.
6.3 Smart WiFi Control
Connect the heater to your home WiFi network to control it remotely via a smartphone application. This allows you to preheat your space before arrival.
- Download the TEMPWARE app from your device's app store.
- Follow the in-app instructions to pair your heater with your smartphone.
- Once paired, you can adjust temperature, set timers, and activate ECO mode from anywhere with an internet connection.

Image 6.4: Controlling the heater via the smartphone application.
6.4 ECO Mode and Timer Function
- ECO Mode: When activated, the heater's precise temperature sensor will automatically adjust the heating output or turn off the unit to maintain the set temperature efficiently.
- Timer: Use the timer function to program the heater to automatically turn off after a set duration (1-12 hours). This can help manage energy consumption.

Image 6.5: Graph demonstrating the ECO function and timer's temperature management.
7. Maintenance
Regular maintenance ensures optimal performance and longevity of your heater. Always disconnect power before performing any maintenance.
- Cleaning: Periodically wipe the exterior of the heater with a soft, damp cloth. Do not use abrasive cleaners or solvents.
- Dust Removal: Ensure the air intake and output vents are free from dust and debris. Use a vacuum cleaner with a brush attachment to gently clean these areas.
- Inspection: Annually inspect the heater for any signs of damage, loose connections, or wear. If any issues are found, contact a qualified technician for repair.
8. Troubleshooting
| Problem | Possible Cause | Solution |
|---|---|---|
| Heater does not turn on. | No power, circuit breaker tripped, power outage, unit is off. | Check power supply. Reset circuit breaker. If power was interrupted, manually turn the heater on. Ensure the power button is pressed. |
| Heater turns off unexpectedly. | Overheat protection activated, timer expired. | Ensure vents are not blocked. Allow unit to cool down. Check timer settings. |
| Remote control not working. | Batteries low/dead, obstruction, out of range. | Replace remote batteries. Remove obstructions. Operate within 27 feet of the heater. |
| WiFi control not connecting. | Incorrect WiFi password, router issues, app not paired. | Verify WiFi password. Restart router. Re-pair the heater with the app following in-app instructions. |
| Insufficient heating. | Temperature setting too low, room size exceeds capacity, drafts. | Increase temperature setting. Ensure room size is within 1,500 sq. ft. Seal drafts. |
9. Specifications
| Feature | Detail |
|---|---|
| Model Number | TW10000ERSC |
| Power Output | 10,000 Watts |
| Voltage | 240-Volt (Hardwired) |
| BTU Output | 34,120 BTUs |
| Heating Area | Up to 1,500 sq. ft. |
| Temperature Range | 45°F to 95°F |
| Item Weight | 45 pounds |
| Product Dimensions | 20.4 x 21.4 x 20.8 inches |
| Control Methods | Remote, WiFi App, Touch Panel |
| Included Components | Heater unit, Remote control |

Image 9.1: Visual representation of heating capacity for various wattage models.
10. Warranty and Support
For any assistance, questions, or warranty inquiries, please contact our support team.
- Customer Support Email: customerservice@albatrossindustry.com
- You may also contact support directly via your Amazon account.
Our local support team aims to respond to inquiries within 24 hours.