1. Introduction
Thank you for choosing the NEU MASTER Manual Staple Gun and Pneumatic Brad Nailer. This versatile tool combination is designed for a wide range of fastening tasks, from upholstery and decoration to carpentry and DIY projects. This manual provides essential information for the safe operation, setup, maintenance, and troubleshooting of your new tools. Please read these instructions carefully before use and retain them for future reference.
The package includes:
- NEU MASTER Manual Staple Gun
- NEU MASTER Pneumatic 2-in-1 Nail/Staple Gun
- 1000 pcs 18GA brad nails (400 pcs 2", 400 pcs 1-1/4")
- 200 pcs 1/4" narrow crown 1-1/4" staples
- Carrying BMC case
- Safety glasses
- Lubricating oil bottle
- 2 Allen wrenches
2. Safety Information
WARNING: Always wear safety glasses when operating these tools. Failure to do so may result in serious eye injury.
General Safety Rules:
- Read all instructions: Familiarize yourself with the tool's operation and safety warnings.
- Keep work area clean: Cluttered areas invite accidents.
- Do not operate in explosive atmospheres: Do not use in the presence of flammable liquids, gases, or dust.
- Keep children away: Do not let children handle the tools.
- Dress properly: Do not wear loose clothing or jewelry. Keep hair, clothing, and gloves away from moving parts.
- Stay alert: Watch what you are doing and use common sense. Do not operate tools when tired or under the influence of drugs, alcohol, or medication.
- Secure workpiece: Use clamps or a vise to hold the workpiece. This is safer than using your hand and frees both hands to operate the tool.
- Do not overreach: Keep proper footing and balance at all times.
- Disconnect power: Always disconnect the pneumatic nailer from the air supply before making adjustments, changing accessories, or storing the tool.
- Use correct tool: Do not force a small tool or attachment to do the job of a heavy-duty tool.
- Maintain tools with care: Keep tools clean for best and safest performance. Follow instructions for lubricating and changing accessories.
- Check for damaged parts: Before using the tool, check for misalignment or binding of moving parts, breakage of parts, and any other condition that may affect the tool's operation. If damaged, have the tool repaired before use.
Specific Safety Rules for Staple/Nail Guns:
- Never point the tool at yourself or others.
- Do not carry the tool with your finger on the trigger.
- Ensure the workpiece is free of hidden wires or pipes.
- Do not drive fasteners into knots or extremely hard materials.
- For pneumatic tools, ensure the air compressor is set to the correct pressure range.
3. Product Components
3.1 Manual Staple Gun
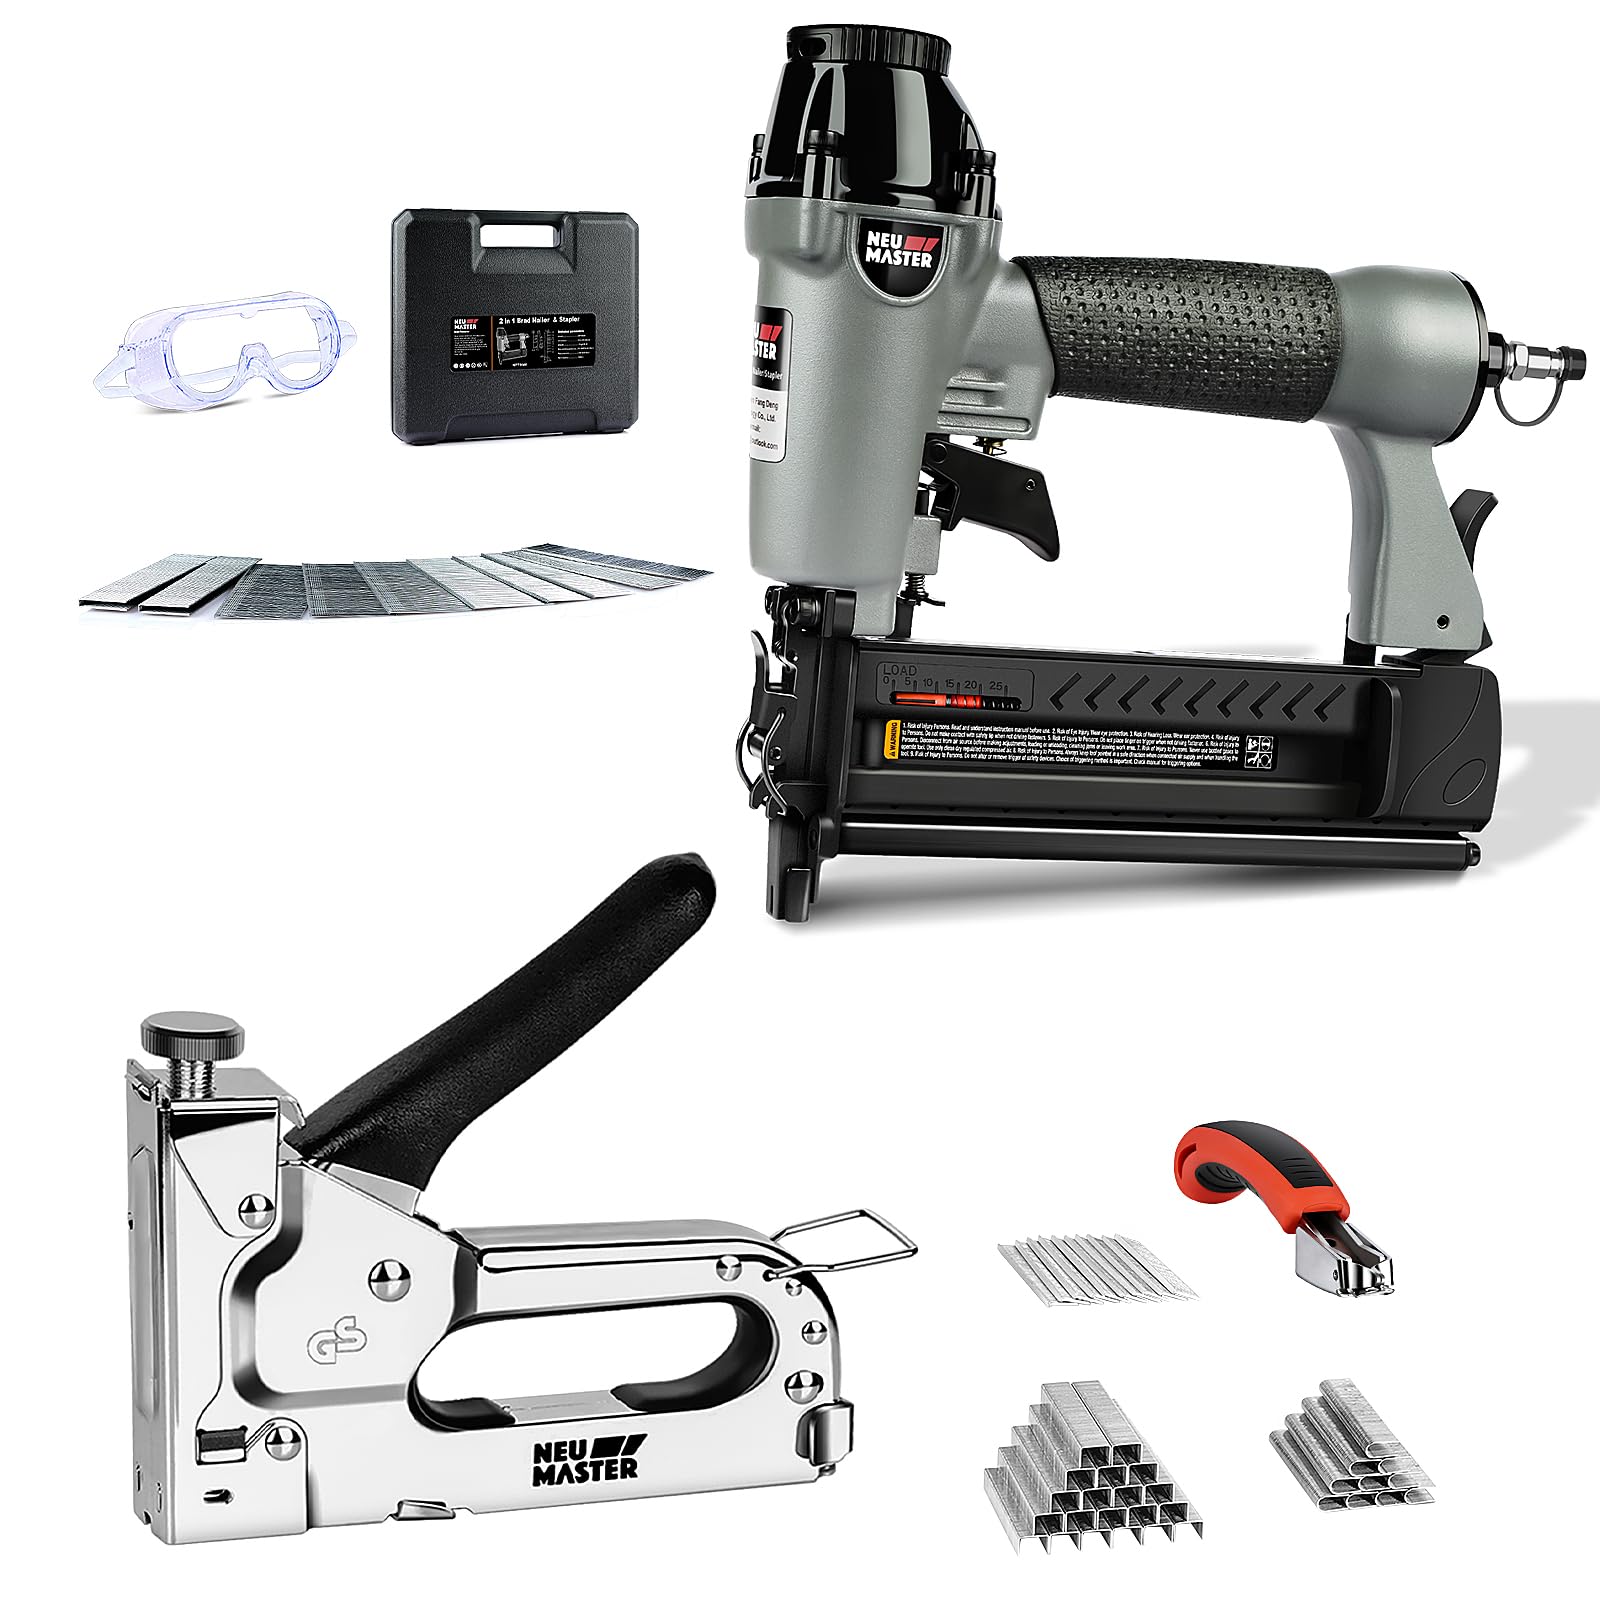
Image: NEU MASTER Manual Staple Gun with labeled components.
This image illustrates the key parts of the manual staple gun. It highlights the non-slip handle for comfortable grip, the pressure setting knob for adjustable power, the handle lock for safe storage, shock absorbers to reduce internal shock pressure, a quick-review window to monitor staple supply, a magazine release latch for easier loading, and a mental drive channel switch for quick jam clearing. An additional tool for easily removing wrong staples is also shown.
- Non-slip Handle: Provides a comfortable and secure grip, minimizing hand fatigue.
- Pressure Setting Knob: Allows adjustment of the driving power for different materials.
- Handle Lock: Secures the handle in a closed position for safe storage.
- Shock Absorbers: Designed to reduce internal shock pressure during operation.
- Quick-review Window: Enables easy monitoring of the staple supply level.
- Magazine Release Latch: Facilitates quick and secure loading of staples.
- Mental Drive Channel Switch: Aids in quickly clearing staple jams.
3.2 Pneumatic Brad Nailer

Image: NEU MASTER Pneumatic 2-in-1 Nail/Staple Gun.
This image provides an overview of the pneumatic nailer, highlighting its robust design and magazine for fasteners. It is designed to drive brad nails up to 2 inches in length.

Image: Key features and specifications of the Pneumatic Nail/Staple Gun.
This image details the operational characteristics of the pneumatic nailer, including its weight (2.6 lbs), capacity (up to 100 nails/staples), recommended pressure range (60-120 PSI), and air inlet size (1/4 inch NPT).
- Magazine: Holds a strip of brad nails or narrow crown staples.
- Trigger: Activates the firing mechanism.
- Depth Adjustment: (If applicable, not explicitly shown but common) Allows control over fastener depth.
- Air Inlet: 1/4 inch NPT connection for air hose.
- Exhaust Port: Directs expelled air away from the user.
4. Specifications
4.1 Manual Staple Gun
- Construction: All-steel with chrome finish
- Grip: Rubberized non-slip
- Staple Types: Compatible with 3 types of staples (D-type, U-type, T-type)
4.2 Pneumatic Brad Nailer
- Fastener Type: 18 Gauge Brad Nails and 1/4" Crown Staples
- Brad Nail Length: 5/8 inch up to 2 inch
- Crown Staple Length: 5/8 inch up to 1-5/8 inch
- Operating Pressure: 70 to 120 PSI (Pounds per Square Inch)
- Air Inlet: 1/4 inch NPT
- Weight: Approximately 2.6 lbs
- Capacity: Up to 100 fasteners
5. Setup and Loading Fasteners
5.1 Loading the Manual Staple Gun

Image: Four-step guide to loading various staples into the manual staple gun.
This image demonstrates the process of loading fasteners into the manual staple gun. Step 1 shows pressing the slider and moving it to the bottom. Step 2 shows pulling out the slider. Step 3 illustrates inserting the staple or nail strip into the magazine, showing examples of staple, brad nail, and wire staple types. Step 4 shows inserting the slider and pushing it until it locks.
- Press the slider at the rear of the staple gun and pull it downwards until it fully extends.
- Insert the appropriate staple or nail strip into the magazine channel. Ensure the fasteners are facing the correct direction (points down).
- Push the slider back into the staple gun until it clicks and locks into place.
- Check the quick-review window to confirm staples are loaded correctly.
5.2 Loading the Pneumatic Brad Nailer

Image: Four-step guide to loading nails/staples into the pneumatic nailer.
This image illustrates the loading procedure for the pneumatic nailer. Step 1 shows pressing a lever while pulling the slider backward. Step 2 shows hanging the staple strip on the middle panel. Step 3 shows loading brad nails with points standing at the bottom of the magazine. Step 4 shows pushing the slider against the tacker head until it snap-locks.
- Disconnect Air Supply: Always disconnect the tool from the air compressor before loading fasteners.
- Open Magazine: Press the magazine release lever and pull the slider backward to open the magazine.
- Load Fasteners: Insert a strip of 18-gauge brad nails or 1/4" crown staples into the magazine. Ensure the points are facing downwards and the strip is properly seated.
- Close Magazine: Push the slider forward until it locks securely into place.
- Connect Air Supply: Reconnect the tool to the air compressor. Ensure the air pressure is set between 70-120 PSI.
6. Operation
6.1 Operating the Manual Staple Gun
- Adjust Pressure: Rotate the pressure setting knob to adjust the driving force. Test on a scrap piece of material to find the optimal setting.
- Position Tool: Place the nose of the staple gun firmly against the workpiece where you want to drive a staple.
- Fire Staple: Squeeze the handle firmly and completely to drive the staple.
- Check Staple: Inspect the driven staple. If it's not flush, adjust the pressure knob and try again.
6.2 Operating the Pneumatic Brad Nailer
- Connect Air: Ensure the air hose is securely connected to the 1/4 inch NPT air inlet and the air compressor is set to the recommended pressure (70-120 PSI).
- Adjust Depth (if applicable): If your model has a depth adjustment feature, set it according to your material and desired fastener depth. Test on a scrap piece.
- Position Tool: Place the nose of the nailer firmly against the workpiece. The safety contact tip must be depressed for the tool to fire.
- Fire Fastener: Squeeze the trigger to drive the nail or staple.
- Sequential Firing: For continuous operation, keep the trigger depressed and repeatedly press the contact tip against the workpiece.
- Clear Jams: If a jam occurs, disconnect the air supply immediately. Refer to the troubleshooting section for clearing instructions.
7. Compatible Fasteners

Image: Examples of D-type, U-type, and 18 Gauge T-type staples.
This image displays the three main types of staples compatible with the manual staple gun: D-type (Arrow T50 equivalent), U-type (Arrow T18 equivalent), and 18 Gauge T-type staples. It also shows how these staples appear when driven into material.
The NEU MASTER Manual Staple Gun is compatible with three common types of staples:
- D-type Staples: Standard flat-crown staples, often referred to as T50 type.
- U-type Staples: Round-crown staples, suitable for securing cables or wires, often referred to as T18 type.
- T-type Staples: Brad nails or pin nails, also known as 18 Gauge T-type staples.
The NEU MASTER Pneumatic Brad Nailer drives 18 Gauge Brad Nails (5/8" to 2" in length) and 1/4" Crown Staples (5/8" to 1-5/8" in length).
8. Applications
8.1 Manual Staple Gun Applications

Image: Various applications for the manual staple gun.
This image displays several common uses for the manual staple gun, including chair decoration, building DIY boxes, shelving assembly, fixing wires, and door decoration.
The manual staple gun is ideal for lighter-duty tasks and projects requiring precision:
- Upholstery and fabric repair
- Decoration and crafting
- Securing fixed wires
- Light carpentry and DIY projects (e.g., building small boxes, shelving)
- Door and window screen installation
8.2 Pneumatic Brad Nailer Applications

Image: Diverse applications for the pneumatic nailer, suitable for heavy and light duty projects.
This image showcases a range of applications for the pneumatic nailer, including building pet houses, flooring installation, shelving construction, upholstery installation, various DIY projects, and roofing.
The pneumatic brad nailer is suitable for a wide range of woodworking and finishing applications:
- Woodworking and trim installation
- Upholstery installation
- Flooring and molding
- Roofing (light duty)
- Picture framing
- Door and window installation
- Building pet houses and other DIY projects
9. Maintenance
Proper maintenance ensures the longevity and safe operation of your tools.
9.1 General Maintenance
- Cleaning: Keep both tools clean and free of dust, debris, and resin buildup. Use a dry cloth or soft brush.
- Inspection: Regularly inspect for loose screws, damaged parts, or signs of wear. Replace or repair any damaged components before further use.
- Storage: Store tools in their carrying case in a dry, secure location, out of reach of children.
9.2 Pneumatic Nailer Specific Maintenance
- Lubrication: Apply a few drops of pneumatic tool oil (provided) into the air inlet before each use or after every few hours of continuous operation. This lubricates internal components and prevents rust.
- Air Filter: Ensure your air compressor has a clean air filter to prevent contaminants from entering the nailer.
- Air Hose: Inspect the air hose for cracks, leaks, or damage. Replace if necessary.
10. Troubleshooting
This section addresses common issues you might encounter.
10.1 Manual Staple Gun Troubleshooting
| Problem | Possible Cause | Solution |
|---|---|---|
| Staples not driving flush | Insufficient pressure setting; hard material | Increase pressure setting; use appropriate staples for material. |
| Staples jamming | Incorrect staple size/type; bent staples; debris in magazine | Use correct staples; remove bent staples; clear debris using the mental drive channel switch. |
| Staples not feeding | Magazine empty; slider not fully engaged | Reload staples; ensure slider is locked. |
10.2 Pneumatic Brad Nailer Troubleshooting
| Problem | Possible Cause | Solution |
|---|---|---|
| Nailer not firing | No air pressure; contact tip not depressed; jammed fastener; empty magazine | Check air supply/pressure; ensure contact tip is pressed firmly; clear jam (disconnect air first); reload fasteners. |
| Fasteners not driving flush | Low air pressure; incorrect depth setting; hard material | Increase air pressure (within range); adjust depth setting; use appropriate fasteners. |
| Fasteners jamming frequently | Incorrect fastener size/type; worn driver blade; debris in magazine | Use correct fasteners; inspect/replace driver blade; clean magazine. |
| Air leak from tool | Loose fittings; damaged O-rings/seals | Tighten fittings; replace damaged seals (consult service center if unsure). |
11. Warranty and Support
NEU MASTER products are manufactured to high-quality standards. For warranty information, technical support, or service inquiries, please refer to the warranty card included with your product or visit the official NEU MASTER website. Please have your model number (B0FH67GKCZ) and purchase date available when contacting support.
Online Support: Visit the NEU MASTER Store on Amazon


