1. Introduction
This manual provides comprehensive instructions for the installation, operation, and maintenance of your CP PLUS CP-UVR-0801E1-IC2 8 Channel Full HD DVR. Please read this manual thoroughly before using the device to ensure proper and safe operation.
Product Overview
The CP PLUS CP-UVR-0801E1-IC2 is a high-performance 8-channel Full HD Digital Video Recorder designed for robust surveillance systems. It supports various camera inputs, including AHD, TVI, CVI, CVBS, and IP cameras, up to 2MP resolution, offering versatile compatibility for different security setups.
Key Features:
- 8 Channel Full HD DVR: Supports AHD, TVI, CVI, CVBS & IP camera inputs up to 2MP for hybrid compatibility.
- H.265+ Video Compression: Saves storage and bandwidth while maintaining smooth video playback.
- Remote Monitoring Anywhere: Access live view or playback remotely via CP Plus app and CMS software.
- Dual Video Output: HDMI and VGA outputs available for high-resolution display on monitors or TVs.
- Smart Motion Detection: Enables efficient surveillance by recording only when activity is detected.
- Multi-Camera Support: Record and manage up to 8 cameras for complete coverage of your premises.
2. Safety Information
Please observe the following safety precautions to prevent damage to the device and ensure personal safety:
- Ensure the power supply matches the specified voltage requirements.
- Do not expose the DVR to water or moisture.
- Avoid placing the DVR in direct sunlight or near heat sources.
- Do not block ventilation openings.
- Only use accessories specified by the manufacturer.
- Refer all servicing to qualified service personnel.
3. Package Contents
Verify that all items are present in the package:
- DVR main unit
- Power Adapter
- USB Mouse
4. Product Overview
Familiarize yourself with the components and interfaces of the DVR.
Front and Side View

Image: Front and side view of the CP PLUS CP-UVR-0801E1-IC2 DVR, showing its compact black casing and ventilation on the side.
Rear Panel Interfaces
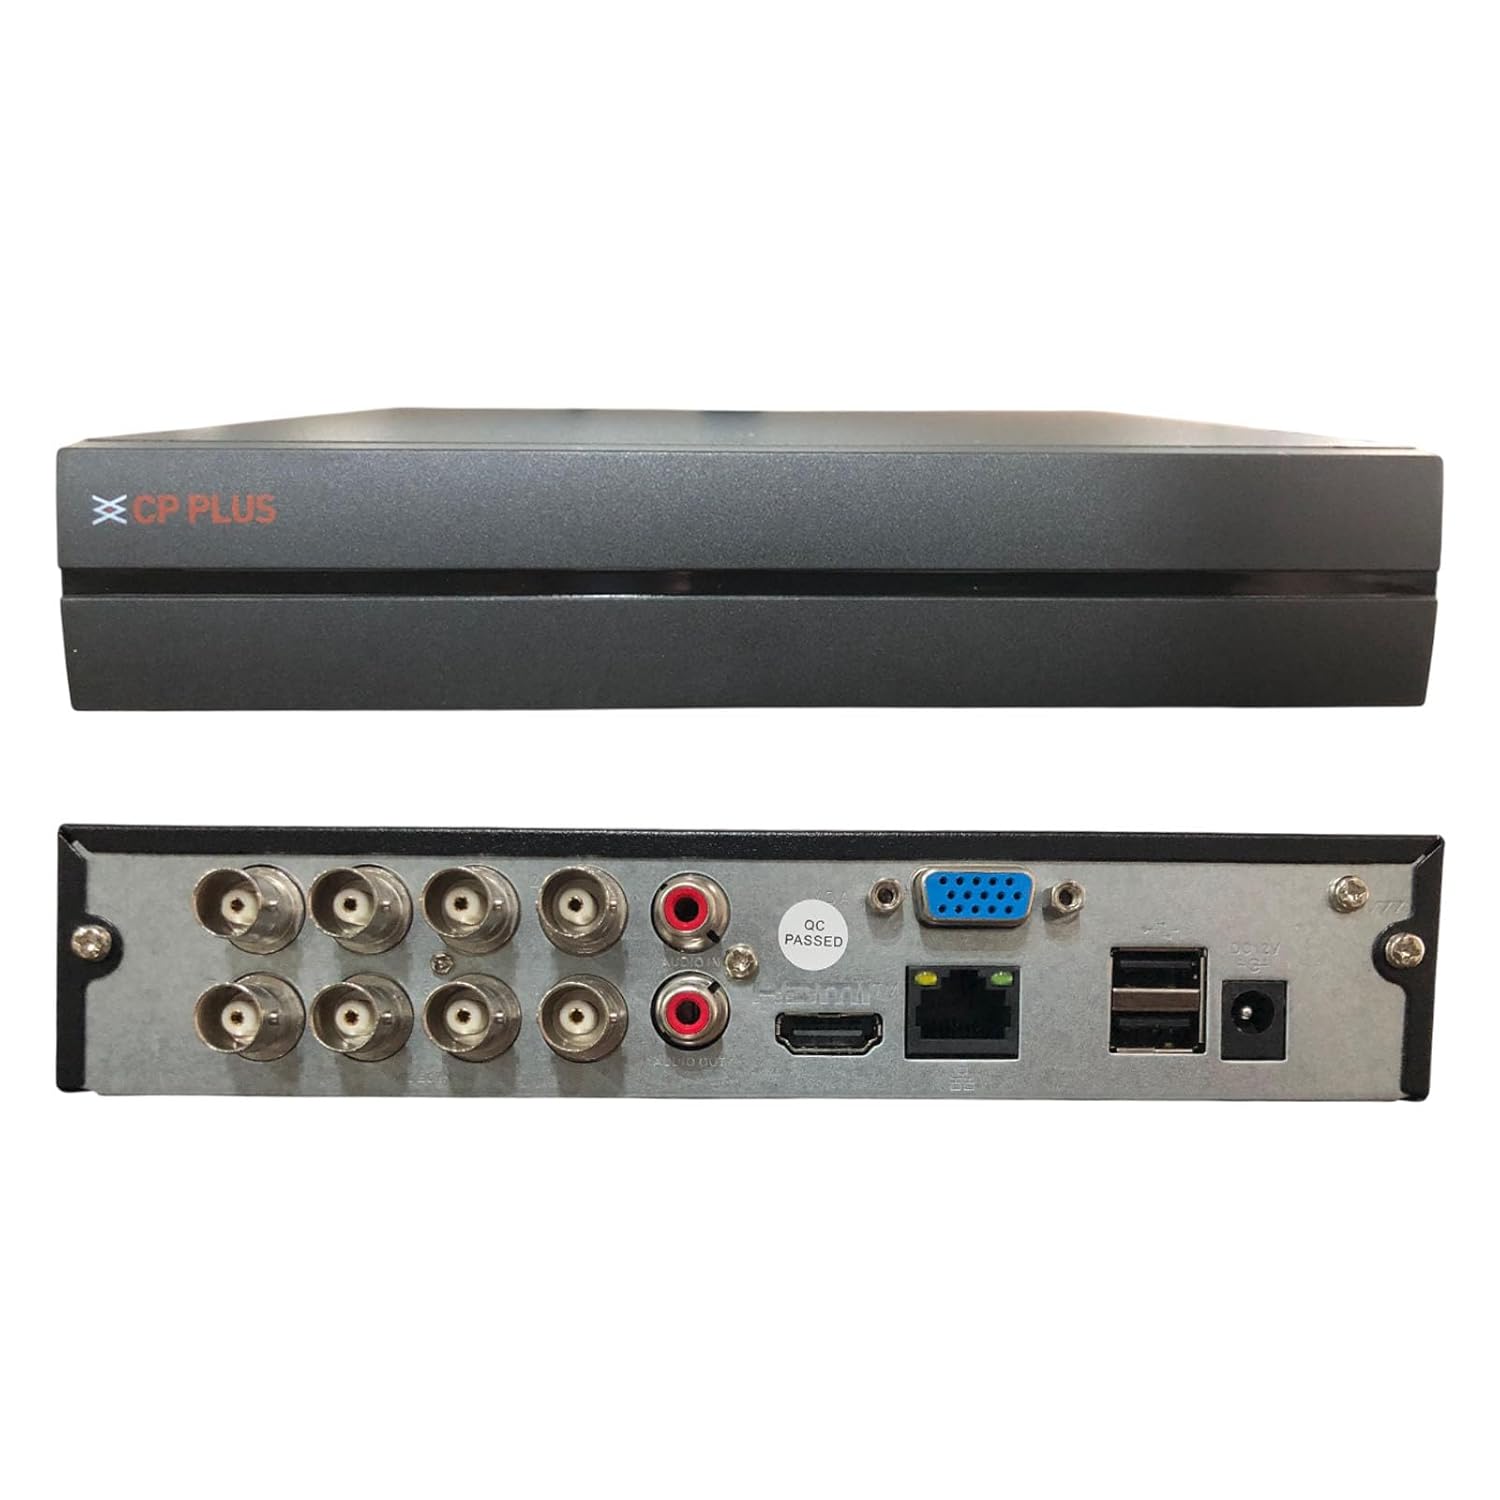
Image: Rear panel of the CP PLUS CP-UVR-0801E1-IC2 DVR, displaying various input/output ports including BNC connectors for cameras, RCA audio inputs/output, VGA, HDMI, Ethernet, USB ports, and power input.
- BNC Video Inputs: Connect up to 8 analog HD or CVBS cameras.
- Audio Inputs/Output (RCA): For audio recording and playback.
- VGA Output: Connect to a VGA monitor.
- HDMI Output: Connect to an HDMI monitor or TV for high-resolution display.
- Ethernet Port (RJ45): For network connection and remote access.
- USB Ports: For mouse connection, USB backup, or external storage.
- DC 12V Power Input: Connect the provided power adapter.
5. Setup and Installation
Follow these steps to set up your DVR system:
- Hard Drive Installation (Optional): If a hard drive is not pre-installed, open the DVR casing, mount the HDD, and connect the SATA power and data cables. Secure the HDD with screws.
- Connect Cameras: Connect your analog HD or CVBS cameras to the BNC video input ports on the rear panel. For IP cameras, ensure they are on the same network as the DVR and add them through the DVR's network settings.
- Connect Display: Connect a monitor to either the VGA or HDMI output port.
- Connect Mouse: Plug the USB mouse into one of the USB ports.
- Network Connection: Connect an Ethernet cable from the DVR's RJ45 port to your router or network switch for remote access capabilities.
- Power On: Connect the provided power adapter to the DC 12V input port and then plug it into a power outlet. The DVR will power on automatically.
- Initial Setup Wizard: Upon first boot, the DVR will guide you through an initial setup wizard for language, date/time, network settings, and password creation.
6. Operating Instructions
This section covers basic operation of your DVR.
Live View
After booting, the DVR will display the live view of all connected cameras. You can switch between single-camera view and multi-camera grid view using the on-screen controls or mouse right-click menu.
Recording
- Continuous Recording: Configure channels for continuous recording via the Main Menu > Record > Schedule settings.
- Motion Detection Recording: Enable motion detection for specific channels in Main Menu > Alarm > Motion Detect. The DVR will record only when motion is detected, saving storage space.
- Manual Recording: Click the record icon on the live view interface to start/stop manual recording.
Playback
To review recorded footage:
- Right-click on the live view screen and select "Playback" or navigate to Main Menu > Playback.
- Select the date and channels you wish to review.
- Use the timeline to navigate through recordings. Green segments typically indicate continuous recording, while red segments indicate motion-triggered events.
Remote Monitoring
The DVR supports remote access via mobile devices and PC software:
- Mobile App: Download the official CP Plus mobile application (e.g., "CP Plus gCMOB" or similar) from your device's app store. Add your DVR using its serial number or IP address.
- CMS Software: Install the CP Plus CMS (Central Monitoring Software) on your PC. This software allows for centralized management of multiple DVRs/NVRs.
- Ensure your DVR is connected to the internet and port forwarding is configured on your router if direct IP access is desired (P2P/Cloud access usually bypasses this).
7. Maintenance
Regular maintenance ensures optimal performance and longevity of your DVR.
- Cleaning: Gently wipe the exterior of the DVR with a soft, dry cloth. Do not use liquid cleaners or aerosols. Ensure ventilation openings are free from dust and debris.
- Firmware Updates: Periodically check the official CP PLUS website for firmware updates. Updating firmware can improve performance, add new features, and fix bugs. Follow the instructions provided with the firmware update carefully.
- Hard Drive Health: Monitor the health of your hard drive through the DVR's system information. Consider replacing the HDD if errors or warnings appear.
- Password Security: Regularly change your DVR's password to a strong, unique combination of characters.
8. Troubleshooting
This section addresses common issues you might encounter.
| Problem | Possible Cause | Solution |
|---|---|---|
| No video output on monitor. | Incorrect cable connection, wrong input selected on monitor, DVR not powered on. | Check HDMI/VGA cable connections. Ensure monitor is on correct input. Verify DVR power. Try a different monitor or cable. |
| Cameras not displaying. | Loose BNC connection, camera power issue, incompatible camera type, faulty camera. | Check BNC connections. Ensure cameras are powered. Verify camera compatibility (AHD, TVI, CVI, CVBS, IP). Test with a known working camera. |
| Cannot access DVR remotely. | Network configuration issues, incorrect app settings, firewall blocking. | Ensure DVR is connected to the internet. Verify network settings (IP address, gateway, DNS). Check app settings (serial number/IP). Consult your router manual for port forwarding if necessary. |
| No recording. | No hard drive, hard drive not initialized, recording schedule not set, hard drive full. | Install/initialize HDD. Configure recording schedule. Check HDD status and free space. Format HDD if necessary (will erase data). |
If the problem persists, please contact CP PLUS technical support.
9. Specifications
Detailed technical specifications for the CP PLUS CP-UVR-0801E1-IC2 DVR:
| Model Number | CP-UVR-0801E1-IC2 |
| Channels | 8 Channels |
| Video Compression | H.265+ |
| Supported Camera Resolution | Up to 2MP (Analog HD, IP) |
| Video Inputs | 8 x BNC (AHD, TVI, CVI, CVBS & IP) |
| Video Outputs | 1 x HDMI, 1 x VGA |
| Audio Inputs/Output | RCA (specific number not detailed, typically 1-4 inputs, 1 output) |
| Network Interface | 1 x RJ45 Ethernet Port |
| USB Interface | 2 x USB 2.0 Ports |
| Storage | Supports 1 SATA HDD (capacity not specified, typically up to 6TB or 8TB) |
| Power Supply | DC 12V |
| Product Dimensions (LxWxH) | 25 x 23 x 4.5 Centimeters |
| Item Weight | 1.1 kg (1 kg 100 g) |
Note: Specifications are subject to change without prior notice. For the most up-to-date information, please refer to the official CP PLUS website.
10. Warranty and Support
Warranty Information
For warranty terms and conditions, please refer to the warranty card included with your product or visit the official CP PLUS website. Keep your purchase receipt as proof of purchase for warranty claims.
Technical Support
If you require technical assistance or have questions regarding your CP PLUS DVR, please contact CP PLUS customer support:
- Manufacturer: Aditya Infotech Limited, CP PLUS
- Contact Number: 8800952952 (as per provided data)
- Website: Visit the official CP PLUS website for support resources, FAQs, and contact forms.


