1. Introduction
Thank you for choosing the IMAYCC 180cm Freestanding Punching Bag. This manual provides essential information for the safe and effective assembly, operation, and maintenance of your punching bag. Please read these instructions carefully before use and retain them for future reference.
This freestanding punching bag is designed for adults and teenagers for various fitness and martial arts training, including boxing, Muay Thai, MMA, and kickboxing. It features a durable PVC construction and a stable base that can be filled with water or sand.
2. Safety Instructions
- Always consult a physician before starting any new exercise program.
- Ensure the punching bag is fully assembled and the base is properly filled before use to prevent tipping.
- Use appropriate hand protection, such as boxing gloves, to prevent injury.
- Maintain a safe distance from walls, furniture, and other objects during use.
- Do not allow children to play unsupervised with the punching bag.
- Inspect the punching bag for any damage or leaks before each use. Discontinue use if damage is found.
- Use on a flat, stable surface.
3. Package Contents
Verify that all components are present in the package:
- 1 x Inflatable Freestanding Punching Bag
- 1 x Base (attached to the punching bag)
- 1 x Pair of Boxing Gloves
- 1 x Electric Air Pump
4. Setup Instructions
Follow these steps to assemble your freestanding punching bag:
- Unpack Components: Carefully remove all items from the packaging.
- Inflate the Punching Bag: Locate the air valve on the punching bag. Use the provided electric air pump to inflate the bag until it is firm but not overinflated. Ensure the valve is securely closed after inflation.
- Fill the Base: The base must be filled to ensure stability. Locate the fill cap on the bottom of the base. You can fill the base with either water or sand.
- Water: Fill with up to 82 kg (180 lbs) of water.
- Sand: Fill with up to 91 kg (200 lbs) of sand for maximum stability. Sand is generally recommended for better stability.
Once filled, securely close the cap to prevent leakage.

Figure 4.1: Filling the base with water or sand. The image shows the fill cap and illustrates the base being filled with either water or sand for stability.

Figure 4.2: Detail of the stabilized base with its plastic lid and waterproof plug, designed to hold both water and sand securely.
- Placement: Place the assembled punching bag on a flat, level surface, ensuring sufficient space around it for safe movement during training. This bag does not require drilling or hanging and can be placed anywhere suitable.
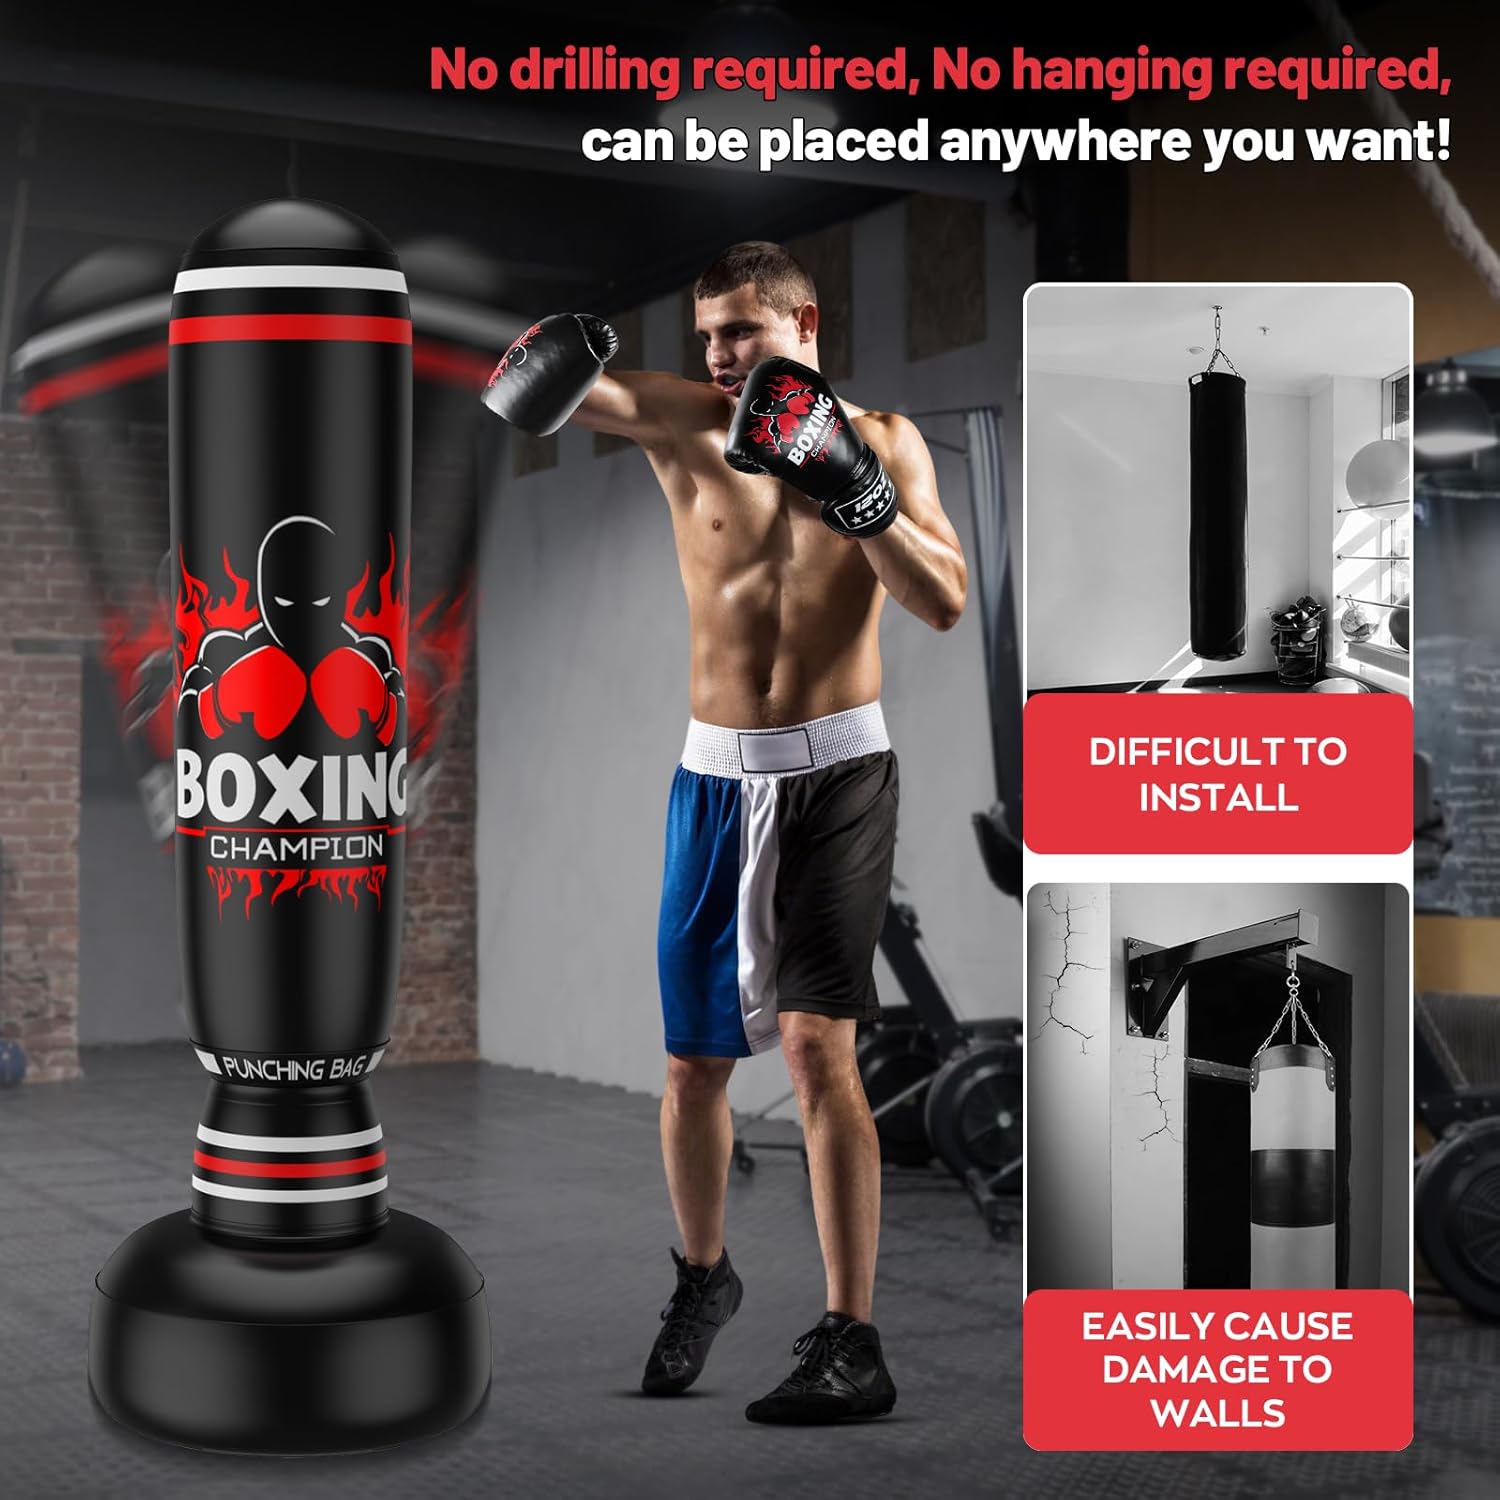
Figure 4.3: The freestanding design allows placement without drilling or wall damage, unlike traditional hanging bags.
5. Operating Instructions
Once assembled and stable, your IMAYCC punching bag is ready for use. Always wear the provided boxing gloves to protect your hands and wrists.
- Warm-up: Begin each training session with a proper warm-up to prepare your muscles and joints.
- Punching Techniques: Practice various boxing and martial arts techniques, including jabs, crosses, hooks, uppercuts, and kicks. The bag's quick rebound feature allows for continuous training.
- Footwork: Incorporate footwork drills around the bag to improve agility and movement.
- Cool-down: Conclude your workout with a cool-down and stretching to aid recovery.

Figure 5.1: Demonstrating use of the punching bag, highlighting its shockproof design and quick rebound capabilities.
6. Maintenance
Proper maintenance will extend the life of your punching bag:
- Cleaning: Wipe down the PVC surface with a damp cloth and mild soap as needed. Avoid harsh chemicals that could damage the material.
- Storage: If storing for an extended period, especially in cold temperatures, it is recommended to empty the water from the base and deflate the bag. Store in a cool, dry place away from direct sunlight.
- Leak Check: Periodically check the air valve and base cap for secure closure to prevent air or water leakage.
- Material Inspection: Regularly inspect the PVC material for any signs of wear, tears, or punctures.
7. Troubleshooting
| Problem | Possible Cause | Solution |
|---|---|---|
| Punching bag is unstable or tips over easily. | Base not sufficiently filled. | Ensure the base is filled to its maximum capacity with water (up to 82 kg) or sand (up to 91 kg). Sand provides greater stability. |
| Punching bag deflates quickly. | Air valve not properly sealed or a small puncture. | Check that the air valve is securely closed. Inspect the bag for any small holes or tears. Use a patch kit if necessary. |
| Base is leaking water/sand. | Base cap not properly sealed or damaged. | Ensure the base cap is tightly closed. Inspect the cap and the base material around it for damage. |
| Electric air pump not working. | Power issue or pump malfunction. | Check power connection. Ensure the pump is clean and free of obstructions. If issues persist, contact customer support. |
8. Specifications

Figure 8.1: Detailed dimensions and practical design features of the IMAYCC Freestanding Punching Bag.
- Brand: IMAYCC
- Model: 180cm Freestanding Punching Bag
- Color: Glossy Black
- Main Material: PVC (Polyvinyl Chloride)
- Product Dimensions (L x W x H): 70 x 70 x 180 cm (27.5 x 27.5 x 70.8 inches)
- Item Weight (empty): 2 Kilograms (4.4 lbs)
- Base Fill Capacity (Water): Up to 82 kg (180 lbs)
- Base Fill Capacity (Sand): Up to 91 kg (200 lbs)
- Included Components: Freestanding punching bag, boxing gloves, electric air pump
- Recommended Sports: Muay Thai, Kickboxing, Taekwondo, Boxing, MMA, Fitness
9. Warranty and Support
For warranty information or technical support, please refer to the product packaging or contact the retailer from whom you purchased this product. Keep your purchase receipt as proof of purchase.


