
1. Introduction
This manual provides detailed instructions for the safe and efficient use of your Aquonderful 201SP Elongated Electric Bidet Toilet Seat. Please read this manual thoroughly before installation and operation, and retain it for future reference. This bidet seat offers enhanced hygiene and comfort features including a heated seat, warm air dryer, multiple wash modes, and dual control options.

2. Safety Information
Observe the following safety precautions to prevent injury or damage to the product:
- Ensure the bidet seat is connected to a grounded electrical outlet.
- Do not immerse the bidet seat or its electrical components in water.
- Unplug the unit before cleaning or performing any maintenance.
- Do not allow children to operate the bidet without adult supervision.
- Avoid using abrasive cleaners or harsh chemicals on the bidet seat.
- If any damage occurs, discontinue use and contact customer support.
3. Package Contents
Verify that all components are present in the package:

- 1x Aquonderful 201SP Bidet Seat
- 1x Wireless Remote Control
- 1x Instruction Manual
- Mounting Hardware (2x Screws, 2x Gaskets, 2x Steel Discs, 1x Mounting Plate, 2x Anchoring Rubbers)
- Water Connection Kit (1x Three-way Valve, 1x PE Pipe)
4. Installation
The Aquonderful 201SP bidet seat is designed for easy DIY installation. No professional plumbing is typically required. Ensure you have an electrical outlet near the toilet.
4.1. Toilet Compatibility Check
This bidet seat is designed for elongated toilets. Verify your toilet's shape and dimensions before installation.
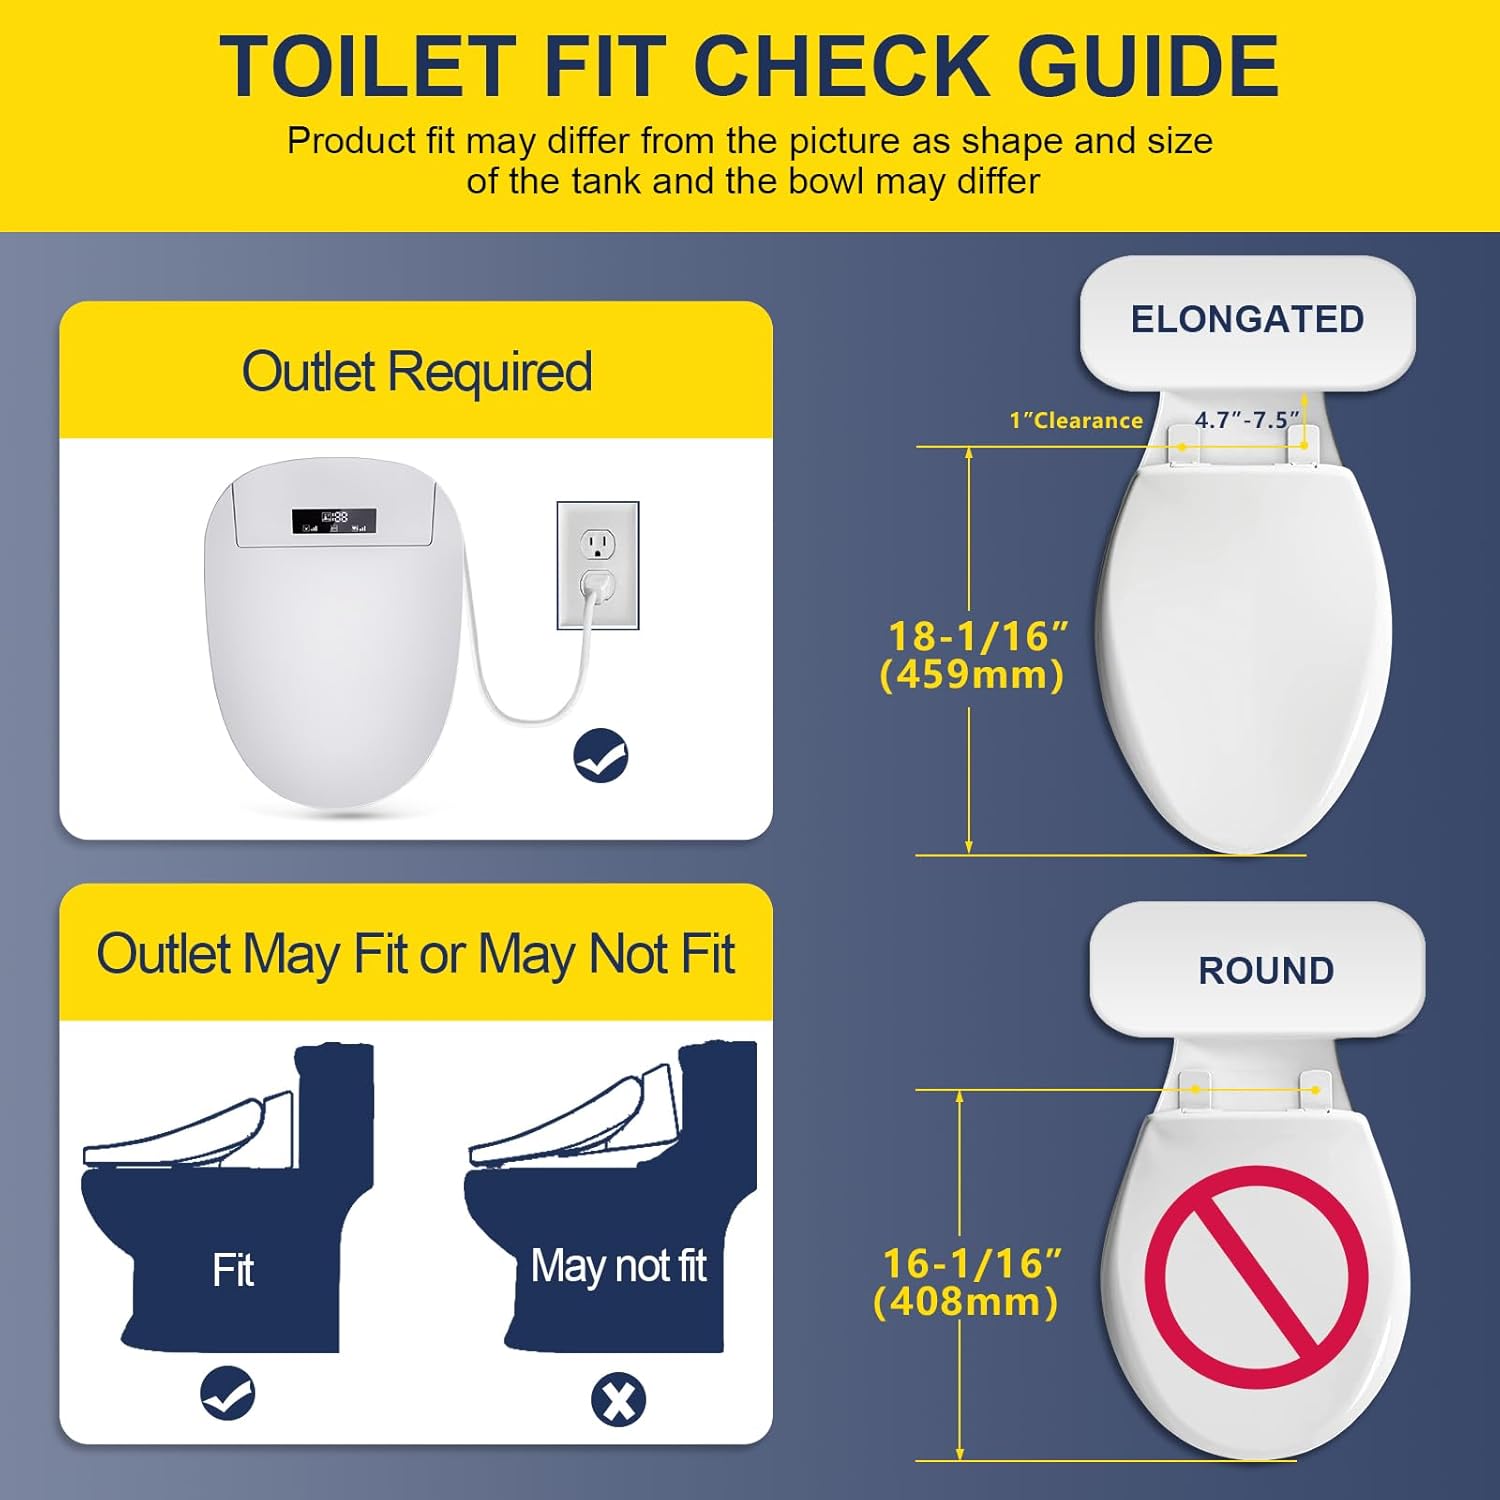
4.2. Installation Steps
Follow these steps for a quick and straightforward setup:

- Remove Existing Toilet Seat: Lift the hinge covers and unscrew the bolts holding your current toilet seat. Remove the seat and store it.
- Install Mounting Plate: Place the mounting plate over the toilet bowl holes. Insert the anchoring rubbers, steel discs, and screws through the mounting plate into the toilet bowl holes. Tighten the screws to secure the plate.
- Install Bidet Seat: Slide the Aquonderful bidet seat onto the mounting plate until it clicks into place. Ensure it is firmly seated.
- Connect Water Supply: Turn off the water supply to your toilet. Disconnect the existing water supply hose from the toilet tank. Install the provided T-valve between the toilet tank fill valve and the water supply hose. Connect the PE pipe from the T-valve to the bidet seat's water inlet.
- Connect Power: Plug the bidet seat's power cord into a grounded electrical outlet.
- Restore Water Supply: Slowly turn on the water supply to the toilet and check for any leaks.
5. Operating Instructions
The Aquonderful 201SP offers dual control modes: a side knob panel and a wireless remote control.
5.1. Main Features Overview
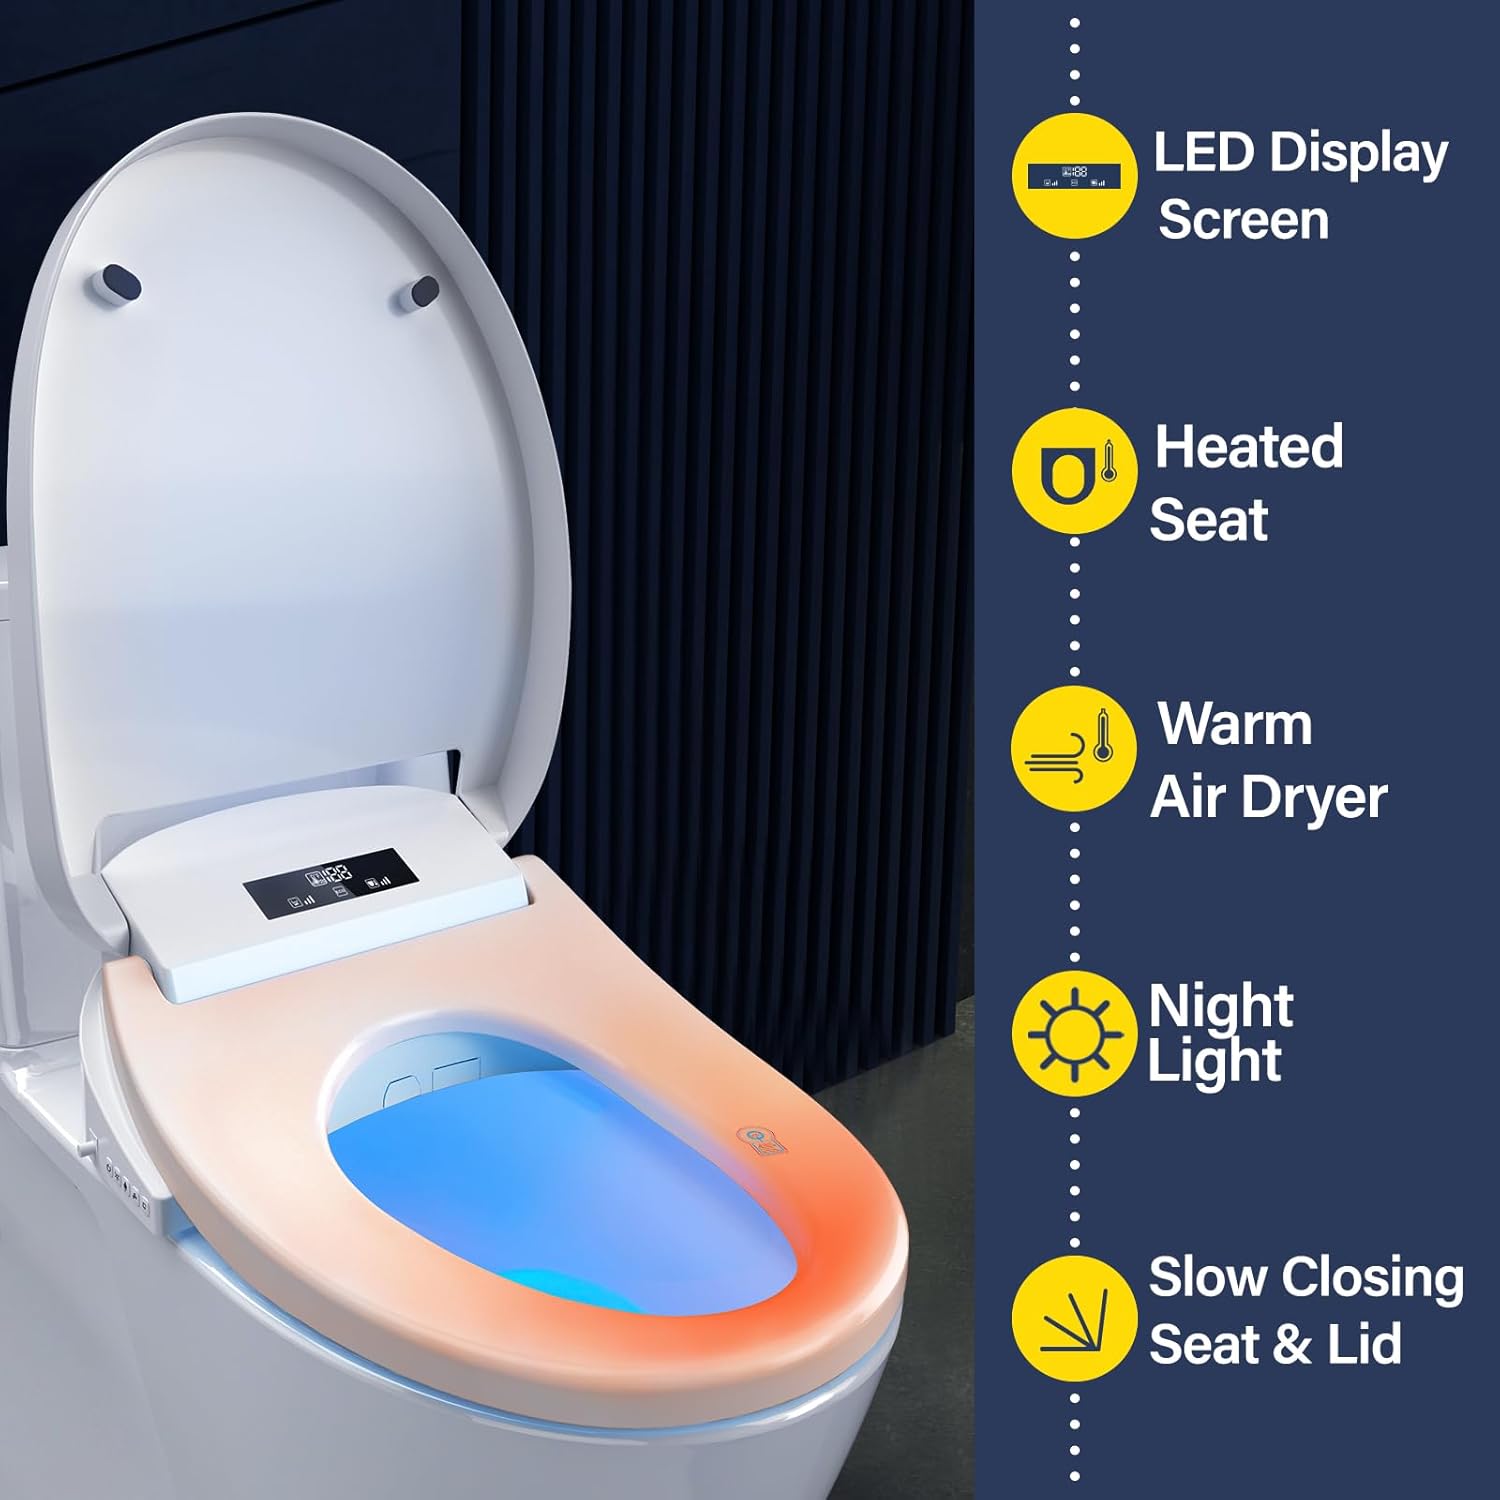
- LED Display Screen: Shows current settings and temperature.
- Heated Seat: Adjustable temperature for comfort.
- Warm Air Dryer: Adjustable air temperature for drying.
- Night Light: Soft LED illumination for nighttime use.
- Slow Closing Seat & Lid: Prevents slamming.
5.2. Wireless Remote Control
The wireless remote provides full control over all bidet functions. It can be wall-mounted or handheld.

- Rear Wash: Activates posterior cleansing.
- Bidet Wash: Activates feminine cleansing.
- Drying: Activates the warm air dryer.
- Auto Mode: Initiates a pre-programmed wash and dry cycle.
- Kids Mode: Provides a gentler wash and lower pressure suitable for children.
- Lighting: Toggles the night light on/off.
- Adjustable Nozzle Position: Moves the nozzle forward or backward.
- Adjustable Water Pressure: Increases or decreases water spray intensity.
- Adjustable Water Temp: Changes water temperature (3 levels).
- Adjustable Heated Seat: Adjusts seat temperature (3 levels).
- Adjustable Warm Air: Adjusts dryer air temperature (3 levels).
- Stop/Power: Stops current operation or turns the unit on/off.
- ECO Mode: Energy-saving mode.
5.3. Side Control Panel
Basic functions can be accessed directly from the side panel on the bidet seat.
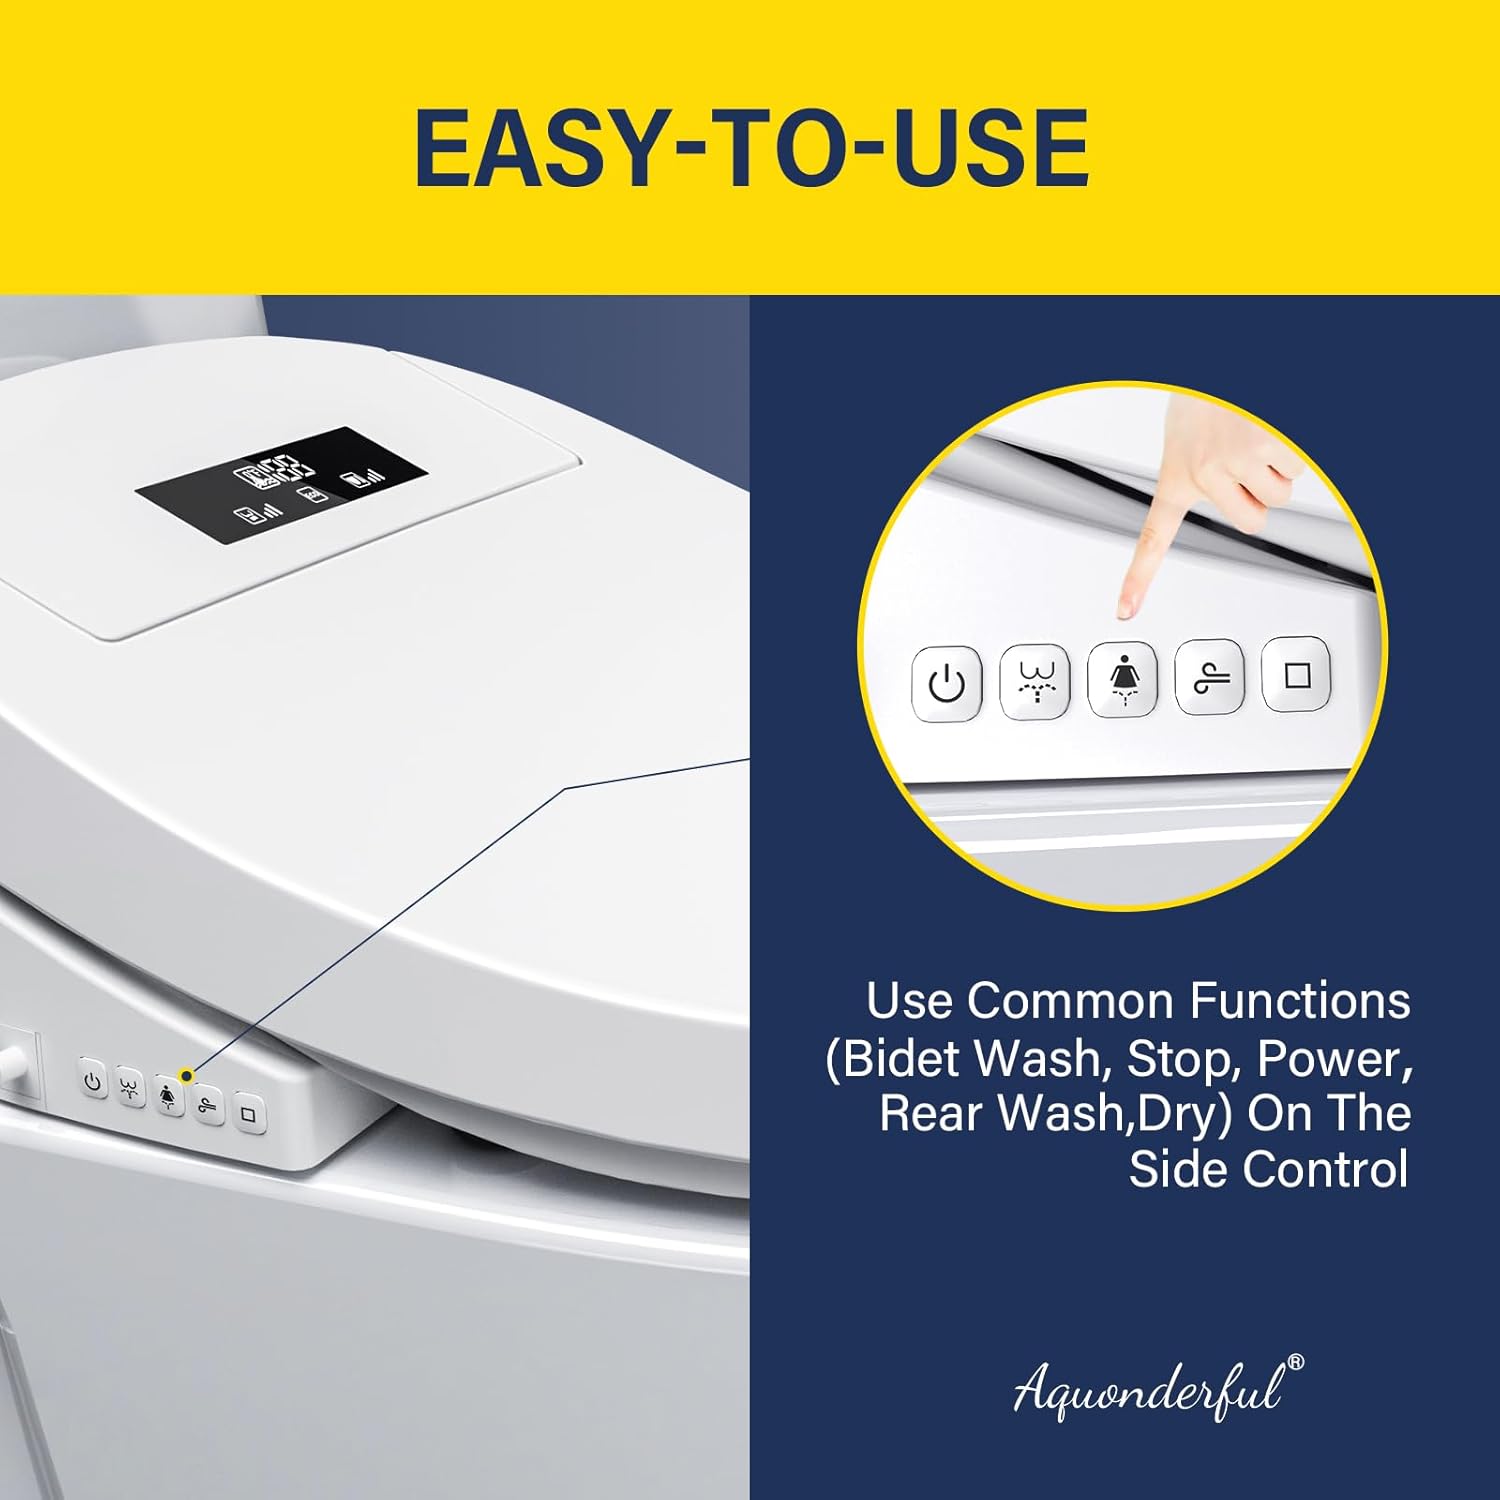
- Power Button: Turns the unit on or off.
- Bidet Wash Button: Activates feminine cleansing.
- Rear Wash Button: Activates posterior cleansing.
- Drying Button: Activates the warm air dryer.
- Stop Button: Stops any active function.
5.4. Wash Functions
The bidet features a self-cleaning stainless steel nozzle with various wash options.

- Rear Wash: Standard posterior cleansing.
- Front Wash (Feminine Wash): Gentle cleansing for feminine hygiene.
- Oscillating Wash: The nozzle moves back and forth for a wider cleaning area.
- Pulsating Wash (Turbo Wash): Provides a rhythmic water spray for a massaging effect (controlled via remote).
- Self-cleaning Nozzle: The nozzle automatically cleans itself before and after each use.
5.5. Warm Air Dryer
After washing, use the warm air dryer to reduce toilet paper usage.

- Press the 'Drying' button on the remote or side panel.
- Adjust the air temperature using the remote control (High, Middle, Low).
6. Maintenance
Regular cleaning and maintenance ensure optimal performance and longevity of your bidet seat.
6.1. Cleaning the Bidet Seat
- Unplug the bidet seat from the electrical outlet before cleaning.
- Wipe the exterior surfaces with a soft, damp cloth and a mild, non-abrasive cleaner.
- Do not use harsh chemicals, abrasive pads, or solvents, as these can damage the finish.
6.2. Nozzle Cleaning
- The nozzle performs an automatic self-cleaning cycle before and after each use.
- For manual cleaning, gently pull out the nozzle and wipe it with a soft cloth or brush. Do not use excessive force.
6.3. Water Filter Maintenance
Periodically check the water filter (if applicable, typically located at the water inlet) for sediment buildup. Clean or replace as necessary to maintain water flow and pressure.
7. Troubleshooting
If you encounter issues, refer to the following common problems and solutions:
| Problem | Possible Cause | Solution |
|---|---|---|
| No power | Power cord unplugged, circuit breaker tripped, no power to outlet | Check power connection, reset circuit breaker, test outlet with another device |
| No water spray | Water supply off, T-valve closed, water filter clogged, nozzle blocked | Turn on water supply, open T-valve, clean/replace water filter, check nozzle for obstructions |
| Water temperature not adjusting | Temperature setting incorrect, bidet not sensing user | Adjust temperature via remote, ensure proper seating on the bidet sensor |
| Heated seat not working | Heated seat function off, temperature setting too low, bidet not sensing user | Activate heated seat function, increase temperature setting, ensure proper seating on the bidet sensor |
| Remote control not responding | Batteries low/dead, remote out of range, signal interference | Replace remote batteries, move closer to the bidet, check for obstructions |
If the problem persists after attempting these solutions, please contact Aquonderful customer support.
8. Specifications
- Model: 201SP
- Dimensions: 20 x 15.5 x 6.51 inches (50.8 x 39.4 x 16.5 cm)
- Weight: 11 pounds (5 kg)
- Shape: Elongated
- Color: White
- Power Source: AC 120V, 60Hz (Standard US outlet)
- Heated Seat: Adjustable (3 levels)
- Water Temperature: Adjustable (3 levels)
- Air Dryer Temperature: Adjustable (3 levels)
- Nozzle Material: Stainless Steel
- Included Components: Bidet Toilet Seat, Wireless Remote, Installation Kit
9. Warranty and Support
Aquonderful products are backed by a manufacturer's warranty. For specific warranty details, please refer to the warranty card included in your package or visit the official Aquonderful website. For technical support, troubleshooting assistance, or to inquire about replacement parts, please contact Aquonderful customer service through the contact information provided on the product packaging or website.