1. Introduction
This manual provides detailed instructions for the installation, operation, and maintenance of your EmpireTech IPC-T54PRO-ZE 4MP Turret IP Camera. Please read this manual thoroughly before using the product to ensure proper functionality and safety.
The EmpireTech IPC-T54PRO-ZE is a high-performance 4-megapixel IP camera featuring a 1/1.8" CMOS image sensor, motorized vari-focal lens (2.7mm-12mm), built-in IR and warm dual lights, two-way talk capability, and Intelligent Video System (IVS) functions. It is designed for both indoor and outdoor surveillance applications.
2. Package Contents
Verify that all items are present and in good condition. If any items are missing or damaged, contact your vendor immediately.
- EmpireTech IPC-T54PRO-ZE 4MP Turret IP Camera
- Mounting Hardware (screws, wall anchors)
- Waterproof Connector for Ethernet Cable
- Quick Start Guide
- Drill Template
3. Product Overview
The following image illustrates the main components of the EmpireTech IPC-T54PRO-ZE camera.
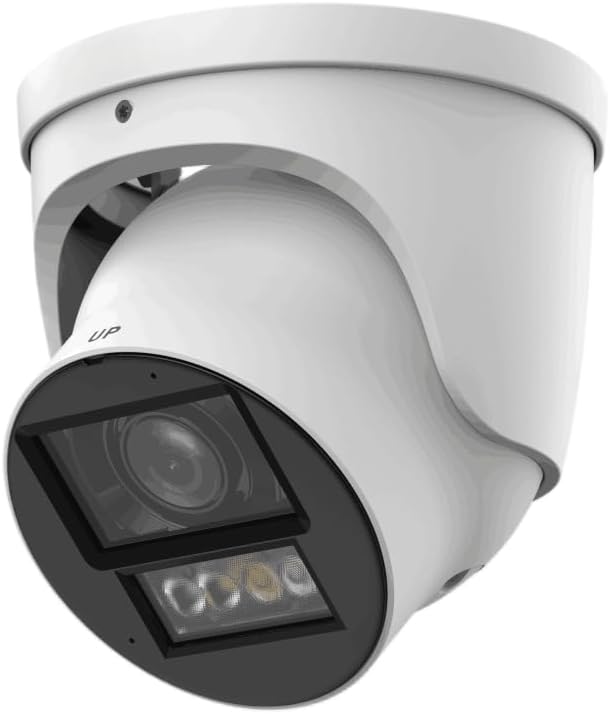
Figure 3.1: EmpireTech IPC-T54PRO-ZE Turret IP Camera. This image shows the front and side view of the white turret camera, highlighting the lens, IR/warm lights, and the adjustable mounting bracket.
- Camera Lens: 2.7mm-12mm Motorized vari-focal lens.
- IR Illuminators: Provides infrared light for night vision up to 60m.
- Warm Lights: Provides visible light for color night vision up to 50m and active deterrence.
- Microphone: Built-in dual microphone for audio input.
- Speaker: Built-in speaker for two-way talk functionality.
- Ethernet Port (PoE): For network connection and Power over Ethernet.
- Power Input: 12 VDC power input.
- Micro SD Card Slot: Supports up to 1 TB Micro SD card for local storage.
- Alarm I/O: 1 input, 1 output.
- Audio I/O: 1 input, 1 output.
- RS-485 Port: For control and communication.
4. Setup and Installation
4.1 Safety Precautions
- Ensure the power supply is disconnected before installation or maintenance.
- Use only specified power adapters (12 VDC or PoE).
- Avoid exposing the camera to extreme temperatures or humidity.
- Do not attempt to disassemble the camera. Refer servicing to qualified personnel.
4.2 Mounting the Camera
- Choose a Location: Select a suitable indoor or outdoor location that provides the desired viewing angle and is within range of your network and power source. The camera is IP67 and IK10 rated for outdoor use.
- Prepare the Surface: Use the provided drill template to mark the screw holes on the mounting surface.
- Drill Holes: Drill pilot holes for the mounting screws and insert wall anchors if necessary.
- Secure the Camera: Attach the camera base to the mounting surface using the provided screws.
- Adjust Angle: Loosen the adjustment screws to position the camera lens to the desired viewing angle, then tighten the screws to secure it.
4.3 Wiring Connections
- Ethernet Connection: Connect an Ethernet cable to the camera's RJ45 port. If using PoE, this will also provide power. Use the waterproof connector for outdoor installations.
- Power Connection (Optional): If not using PoE, connect a 12 VDC power adapter (not included) to the camera's power input port.
- Audio/Alarm/RS-485 (Optional): Connect external audio devices, alarm sensors, or RS-485 control devices as required.
- Micro SD Card Installation: Locate the Micro SD card slot (usually under a cover) and insert a Micro SD card (up to 1 TB) for local storage. Ensure the camera is powered off before inserting/removing the card.
5. Operating Instructions
5.1 Initial Setup and Network Configuration
- Power On: Connect the camera to power (PoE or 12V DC adapter).
- Network Access: The camera will obtain an IP address via DHCP by default. Use the manufacturer's IP Search Tool (available on the EmpireTech website) to find the camera's IP address on your network.
- Web Interface Access: Open a web browser and enter the camera's IP address. Log in using the default username and password (refer to the Quick Start Guide or manufacturer's documentation for default credentials).
- Change Password: For security, immediately change the default password upon first login.
- Network Settings: Configure network settings (e.g., static IP address) if required.
5.2 Video Surveillance and Recording
- Live View: Access the live video feed through the web interface or a compatible NVR/VMS software.
- Motorized Lens Control: Use the zoom and focus controls in the web interface to adjust the 2.7mm-12mm motorized vari-focal lens for optimal clarity.
- Recording: Configure recording schedules, motion detection recording, or continuous recording to the Micro SD card, NVR, or network storage.
- Smart H.264+/H.265+ Encoding: The camera supports advanced compression for efficient storage and bandwidth usage.
5.3 Dual Light Modes (IR and Warm Light)
- The camera features built-in IR illuminators for black and white night vision and warm lights for full-color night vision.
- Smart Dual Light: The camera can automatically switch between IR and warm light modes based on detected events or ambient light conditions. Configure these settings in the camera's web interface.
5.4 Two-Way Talk
- Utilize the built-in dual microphone and speaker for two-way audio communication through the camera's web interface or compatible mobile application.
5.5 Intelligent Video System (IVS)
- The camera supports IVS features such as tripwire and intrusion detection. Configure these functions in the camera's web interface to enhance surveillance capabilities and trigger alarms.
6. Maintenance
- Regular Cleaning: Periodically clean the camera lens and housing with a soft, dry cloth. For stubborn dirt, use a mild cleaning solution and a soft cloth. Do not use abrasive cleaners.
- Firmware Updates: Check the EmpireTech official website regularly for firmware updates. Updating firmware can improve performance, add new features, and enhance security. Follow the provided instructions carefully when updating.
- Password Management: Regularly change your camera's password to maintain security.
- Storage Management: If using a Micro SD card, periodically review and manage recorded footage to ensure sufficient storage space.
7. Troubleshooting
| Problem | Possible Cause | Solution |
|---|---|---|
| No video feed | No power; Network connection issue; Incorrect IP address. | Check power supply (PoE or 12V DC). Verify Ethernet cable connection. Use IP Search Tool to confirm IP address. |
| Poor image quality | Dirty lens; Incorrect focus; Low light conditions. | Clean the lens. Adjust the motorized vari-focal lens focus via the web interface. Ensure IR/warm lights are enabled for low light. |
| Cannot access web interface | Incorrect IP address; Network firewall; Browser issues. | Verify IP address. Check network firewall settings. Try a different web browser. |
| Two-way talk not working | Microphone/speaker settings; Network bandwidth. | Check audio settings in the web interface. Ensure sufficient network bandwidth. |
8. Specifications
| Feature | Detail |
|---|---|
| Model Number | IPC-T54PRO-ZE |
| Image Sensor | 4-MP 1/1.8" CMOS |
| Max. Resolution | 4 MP (2688 × 1520) @25/30 fps |
| Lens Type | 2.7mm-12mm Motorized Vari-focal |
| IR Distance | Up to 60 m (196.85 ft) |
| Warm Light Distance | Up to 50 m (164.04 ft) |
| Video Compression | ROI, SVC, SMART H.264+/H.265+, AI H.264/H.265 |
| Audio | Built-in Dual Mic, 1-ch Speaker, Two-Way Talk |
| Storage | Micro SD card (max. 1 TB) |
| Alarm I/O | 1 in, 1 out |
| Power Supply | 12 VDC/PoE (ePoE support) |
| Power Output | 12 VDC, max. 165mA |
| Protection | IP67, IK10 |
| Dimensions | 5.02 x 4.8 x 5.02 inches |
| Weight | 2.03 pounds |
| Connectivity Protocol | Ethernet |
| Specific Uses | Surveillance (Indoor, Outdoor) |
9. Warranty Information
EmpireTech products typically come with a limited manufacturer's warranty. For specific warranty terms and conditions, please refer to the warranty card included with your product or visit the official EmpireTech website. Keep your proof of purchase for warranty claims.
10. Customer Support
If you encounter any issues or have questions regarding your EmpireTech IPC-T54PRO-ZE camera, please contact EmpireTech customer support through their official website or the contact information provided in your product documentation.
- Online Resources: Visit the EmpireTech Store on Amazon for product information and updates.
- Technical Support: Refer to the contact details provided in your product packaging or on the official EmpireTech website for technical assistance.


